
 Welcome to the tutorial on SAP infotype screen modification. This tutorial will explain how an infotype screen can be modified through customizing alone, without the need for ABAP help. Using screen modifications, you can edit the characteristics of the individual infotype fields. For example, you can hide fields that you do not need, or you can make essential fields mandatory. You can also modify the screen for different subtypes of an infotype or based on an employee’s organizational assignment. Furthermore, you can define that a particular field should be mandatory only for employees in a particular employee group.
SAP Infotype Screen Modification Activities
SAP infotype screen modification must be done at the infotype level. The activities to be carried out depend on the answer to the following question:
For the infotype in question, will the screen vary based on employee subtype/organizational assignment?
A “no” answer implies that the same screen is always required for this infotype and you should follow the steps and example under the “Identical Infotype Screens” subheading.
A “yes” response implies that the screens may vary based on employee data and you should skip ahead to the steps and example under the “Varying Infotype Screens” subheading.
Identical Infotype Screens
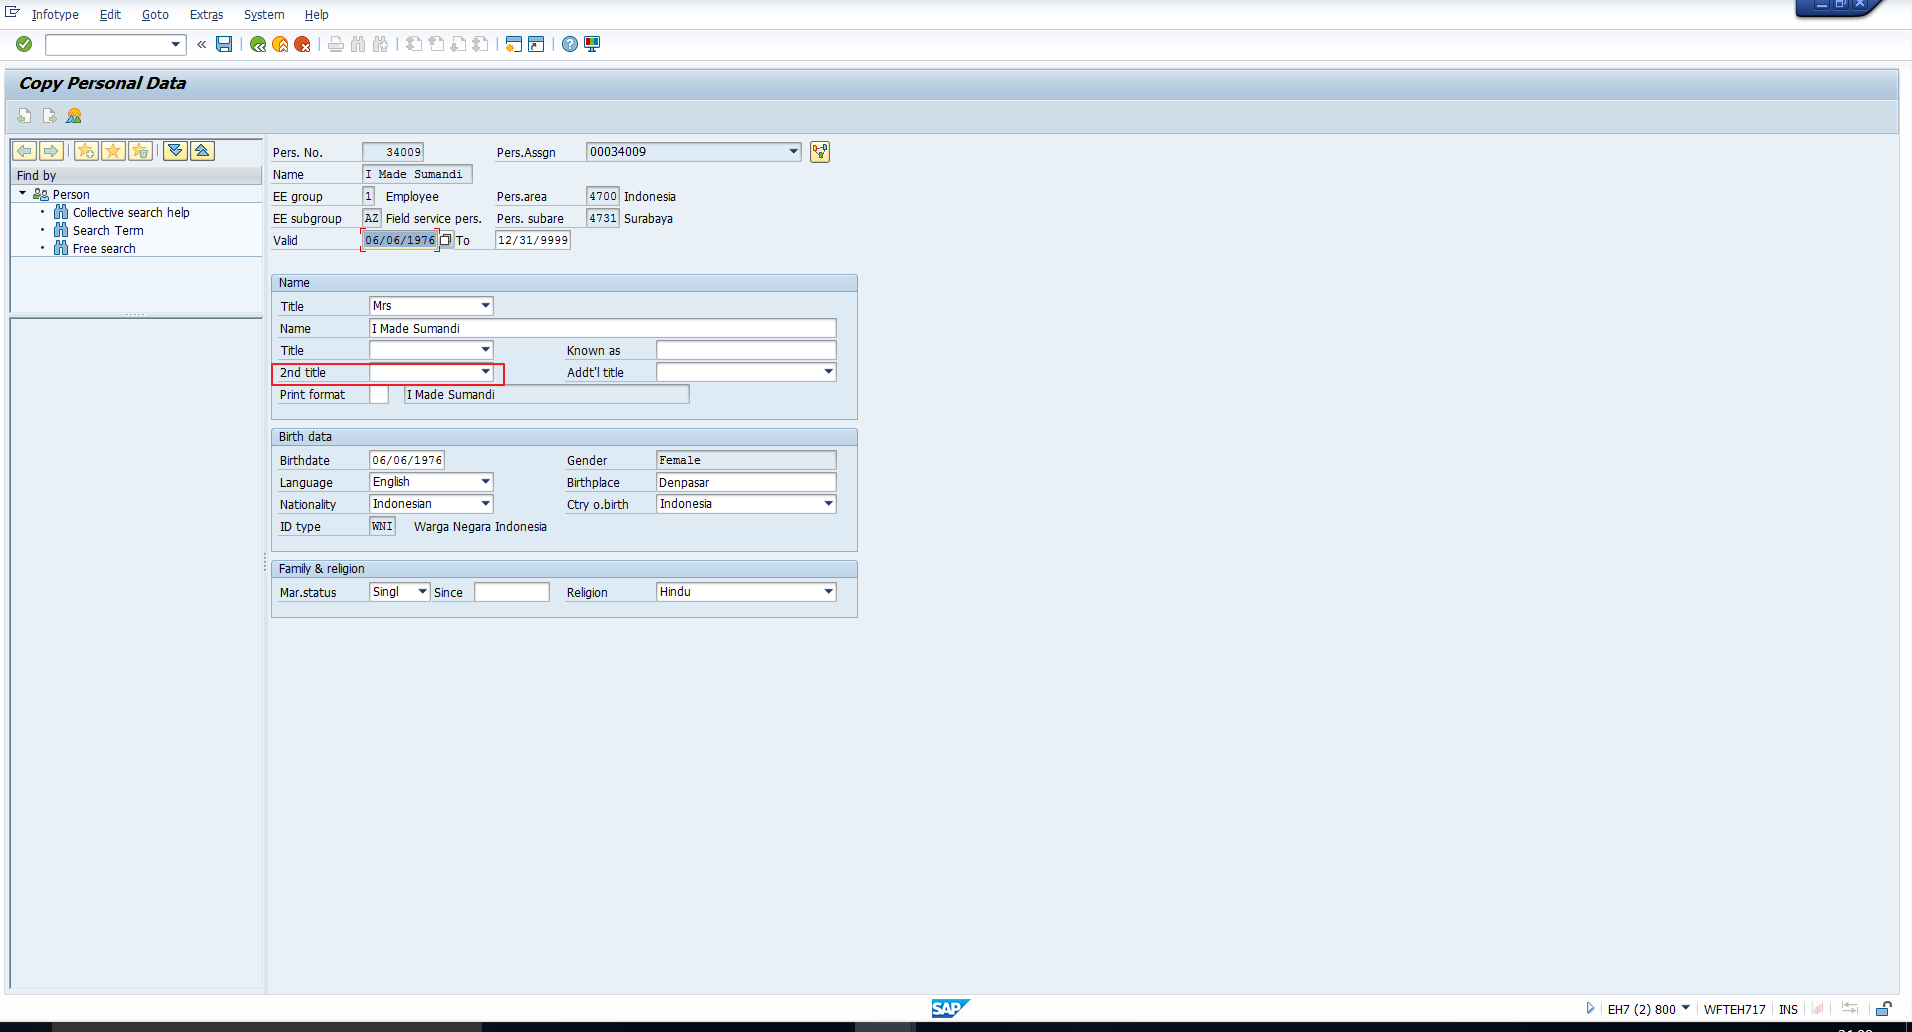
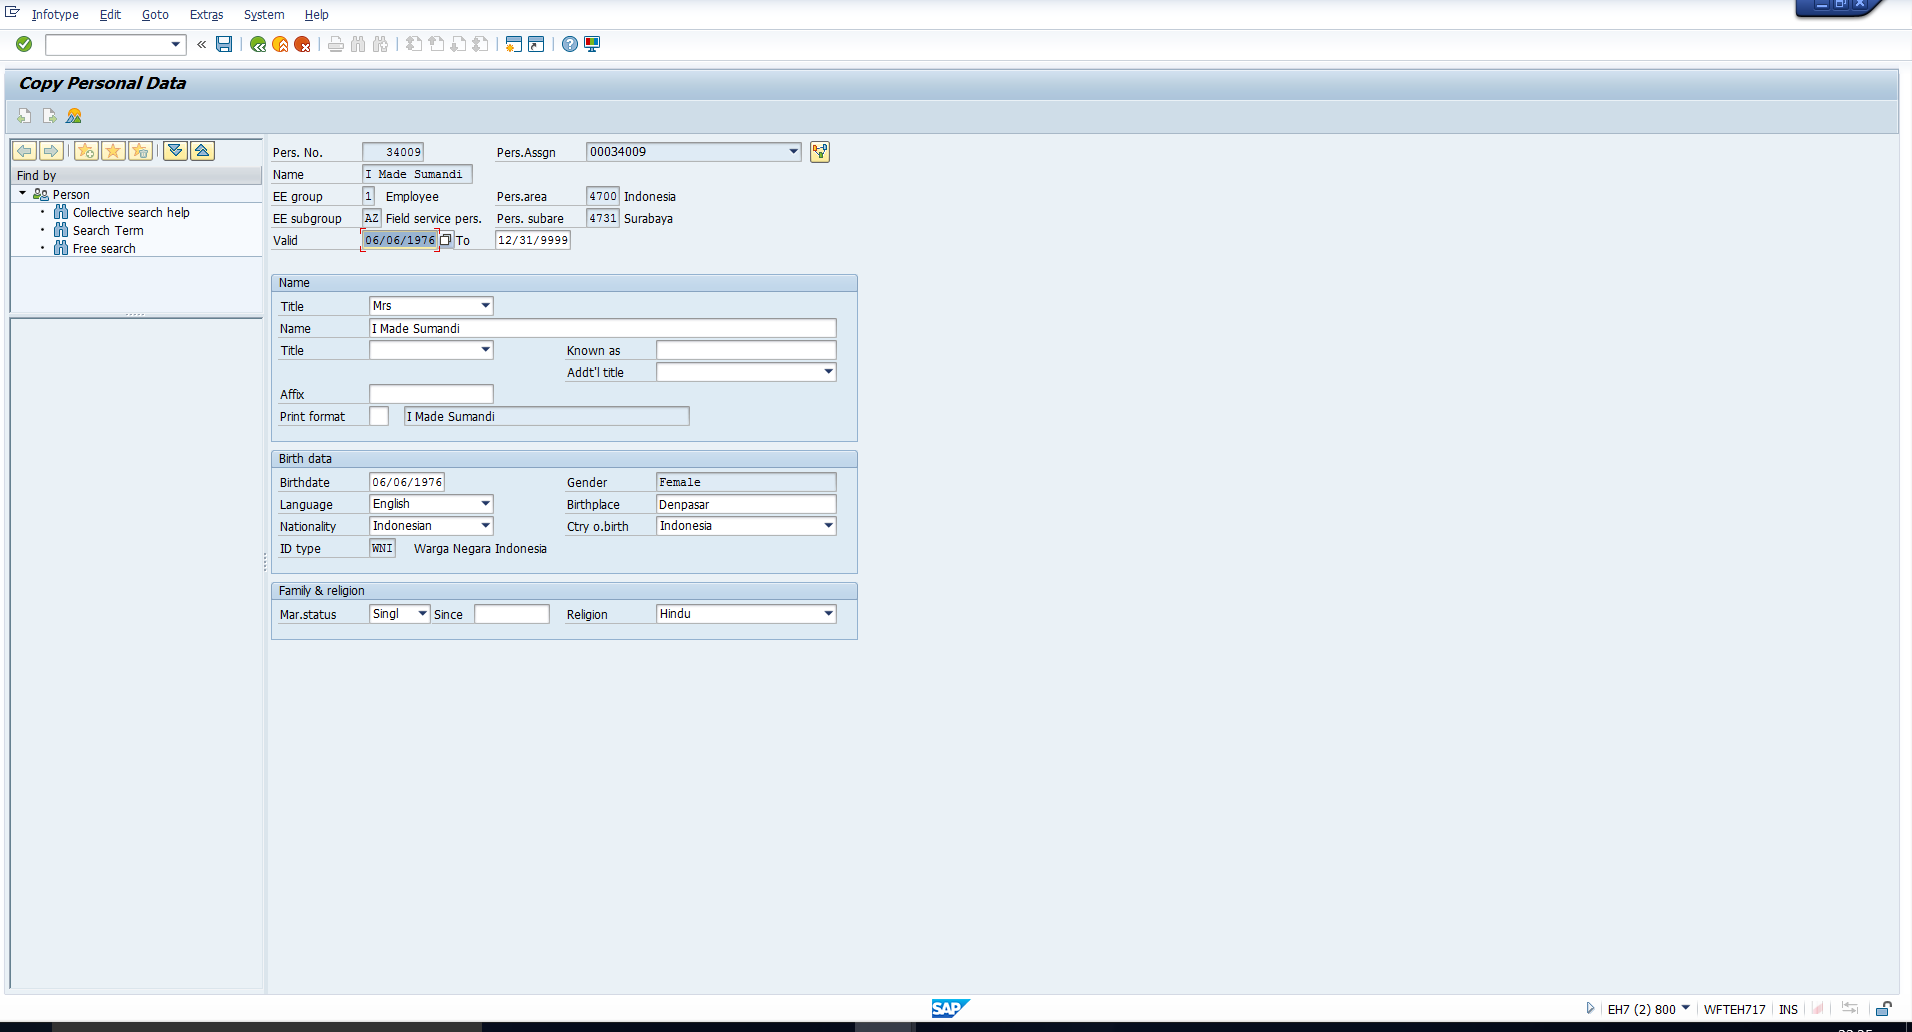
Let’s start by executing transaction code PA30 and looking at the personal data infotype. As an example, let’s assume that the client wishes to hide the field 2nd title which has been highlighted below:
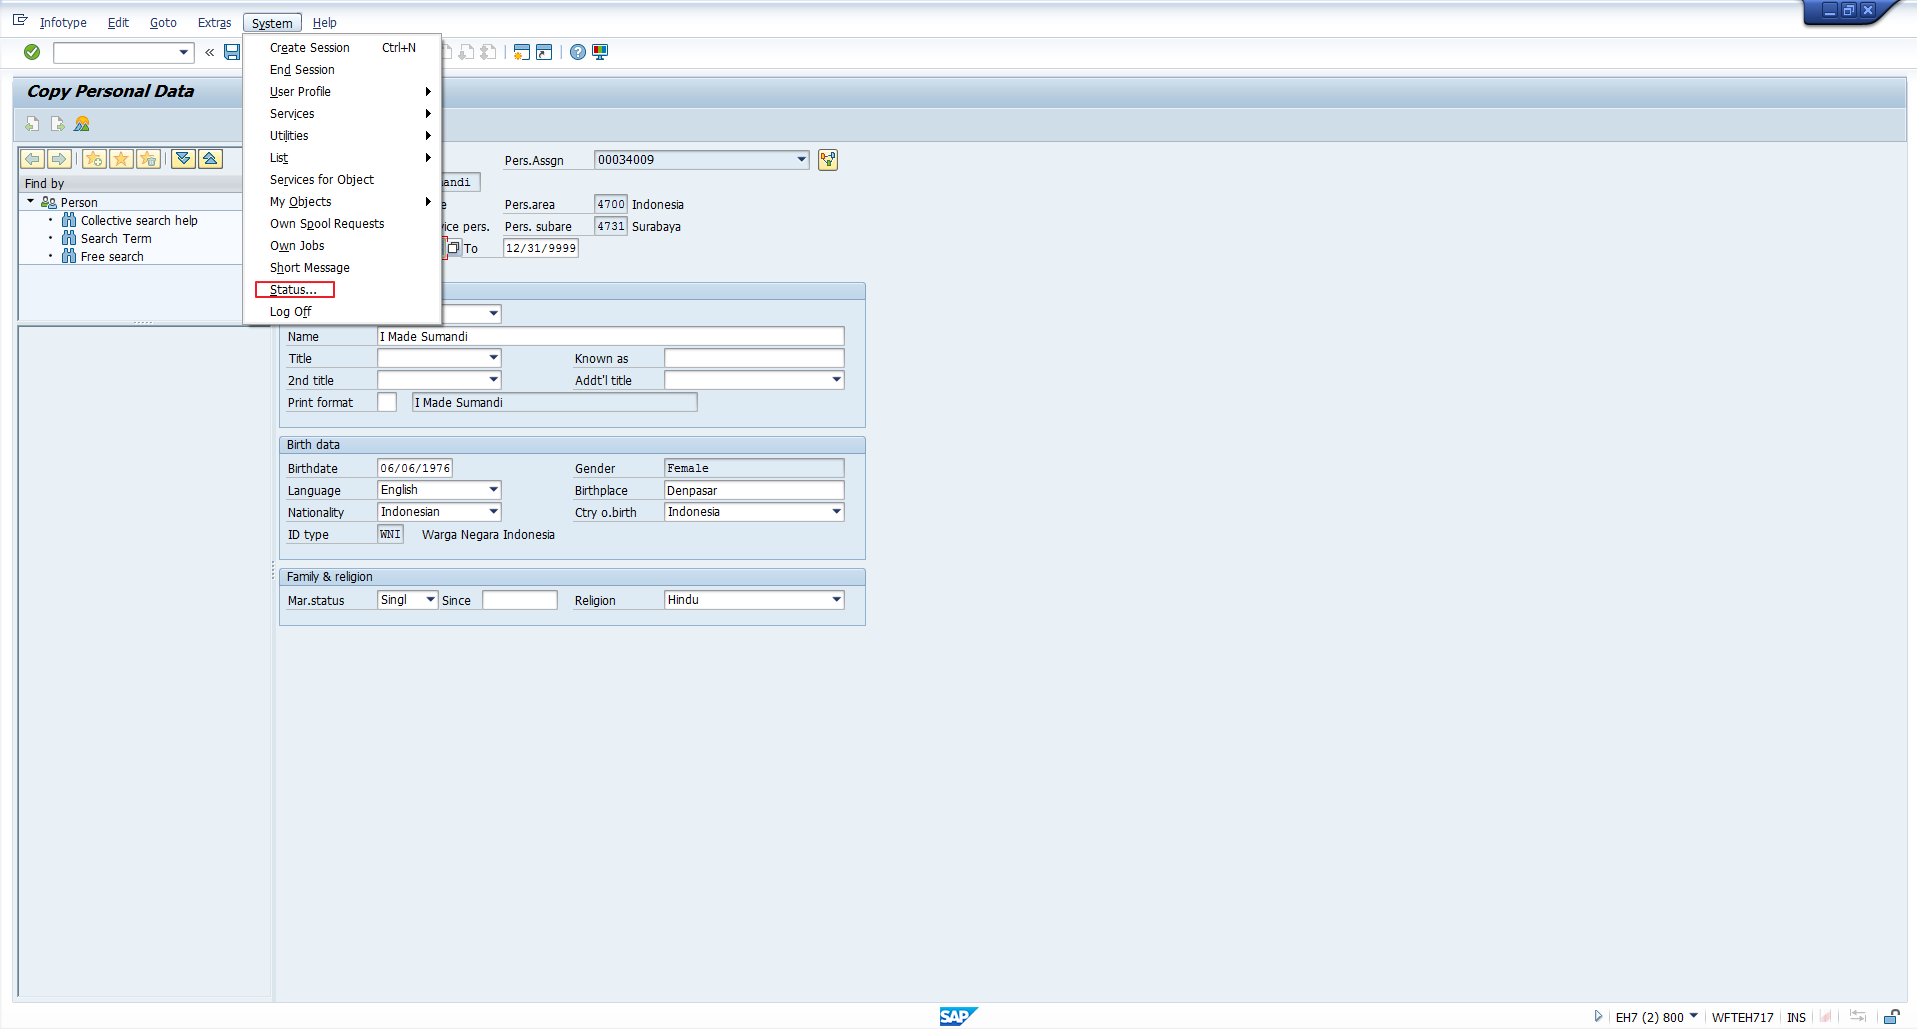
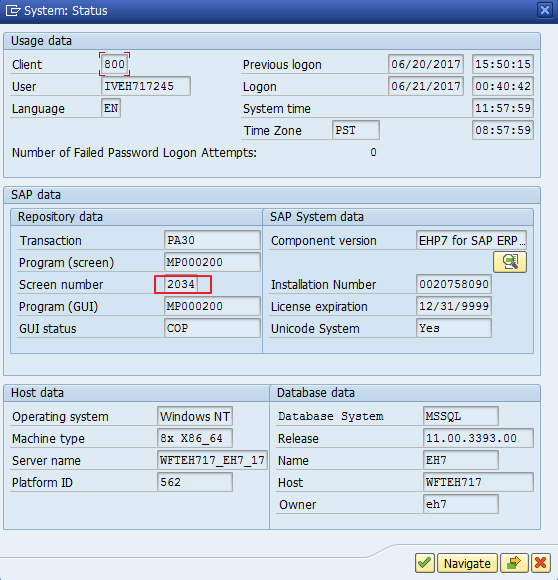
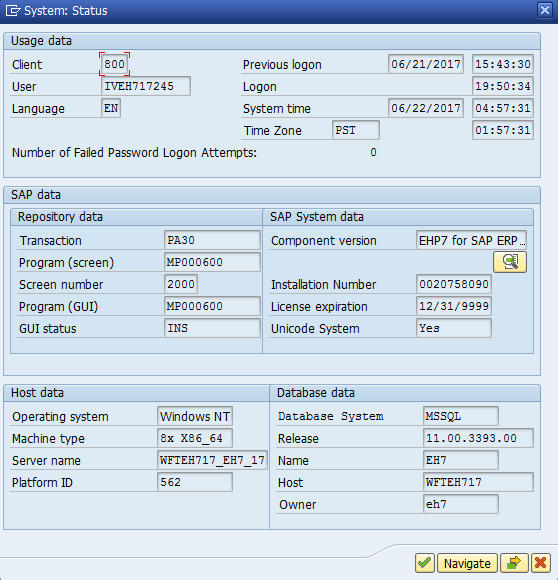
To remove a field from the infotype screen for all employees, you must first identify the module pool and the screen number of the infotype. These are technical details about the screen that can be found in the change/display view of the infotype (PA20/PA30). From here, click on System > Status in the toolbar menu as shown below:
The module pool is the displayed in the Program (screen) field as highlighted below:
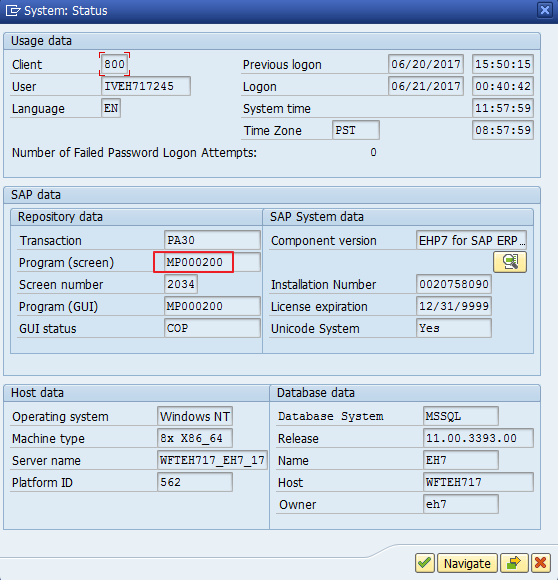
The screen number is displayed directly below the module pool as identified below:
Take note of the module pool and screen number. Next, check if there is a relevant customizing entry via the path below in transaction code SPRO:
Personnel Management – Personnel Administration – Customizing User Interfaces – Change Screen Modifications

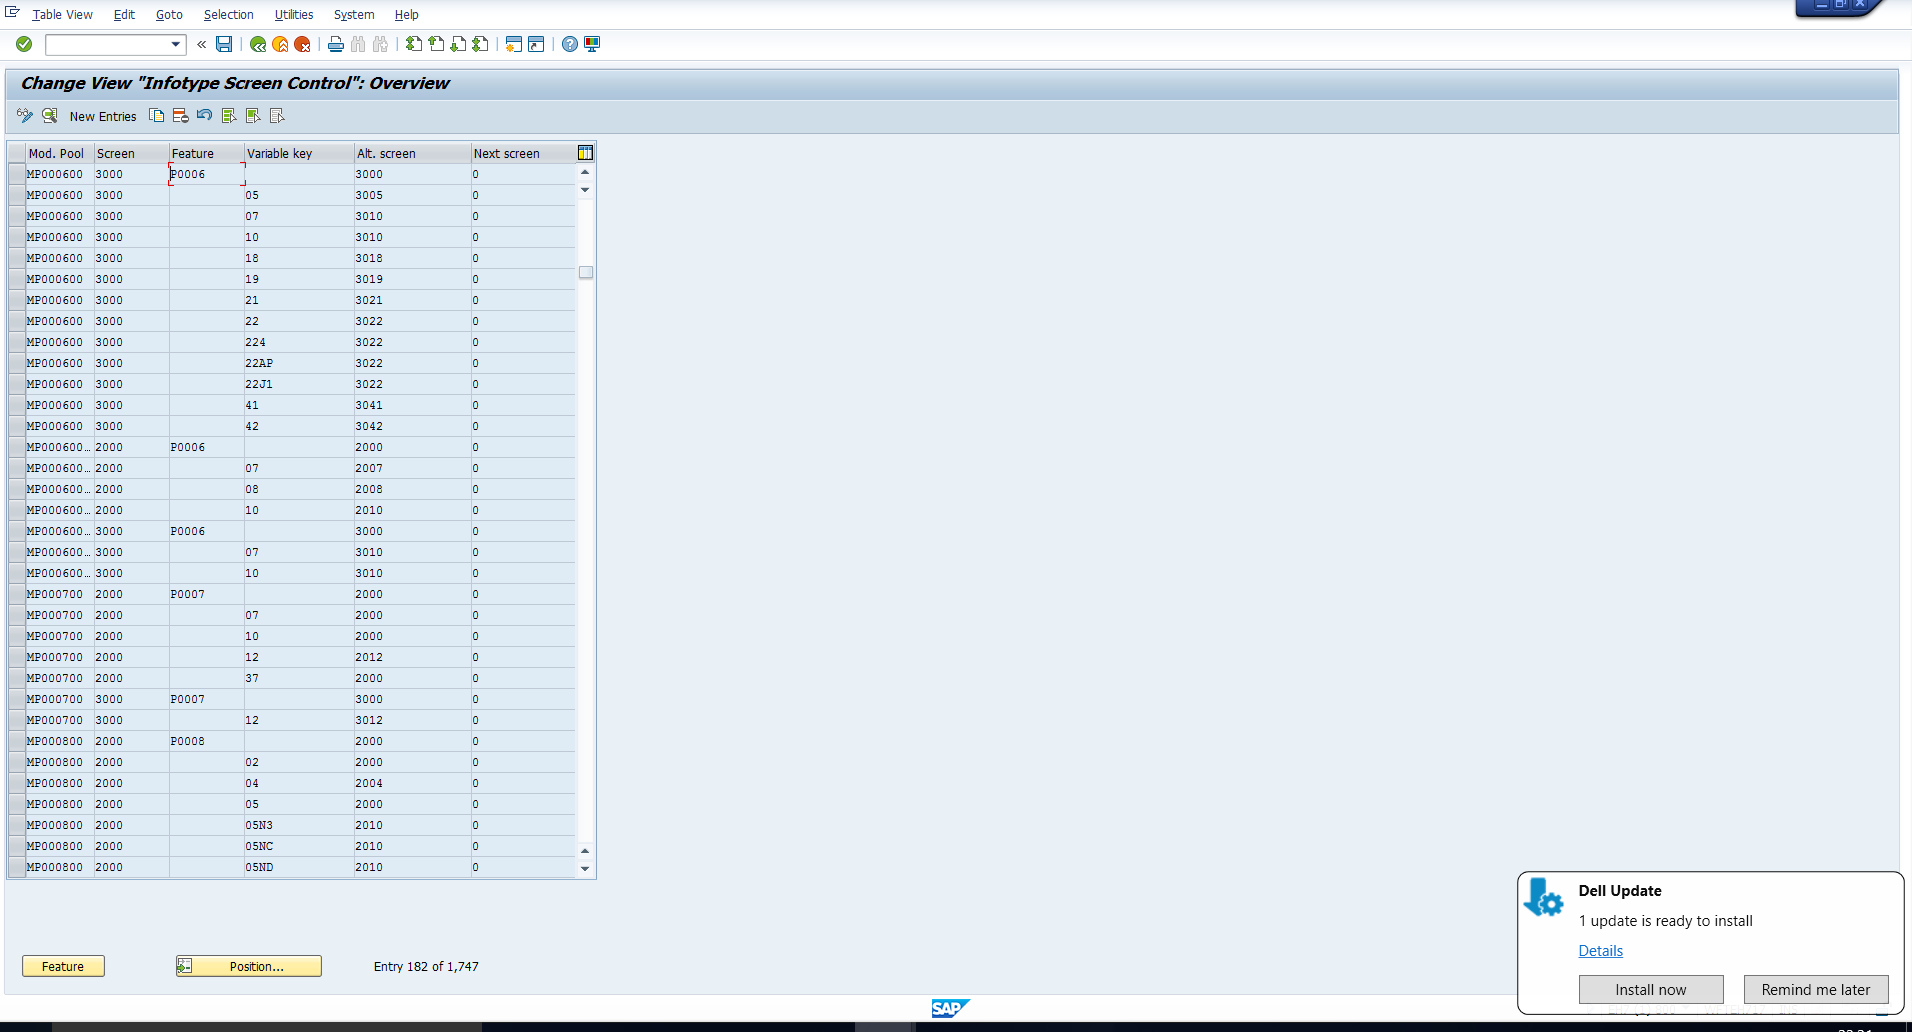
The infotype screen control overview is displayed. Click the Position button as highlighted below:
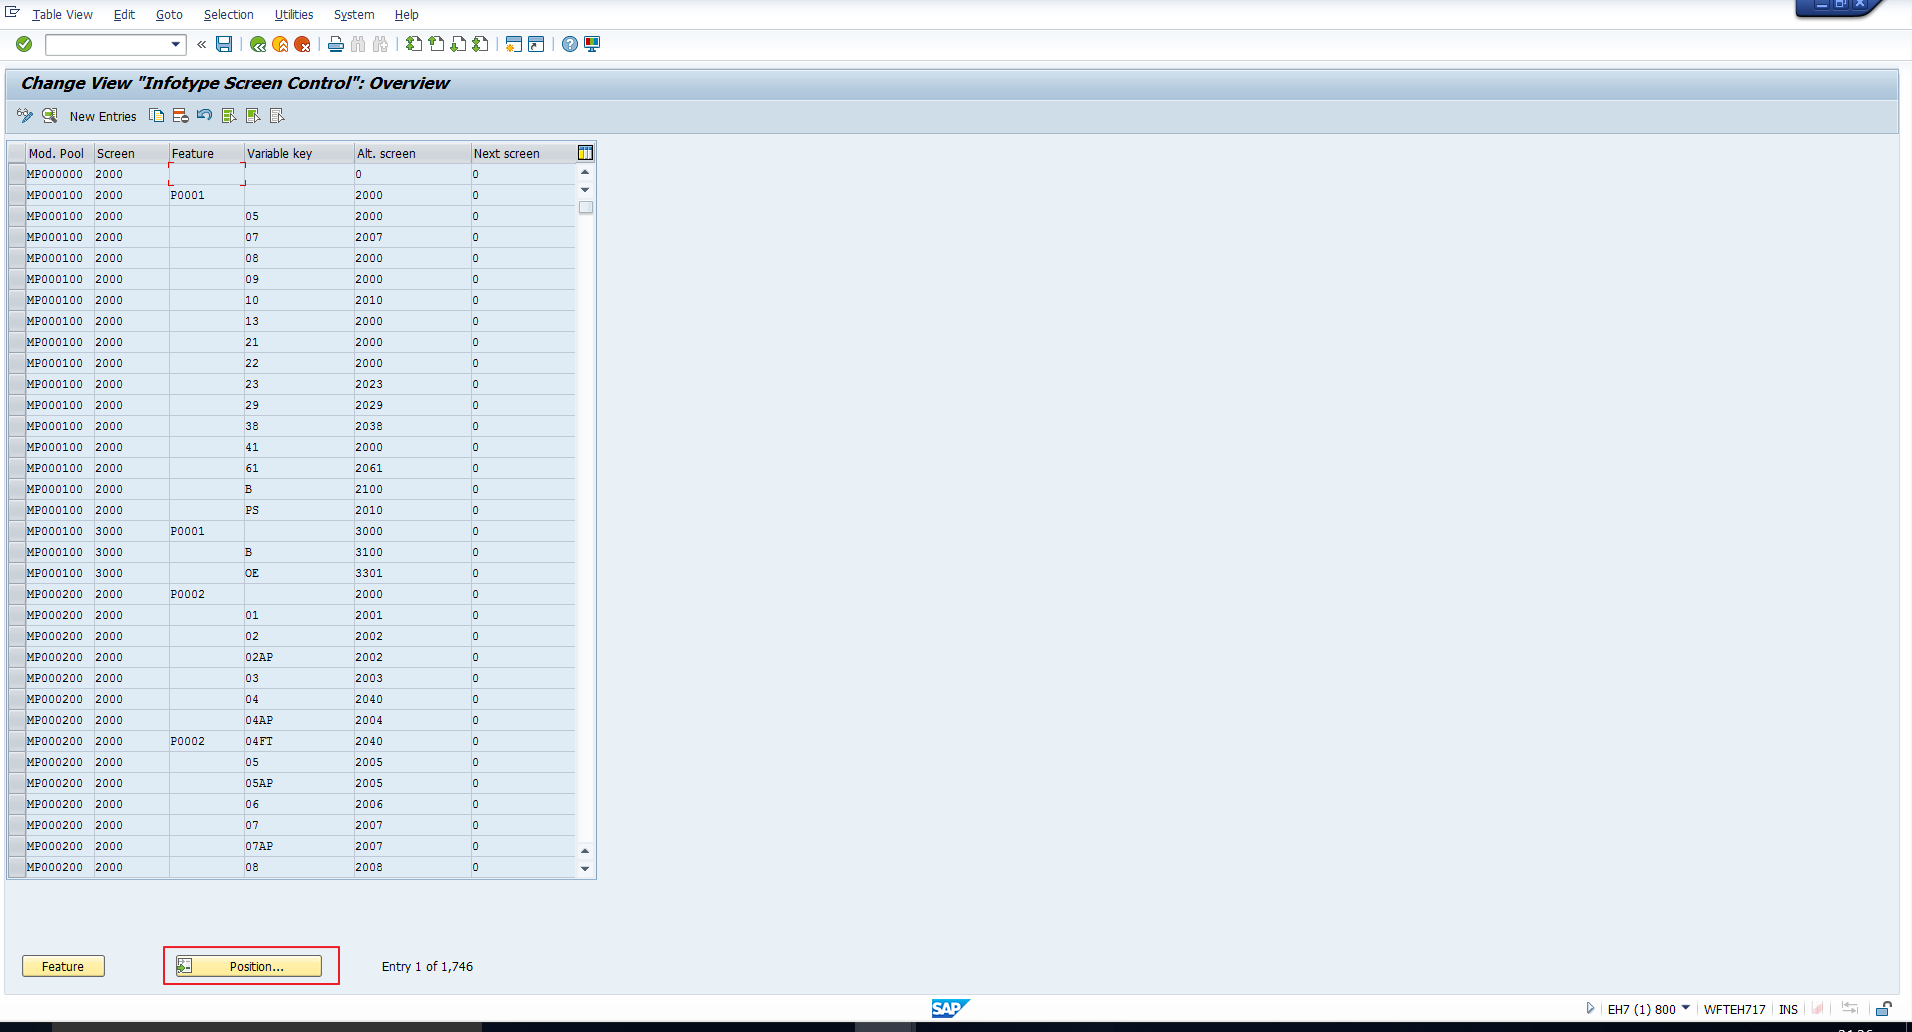
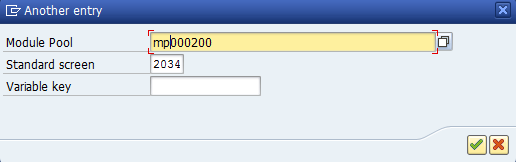
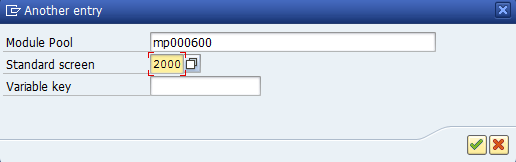
Enter the module pool and screen number in the search fields as indicated below:
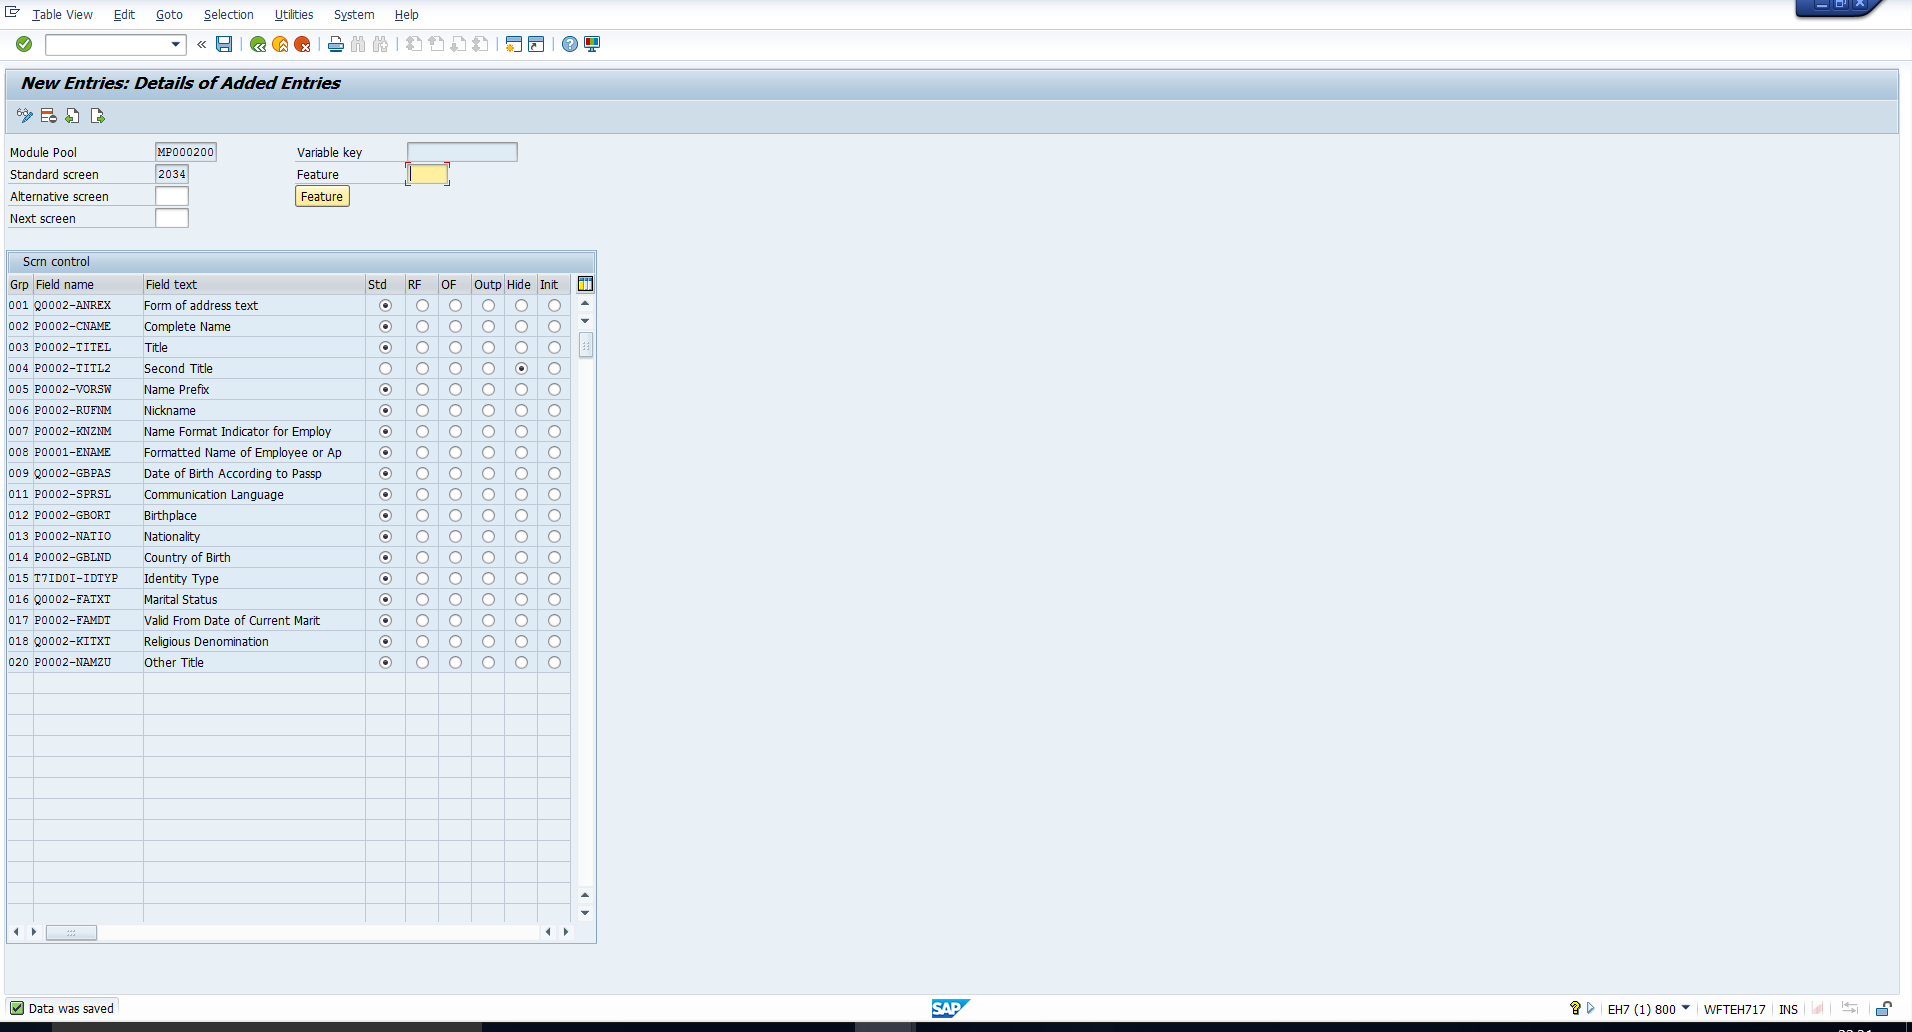
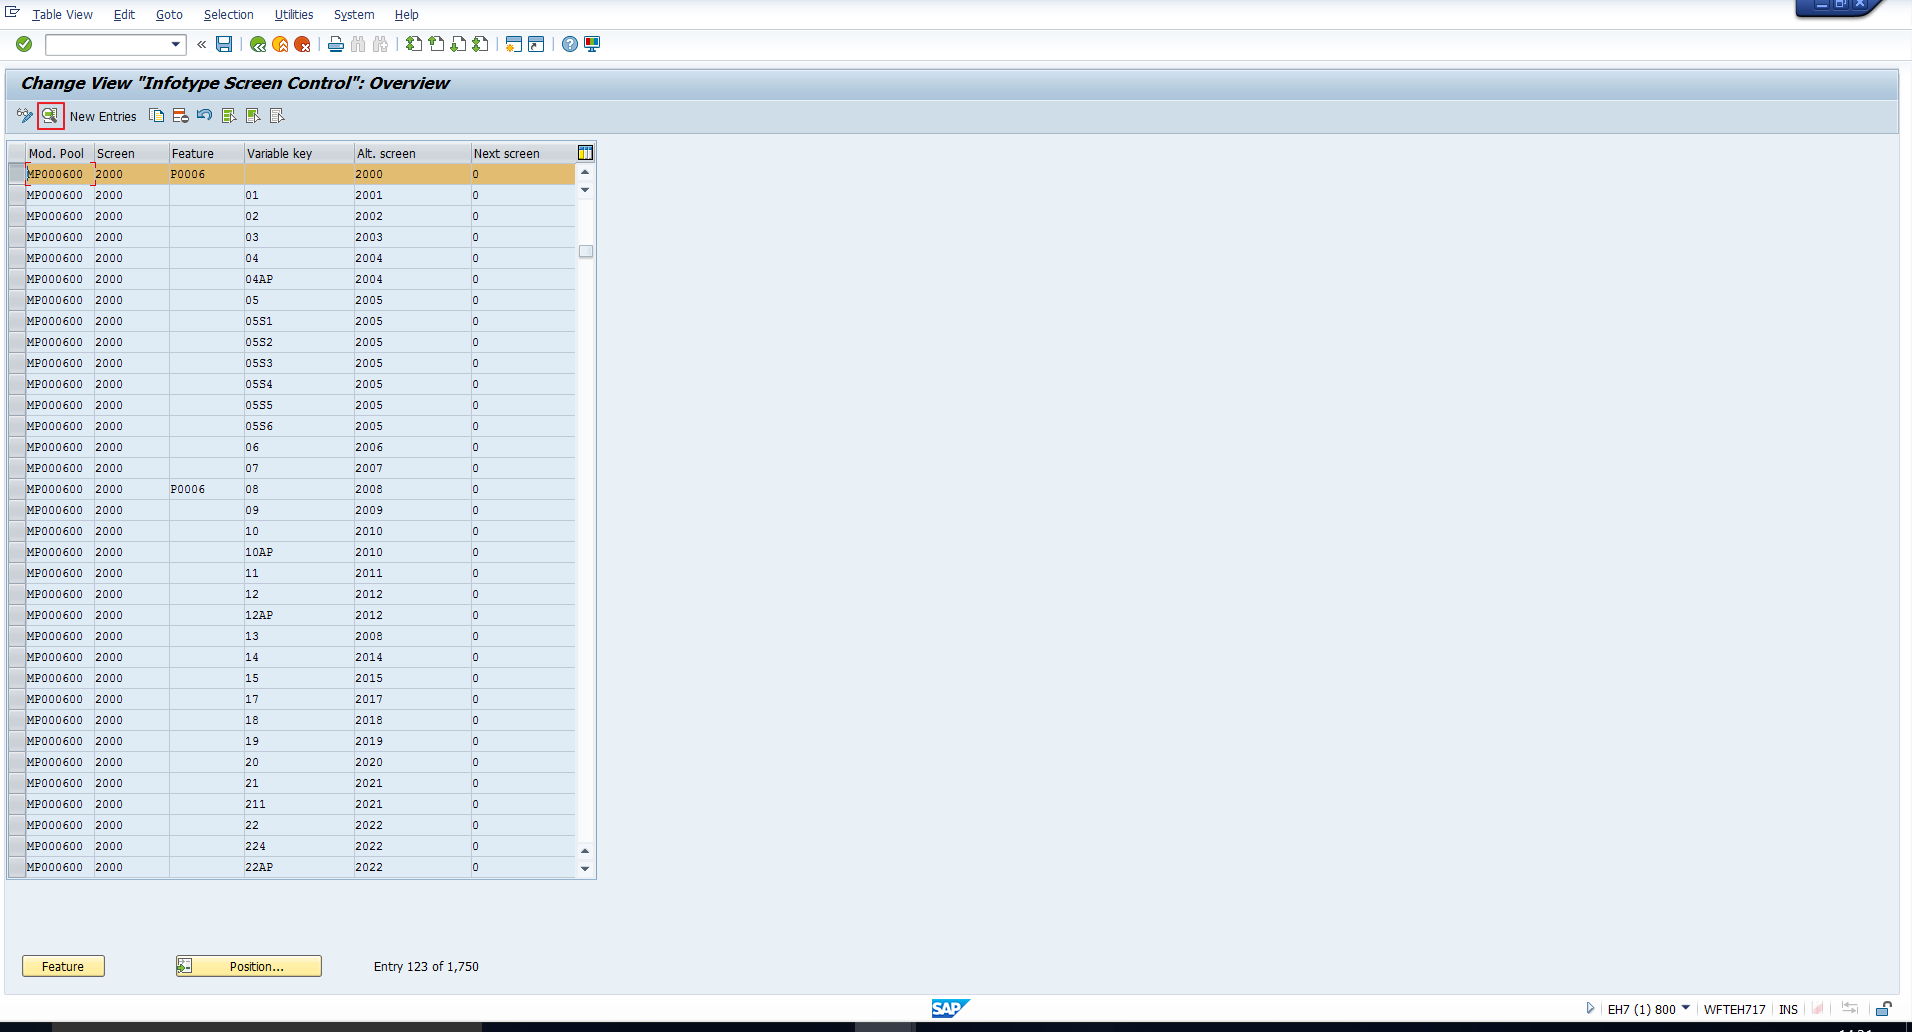
If no entry exists, create a new entry. Click on the New Entries button. Then, enter the required module pool and standard screen and hit Enter. All the fields will be defaulted as seen below:
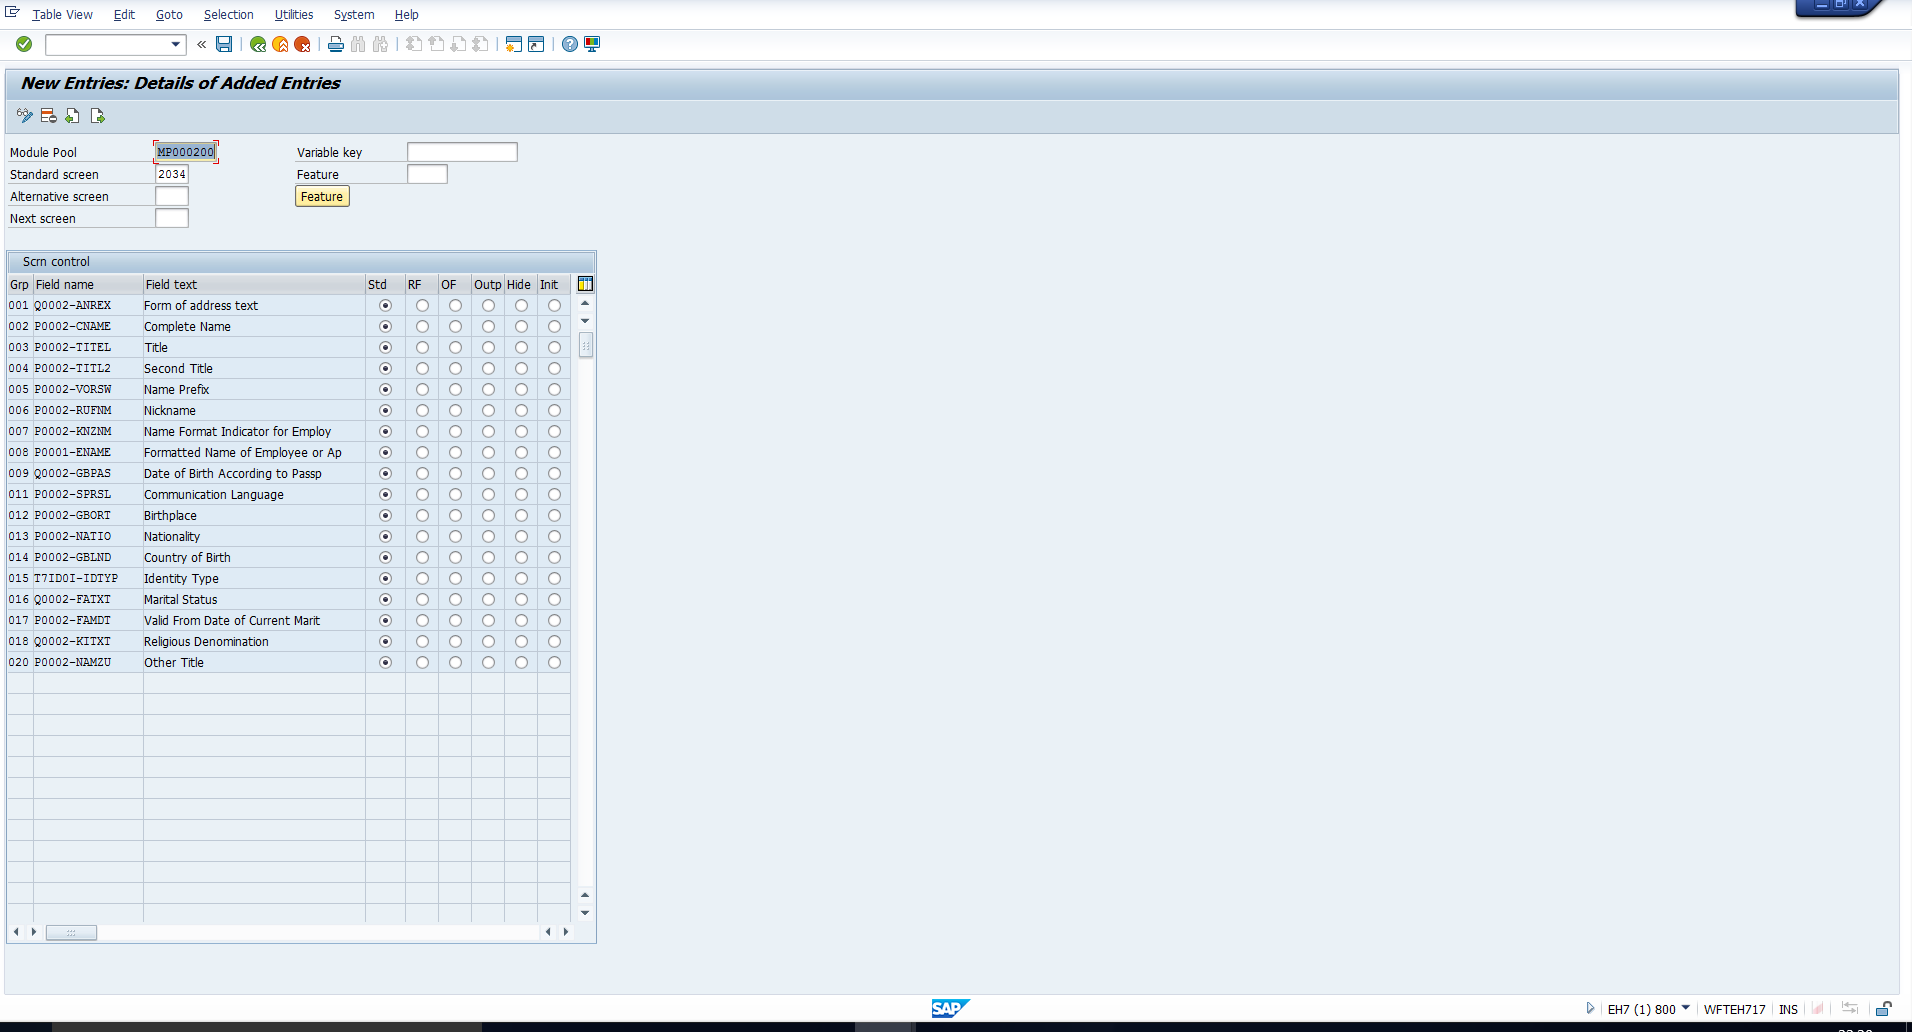
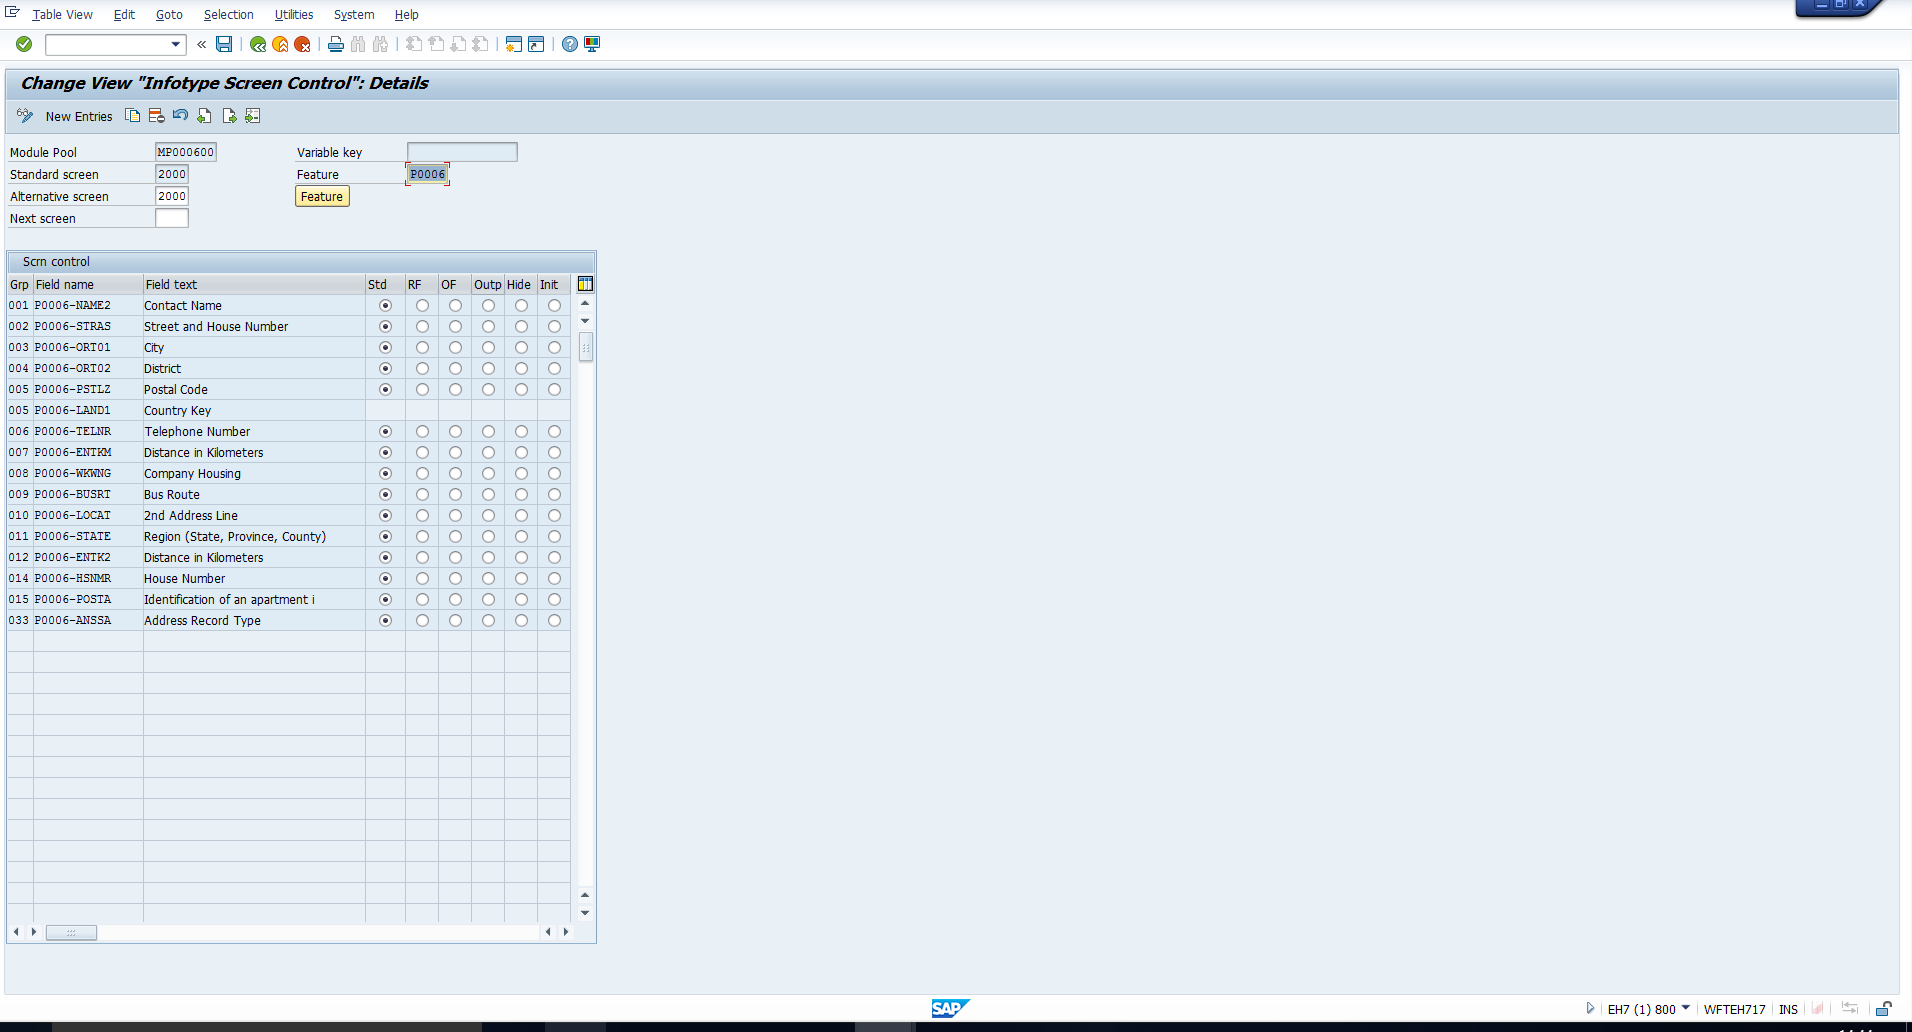
Next, change the individual field characteristics. Identify the field whose properties must be changed. In our example, we want to update the Second Title field. You can select any of the following radio buttons:
Std – This is the standard default setting, where the field is displayed
RF – This is used to make a field mandatory
OF – This is used to make a field optional
Outp – This is used to make a field non-editable, where its contents can be seen but cannot be changed
Hide – This is used to hide a field
Init – This is used to hide a field as well as initialize its contents if a record is created or copied
For our example, we must select the Hide radio button for the Second Title field and then save the entry as seen below:
Now, let’s go back to check the personal data screen in transaction code PA30. We can see that the 2nd title field is no longer displayed, as shown below:
Varying Infotype Screens
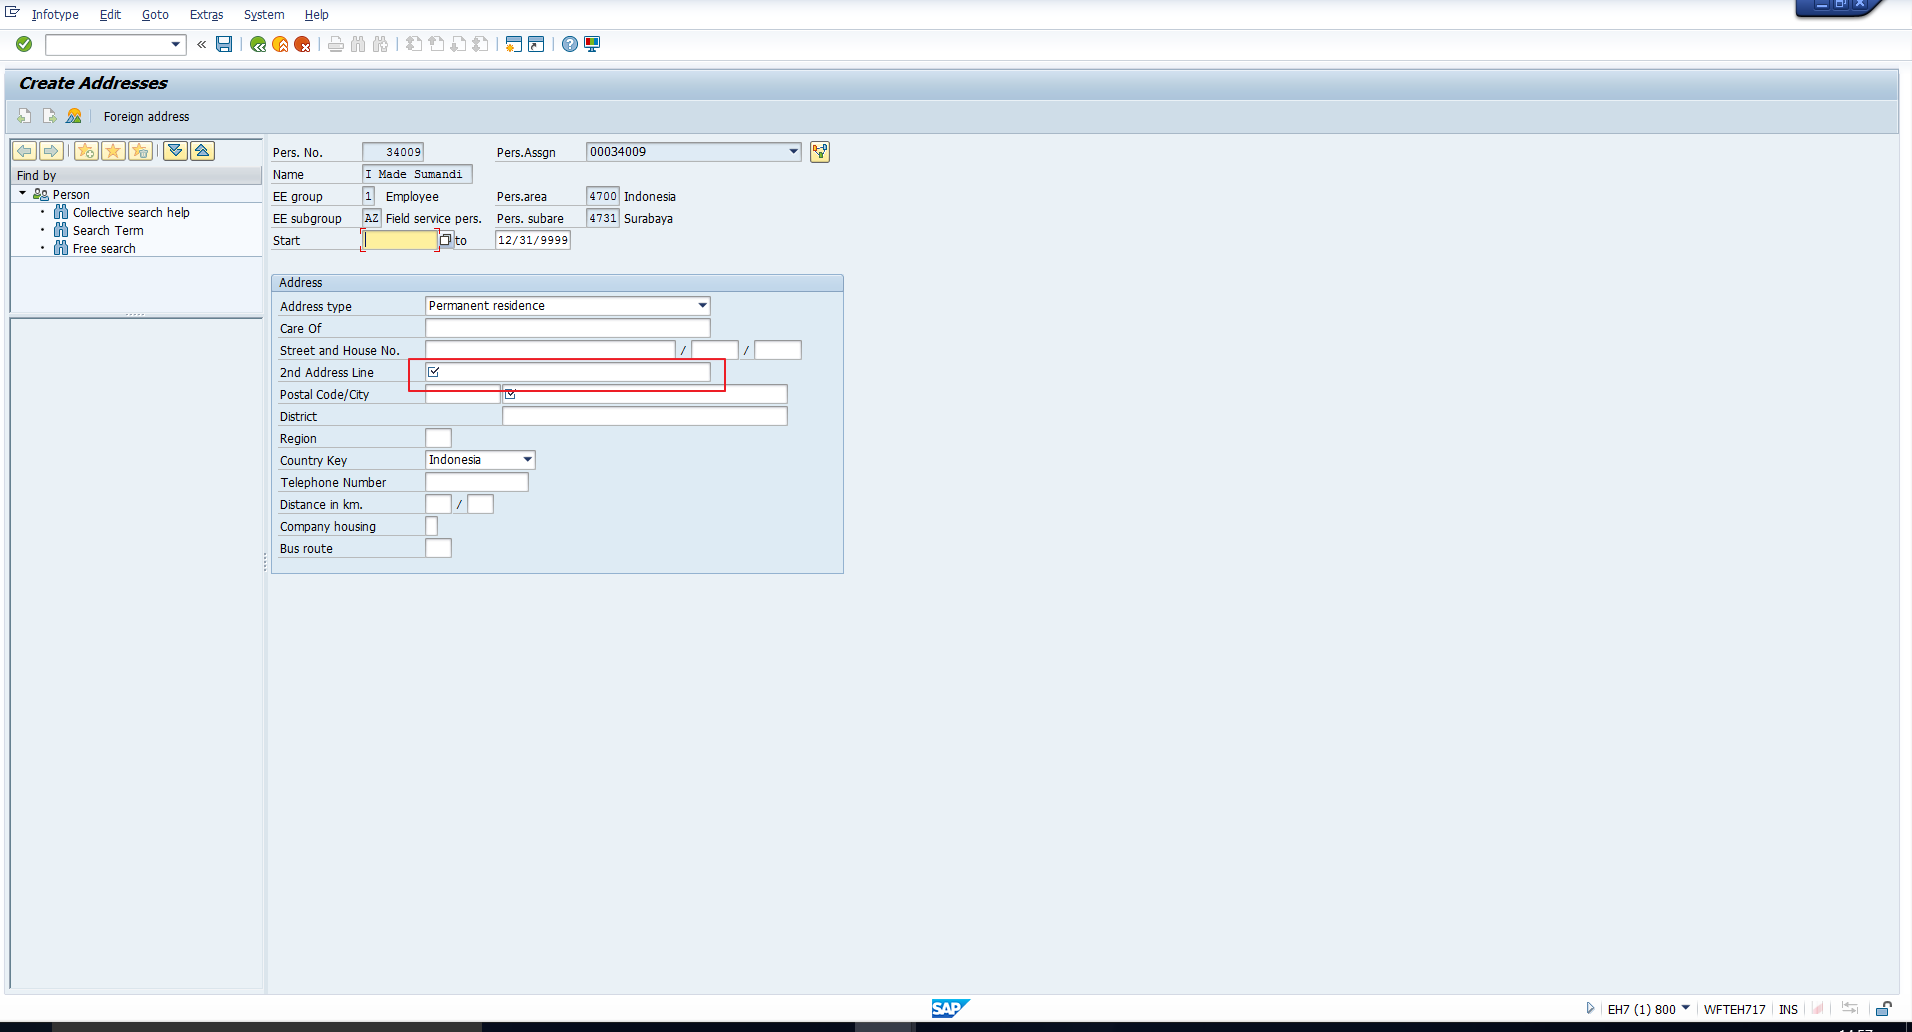
Let’s execute transaction code PA30 and examine two different subtypes of the address infotype. First we have the subtype for permanent residence:

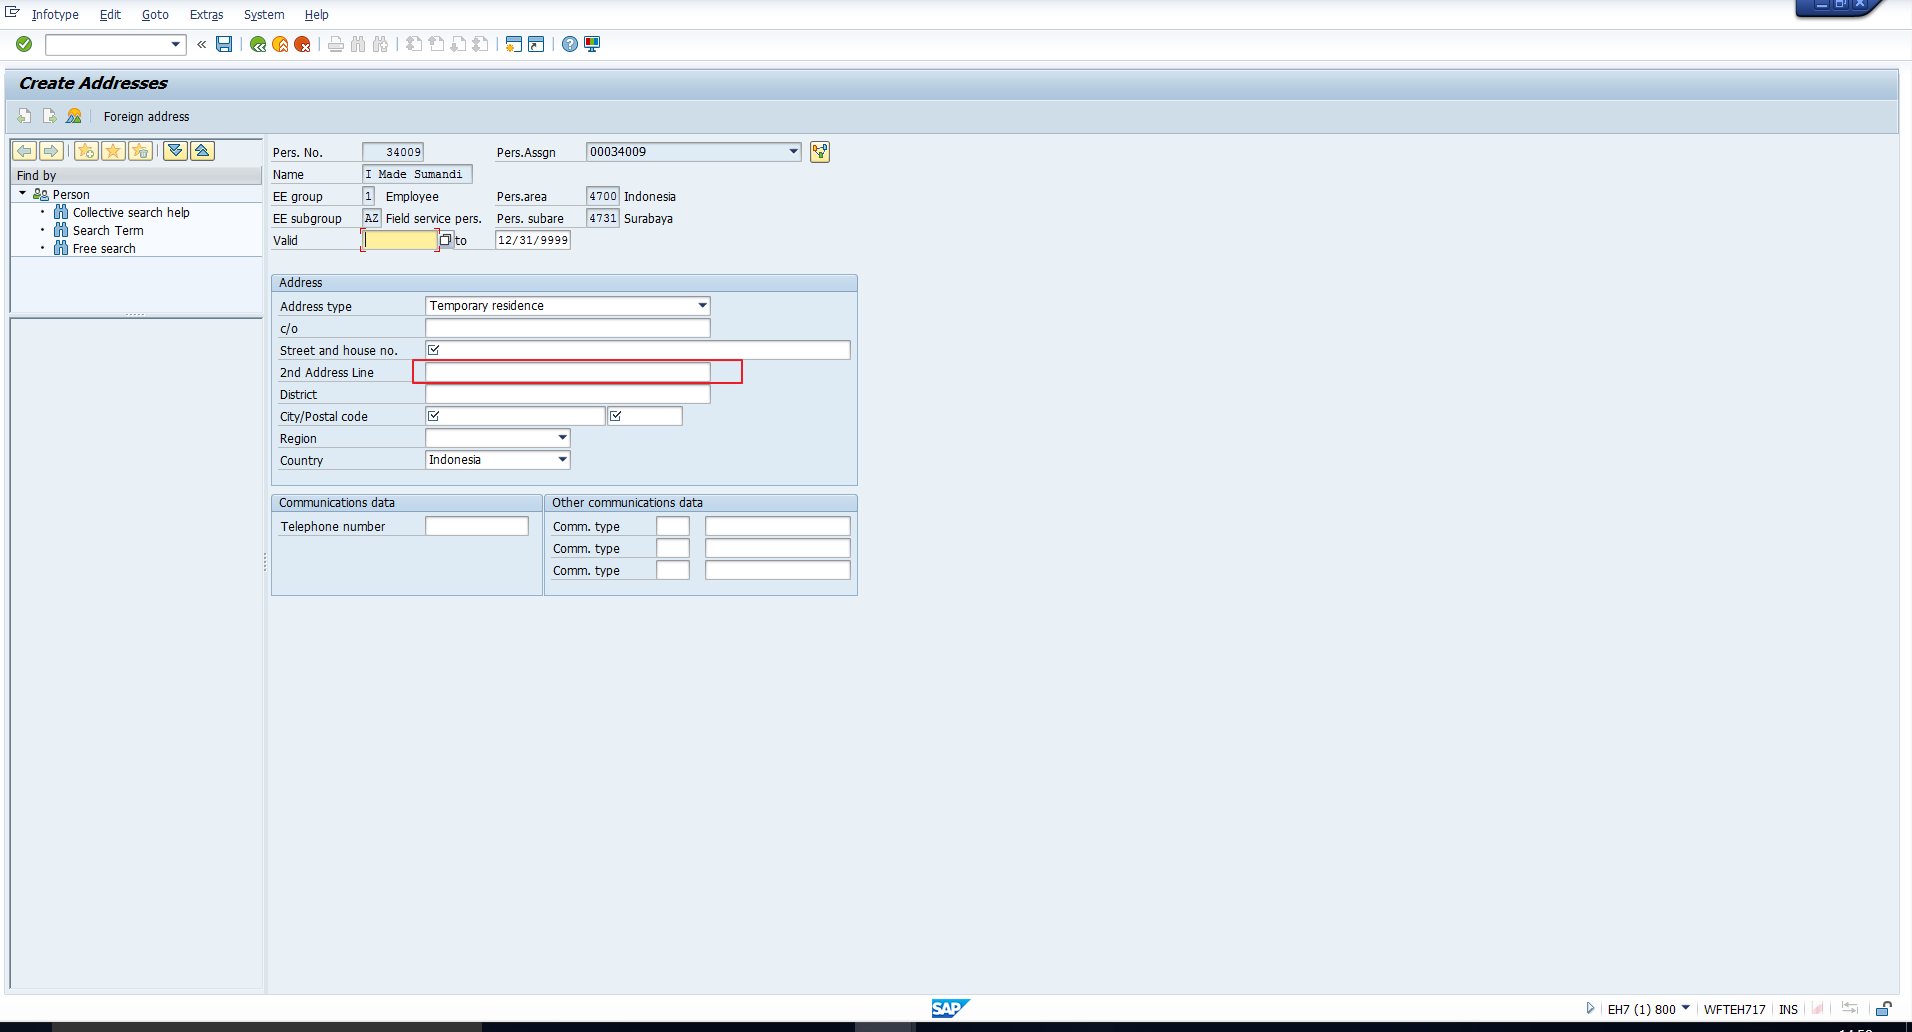
Then we have the subtype for temporary residence:
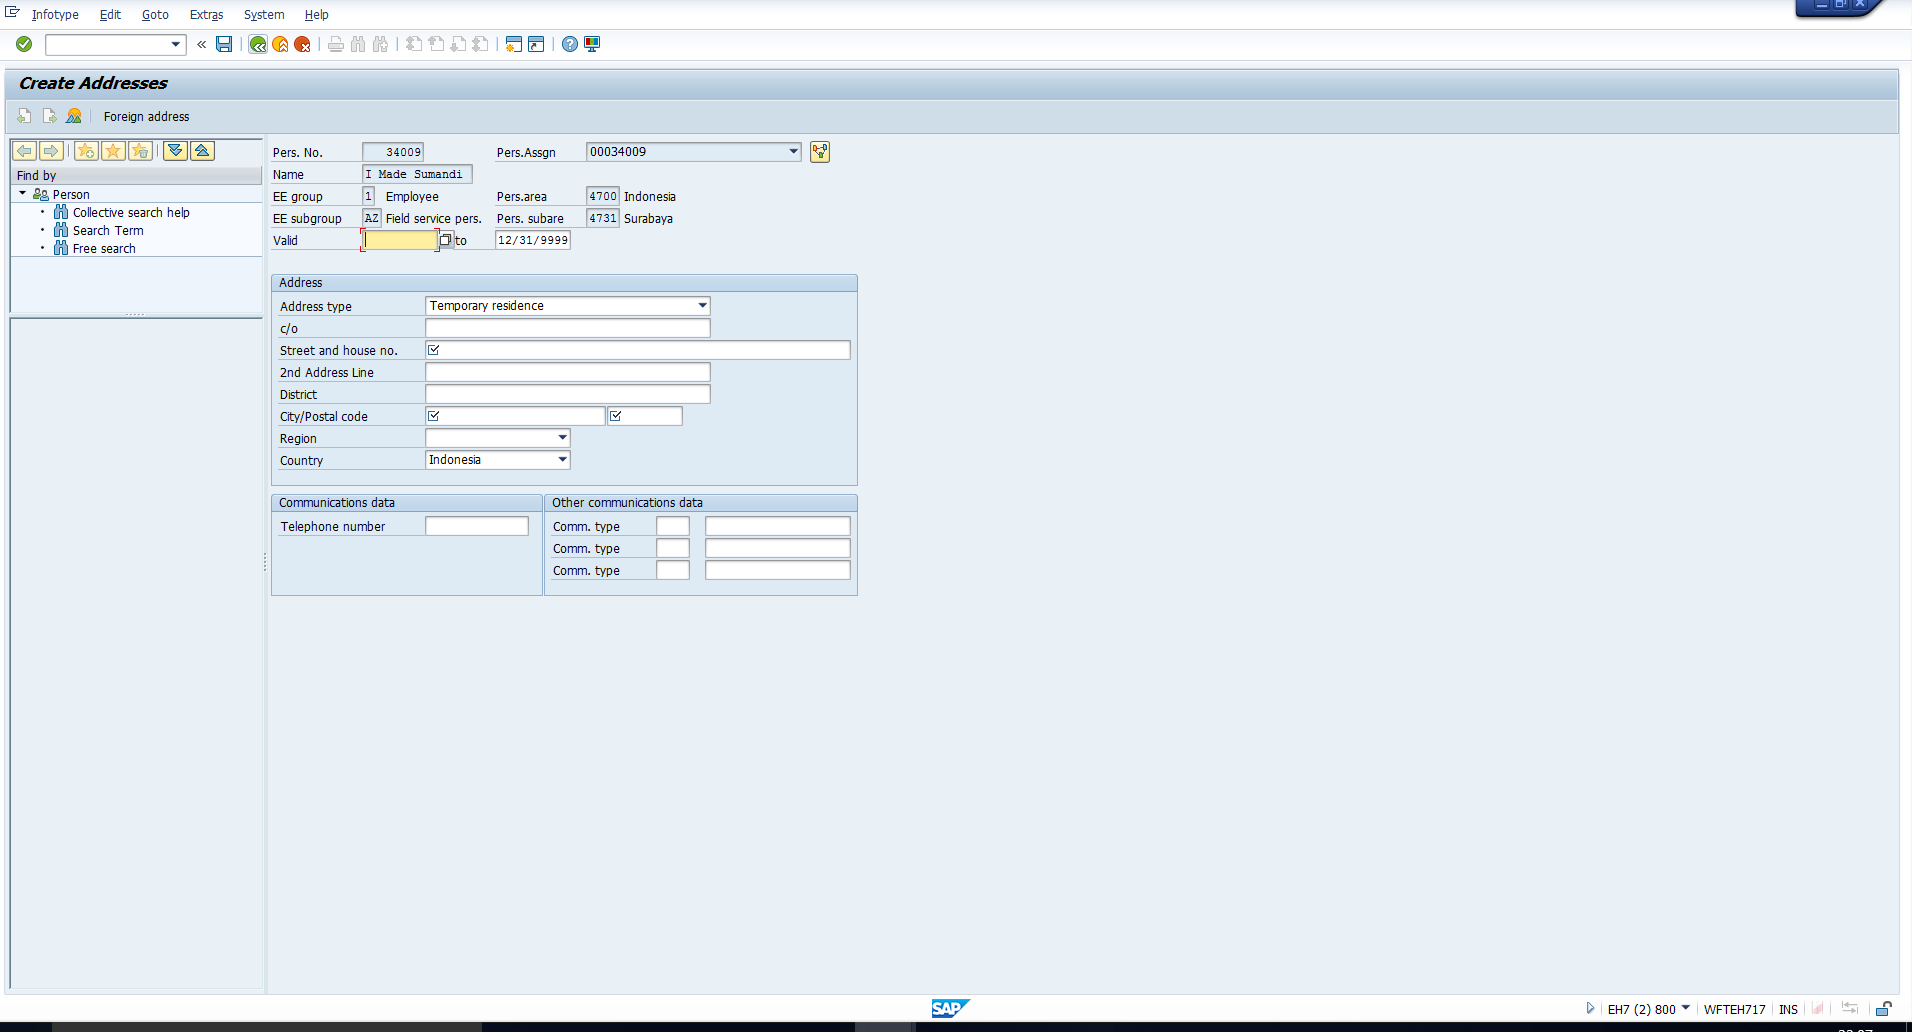
A comparison of the above figures shows us that both subtypes have identical screens. Let’s assume that the client wants the 2nd Address Line field to be mandatory for the permanent residence subtype, but only for Indonesia. For the temporary residence subtype, no changes to the screen are required. Follow the below steps to carry out this SAP infotype screen modification based on subtype.
First, identify the module pool and screen number as instructed in the previous section. Note the module pool and screen number for permanent residence details below:
Also note the module pool and screen number for temporary residence details below:

We can see that the details are identical for both subtypes.
Next, check if there is a relevant customizing entry via the path below in transaction code SPRO:
Personnel Management – Personnel Administration – Customizing User Interfaces – Change Screen Modifications

The infotype screen control overview is displayed as below. Click the Position button:
Enter the module pool and screen number in the search fields as indicated below:
If no entry exists, create a new entry. Click on the New Entries button. Then, enter the required module pool and standard screen and hit Enter. All the fields will be defaulted as seen in the earlier set of activities. In the Feature field, enter P####, where #### represents the number of the infotype. In our example, we are working with infotype 0006 – Addresses. Therefore, highlight the line with the feature P0006 where Variable key is blank, as this is the basic entry. Click on the details icon as highlighted below:
All the fields will be defaulted as seen below:
Click on the Feature button and you will see the features initial screen as below:
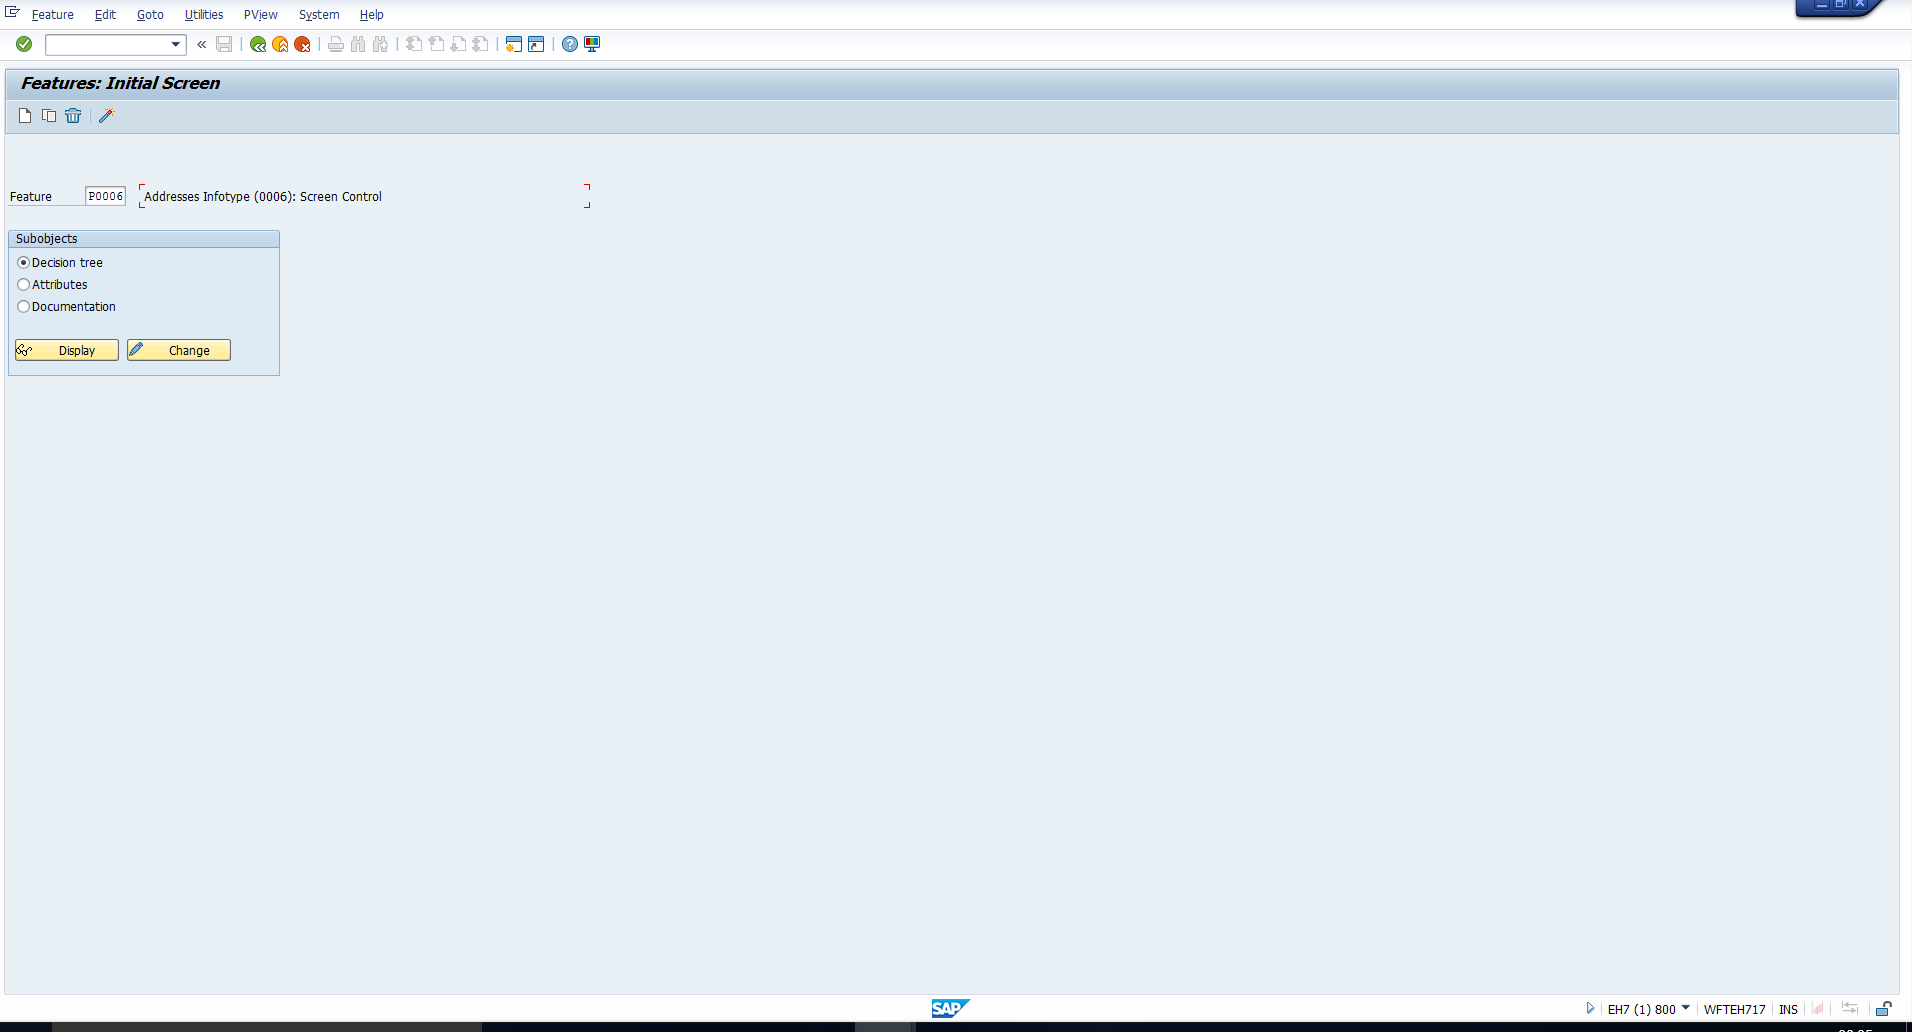
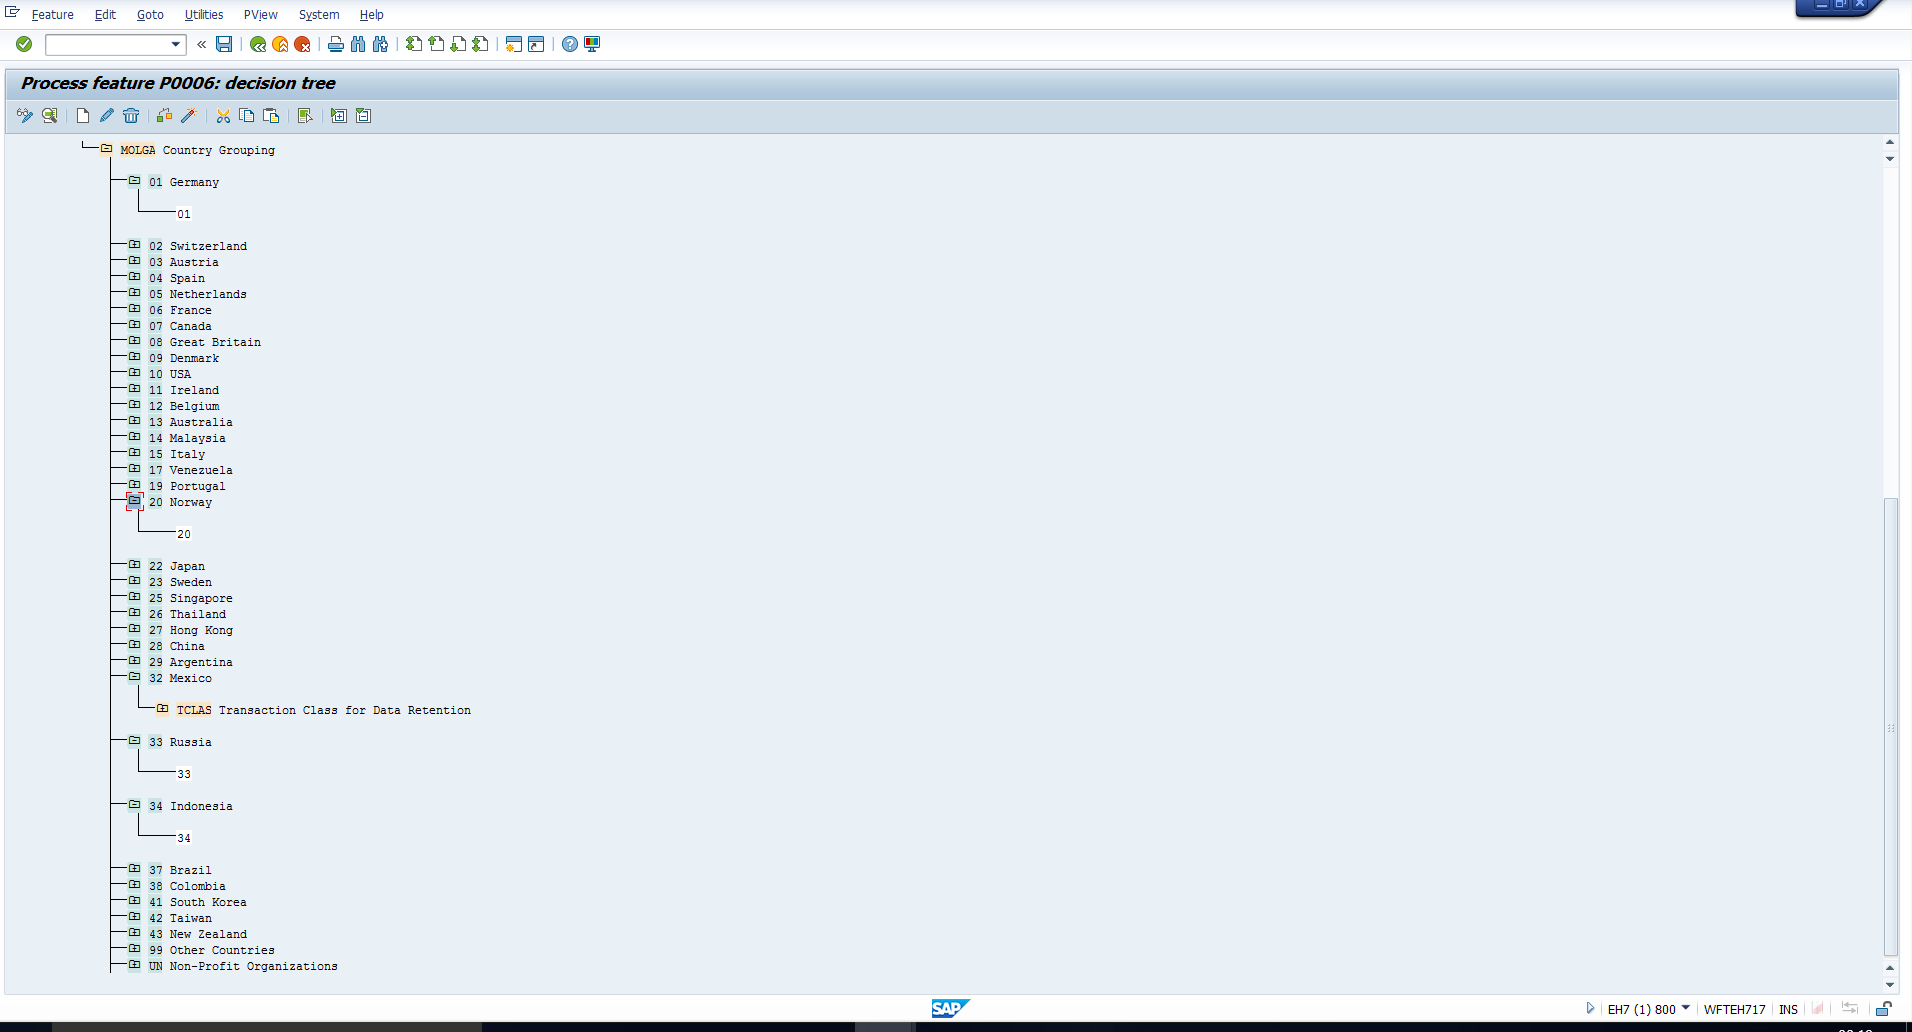
Select the radial button for Decision tree and click on Change to incorporate the new decision based on subtype in the feature. In our example, the feature already uses country as a decision field. The current return value for Indonesia is 34 as shown below:
In our example, the 2nd Address Line field should be mandatory for permanent residence subtype only for Indonesia. For temporary residence subtype, no changes to the screen are required.
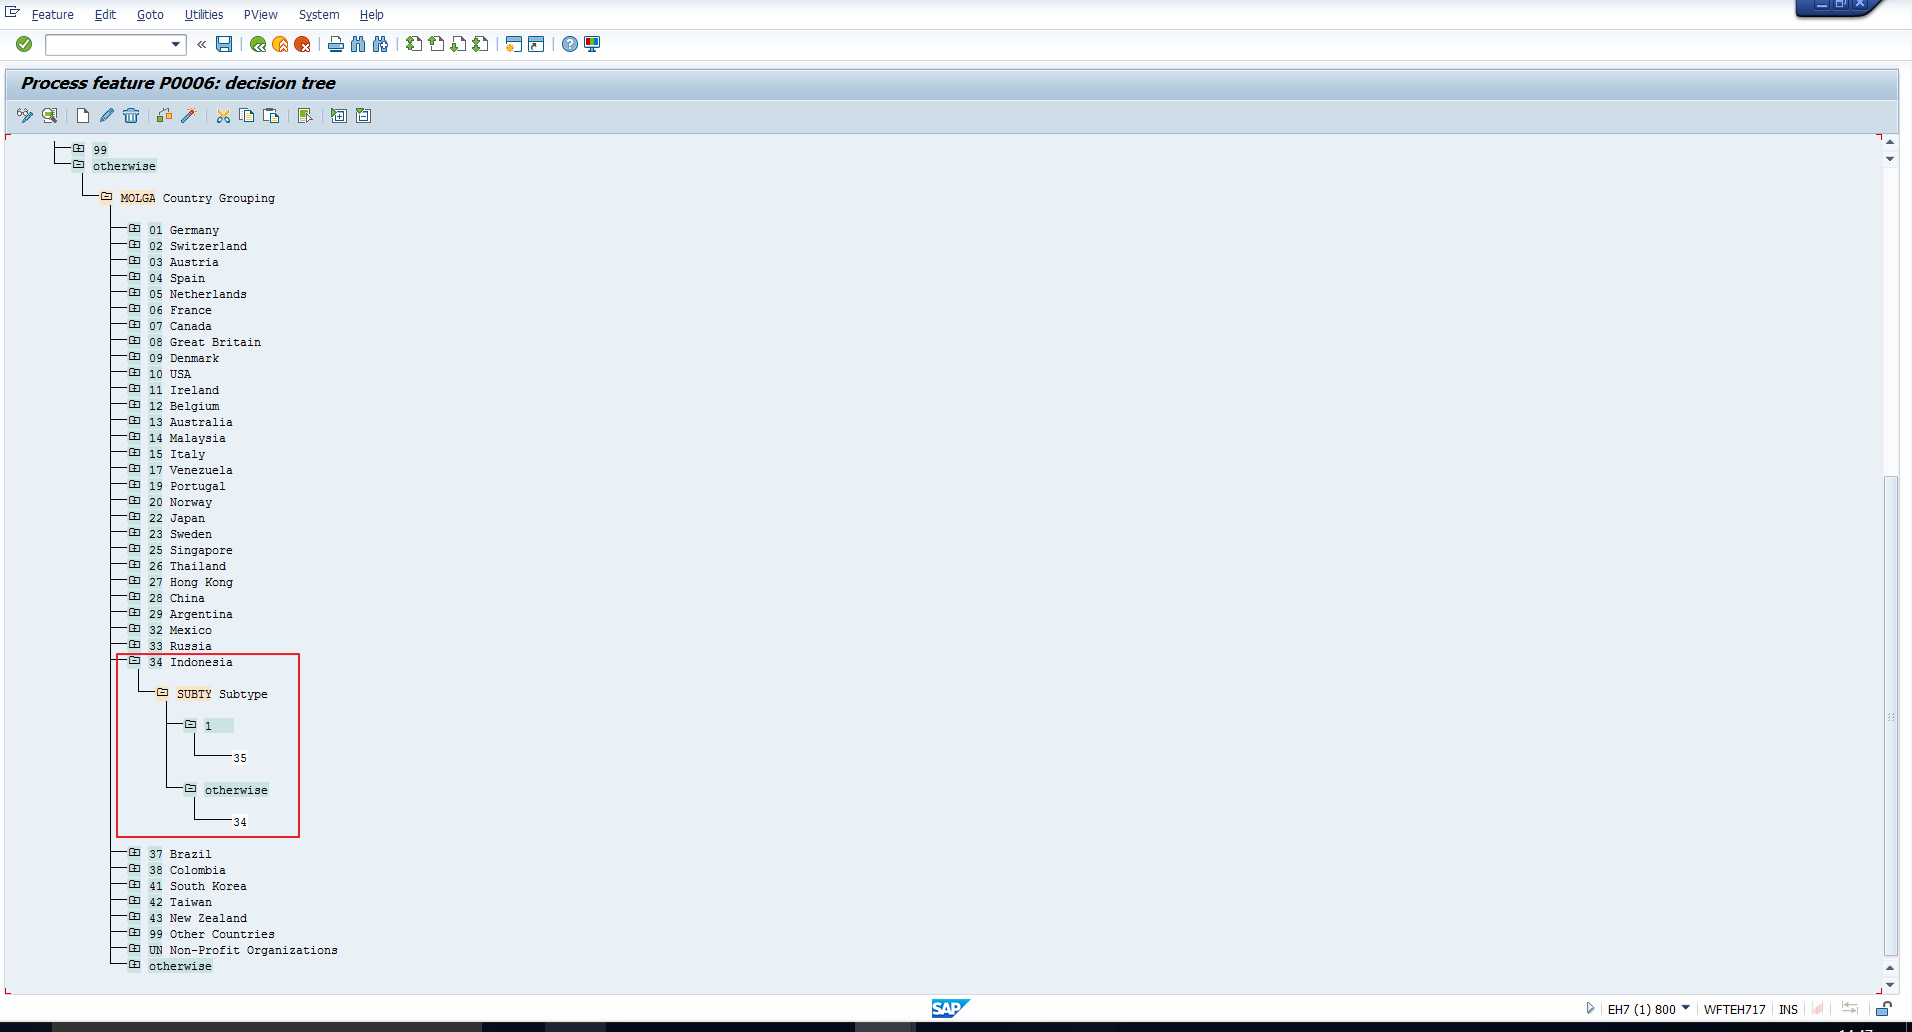
Therefore, let us add subtype as a decision field under Indonesia. If the subtype is 1 – Permanent residence, the return value is 35, otherwise the return value will remain as the default 34:
Save and activate the feature. Click the Back icon until you reach the infotype screen control overview.
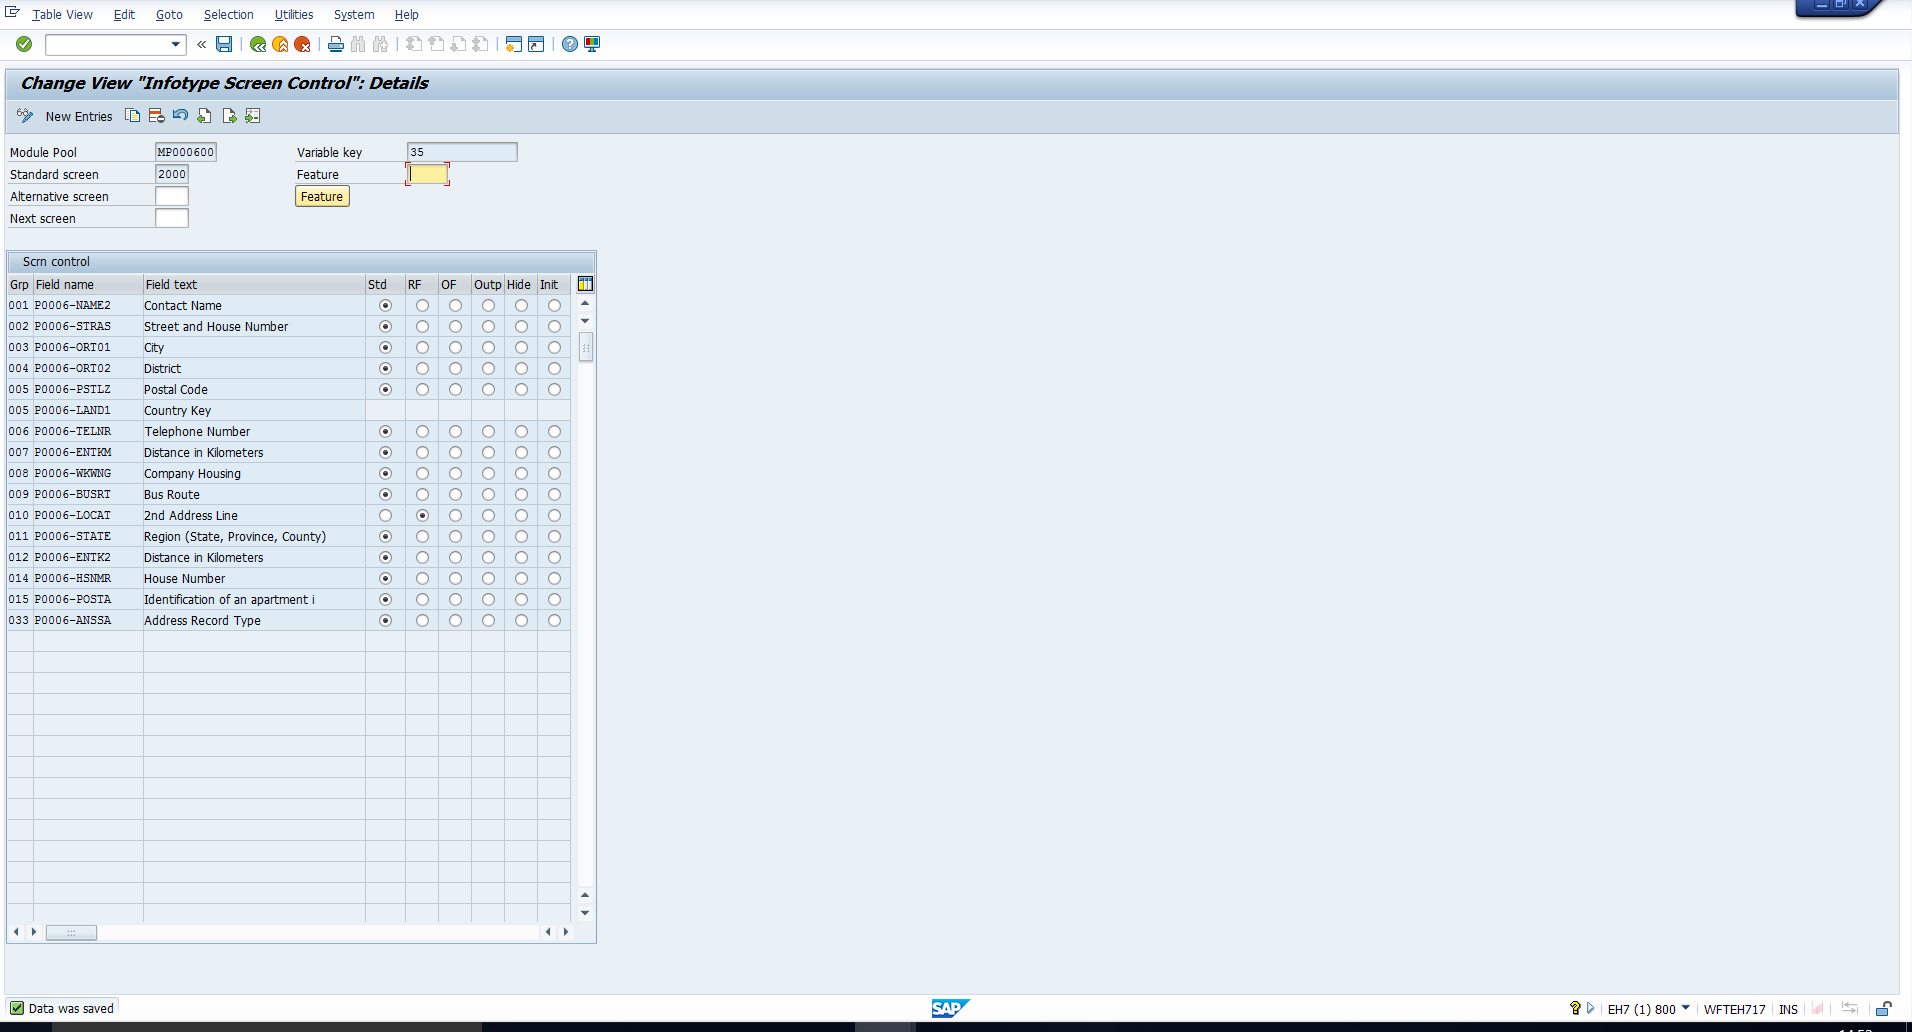
Next, create a new entry for every new return value of the feature. Assign the return value of the feature as the variable key. Leave the feature field blank. In our case, we have added one new return value, 35, for the permanent residence subtype. So we will create one new entry with 35 as the variable key. The new entry will have the 2nd Address Line set as a required field, as displayed below:
Let’s execute transaction code PA30 to check the modified screen for permanent residence with country key Indonesia. The 2nd Address Line field is now marked as mandatory, as shown below:
Finally, let’s check the temporary residence subtype. Here we see that the 2nd Address Line field is not marked as mandatory, in accordance with our requirement:
—
Did you like this tutorial? Have any questions or comments? We would love to hear your feedback in the comments section below. It’d be a big help for us, and hopefully it’s something we can address for you in improvement of our free SAP HR tutorials.
Navigation Links
Go to next lesson: SAP Infotype Menus
Go to previous lesson:
Go to overview of the course: SAP HR Training
It’s great that you are providing this free online courses. However the SAP screens are illegible and so unable to follow what is being instructed in words. May be add screens that are clearer in future? Thank you
You need to simply click on each picture to zoom in and see all the details.
Dear Mr.Isco,
I want to solve questions related to each topic.kindly send questions also after completing each topic so that I can evaluate myself and would understand how much more study needs to fully complete the course.
Hi Team,
Hi Team, Thank you for the e online course material. The content is clear, but the screenshot are not clearly hence unable to follow the instruction. Looks like few modules are missing, please upload those modules. Along with text one video for each module uploaded it would be a great help. I would like do you provide same training SAP Success Factor.
Hi Team, Thank you for your online course material. The content is clear, but the screenshot is not clearly hence unable to follow the instruction. Looks like few modules are missing, please upload those modules. Along with text one video for each module uploaded it would be a great help. I would like to do you to provide the same training SAP Success Factor.