
 This SAP easy access tutorial will give you an overview on how to set up, access, and utilize the easy access shortcuts within SAP. You will also learn about setting up connections and executing transactions.
Accessing SAP Using GUI
The SAP graphical user interface (GUI) is used for accessing SAP’s applications using a logon window, also referred to as a logon pad. Once you install SAP GUI on your device, the logon icon ![]() is displayed on your desktop. From here, you can easily access the desired clients through the logon window. The below image shows the logon window which contains a list of connections that can be named and organized into folders and subfolders for easier management:
is displayed on your desktop. From here, you can easily access the desired clients through the logon window. The below image shows the logon window which contains a list of connections that can be named and organized into folders and subfolders for easier management:
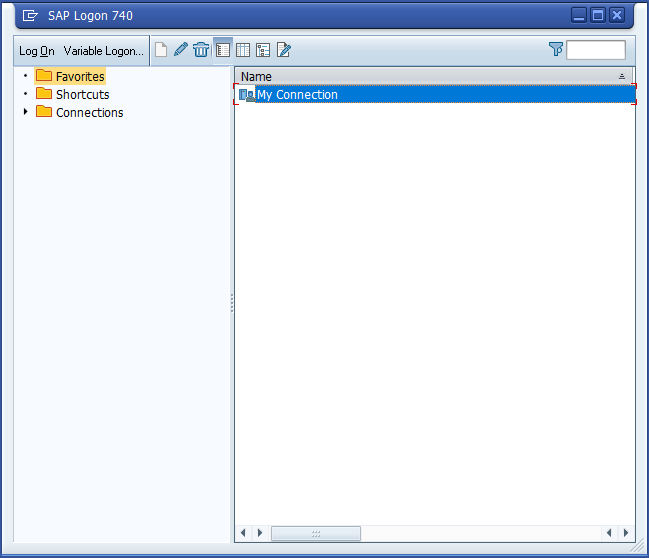
The following folders can also be seen in the default view on the left pane of the logon window:
- Favorites: This folder allows you to bundle a group of systems that you currently use frequently
- Shortcuts: This folder allows you to start SAP transactions, run reports or execute system commands directly after logging on to a specific system
- Connections: This folder allows you to maintain connections that you use daily
Sub-folders can be created under these nodes as well for further categorization.
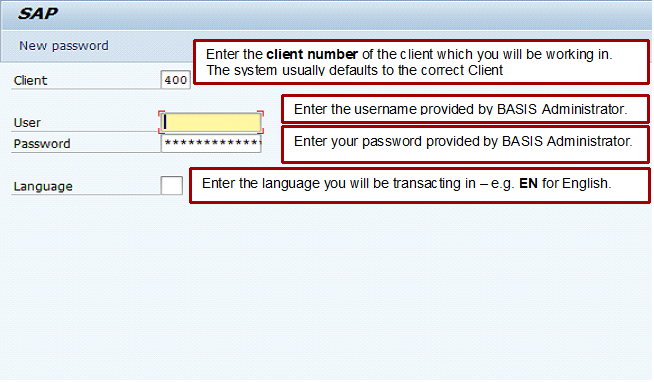
Select the client you want to connect to and logon to the SAP GUI by entering the username and password provided by your BASIS administrator as instructed below:
Once you have correctly entered your credentials, you will see the SAP easy access home screen as below:
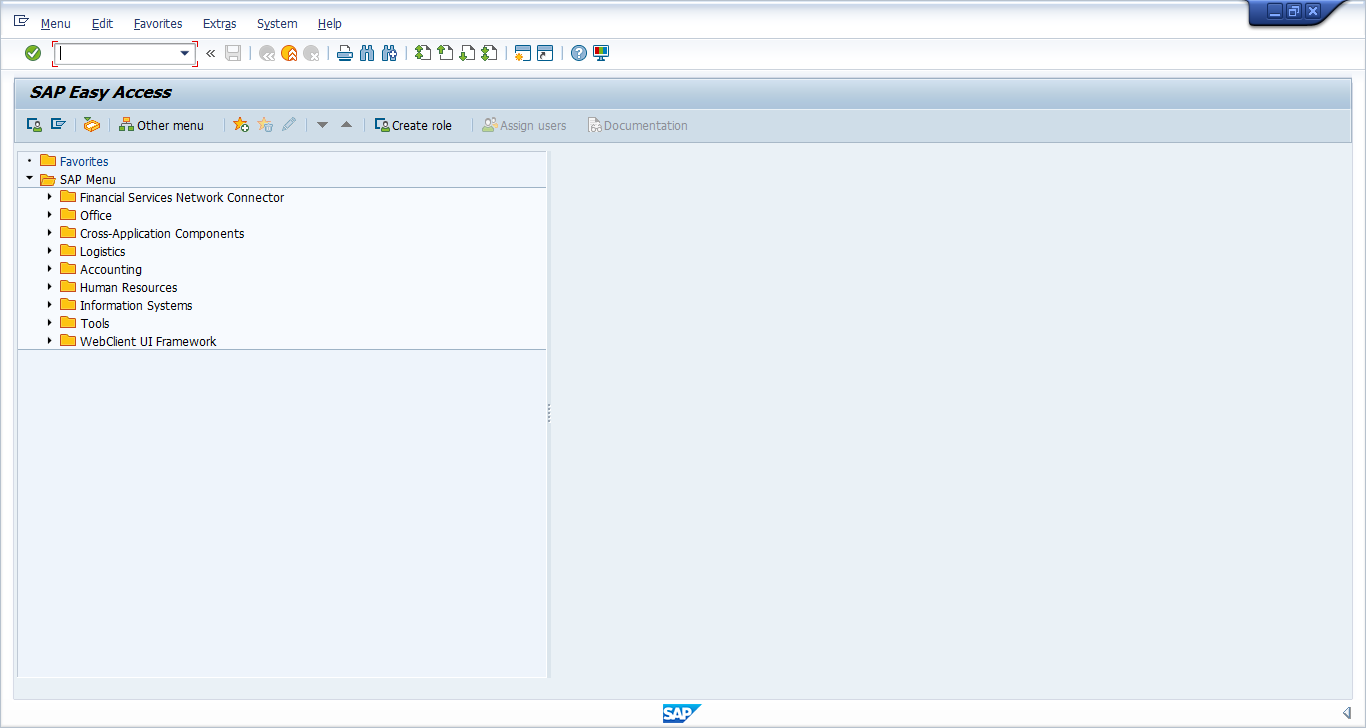
You can see different buttons, menus and folder details, as well as functionality and descriptions which we will discuss throughout this SAP easy access tutorial.
SAP Header Section
The main sections that most SAP screens are made up of are highlighted below:
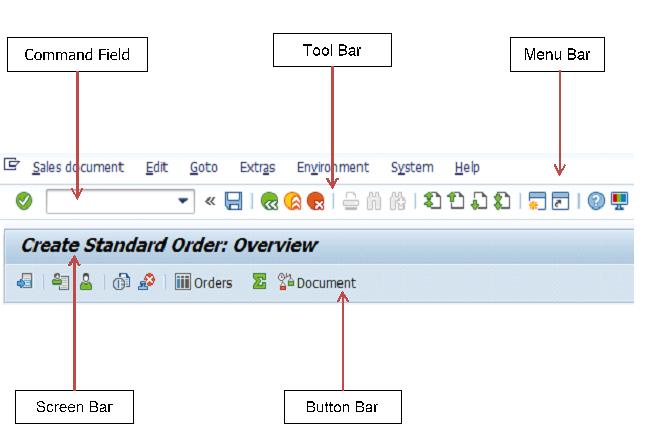
- Menu Bar: The contents of the menu bar change according to the transaction you are in. The System and Help options remain as a standard.
- SAP Standard Toolbar: The toolbar has standard icons which are discussed further in the next section.
- Screen Bar: This contains the screen title which corresponds to the transaction name.
- Button Bar: This contains buttons specific to the transaction.
SAP Standard Toolbar
The SAP standard toolbar is used to navigate through the screens of a transaction. If an icon on the toolbar is grey, then the icon cannot be used at that time.
![]() Enter: Allows you to confirm entries made in the input fields
Enter: Allows you to confirm entries made in the input fields
![]() Command Field: Allows you to enter commands, such as transaction codes
Command Field: Allows you to enter commands, such as transaction codes
![]() Save: Allows you to save the document or transactional data
Save: Allows you to save the document or transactional data
![]() Back: Allows you to return to the previous screen without saving the data
Back: Allows you to return to the previous screen without saving the data
![]() Exit: Allows you to leave the current transaction without saving the data
Exit: Allows you to leave the current transaction without saving the data
![]() Cancel: Allows you to exit the current transaction without saving the data
Cancel: Allows you to exit the current transaction without saving the data
![]() Print: Allows you to print the information on the screen that is currently displayed
Print: Allows you to print the information on the screen that is currently displayed
![]() Find/Find Next: Allows you to search for required data
Find/Find Next: Allows you to search for required data
![]() Paging Keys: Allows you to navigate between pages of a transaction or report
Paging Keys: Allows you to navigate between pages of a transaction or report
![]() Create Session: Allows you to create a new session without leaving the current one
Create Session: Allows you to create a new session without leaving the current one
![]() Create Shortcut: Allows you to create a desktop shortcut to any SAP report, transaction or task
Create Shortcut: Allows you to create a desktop shortcut to any SAP report, transaction or task
![]() Help: Navigates you to standard help tools
Help: Navigates you to standard help tools
![]() Layout Menu: Allows you to customize the local layout
Layout Menu: Allows you to customize the local layout
User Profile Settings
When you logon to SAP for the first time you may wish to set up your own data in the user profile settings. This data will support you while performing transactions within the system. For example, you can enter your personal information or set default parameters for pre-population of fields.
| Menu Path | Via Menu Bar: System > User Profile > Own Data |
| Transaction Code | SU3 – Own Data |
You can maintain your own personal contact information in the Address tab:

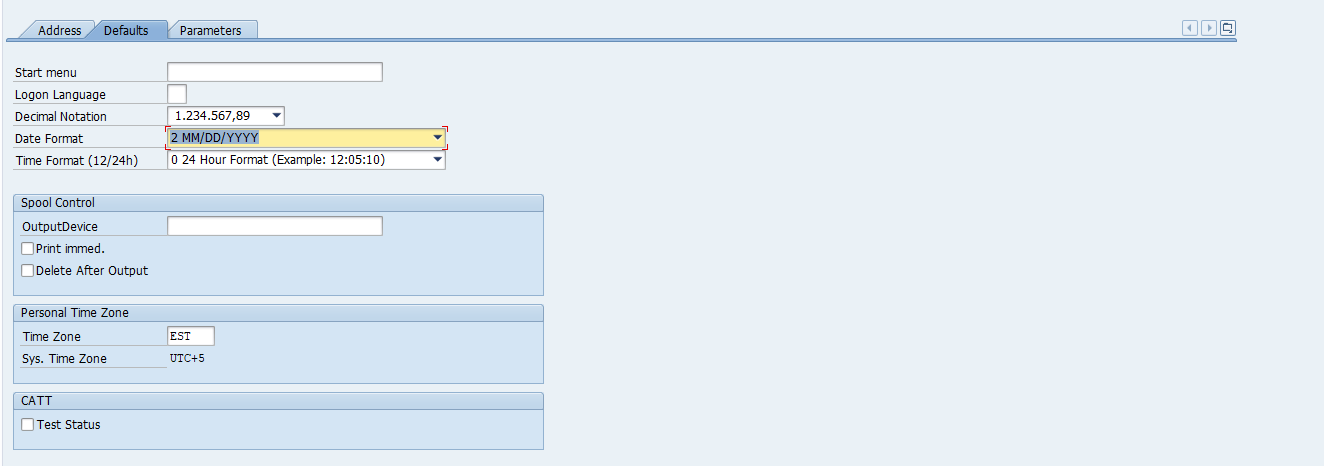
You can maintain your prefered user defaults, such as date and time format, in the Defaults tab:
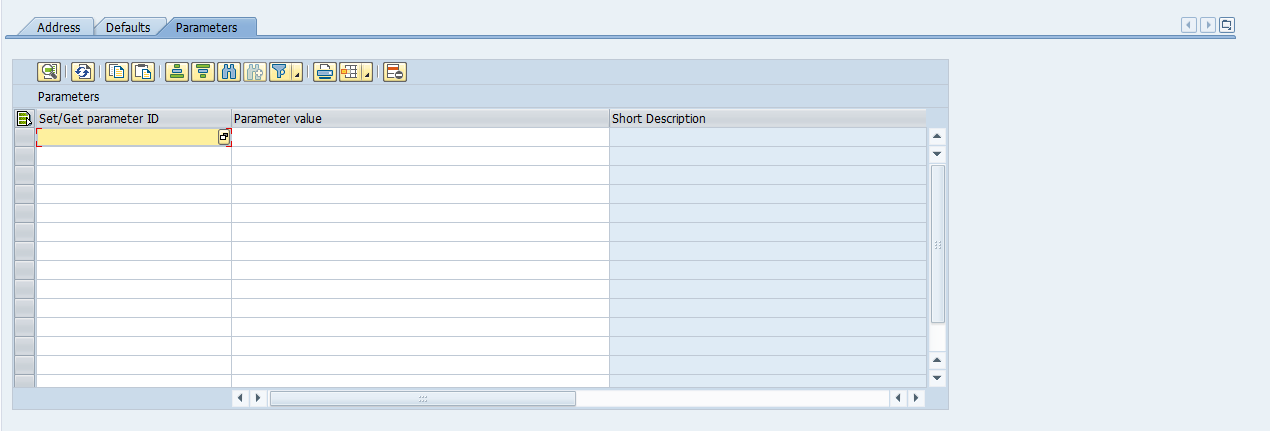
You can maintain user-specific authorized parameters, such as default plant or company code, in the Parameters tab:
SAP Easy Access Menu
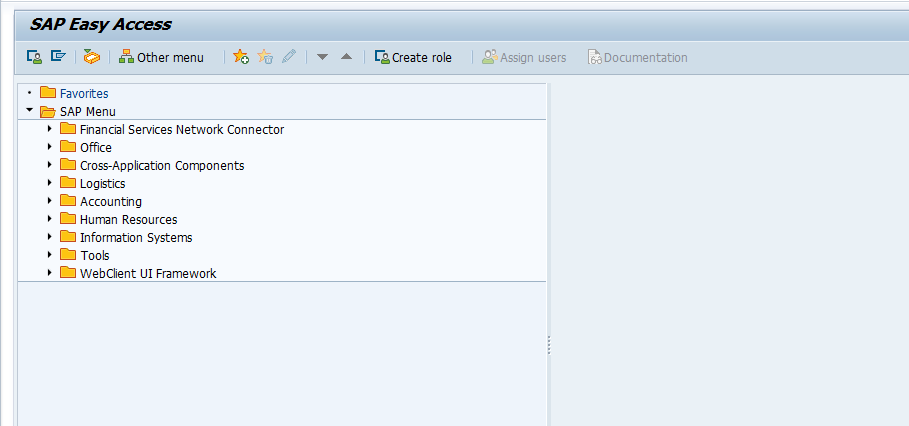
The SAP easy access menu allows you to access desired transactions and reports if you are not aware of the transaction code. You can reach your desired transaction or report by clicking on the expand button ![]() to expand the options and subfolders. The below image shows the standard SAP menu which will be displayed if no user-specific menu is set:
to expand the options and subfolders. The below image shows the standard SAP menu which will be displayed if no user-specific menu is set:
If the user has limited access to certain transactions, a user-specific menu can be created and set as the default menu by your system administrator. The user-specific menu contains only those transactions which the user can access so that they may easily find their desired set of transactions without navigating through the full SAP easy access menu.
You can easily toggle between user-specific menu and the SAP easy access menu. Click the user-specific menu button ![]() or press CTRL+F10. To toggle back, click the SAP easy access menu button
or press CTRL+F10. To toggle back, click the SAP easy access menu button ![]() or press CTRL+F11 on your keyboard.
or press CTRL+F11 on your keyboard.
Transactions in the SAP Easy Access Menu
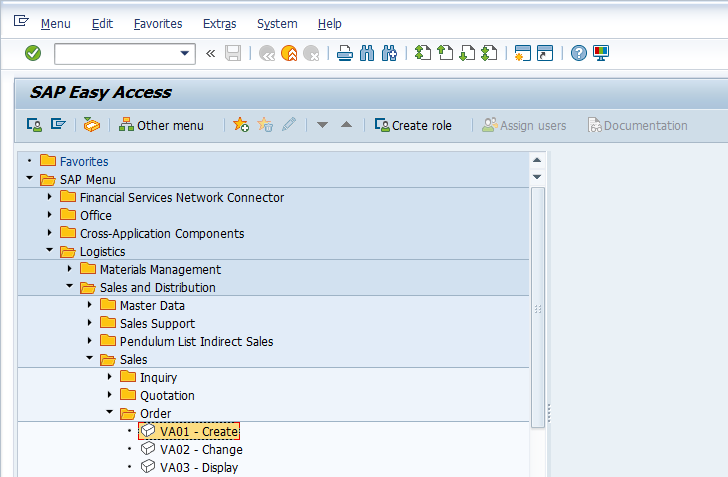
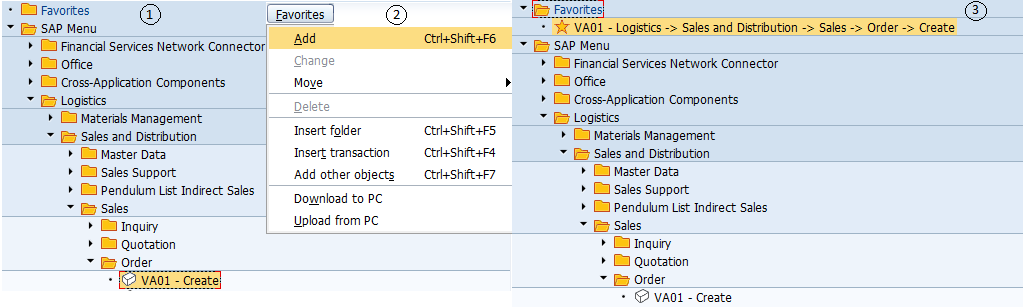
This section will guide you on how to access your desired transaction or report using the SAP easy access menu. For example, if you want to access transactions related to sales order, but you don’t know the transaction code, follow the logical folder path to locate the desired transaction. See the below expanded folders to reveal the menu path for the Create transaction for sales orders:
Following the same example, when reading online tutorials menu paths are described in the following manner:
SAP Menu > Logistics > Sales & Distribution > Sales > Order > Create
Creating Favorites
You can create favorites to easily access commonly used transactions. If you don’t know the transaction code by heart, follow the below steps to create a favorite using the menu bar:
- Find the location of the transaction in the SAP easy access menu or user-specific menu
- Click on the transaction once to highlight it
- Select from the menu bar: Favourites > Add
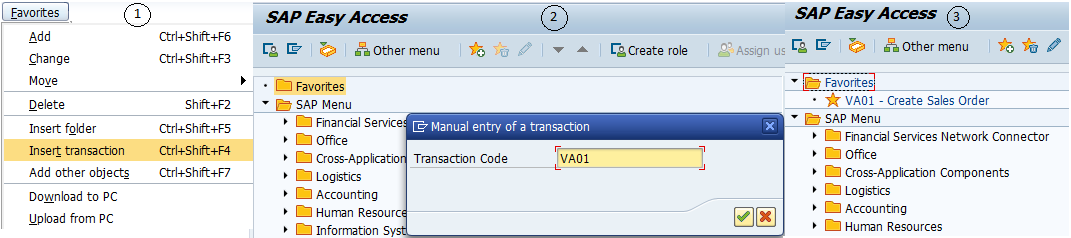
If you know the transaction code and you want to add it directly to your favorites, follow the below steps:
- Select from the menu bar: Favorites > Insert transaction
- Enter the transaction code and click on Enter
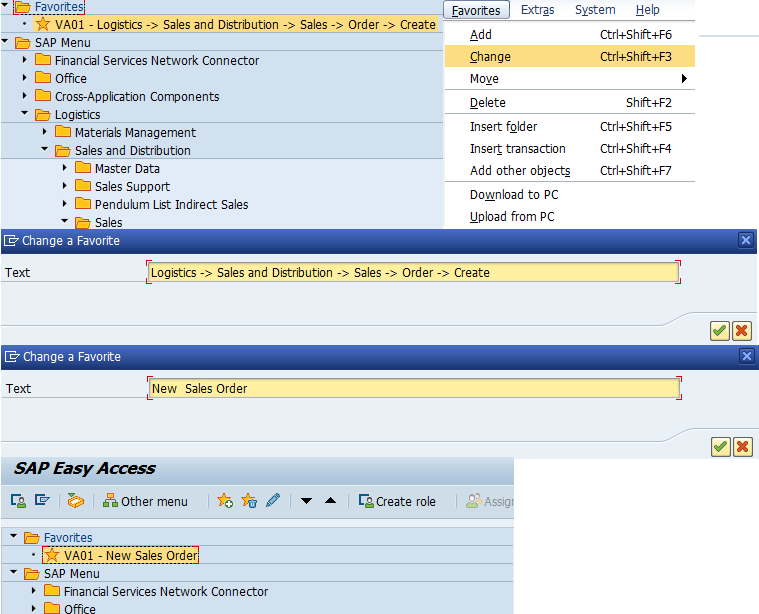
Organizing Favorites
Once you add favorites to your SAP easy access menu, you may maintain them by renaming them, deleting them or adding more. To rename a favorite, follow the below steps:
- Click on the transaction you wish to rename
- Select from the menu bar: Favorites > Change
- Change existing text as you see fit and hit Enter
You can also add or delete favorites using the following icons from the button bar of the SAP easy access menu:
![]() Click the desired transaction and press this icon to add it to your favorites
Click the desired transaction and press this icon to add it to your favorites
![]() Click the desired transaction under favorites and press this icon to remove it
Click the desired transaction under favorites and press this icon to remove it
SAP Screen Features
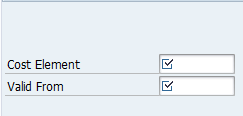
Mandatory Fields are required to be filled in. These fields may be free text or may have a range of valid values. If nothing is entered in these fields, the transaction will not process further. These fields are indicated by a checkbox and if left unpopulated, the system prompts with an error message ![]() :
:
Optional Fields, as the name suggests, are not mandatory and the transaction or report can be executed without populating them. They do not contain a checkbox:
Default Fields have values recommended by the system. The default value is automatically populated but can be overridden by an alternative valid value:

Radio Buttons allow you to select one criteria from multiple options and may allow for further data input:
Check Box allows you to select single or multiple options for a given criteria:

Tabs can be seen when working in a transaction. They contain and categorize different sets of information related to that transaction:

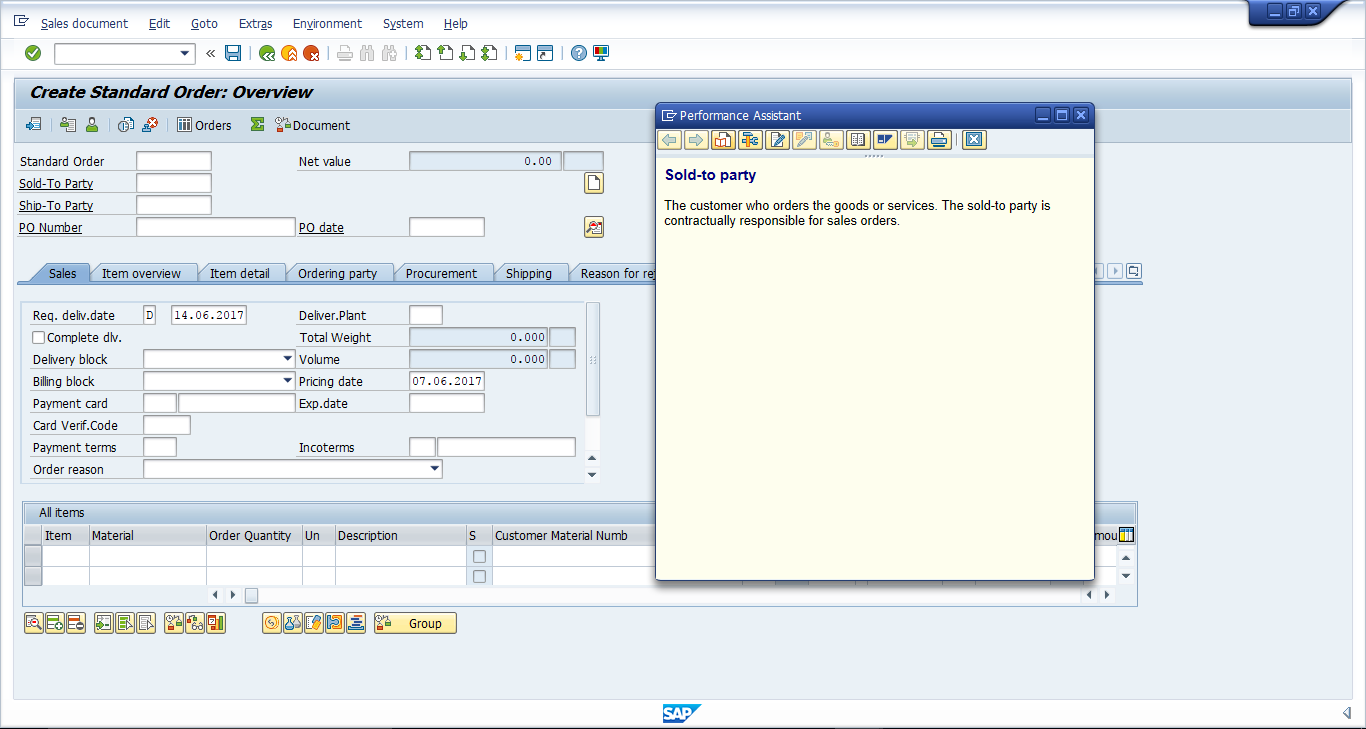
Performance Assistant can be accessed from anywhere if you have a query within the system. You can simply place the cursor on the particular field and press the F1 on your keyboard. Detailed information will be provided for standard fields or custom information can be displayed for custom fields.
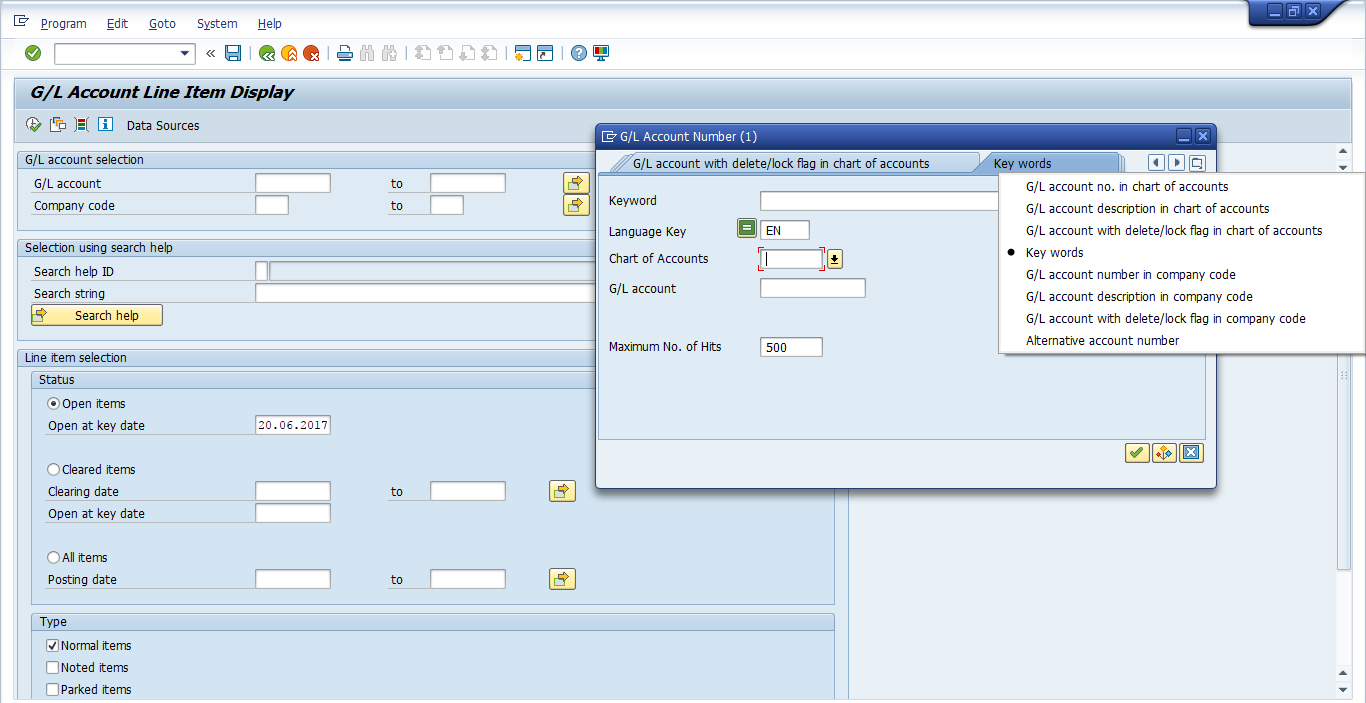
Search Help allows you to view a list of valid entries linked to any field. You can either place your cursor in the field and press F4 on your keyboard to see all possible entries or click the search button ![]() within the desired field.
within the desired field. ![]()
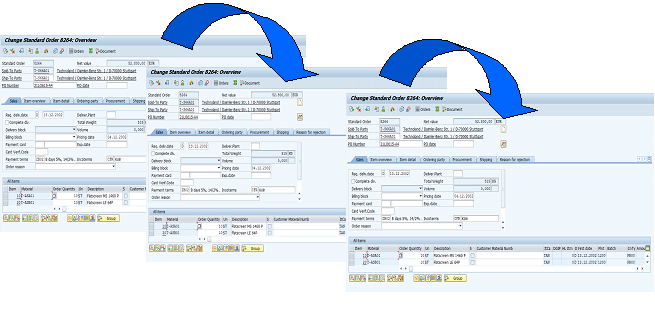
Transaction Bifurcations
In general, when you access any transaction, it will consists of three sections:
- Header – This data for the document header is valid for the entire document.
- Item Overview – This gives you the basic information of the item.
- Item Detail – This gives you the detailed information of the item.
These sections can be expanded and collapsed using the following buttons:
![]() Expand a Section
Expand a Section
![]() Collapse a Section
Collapse a Section
Navigation Tricks
A session is the term for each SAP window. Opening multiple sessions allows the user to work on more than one transaction or report at a time, enabling the ability to multi-task. The user may access all the tools and information within a transaction without having to cancel or exit other sessions. As a standard, up to six sessions may be open by one user at a given time:
To easily move between transactions in SAP you can use the command field ![]() in the toolbar. You have the following options:
in the toolbar. You have the following options:
- If you are in a transaction and wish to exit the current window and return to the main menu, enter /n
- If you are in a transaction and wish to switch to a new one while closing the current window, you can use /n followed immediately by the transaction code (e.g. /nVA02)
- If you wish to end the current transaction and close the session simultaneously, use /i
- If you wish to open a new session in a new window without ending the current one, you can use /o
- If you wish to jump to a new transaction without closing the current one you can add the transaction code after /o (e.g. /oVA01)
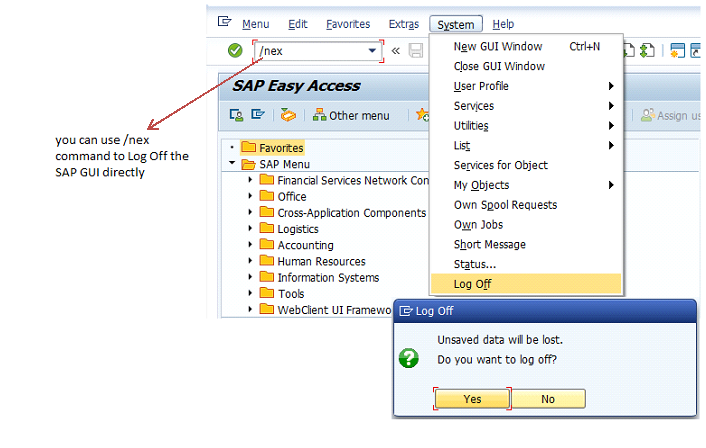
Logging Off
As with many types of software, there are multiple ways to exit SAP. You can use any of the following:
- Select from the menu bar: System > Log off
- Click the X in the top right corner of the screen
- Click Exit from the toolbar
- Type /NEX in the command field; This will close ALL sessions and transactions simultaneously without prompting to save data in any particular transactions
Each time you log off, SAP prompts you to confirm your intention. Click Yes to log off or No to return to what you were doing:
Hi,
Do you offer remote access to SAP easy access? If so, what about the fees?
Cedar
No, we don’t. Please check this page for information about companies that offer this kind of service: SAP IDES Access.
I would appreciate your help. Do you have a server for SAP MM SCM52. I need it ASAP. Urgent please. Thank you.
I mistakenly selected “Time Evaluation” and the function displayed all employees on my “Transaction ZPMAERROR” list. Therefore, I can’t clear my error log until the next day. Is there a solution to rebound today, so I can get an accurate error log list?
I would like to download a ME23N report to Excel but cannot remember how to – please explain in the simplest form
Is there any option were I can upload related documents of particular Sales order in TAB VA03?