
 Welcome to our tutorial on SAP evaluated receipt settlement. To summarize the normal SAP procure to pay process, it involves sending a purchase order to a vendor, receiving the goods from the vendor along with an invoice, then posting the invoiced amount against the goods receipt through invoice verification. Evaluated receipt settlement (ERS) is a unique process where the creation of an invoice against a goods receipt happens automatically. The invoice is posted on the basis of the data in the purchase order and goods receipts. In this process, it is not necessary for the vendor to submit an invoice. Thus, there must be a prior agreement between the buyer and supplier to enable SAP evaluated receipt settlement functionality.
In this tutorial, we itemize the advantages and requirements of SAP evaluated receipt settlement, then walk through the steps of the process. Check out the other articles in our free SAP MM training to examine other functionalities of the SAP MM module.
SAP Evaluated Receipt Settlement Advantages
ERS has several advantages over standard procure to pay invoice posting. We have identified the three most important benefits here:
- Purchasing transactions are settled quickly, since the process is automated.
- Automated processing avoids errors in communication between the vendor and the buyer.
- Price and quantity variances do not occur during the invoice process.
SAP Evaluated Receipt Settlement Process
In order to realize the above-mentioned advantages, ERS must be set up correctly in SAP. As mentioned, this will happen as a result of communication between the buyer and supplier in agreement of the terms of the automatic settlement. In the following sections, we discuss the below basic system requirements for executing the SAP evaluated receipt settlement process:
- Update Vendor Master Data
- Create Purchasing Info Record
- Create Purchase Order
- Enter Goods Receipt
- Run Evaluated Receipt Settlement
Update Vendor Master Data
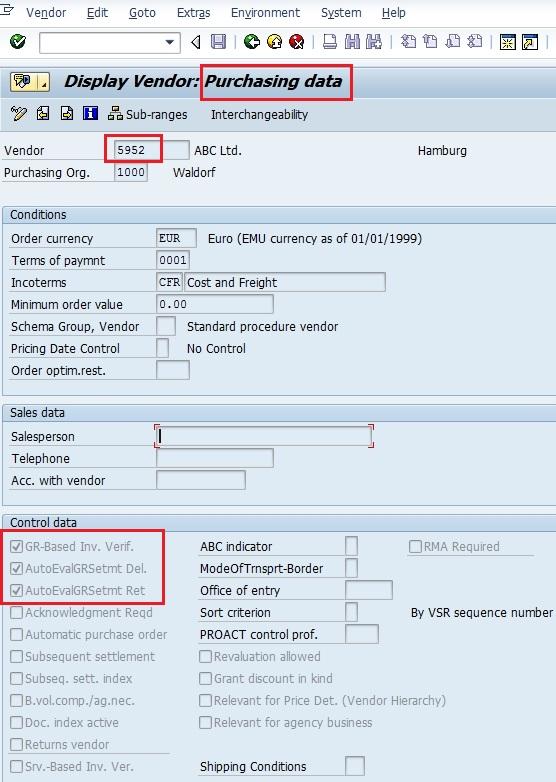
To maintain vendor master data for ERS, select the following indicators in the Purchasing data view of the vendor master record:
- GR-Based Inv. Verif. – This indicator specifies that invoice posting cannot be done without a goods receipt.
- AutoEvalGRSetmt Del. – This indicator triggers the creation of invoices automatically with respect to goods received.
- AutoEvalGRSetmt Ret – Check this indicator to allow the automatic creation of credit memos with respect to returned materials.
All three of these indicators must be selected in order to activate SAP evaluated receipt settlement, as shown below:
Create Purchasing Info Record
A purchasing info record is like a data register where material and vendor details are stored with a one-to-one relationship between material and vendor. We know which material can be procured from which vendor through this master record. It also contains settings relevant to activate SAP evaluated receipt settlement.
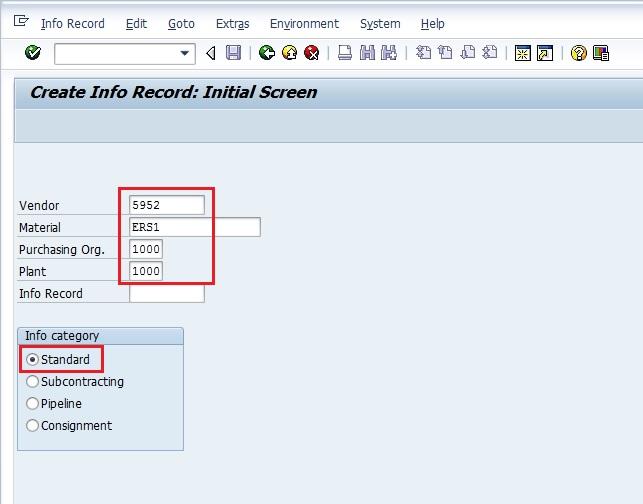
To create a purchasing info record, execute transaction code ME11. In the initial screen, enter the following information for each vendor/material combination you want to create a record for:
- Enter vendor number maintained for ERS in the previous step
- Identify the material number that is to be made applicable for ERS
- Specify purchasing organization
- Enter plant
- Select Standard info category radial button
Hit Enter to proceed to enter purchasing data. Enter details as required for the record, taking care to elect the following:
- Select the GR-Bsd IV indicator
- De-select the No ERS indicator
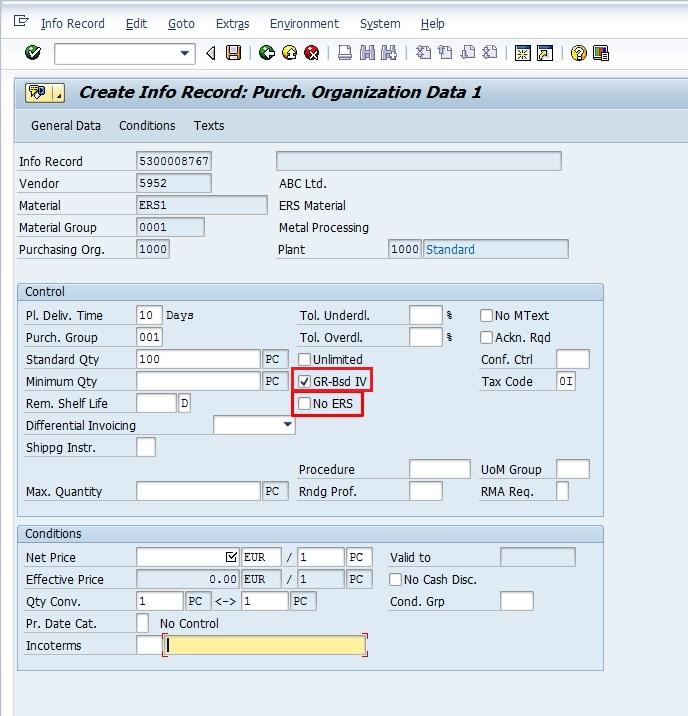
Press Enter then Save ![]() to create the purchase info record.
to create the purchase info record.
Create Purchase Order
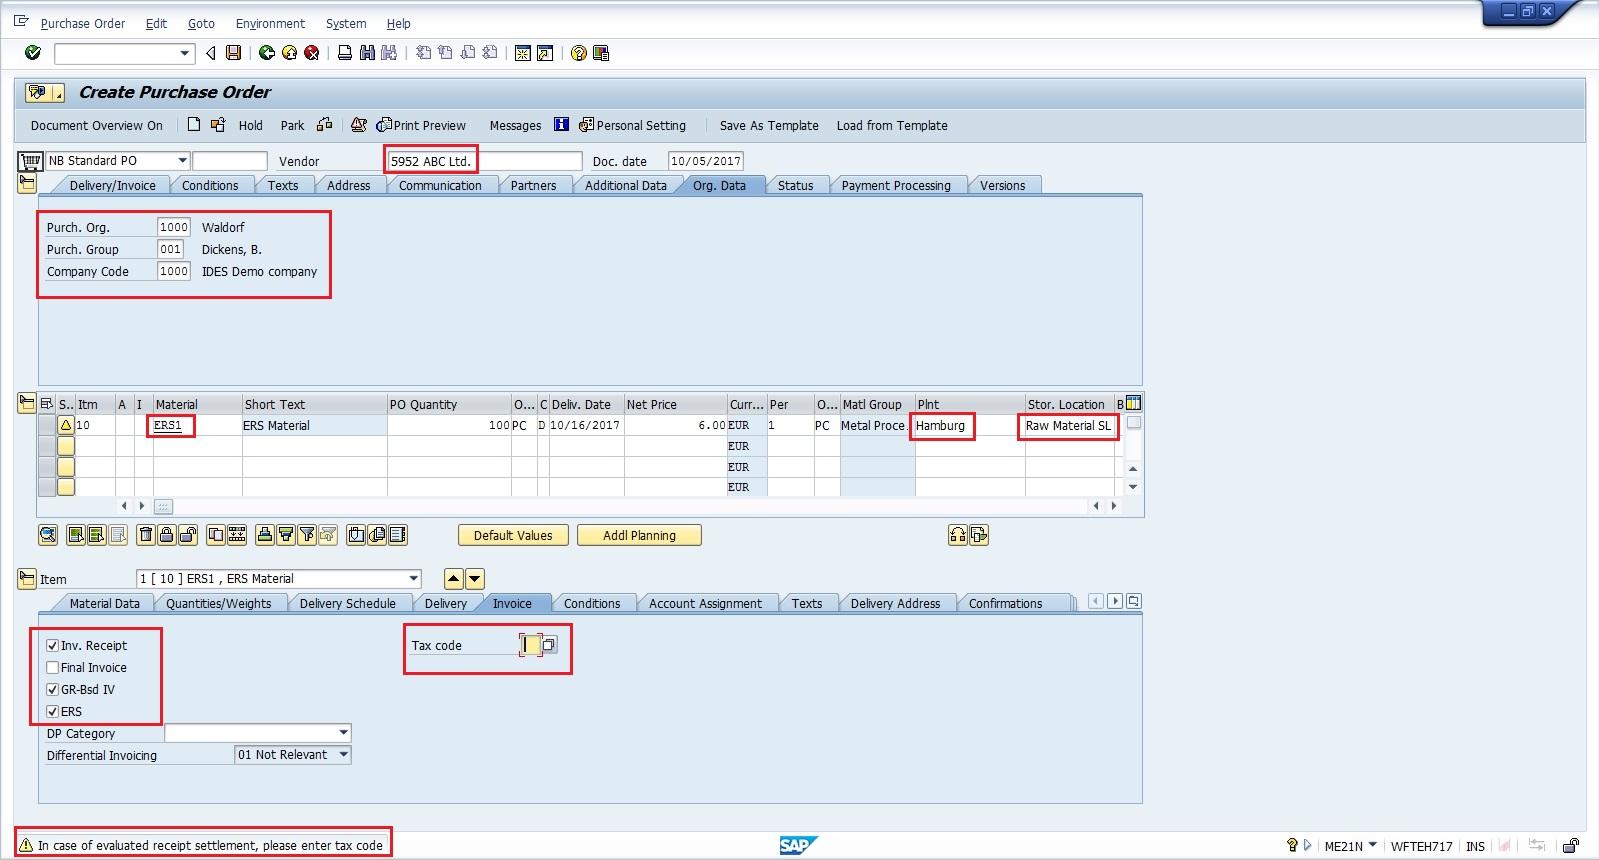
Now we are ready to create the purchase order that will be used for the SAP evaluated receipt settlement. Use transaction code ME21N and enter the required information, taking care to use the following details:
- Use the vendor number for which you updated the master data and purchase info record in the previous sections. In our example, we use vendor number 5952.
- Enter the purchasing organization, material and plant for which you created a purchasing info record in the last step. For instance, we use purchasing org 1000, material number ERS1 and plant 1000 – Hamburg.
- Since we set the GR-based invoice verification and ERS indicators in the vendor master record, we can see those indicators selected automatically on the purchase order as well. Leave them as defaulted.
- For ERS, a tax code should also be entered during the purchase order creation to be leveraged during automatic invoice creation.
Press Enter then Save ![]() to create the purchase order.
to create the purchase order.
Enter Goods Receipt
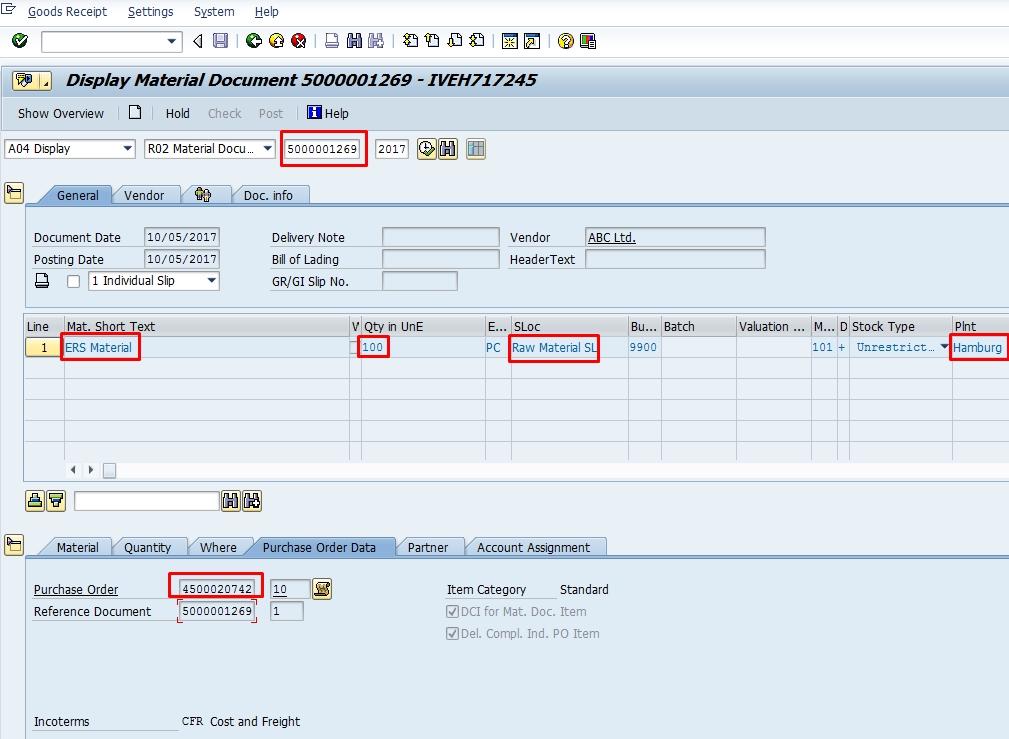
Once the purchase order is created and sent to the vendor, the buyer receives the goods. To record the transaction, create a goods receipt (GR) in SAP. A goods receipt is mandatory for ERS to automatically generate the invoice. Enter the goods receipt via transaction code MIGO using the following information:
- Specify the purchase order number created in the previous step. In our case, we use purchase order number 4500020742.
- The material, plant and storage location are defaulted from the purchase order.
- Specify the quantity of material received.
Press Enter then Save ![]() to post the goods receipt.
to post the goods receipt.
Run Evaluated Receipt Settlement
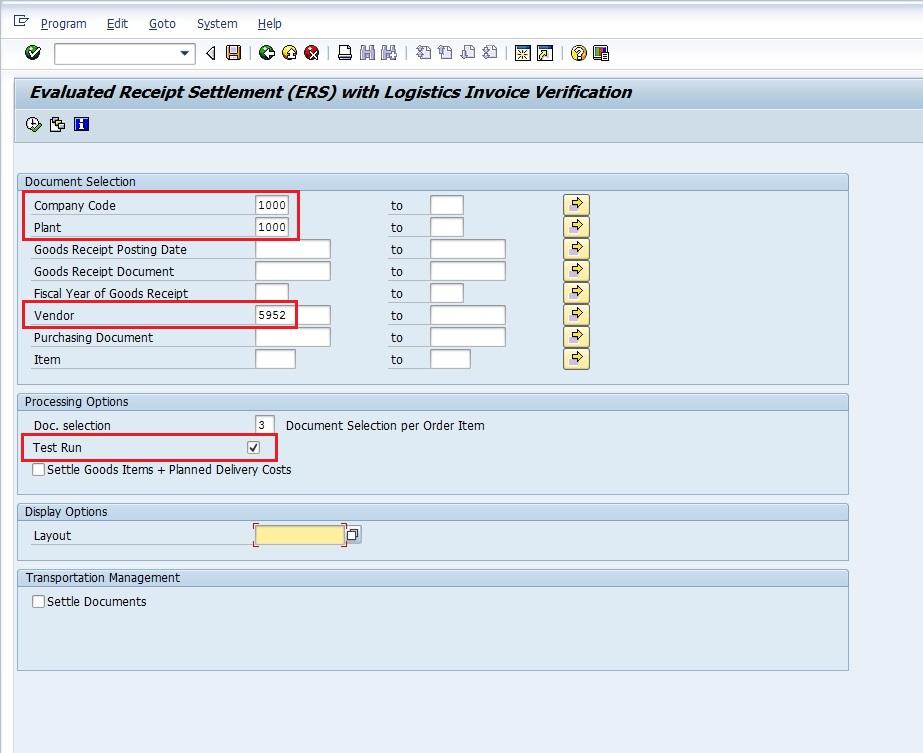
Finally, it is time to run SAP evaluated receipt settlement to automatically post invoices. Execute the process via transaction code MRRL. In the initial screen, enter the following information:
- Specify company code used in the purchase order. In our case we use company code 1000.
- Enter the plant from the purchase order and goods receipt. For our example, we use plant 1000.
- Identify the vendor number that was set as relevant to ERS in previous steps. Again, we select vendor number 5952.
- Select Test Run tickbox
Click Execute ![]() to run in test mode and check the results.
to run in test mode and check the results.
Review the results for proposed invoice postings. If everything is correct, go back and remove the Test Run tickbox and re-execute.
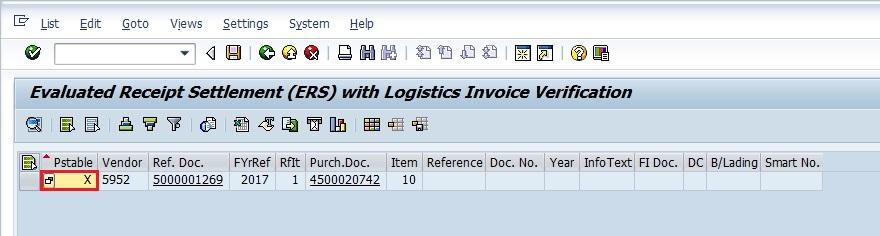
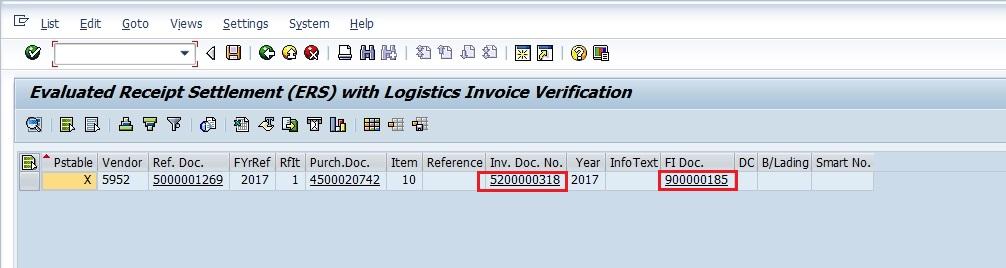
When executed as a posting run, the ERS run posts the proposed invoice document automatically and the results display the MM and FI document numbers, as highlighted below:
—
Did you like this SAP MM tutorial? Have any questions or comments? We would love to hear your feedback in the comments section below. It’d be a big help for us, and hopefully it’s something we can address for you in improvement of our free SAP MM tutorials.
Navigation Links
Go to next lesson: SAP Service Master
Go to previous lesson: SAP Source List
Go to overview of the course: SAP MM Training
Hi,
I would like to ask if the vendor will be notified once the Goods Receipt was generated?
Thanks.
By default, it won’t be notified. However, you can potentially configure output determination to send an email to a vendor after goods receipt.
How is this done?
Do I have to check the GR Base IV indicator ( PO : ME21N ) to use ERS Process?
Yes,because invoice can be posted only if the customer is posting GR for the goods received.
RT ^^^
Nice document clearly explained step by step, thank you.
Guys,
I have done the all configuration about ERS and i have change display to optional field ” AutoEvalGRSetmt Del.” in vendor master data but still ” AutoEvalGRSetmt Ret.” field showing as a display i want to do as optional field ” AutoEvalGRSetmt Ret.” in vendor master data please help to do this changes.
Can this be done for all Purchase Orders at one or does the buyer need to select which PO’s will go through this system
Thank you very much. Very helpful.
Inforecord should be consignment right?
No, it can be anything whether it is Consignment, standard, sun contracting or Pipeline. It works for every scenario.
Is automatic ERS Invoice configurable?
Hi, How do you items in MRRL that are marked as non postable get posted.
I understand why these are not postable, but I need them posted to the vendor.
Thank you
Is it possible to enter vendor invoice number during ERS?
In ERS, invoice posted is represented as Credit memo or debit memo to supplier?