
 Welcome to the tutorial on SAP Absence Types configuration. In the tutorial on SAP Time Management infotypes, we introduced you to the absences infotype. We also explained that an organization may have different SAP absence types, for example, Earned leave and Sick leave. Each absence type is essentially a subtype of the infotype. In this tutorial, we will show you how to create a new absence type. Once the absence type has been defined, there are two other significant configuration steps – Deduction rules and Counting rules – which we will cover in subsequent tutorials. While the configuration of deduction rules is relevant only for those absence types that must be deducted from an absence quota, the configuration of counting rules is mandatory for all absence types. Without this, an absence type cannot be used.
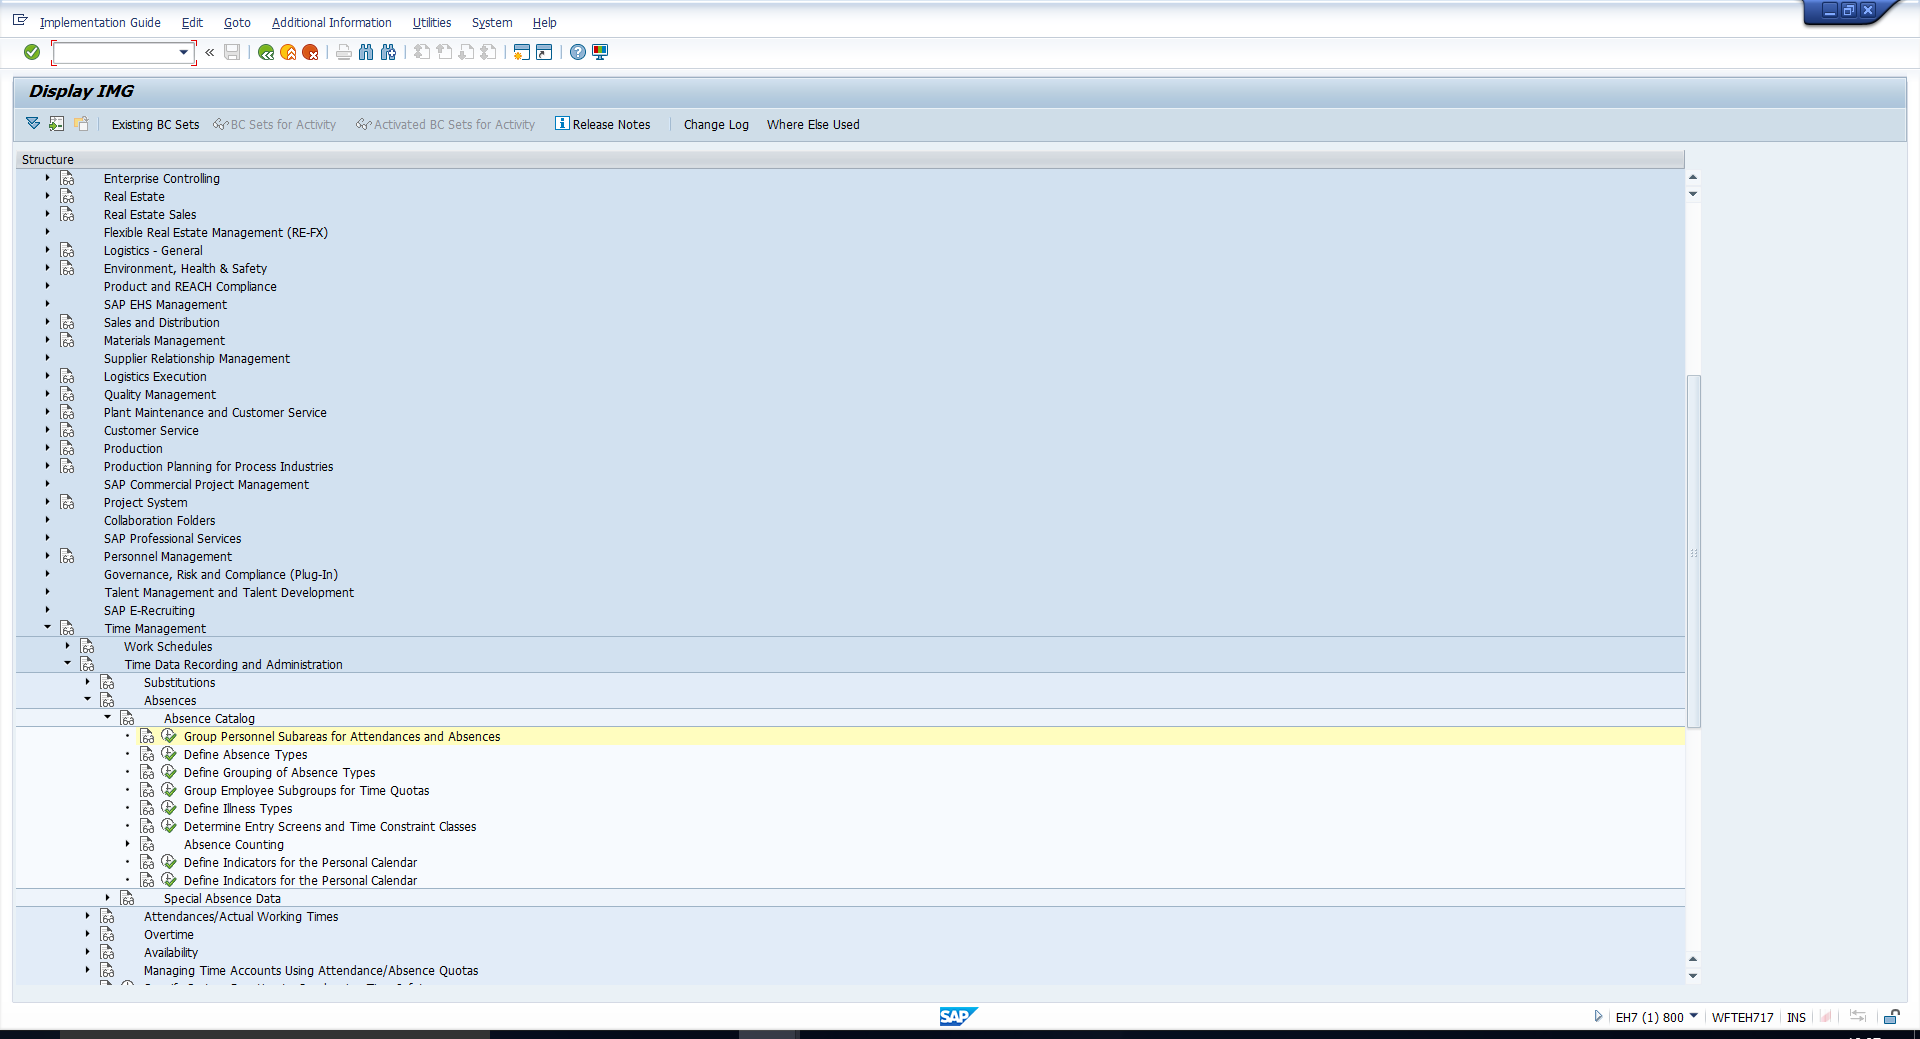
Group Personnel Subareas for Absences
The first step in the configuration of SAP absence types is to group Personnel subareas for Absence /Attendance types. This means that all personnel subareas that have the same SAP absence types and attendance types must be assigned the same grouping. Note that this is a common grouping for both absences and attendances. This implies that if two personnel subareas have the same set of SAP absence types, but different attendance types, you will need to assign two different groupings to these personnel subareas.
To assign this grouping, enter transaction code SPRO and follow the IMG path:
Time management – Time data recording and Administration – Absences – Absence catalog – Group Personnel Subareas for Attendances and Absences
This path has also been depicted in Figure 1.
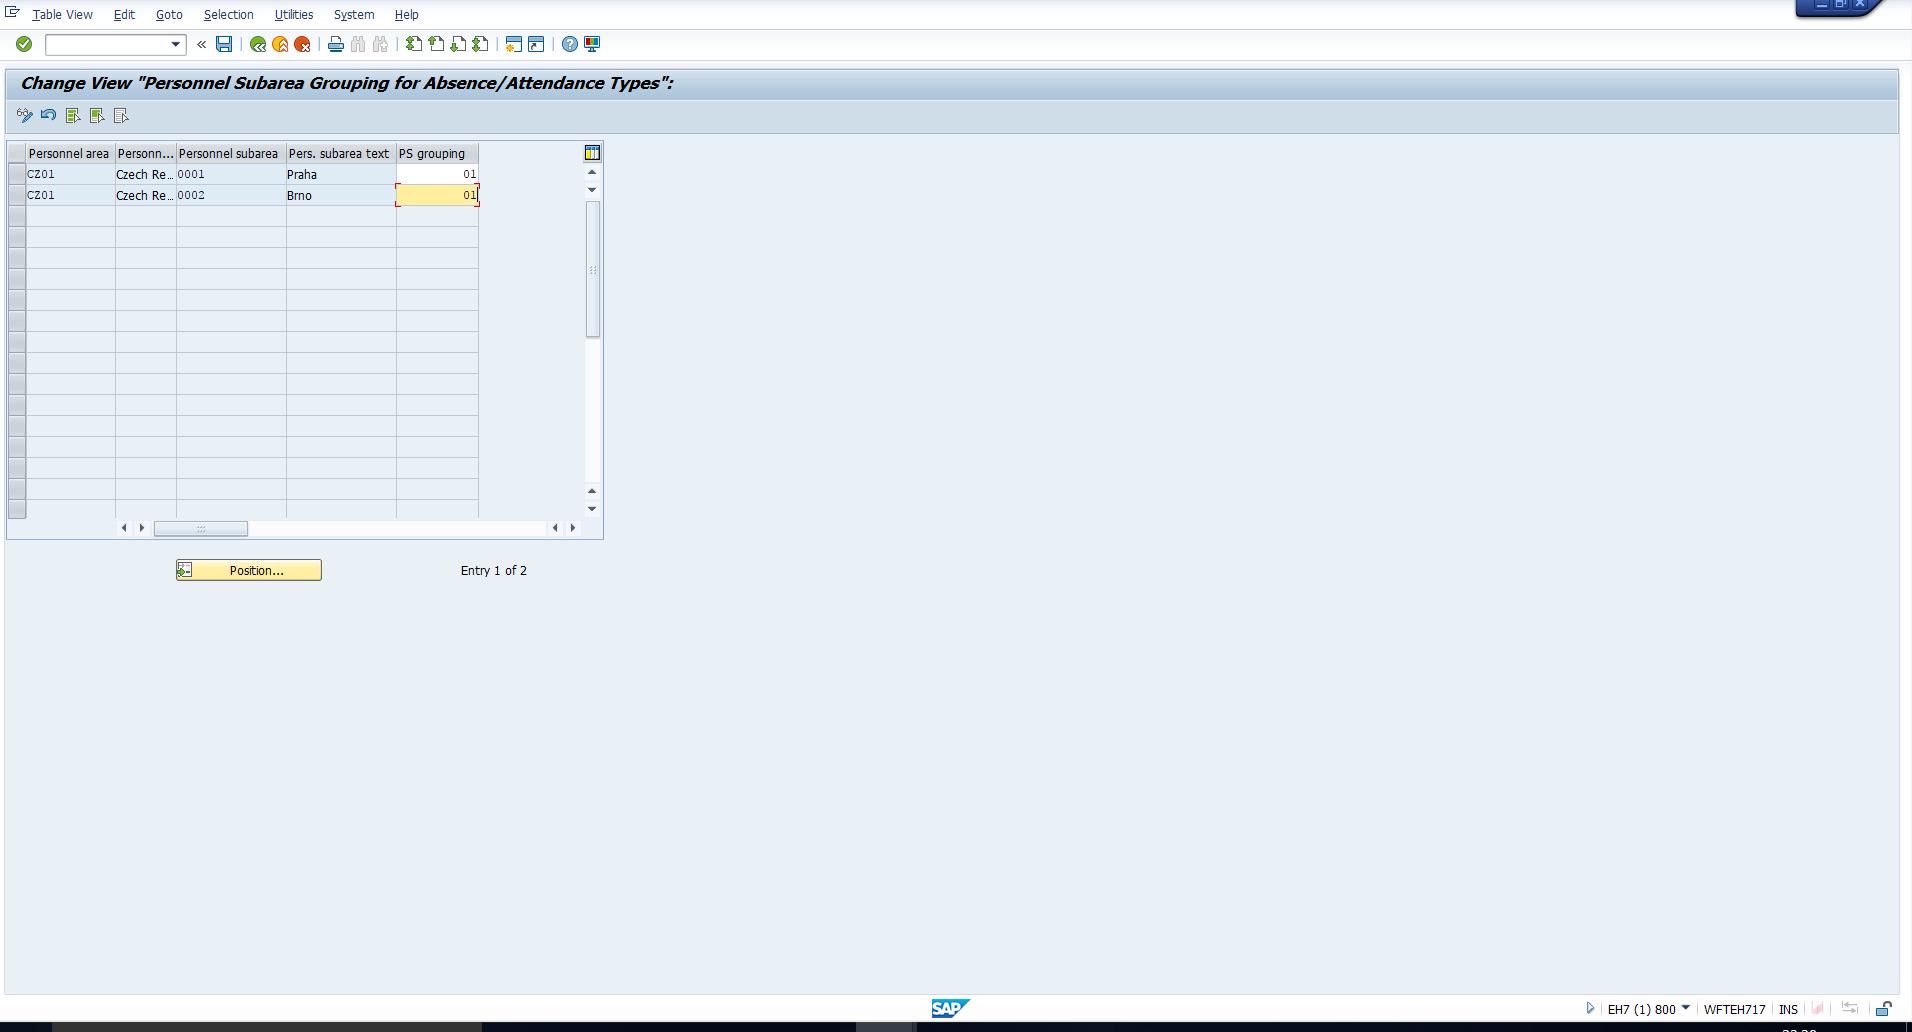
This takes you to the table in Figure 2, where you should assign a two-digit grouping to each Personnel Subarea. Assign a suitable grouping and then save the data.
Define SAP Absence Types
Next, follow the IMG path depicted in Figure 3, which has also been mentioned below:
Time management – Time data recording and Administration – Absences – Absence catalog – Define Absence Types
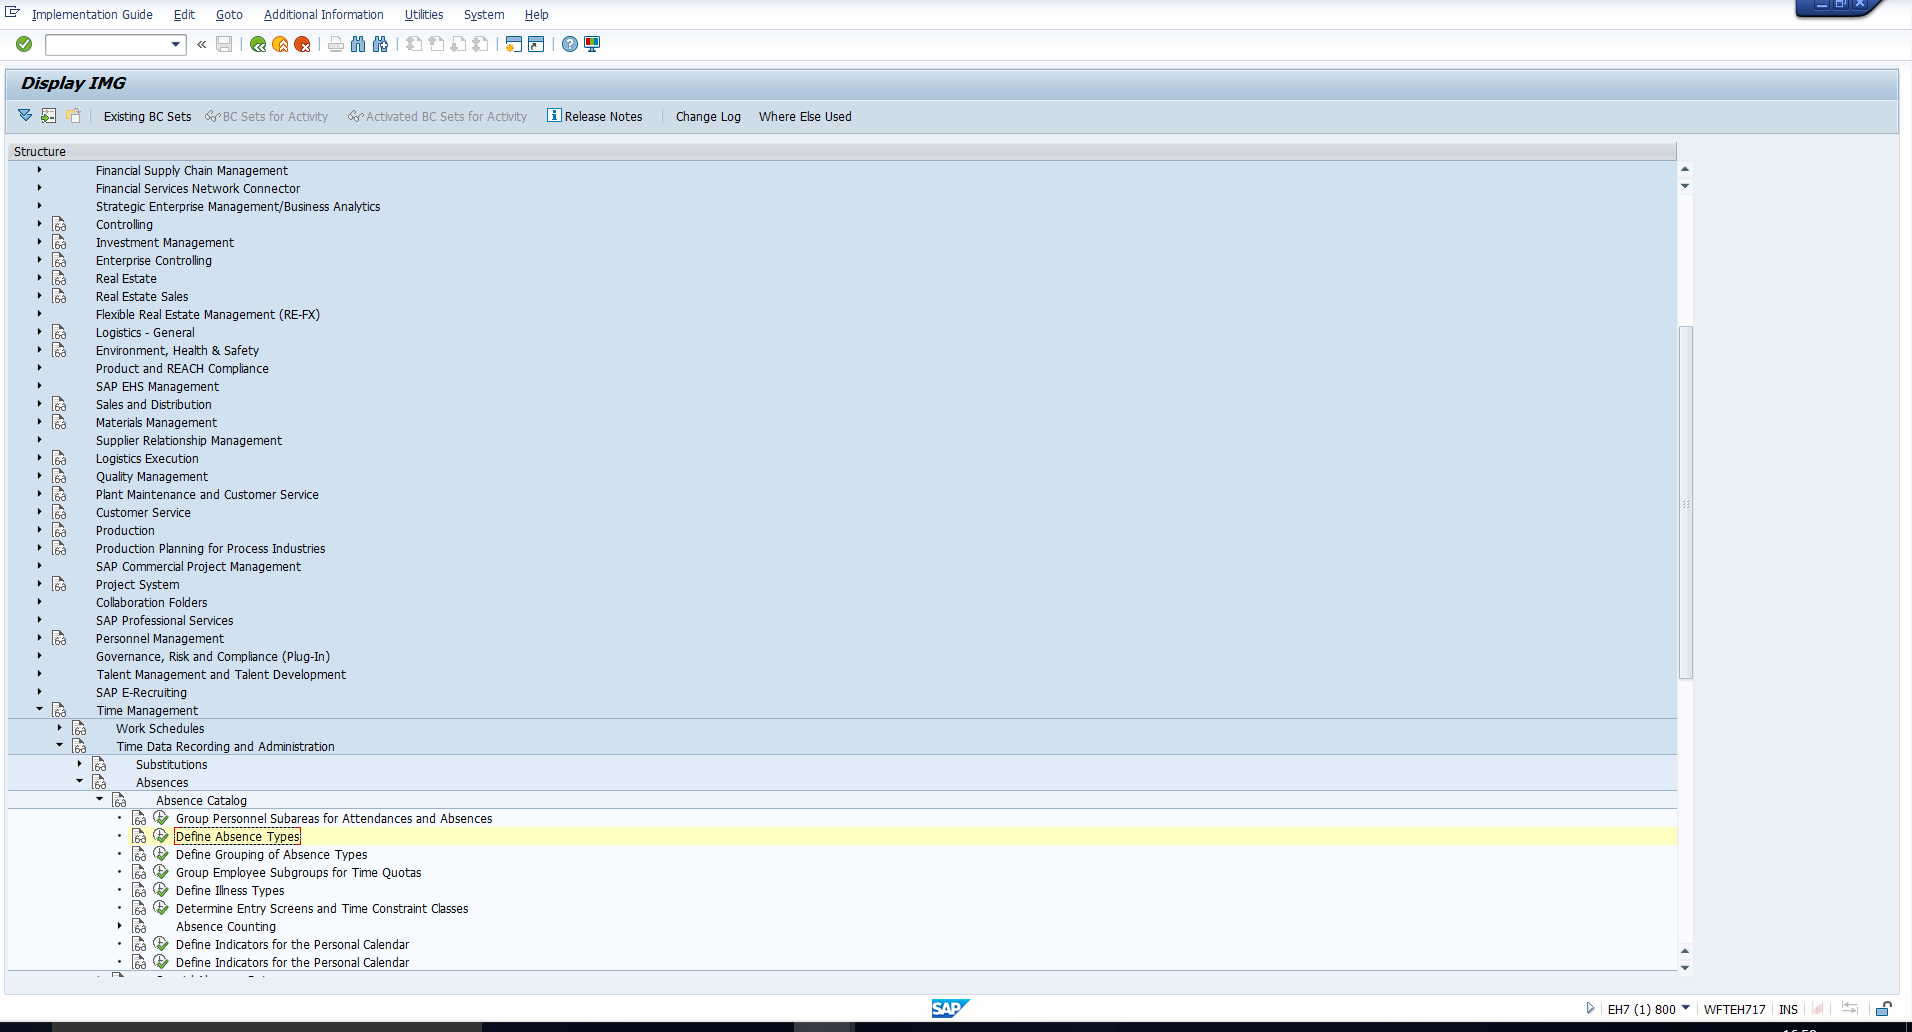
Execute the highlighted activity. You will then see the view that has been shown in Figure 4.
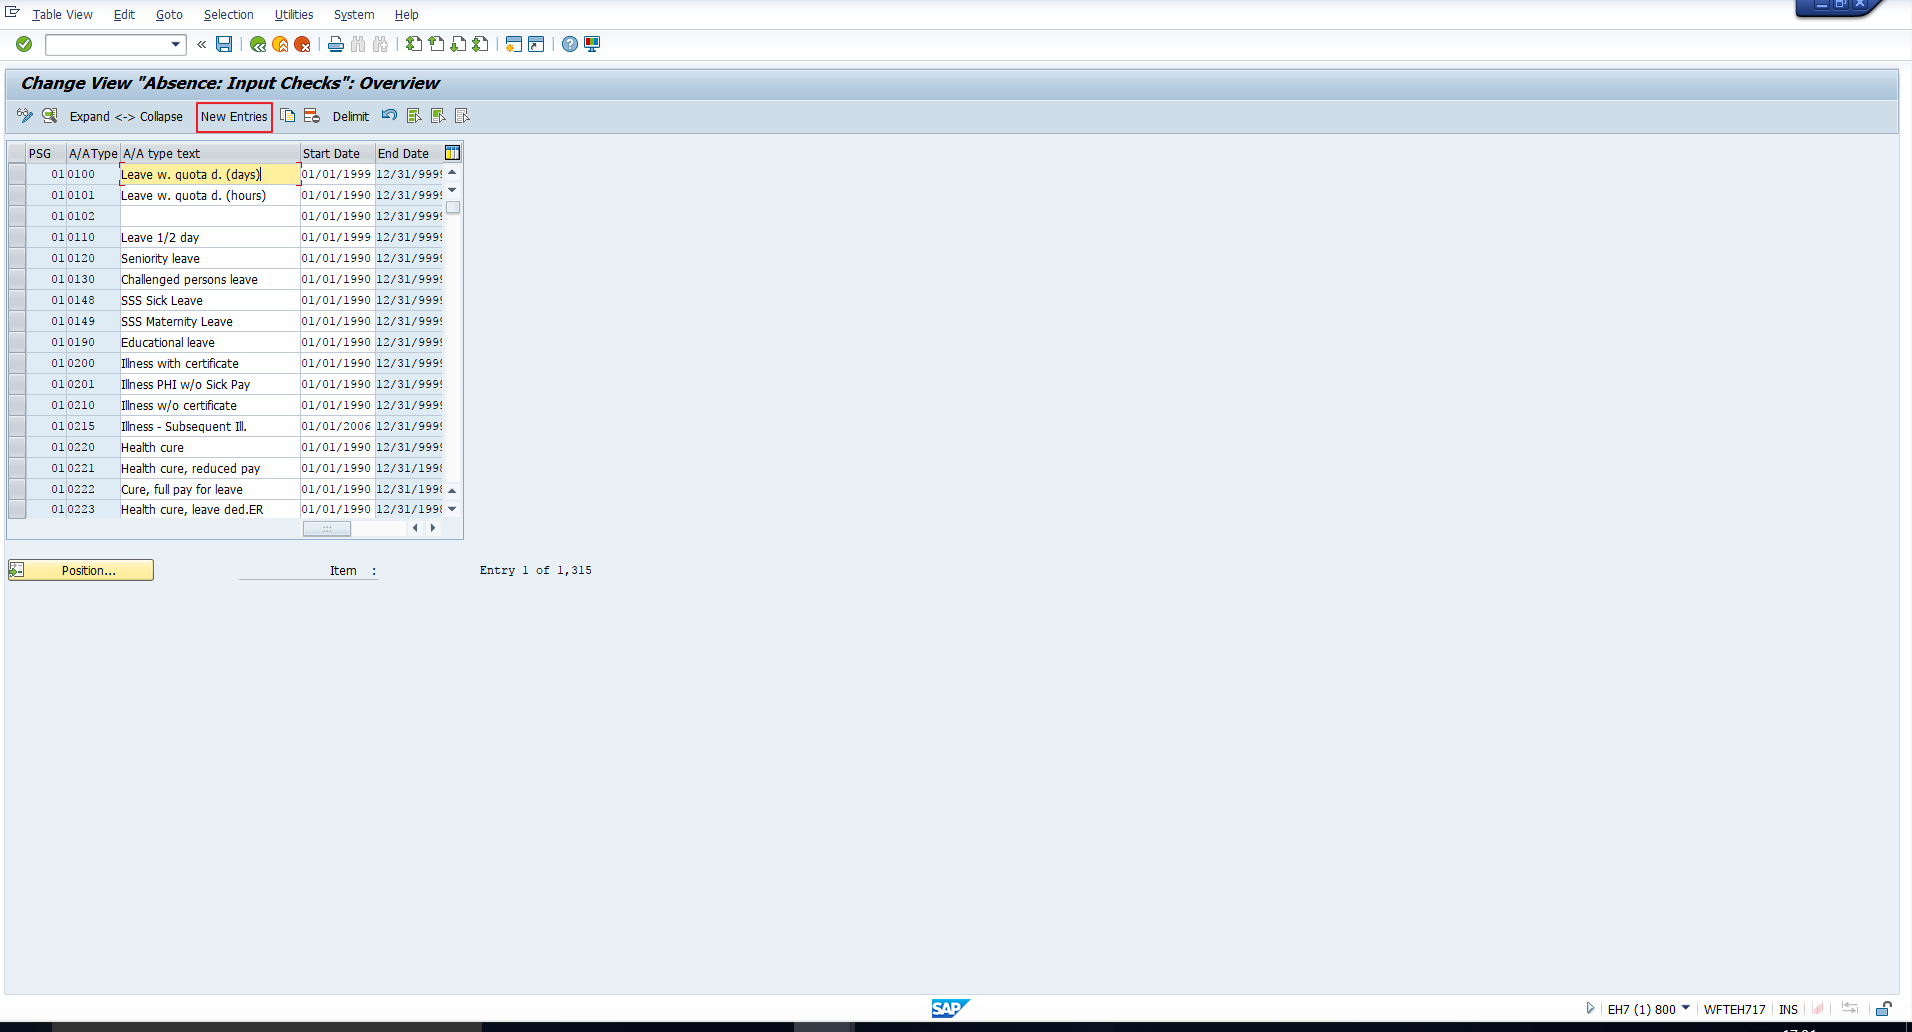
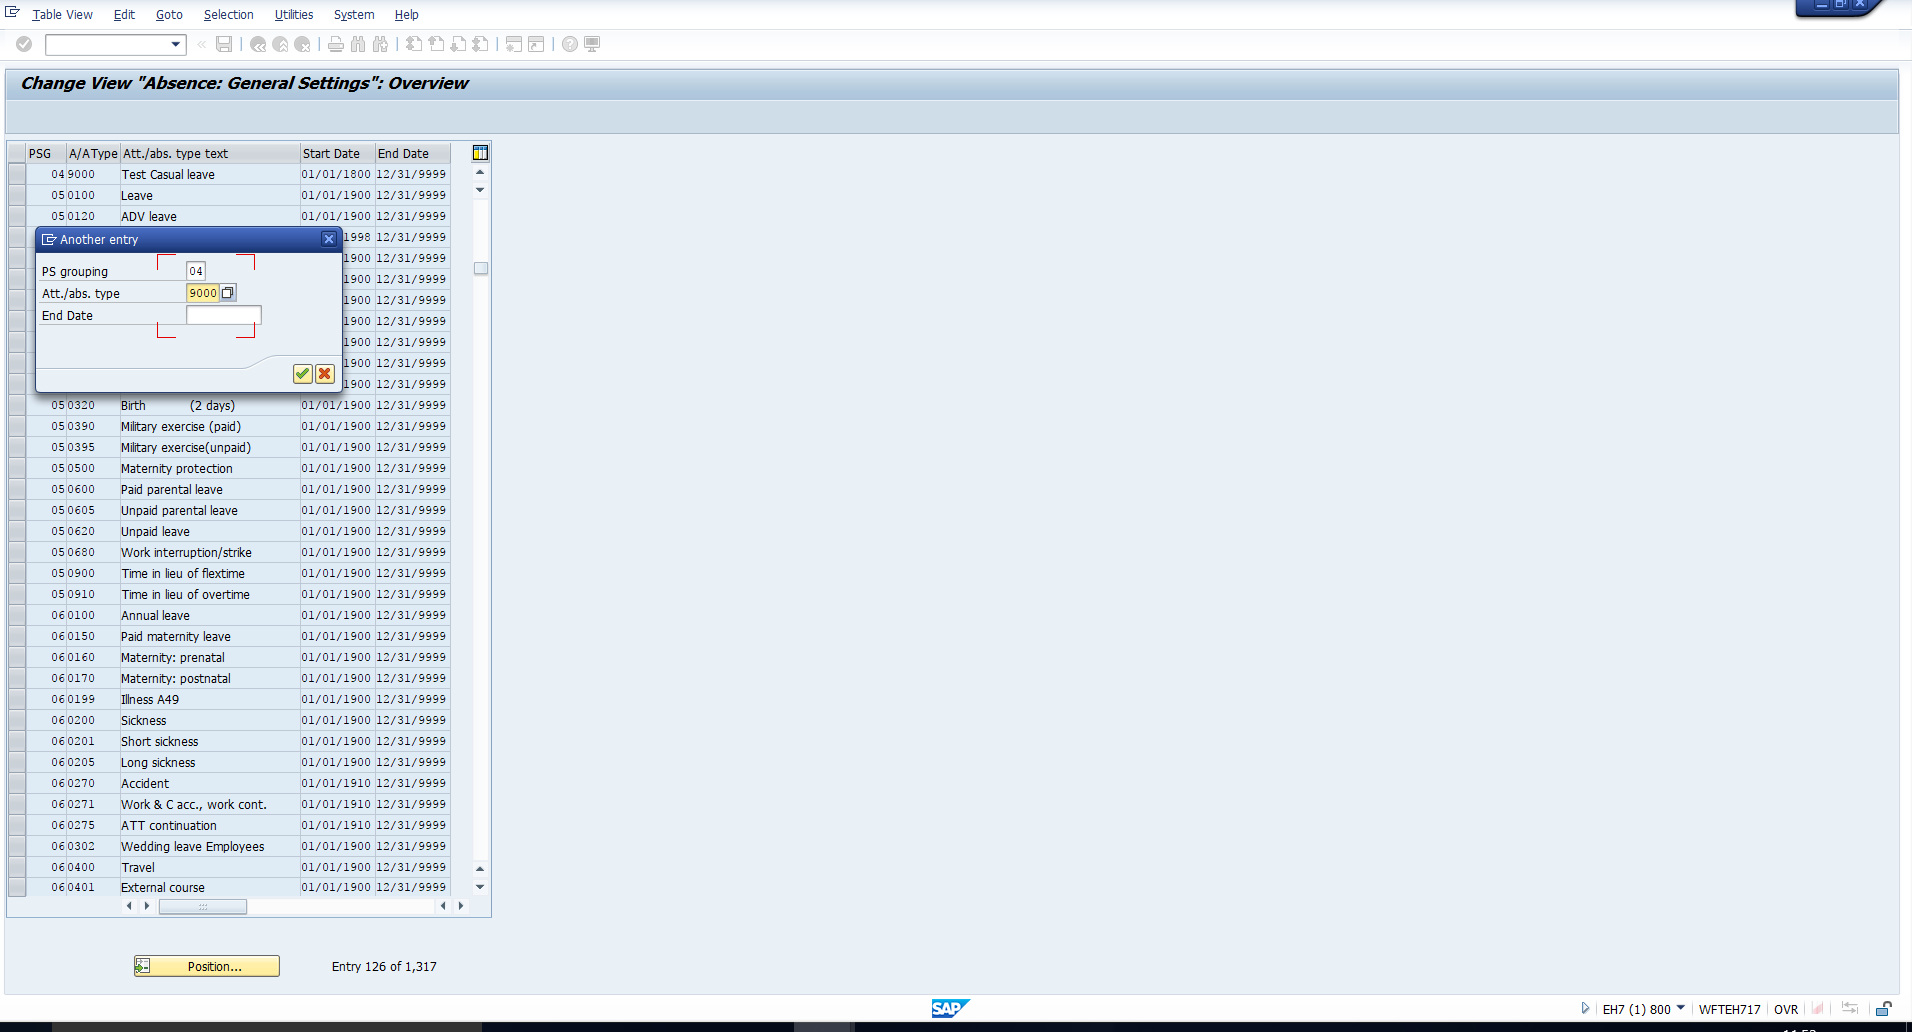
Here you see an overview of all SAP absence types configured in the system. To define a new absence type, you can copy an existing absence type using the Copy icon. Via this mode, all the settings get copied from the reference absence type. Hence you should use this if you want to create an absence type whose characteristics are similar to an existing one.
Alternatively, you can click on the ‘New entries’ button that has been highlighted in the screenshot.
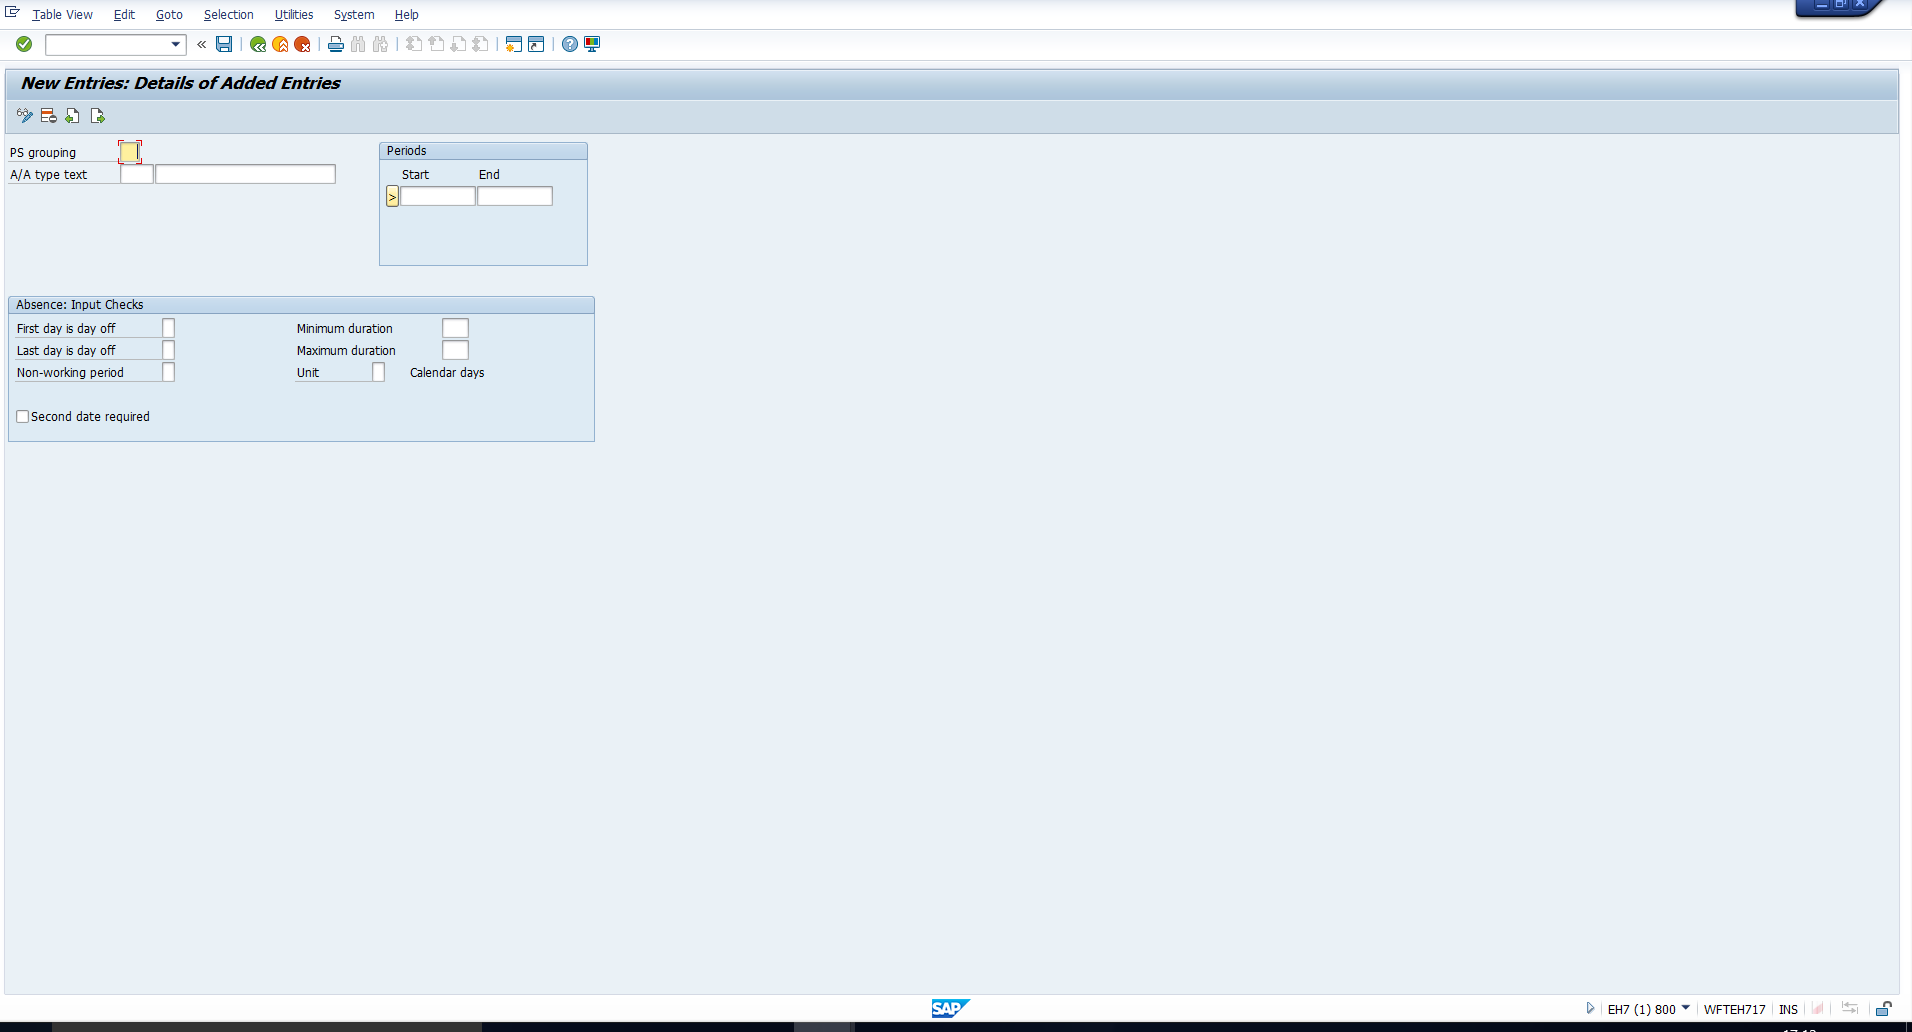
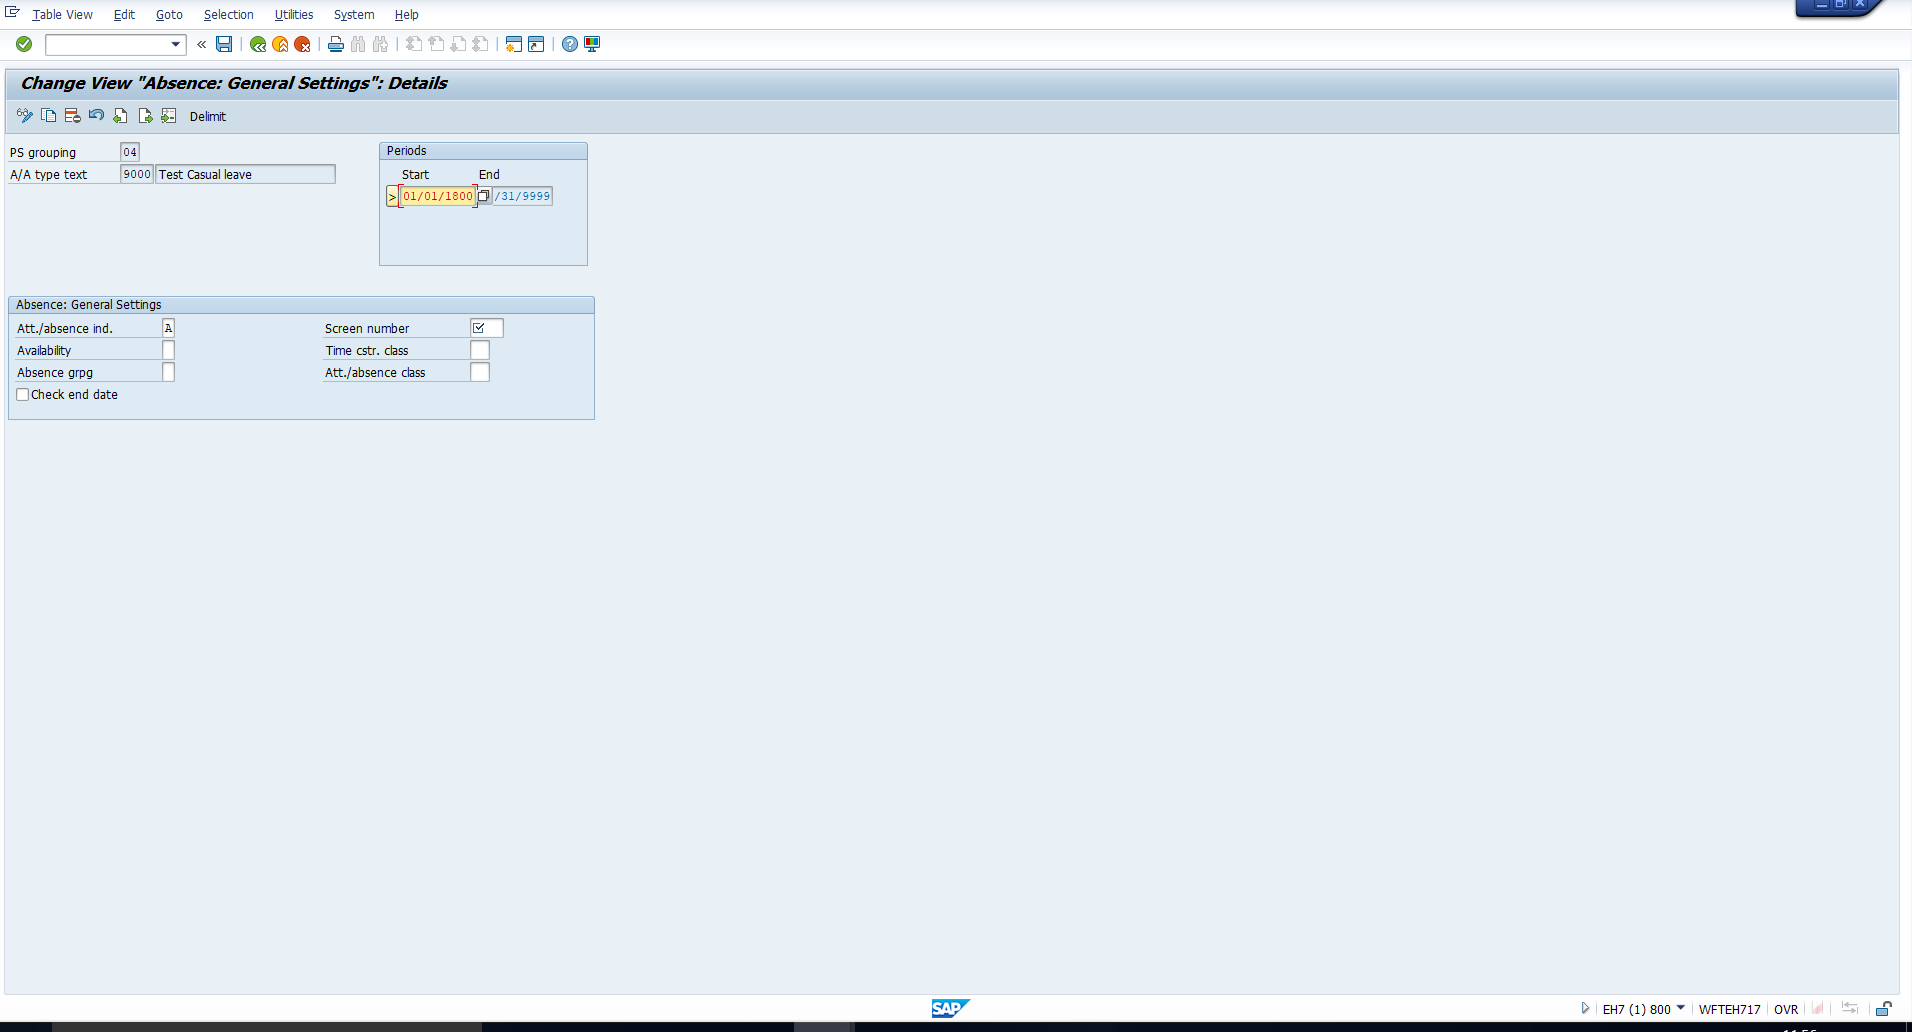
In the screen that follows, you can see the information that must be entered for the new absence type. You can refer to the screenshot in Figure 5. Let us run through these fields.
PS grouping
Specify the Personnel Subarea grouping for which the new absence type is applicable. This refers to the Personnel subarea grouping for absence and attendance types, which we covered in the previous section.
A/A type
Enter a unique 4-character code to define the absence type, and a text of maximum 25 characters to describe the absence type.
Start date and End date
These define the validity period of the absence type. Ensure that the start date that you enter here is the same as or earlier than the date effective which Time management master data will be recorded in SAP. If you do not know this date, you can enter the start date as 01.01.1800 (in mm.dd.yyyy format). The end date is usually kept open-ended as 12/31/9999 (in mm.dd.yyyy format). It should only be delimited if the absence type becomes obsolete and is no longer required in the organization.
The next set of fields belongs to the Absence: Input checks section. As the name suggests, all the below fields are used to validate the data entered by the user in the Absences infotype. We will now take you through these fields.
First day is day off
This indicator defines the system’s reaction if the user enters an absence wherein the first day is a day off as per the employee’s work schedule.
You can enter any of the below codes, the meaning of which has been explained alongside:
E – The absence entry is rejected and an error message is displayed
W – The entry is accepted but a warning message is displayed
S – The entry is accepted but an informational message is displayed
Blank – The entry is accepted, without any message being displayed
Last day is day off
This indicator controls the system’s reaction if the user enters an absence where the last day is a day off as per the employee’s work schedule.
Again, you can enter any of the below values:
E – The absence entry is rejected and an error message is displayed
W – The entry is accepted but a warning message is displayed
S – The entry is accepted but an informational message is displayed
Blank – The entry is accepted, without any message being displayed
Non-working period
This indicator defines the system’s reaction if you enter periods of absence which are entirely non-working periods according to the employee’s work schedule.
Again, you can enter any of the below values to determine the system reaction:
E – The absence entry is rejected and an error message is displayed
W – The entry is accepted but a warning message is displayed
S – The entry is accepted but an informational message is displayed
Blank – The entry is accepted, without any message being displayed
Minimum duration
In this field, you should enter the minimum permitted duration (in days) of the absence. Enter ‘000’ if the absence can last for less than one day.
Maximum duration
Here you should enter the maximum permitted duration (in days) of the absence. Enter ‘000’ if the absence must last for less than one day. Enter ‘999’ if there is no upper limit on the duration of the absence.
Unit
This field is used in conjunction with the previous two fields. The value entered here is used to determine which of the three kinds of days should be used to check the minimum and maximum duration of the absence. You can select any of the below values:
Blank or K – Calendar days
This is the number of calendar days in the absence period, irrespective of the planned work schedule of the employee. We have explained this concept with an example in the tutorial on SAP Time Management infotypes.
A – Absence days
This is the number of planned working days in the absence period. This depends on the employee’s work schedule. We have explained this concept with an example in the tutorial on SAP Time Management infotypes.
R – Payroll days
This is the number of days which will be deducted from the corresponding absence quota. The calculation of this value depends on the organization’s policy. You can refer to our explanation of the Quota used field in the tutorial on SAP Time Management infotypes, as these two field names are conceptually similar.
Second date required
Select this checkbox to mandate that the user must specify the end date of the absence record, whenever he/she creates a new record or copies an existing one.
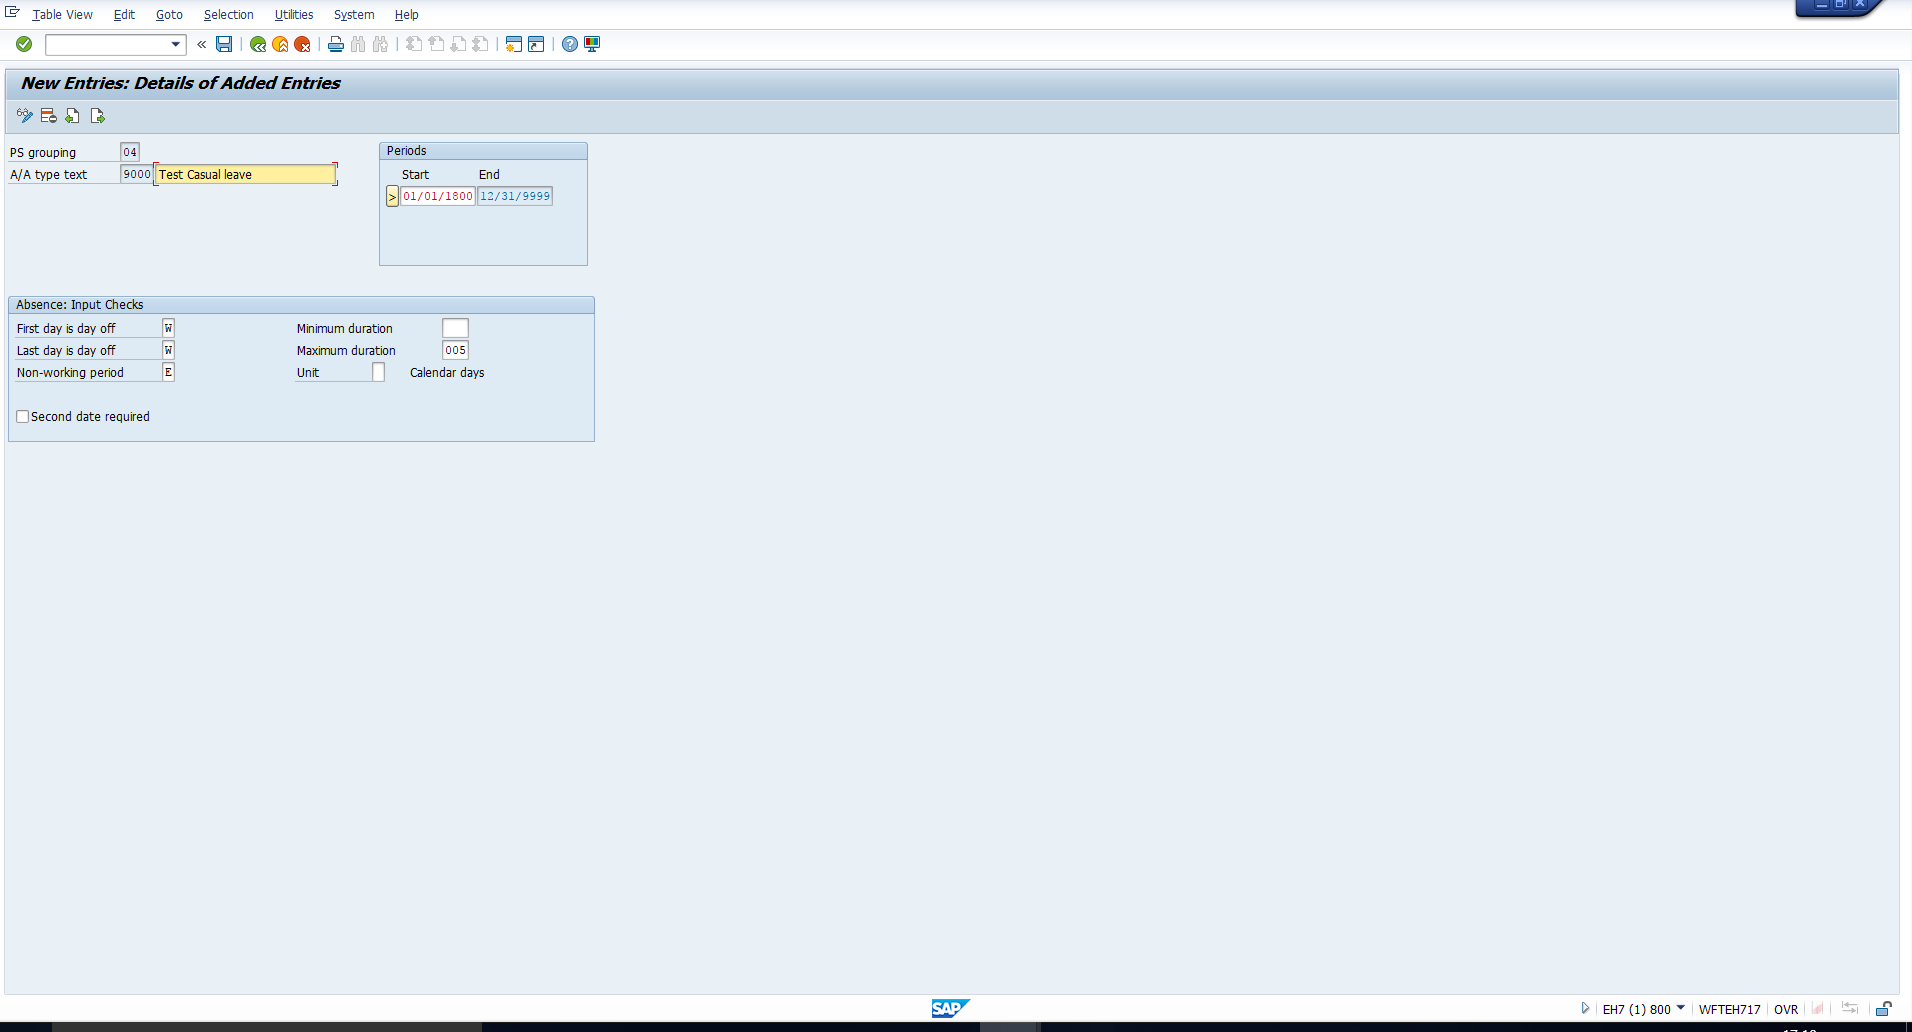
Once you enter suitable values in all the above fields, as illustrated in Figure 6. In this example, we have created an absence type ‘Test Casual leave’, for which the user can enter a maximum duration of 3 calendar days. Also, a Warning message will be displayed if either the first day or the last day is a day off. If the entire absence period is non-working as per the Work schedule, an Error message will be displayed and the entry will be rejected. Once you enter the details, you must save the data by clicking on the Save icon.
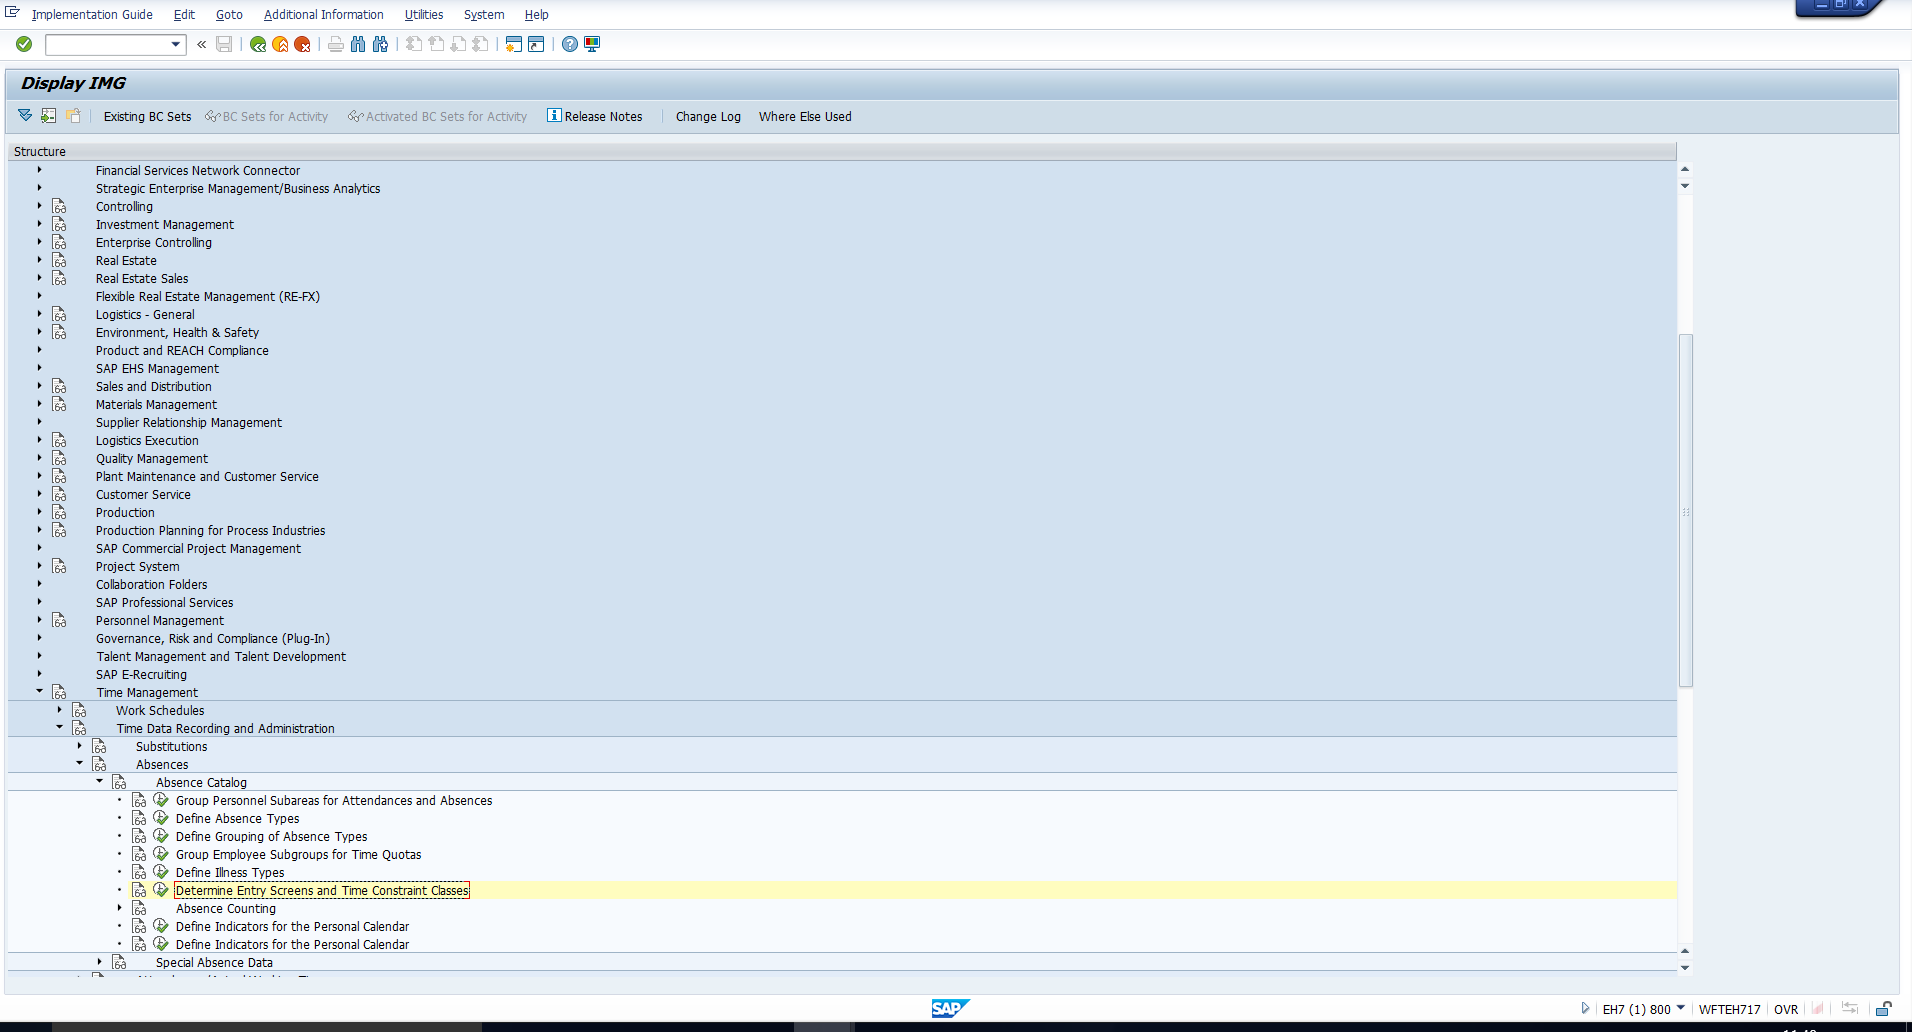
Determine Entry Screens and Time Constraint Classes
Next, follow the IMG path depicted in Figure 7. The path is:
Time management – Time data recording and Administration – Absences – Absence catalog – Determine Entry screens and Time constraint classes
On executing this activity, you will see the screen shown in Figure 8.
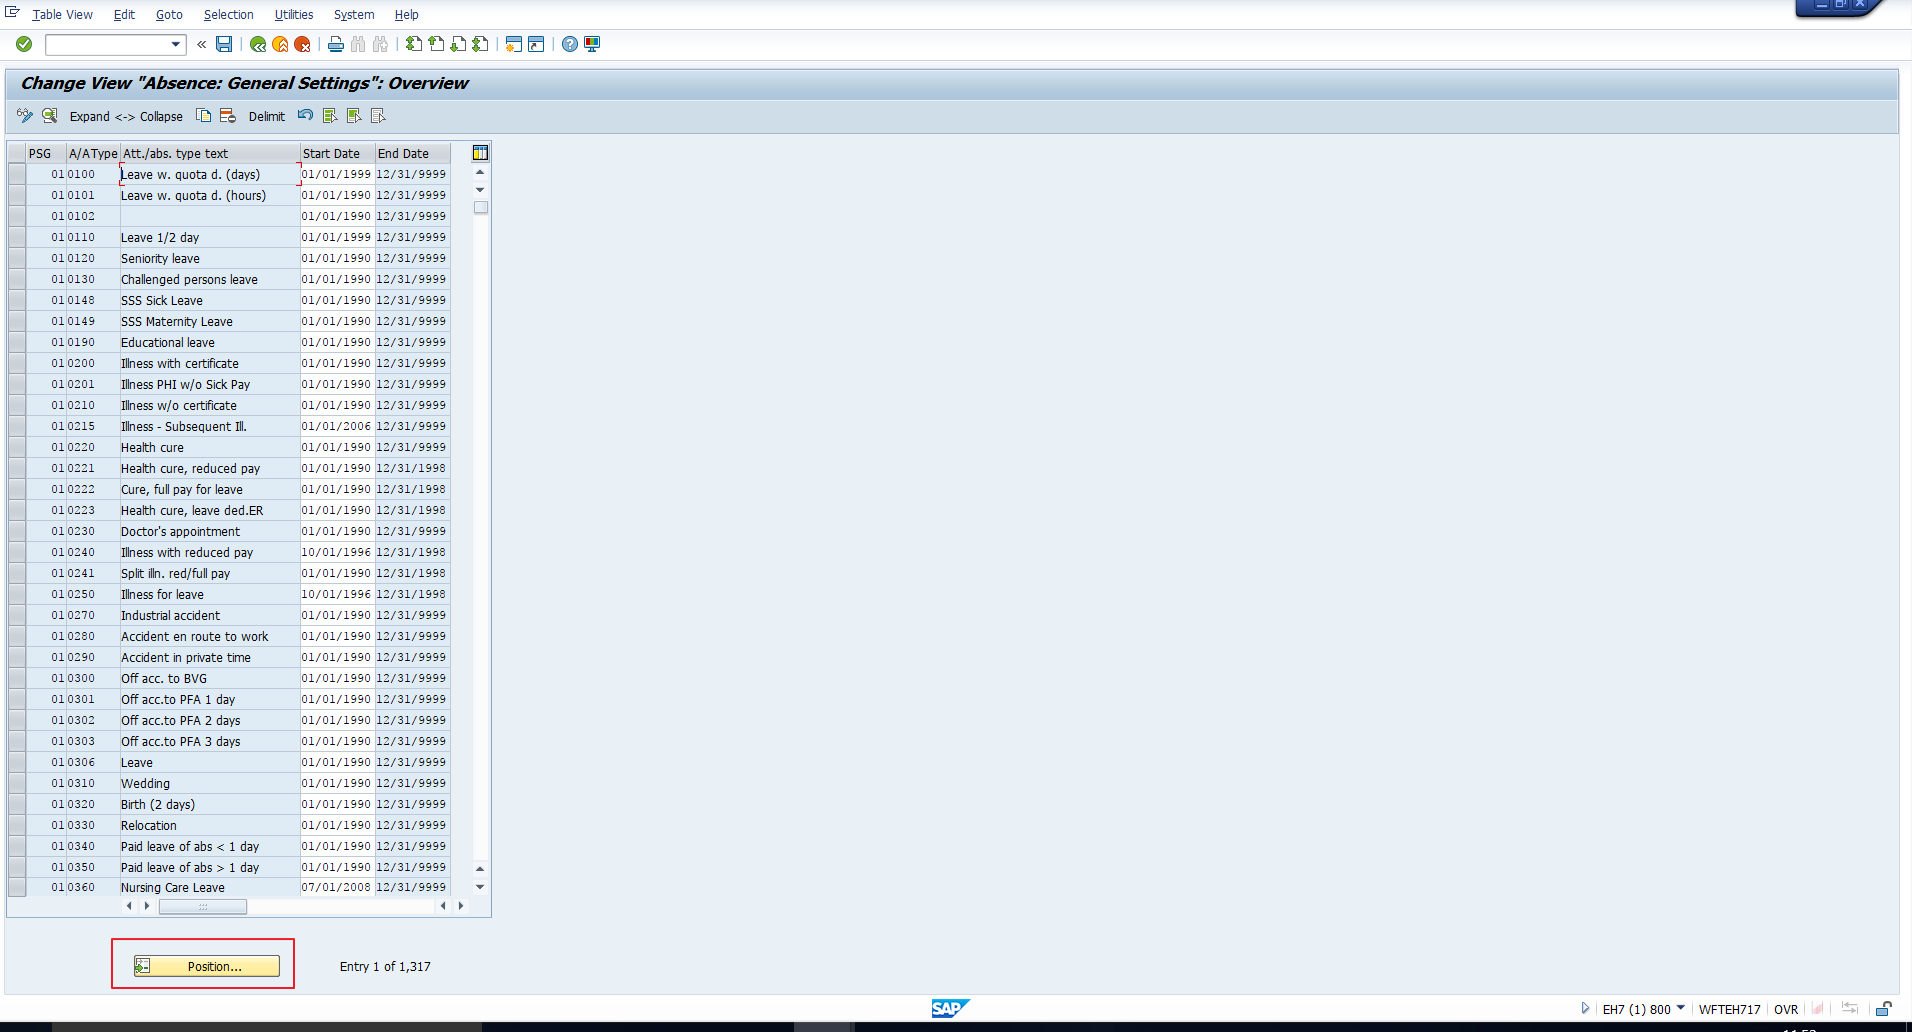
With the help of the Position button, highlighted above, search for the newly created absence type. This has been demonstrated in Figure 9.
Then, select the entry and click on the Details icon, highlighted in Figure 10.

The detailed screen has been captured in Figure 11.
We would like to focus on three fields in this screen:
Att./absence ind. – This indicator should be ‘A’ for absences and ‘P’ for attendances.
Screen number – This is used to specify the entry screen for the Absences infotype. The layout of the infotype will vary based on the entry you make here. SAP provides various standard screens. The two most commonly used are:
2000 – Use this if Quota deduction is not required for the absence type
2001 – Use this if Quota deduction is required for the absence type
In this example, let’s assume that Quota deduction is not required, hence we will assign screen 2000 to the absence type, as shown in Figure 12.
Time cstr. Class – We recommend that you go through the tutorial on Time Constraint classes to understand the significance of this field. Enter the desired Time constraint class as illustrated in Figure 12.

After entering the appropriate values, click on the Save icon.
Now, understandably, you’d like to test this new absence type so you can verify that the configuration is correct. However, as we mentioned at the beginning of this tutorial, an absence type can be considered ready-to-use only after the configuration of counting rules. So please look out for our upcoming tutorial on counting rules, in which we will test this absence type.
—
Did you like this tutorial? Have any questions or comments? We would love to hear your feedback in the comments section below. It’d be a big help for us, and hopefully it’s something we can address for you in improvement of our free SAP HR tutorials.
Navigation Links
Go to next lesson: SAP Absence Counting Rule
Go to previous lesson: SAP Time Constraint Class
Go to overview of the course: SAP HR Training
Hi Tania.
Will definitely add this website to my favourites.
I have lots of “How to… in SAP” documents but have never managed to find the time to share them online, so well done for doing so yourself.
Your absence tutorial info has helped me discover the box I need to tick for my latest requirement, so thank you very much and keep up the good work!
Thank you for the very encouraging feedback, Richard. We are glad that you find the tutorials useful.
Thank you very much Tania, for this explaintation. Really helpfull!
Please help to have full trainings on time management..
A good explanation even for beginners