
 Welcome to the tutorial about SAP Personnel Structure. This tutorial is part of our free SAP HCM course. SAP Personnel Structure describes the employees’ positions in a company from the individual employee’s view. It is one of the main structures in SAP HCM. SAP Personnel Structure has the following key components.
Employee Group – is used to classify employees as a whole and to group them based on their pay and time benefits.
Example:
- Regular
- Probationary
- External
- Expatriate
Employee Subgroup – a subdivision of employee group that allows to further distinguish employee according to specific benefits.
Example:
| Employee Group | Employee Subgroup |
| Regular | Semi-monthly Paid |
| Monthly Paid | |
| Probationary | Semi-monthly Paid |
| Monthly Paid | |
| External | Consultant |
| Outsourced | |
| Expatriate | Management |
| Non-Management |
Payroll Area – is a unit that groups together employees that will have their payroll run at the same time. This is a key used for payroll processing.
Example:
- Monthly Paid
- Semi-monthly Paid
- Weekly Paid
Additional SAP Personnel Structure component is work contract.
Work Contract – a field used for additional reporting that allows to group employees together.
Example:
- Full-time
- Part-time
- Temporary
- Shareholder
Employee group, subgroup and payroll area may vary per organization as they will depend on the current structure and process. Based on these factors SAP Personnel Structure should be designed in such a way that it is aligned with what the organization currently has. SAP Personnel Structure is very significant especially when Time module and Payroll is implemented because it usually is the basis for the employee groupings and processing.
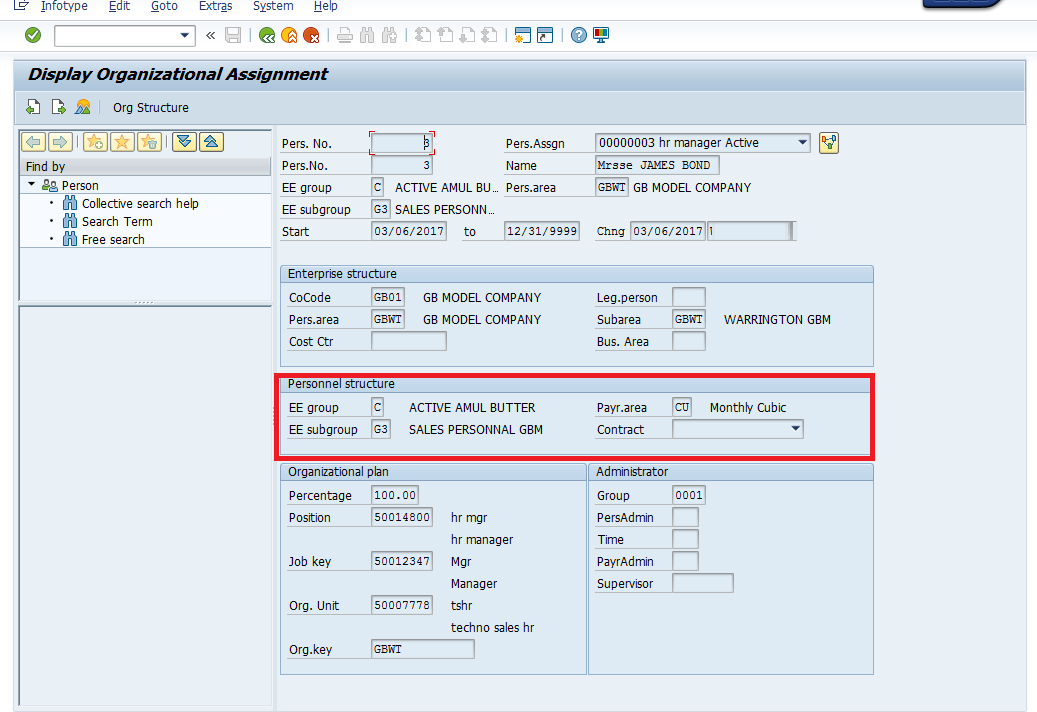
The Personnel Structure is stored in the Infotype 0001 – Organizational Assignment of the employee. It can be displayed via transaction code PA20 or from SAP Menu:
Human Resources -> Personnel Management -> Administration -> HR Master Data -> PA20 – Display
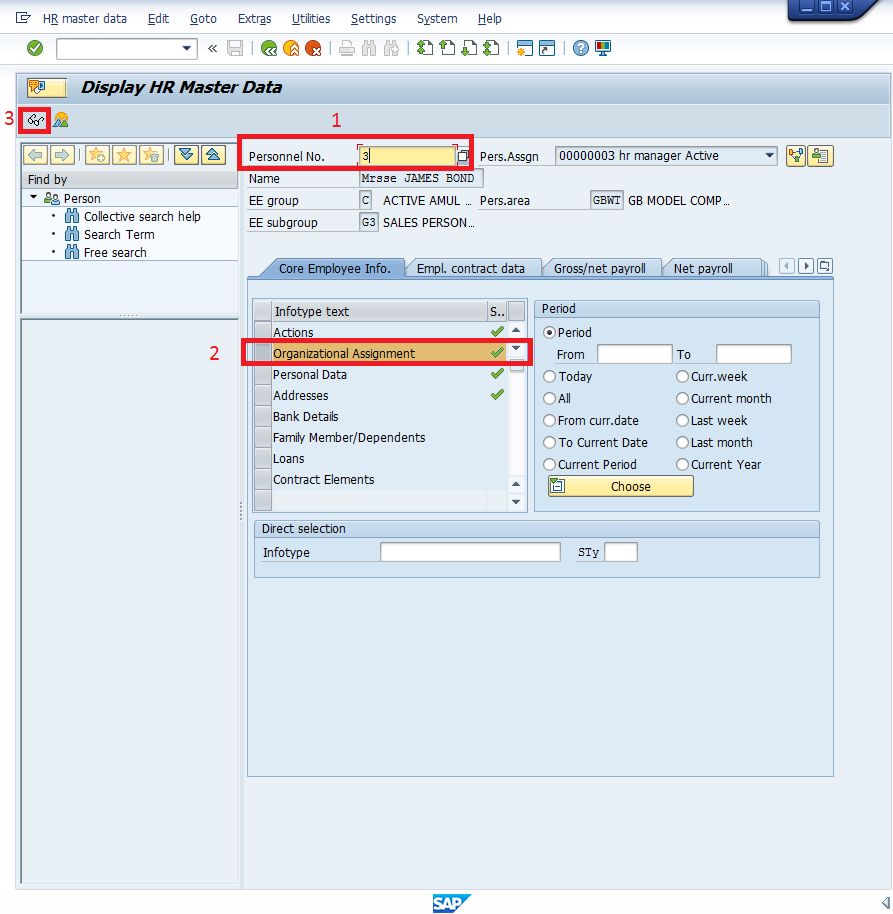
You need to do the following after starting PA20 transaction:
1. Enter a sample personnel number.
2. Then select the Organizational Assignment, the green check means that there is an existing record in the infotype.
3. Click on the details view – the glasses icon to view the infotype record.
SAP Personnel Structure Configuration
Let’s discuss configuration of elements forming SAP Personnel Structure.
1. Create Employee Group
Employee group key contains only one alphanumeric character and text of 20 characters. To create a new employee group. you need to execute the below transaction code and navigate to this menu path:
Transaction code: SPRO
Menu path: Enterprise Structure -> Definition -> Human Resources Management -> Employee Groups
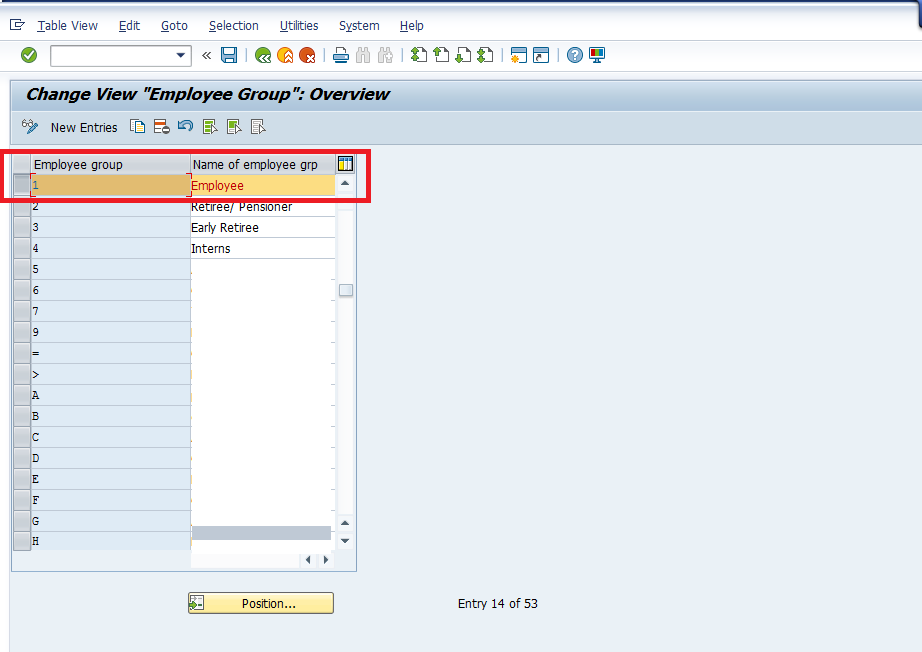
The following information is maintained for the Employee Group:
- Employee Group key – should be 1 unique key.
- Name of Employee Group – description that is displayed in Infotype 0001 Organizational Assignment.
2. Create Employee Subgroup
Employee subgroup key is two alphanumeric characters and the name is 20 characters. To create a new employee subgroup, you need to execute the below transaction code and navigate to this menu path:
Transaction code: SPRO
Menu path: Enterprise Structure -> Definition -> Human Resources Management -> Employee Subgroups

The following information is maintained for the Employee Subgroup:
- Employee Subgroup – two-characters unique key.
- Name of Employee Subgroup – description that is displayed in Infotype 0001 Organizational Assignment.
3. Assign Employee Subgroup to Employee Group
In this step, each employee subgroup is linked to the employee group. It limits the use of the employee subgroup within a certain employee group. This is also where the employee group / subgroup combination is activated to the specific countries it will be used in. To assign the employee subgroup to the employee group you need to execute the below transaction code and navigate to this menu path:
Transaction code: SPRO
Menu path: Enterprise Structure -> Assignment -> Human Resources Management -> Assign employee subgroup to employee group
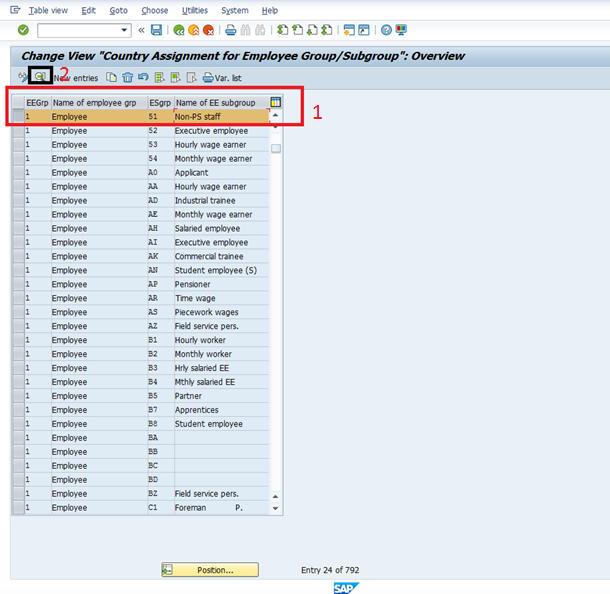
Assignment of the employee group and employee subgroup is configured with the following columns:
- EEgrp – Employee Group Key
- Name of Employee Group – automatically populated when Employee Group is entered
- ESgrp – Employee Subgroup key
- Name of Employee Subgroup – automatically populated when Employee subgroup is entered
To view the details per Employee Group and Employee Subgroup combination:
- Select one of the Employee group and subgroup combination.
- Then click details button or press F2 on the keyboard to view the list of countries where the employee group – subgroup combination is allowed.
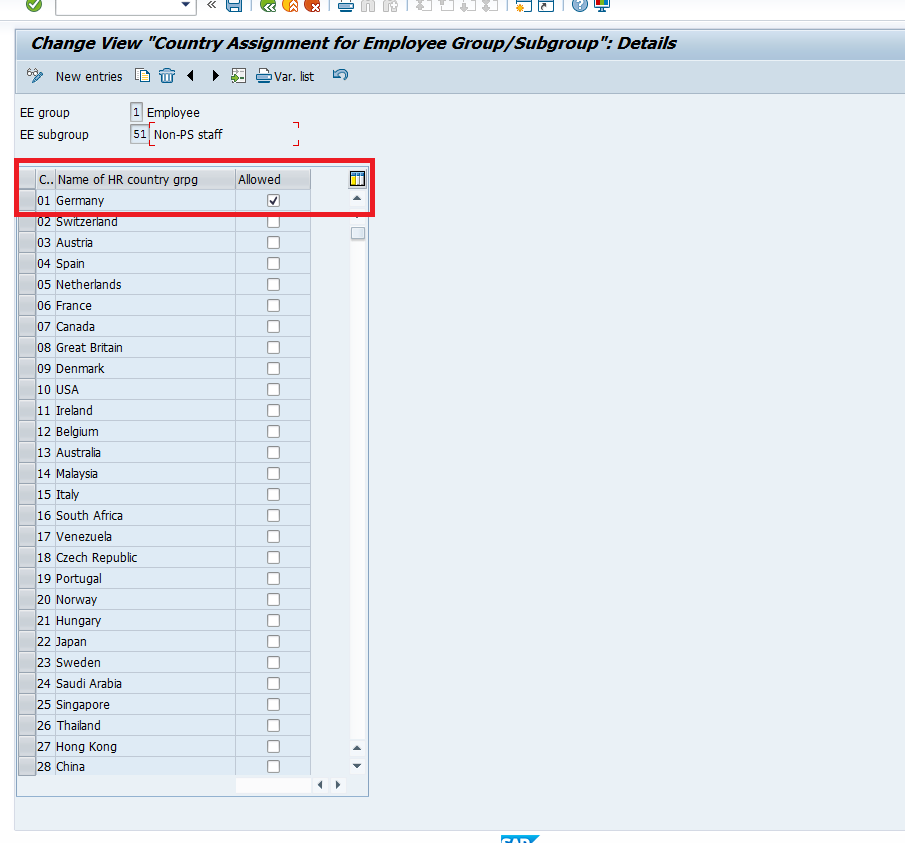
The country assignment of the Employee Group and Subgroup is defined with the following columns as explained below:
- Country Grouping – SAP standard key for each country
- Name of country grouping
- Allowed check box – identifier if combination is allowed per country
When checkbox is marked it means that the employee group – subgroup combination can be used for employees in that country.
For example, on the screenshot above:
Employee Group: 1
Employee Subgroup 51
This combination is only allowed to be used for Germany.
4. Create Payroll Area
Payroll area is a two characters alphanumeric key which is primarily used to run payroll for the employees assigned to a specific payroll area. To create the Payroll area, execute the below transaction code and navigate the following menu path:
Transaction code: SPRO
Menu path: Personnel Management -> Personnel Administration -> Organizational Data -> Organizational Assignment -> Create payroll area
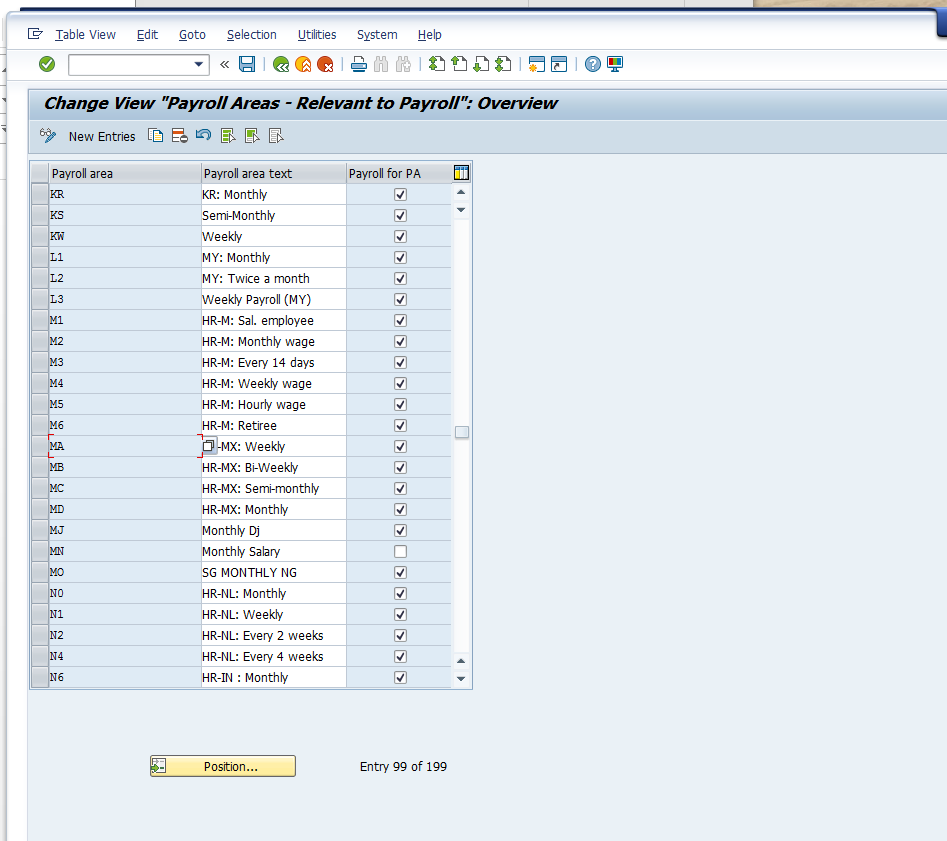
Payroll Area is defined in this table with the following information:
- Payroll Area – two-characters key
- Payroll Area Text – description of the payroll area
- Payroll for PA – flag to identify if the Payroll Area is subject for Payroll run if Payroll module is configured.
5. Check Payroll Accounting Area
Additional configuration for the Payroll area is to assign the period parameter and date modifier to be used for payroll run. To make the necessary changes, execute the transaction code mentioned below and navigate to the following menu path.
Transaction code: SPRO
Menu path: Personnel Management -> Personnel Administration -> Organizational Data -> Organizational Assignment -> Create payroll area
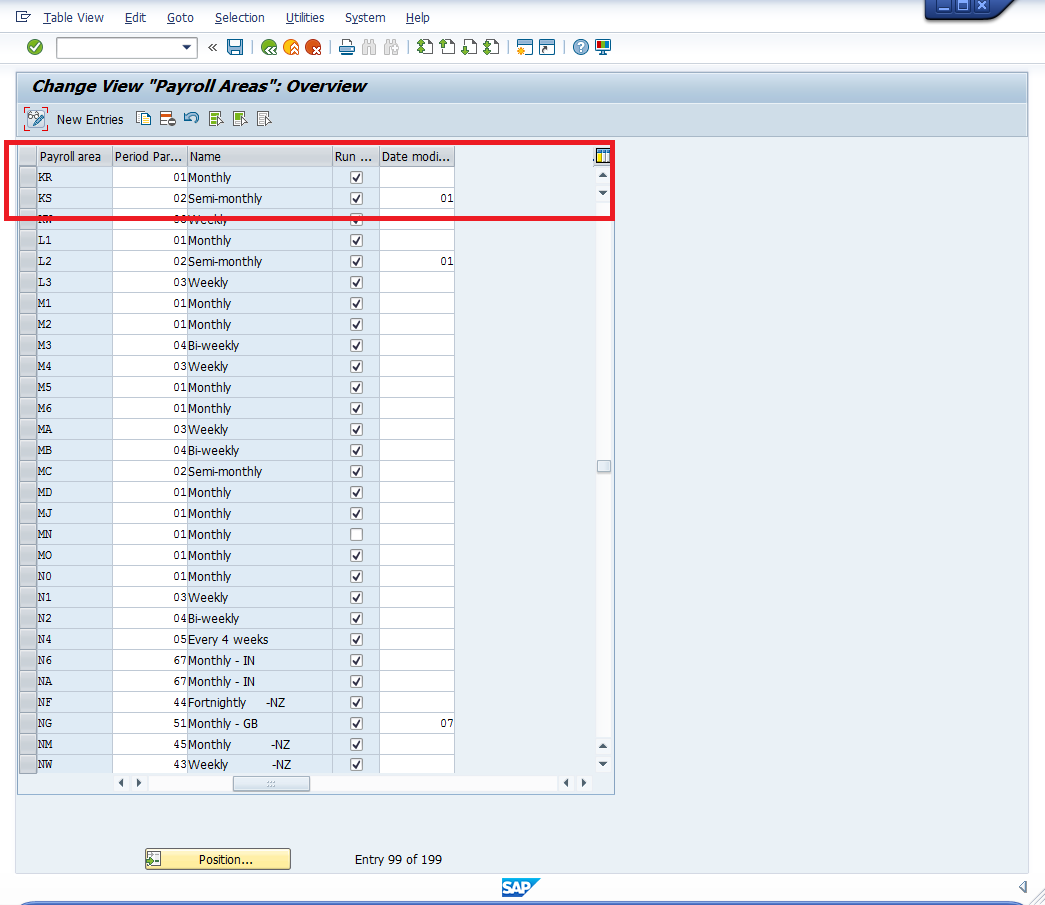
The following columns are maintained in this table:
- Payroll Area – two-characters key
- Period Parameter – determines the frequency of the payroll run
- Name – Period parameter name
- Run payroll flag – if payroll is run for the specified payroll area
- Date Modifier – used to link additional date type in a Payroll calendar, usually used to set payment date of the payroll upon generation of payroll periods
In the screenshot above, the payroll area ‘KS’ is assigned to period parameter 01 – Monthly which means that payroll is run monthly and the date modifier is 01 – Standard Modifier.
6. Check Default Payroll Area
Upon hiring a default Payroll Area can be assigned to the new employee using the feature called ABKRS. The feature contains an operation (text in pink, see the picture below) that is used to filter and identify which a particular default payroll area value to be populated in Infotype 0001 – Organizational Assignment. The feature may contain more operations depending on the design. Kindly refer to the below example for more details.
The feature can be directly accessed via transaction code PE03 or via below transaction code and the menu path.
Transaction code: SPRO
Menu path: Personnel Management -> Personnel Administration -> Organizational Data -> Organizational Assignment -> Check Default Payroll Area
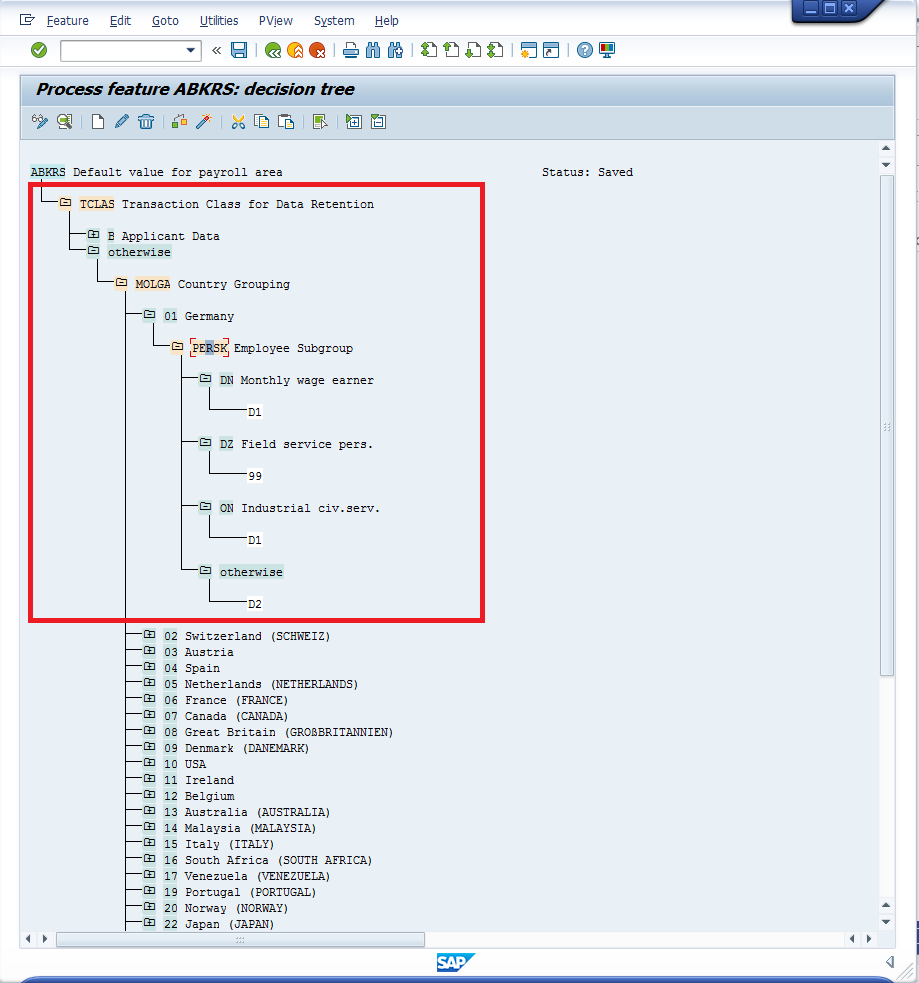
In the screenshot above, the first operation is TCLAS or Transaction class. If the data being maintained is applicant data, it will go to ‘B Applicant Data’. If not, it will proceed to ‘Otherwise’. If we execute a ‘Hiring Action’ for an employee, it will go to ‘Otherwise’. Under ‘Otherwise’ another operation is also used which is MOLGA – Country Grouping. If the employee is hired for Country Grouping ’01- Germany’, it will do an additional check to ‘PERSK Employee Group’. It will continuously go through the series until it matches the return value. So, if the employee subgroup is ‘DN’, the default payroll area will be ‘D1’. If the employee subgroup of the employee is not available in the choices, it will use the value of ‘otherwise’ which is payroll area ‘D2’.
7. Create Work Contract
It consists of two-characters key and a description. Configuration is country-specific based on country grouping. To configure the work contract, execute the below transaction code and follow this menu path.
Transaction code: SPRO
Menu path: Personnel Management -> Personnel Administration -> Organizational Data -> Organizational Assignment -> External Organizational Assignment -> Maintain external work contract

For the example above, country grouping ‘01’ Germany is used. The following information is maintained:
- Work Contract – two-characters key
- Work Contract Text – 15 characters
—
Did you like this tutorial? Have any questions or comments? We would love to hear your feedback in the comments section below. It’d be a big help for us, and hopefully it’s something we can address for you in improvement of our free SAP HR tutorials.
Navigation Links
Go to next lesson: SAP HR Enterprise Structure
Go to previous lesson: Structures in SAP HR
Go to overview of the course: SAP HR Training