
 Previously posted tutorials provided a general overview of the Dunning process and basic Dunning configuration steps. Now that you have an understanding of the fundamentals, we will build on that by looking at the program used to execute the Dunning process and provide SAP Dunning run step by step demonstration.
Prerequisites
There are 2 prerequisites to the Dunning process. One is obvious – there must be invoices that are overdue and past the grace period (if applicable). The other is that the customer master record must have a Dunning procedure assigned at the company code level.
Let’s check for open items on a customer by using transaction FBL5N.
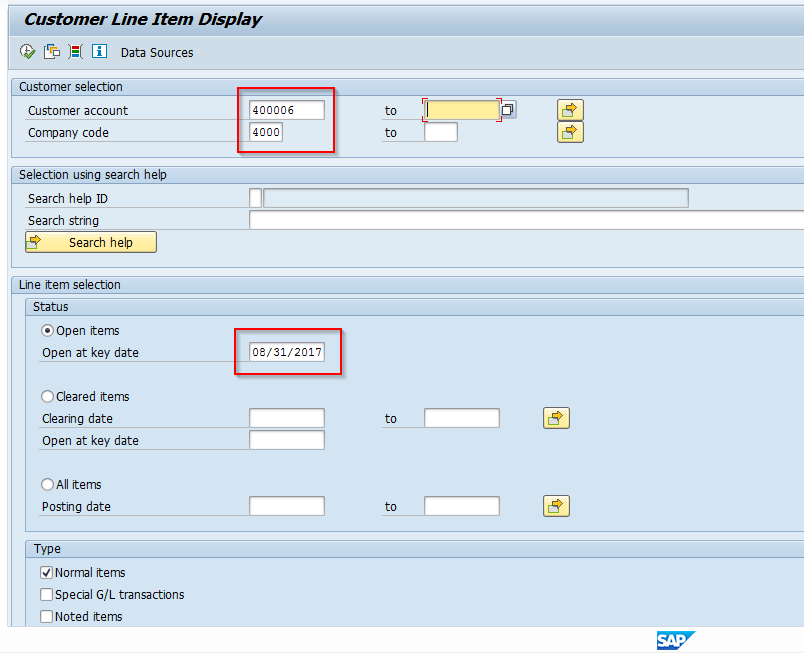
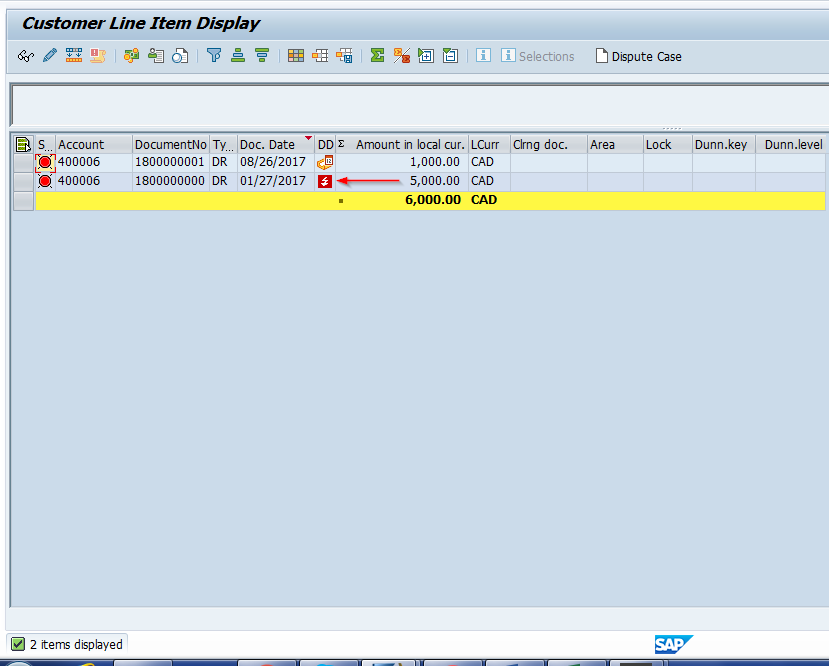
Here we have 2 open customer items – one item is not due and one item is past due. Only the past due item should be selected when we execute the Dunning program.
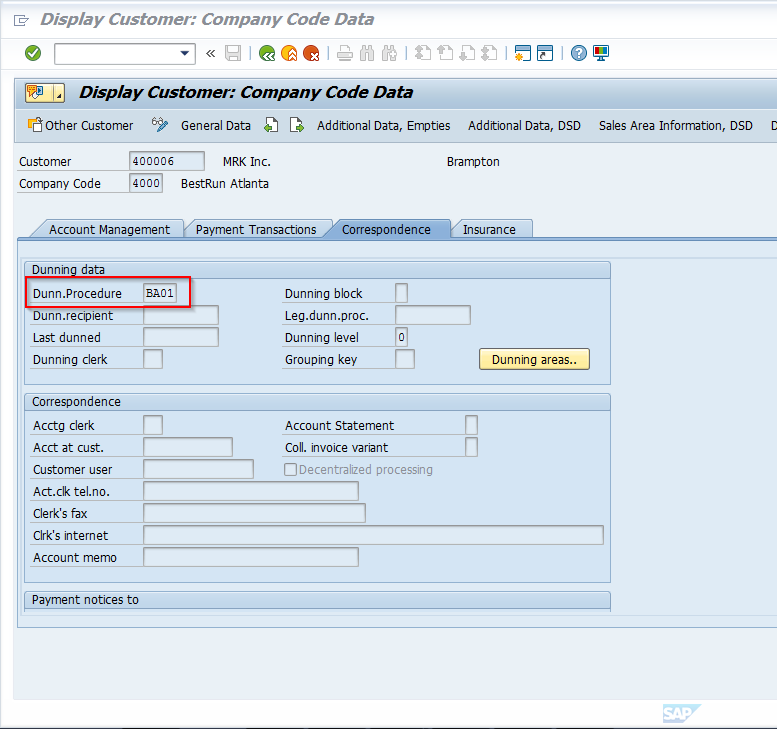
Now let’s check the customer master record. Below is a screenshot of where you can see the Dunning procedure on the master record.
Use transaction FD03 or follow menu path:
SAP Easy Access Menu > Accounting > Financial Accounting > Accounts Receivable > Master Records > Display
Note: If you wanted to use multiple dunning procedures within the same company code for a customer, you could utilize the Dunning areas button and assign accordingly (see configuration tutorial on how to set up). This is an optional feature we will not be using here.
Prerequisites are met for requiring the Dunning program execution.
SAP Dunning Run
Depending on an organization’s requirements, the Dunning program can be executed online at any time by a user transaction or it can be set up to run as a scheduled batch job. In this tutorial, we will look at the steps to run the program online.
To execute the program, use transaction F150 or follow menu path:
SAP Easy Access Menu > Accounting > Financial Accounting > Accounts Receivable > Periodic Processing > Dunning
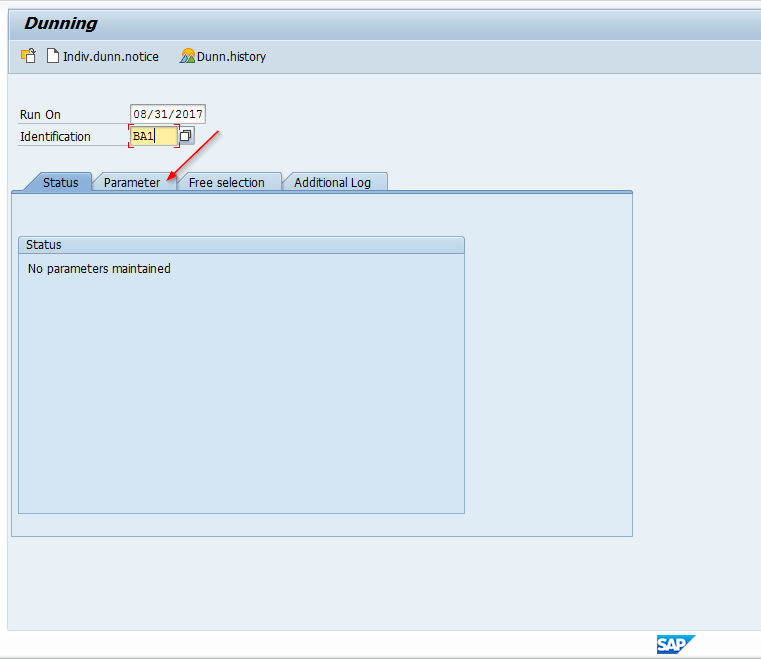
You will first see a screen that appears as follows:
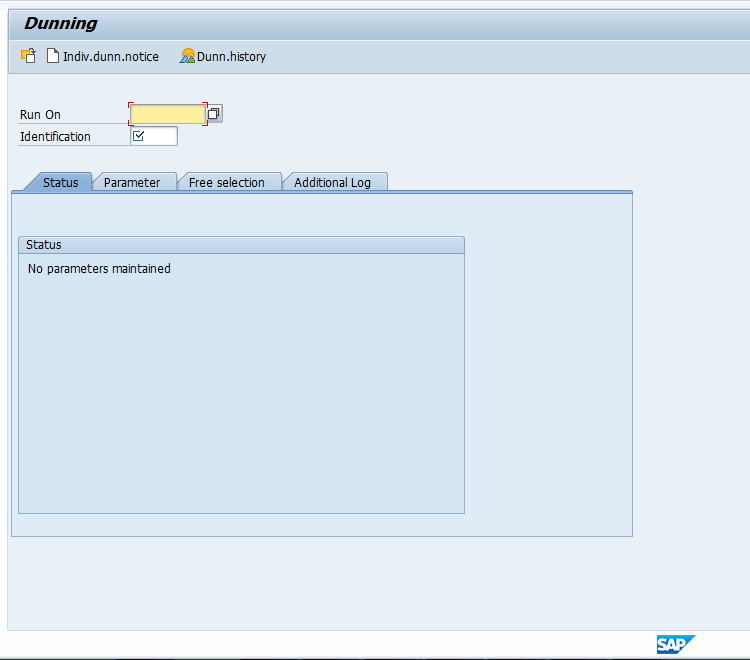
To begin, enter a Run On date and a program ID. The unique combination of Run On date and Run ID is a used to identify a specific SAP Dunning run in the applicable tables (i.e., MHNK, MHND, etc.). You can reuse the Run ID, but cannot reuse it with the same Run On date.
Complete the screen as follows and then click on the Parameter tab:
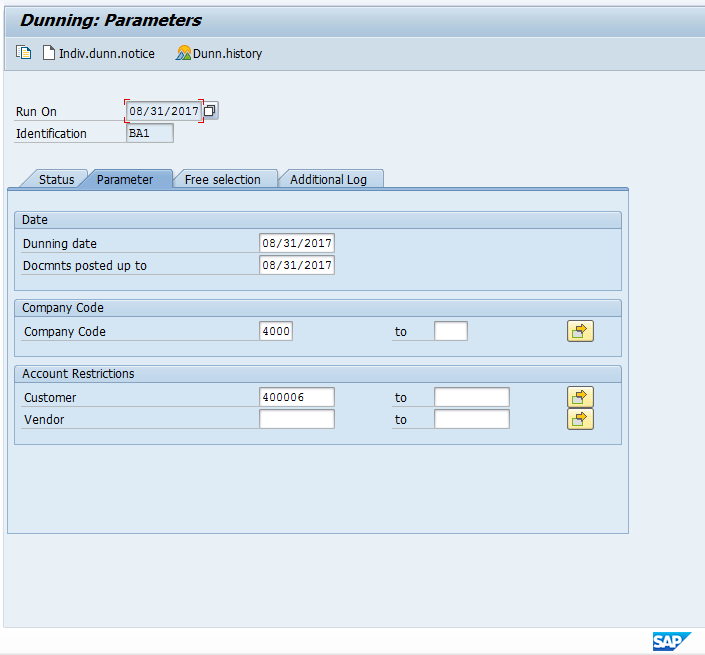
Enter parameters to specifically define what you want to run the SAP Dunning program for. In this example, we will run the program for a single company code, customer and for documents posted up to 08/31/2017. The Dunning date is the date the system compares to the due date to determine if a line item should be dunned. An example parameter screen could look as follows:
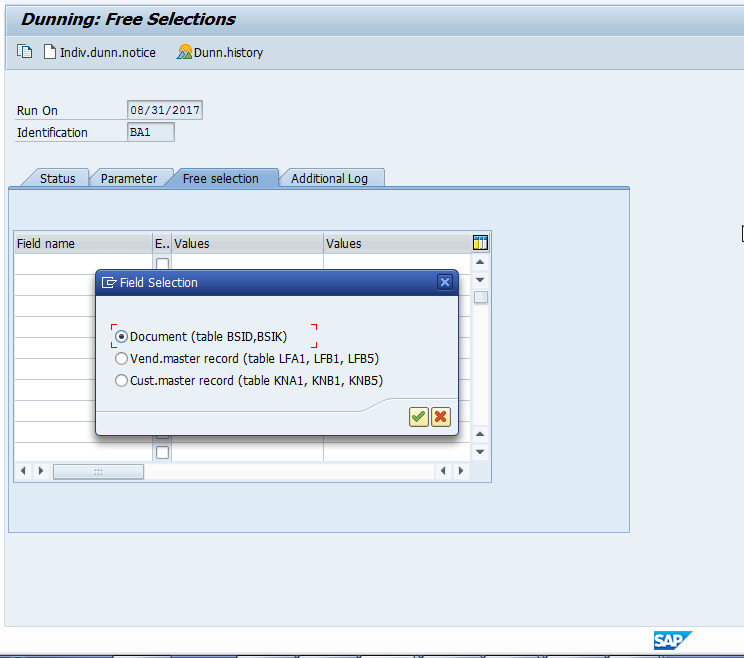
Next, click on the Free Selection tab. This is an optional tab where you can choose fields to further refine your selection of line items. Do you need to select only line items with certain criteria? If you used a range of customers or vendors in the parameter tab, do you need to further narrow your selection by specific master record fields? If so, this is the method to do so. Place the cursor in the “Field name” field and click the drop down and you will see this dialog box with radio buttons. Depending on your choice, you will get available fields listing from the tables indicated next to each button. Choose the desired field you want, then input a single value or a range of values to select by. You also have the option to exclude instead of including your selection. We will not use the Free Selection in this example, but here is a screen image to demonstrate.
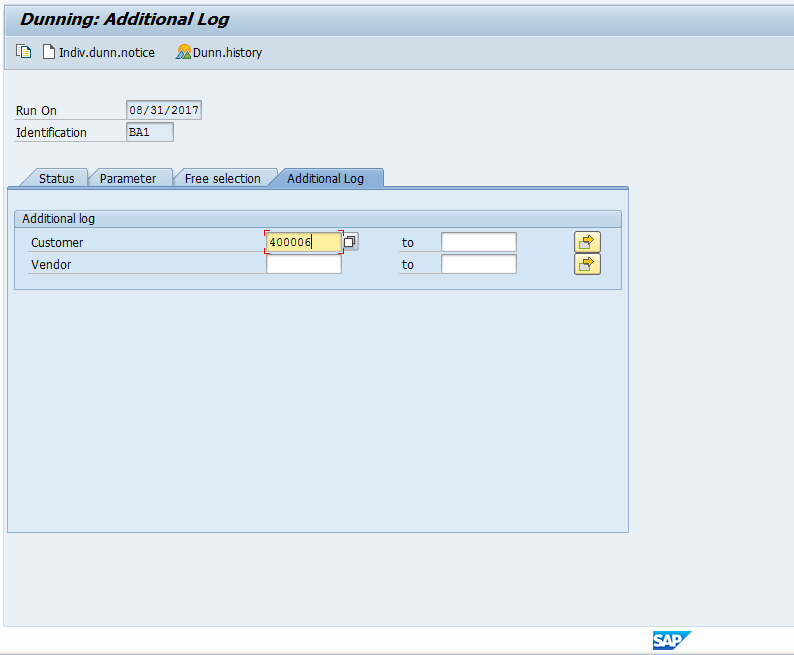
Now click on the Additional log tab. This is an optional tab as well and is useful in cases when there are errors or you want to see additional information about the customer or vendor that was processed. The screen appears as follows.
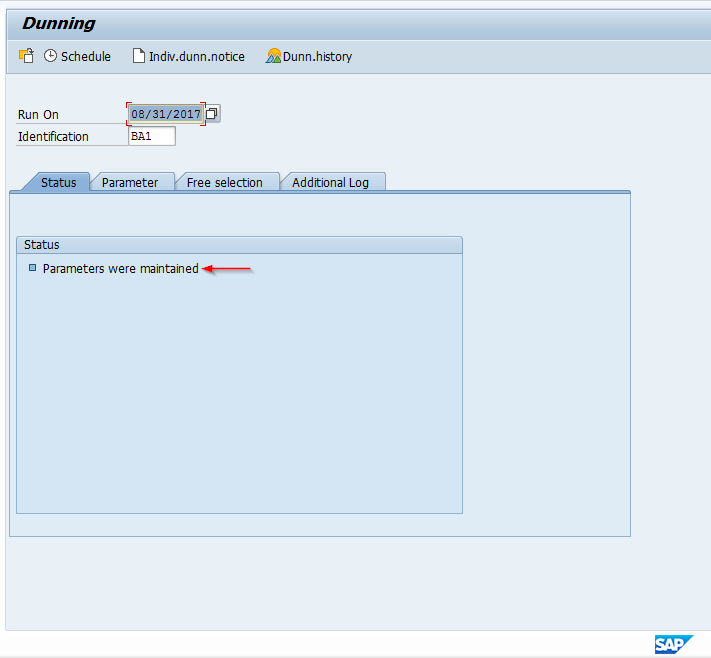
Now click on the Status tab. You will see a dialog pop up box asking if you want to save the parameters. Click Yes and proceed. Once back on the Status tab, a message will appear in the status box saying Parameters were maintained. It is worth noting here that the Status box is exactly what the name implies, a snap shot indicator of the status of the Dunning run. As you move through the process of executing the program, additional status messages will appear. To update the statuses as you proceed with each step, click on one of the other tabs then back on the status tab to see the latest status. You can double click on any of the status messages to see additional detailed information about the message.
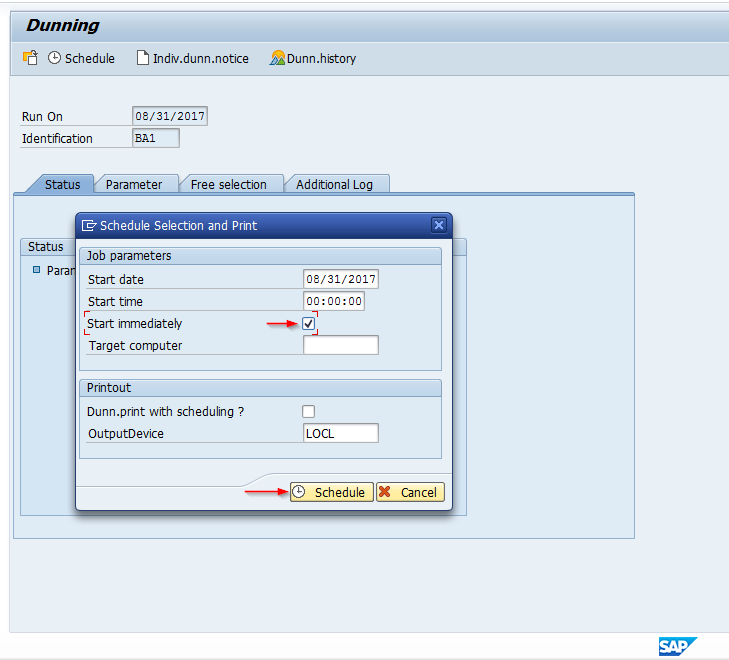
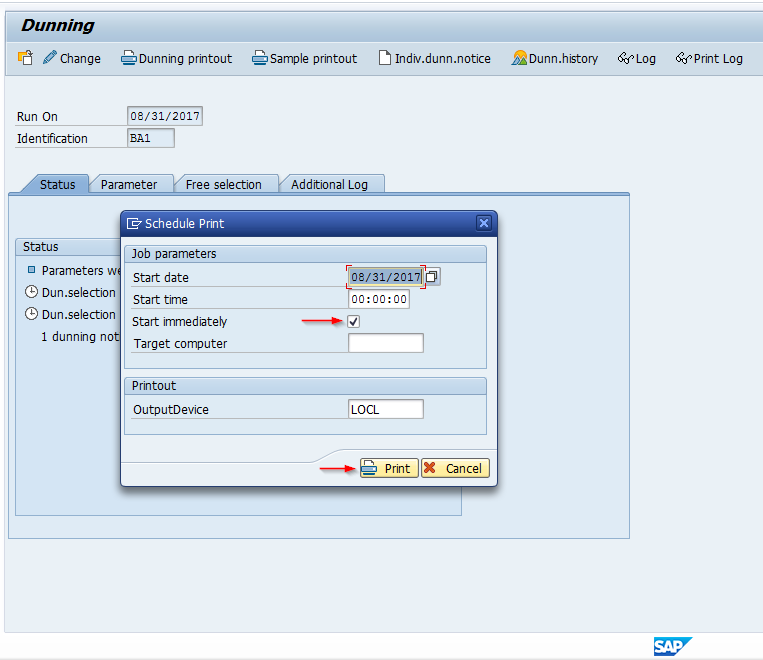
The selections have been entered and the next step is to schedule the proposal. The Dunning proposal will list items to be dunned and record a log in the Dunning tables of the Dunning run ID, date, and details of the dunning status. Click on Schedule button. A dialog box will appear. Check the Start immediately check box, then click the Schedule button on the screen as follows.
Once the SAP Dunning run is scheduled, you will be taken back to the status screen. The Dunning proposal is now running as a background job and indicated on the message bar at the bottom of the screen.
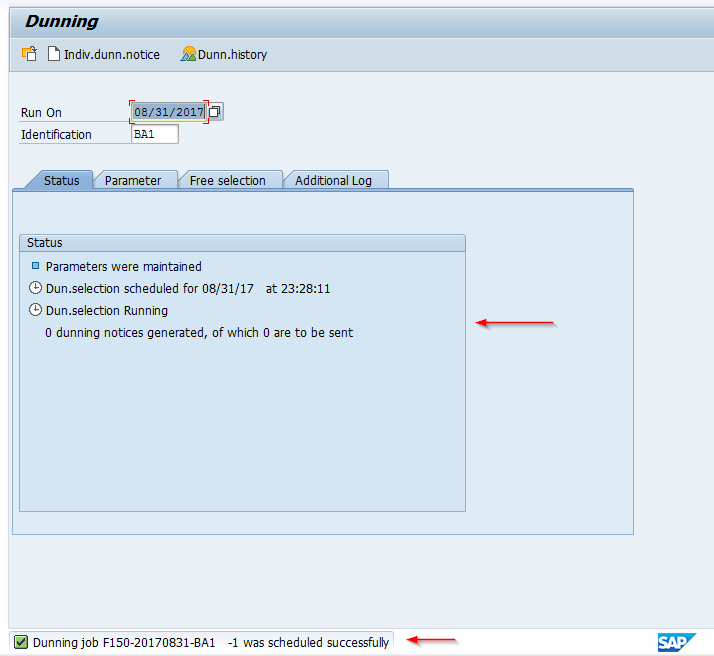
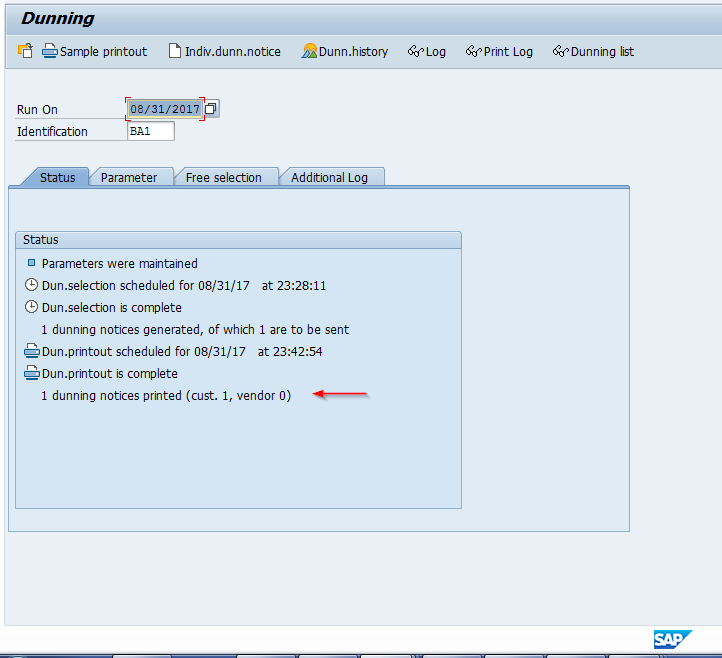
Click on one of the other tabs and then back on the status tab to update the status messages. Once the job is complete, the results will appear as follows.
The message is stating that there is 1 item that will get a dunning notice. This is expected, because as we saw in the open item selection, there were 2 open items for the customer but only 1 was past due and subject to Dunning.
Now click the Dunning printout button. A dialog box will appear. Click start immediately and print. The screen will appear as follows.
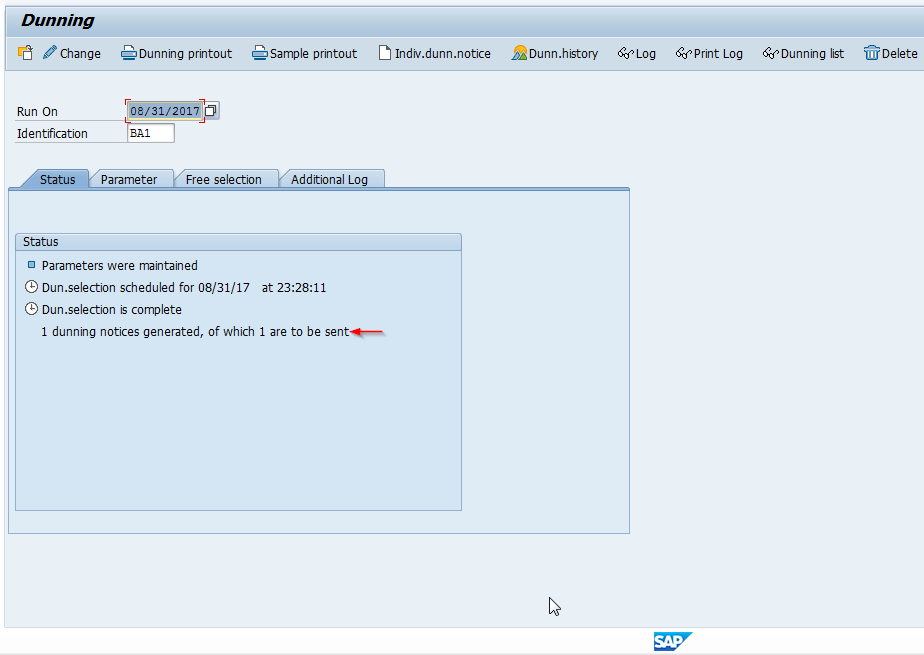
This will take you back to the status screen again and will schedule a background job, like we saw when scheduling the proposal. A message will appear at the bottom of the screen and you will see updated status messages in the status box. Click any of the other tabs then click back on the status tab to refresh. Once complete, the screen will appear as follows.
At this point, the Dunning program has completed and we should have a spool report to review that will show the Dunning notice. The Dunning notice should reflect the form assigned during configuration of the Dunning procedure and have the correct verbiage defined for the Dunning level.
Verification SAP Dunning Run Results
Once the SAP Dunning program has been executed, we should see resulting Dunning notices and master record updates for items selected.
To review the spool report results, use transaction SP02 or follow menu path:
System > Own spool requests
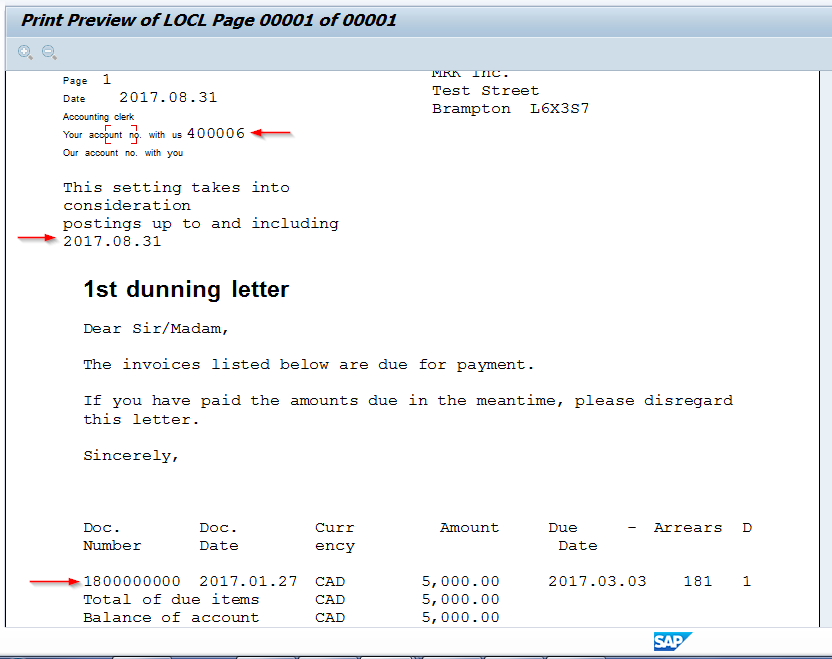
A few things are pointed on the form that indicate this is what we expected. The customer number and posting date matches what we specified in our parameters, and the document number is what we expected based on our review of open customer items.
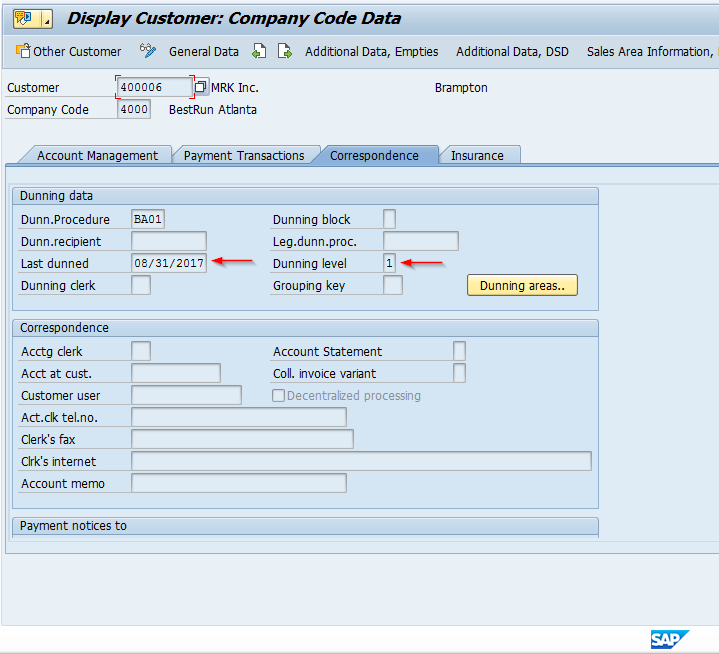
To review the customer master record to verify that the program updated the last dunned and Dunning level fields correctly:
Use transaction FD03 or follow menu path:
SAP Easy Access Menu > Accounting > Financial Accounting > Accounts Receivable > Master Records > Display
Conclusion
There are additional features you can explore within the SAP Dunning program, but this completes the basic SAP Dunning run and results verification. Future tutorials will cover SAP Dunning proposal modification and more details on SAP Dunning notices.
—
Did you like this tutorial? Have any questions or comments? We would love to hear your feedback in the comments section below. It’d be a big help for us, and hopefully it’s something we can address for you in improvement of our free SAP FI tutorials.
Navigation Links
Go to next lesson: SAP Dunning Proposal Modification
Go to previous lesson: SAP Dunning Configuration
Go to overview of the course: Free SAP FI Training
Hi Team,
Its very good document. how to setup customer email id and where.
Thanks,
Madhu
Hi Team,
I agree to madhu that it is a very helpful doc, and I would like to understand the Setup of customer email id too.
Regards,
DRU
Hello,
Thanks for the document. I have one issue regarding dunning. In case of dunning run with multiple customer, how do we identify which spool belongs to which customer since the Run ID and Run Date are same for all customer.
Hello ,
It’s a very good document , and we followed the steps .
We failed
1. Print out of the dunning letters , by go through SP02 we noticed our layout similar like log .
Does it mean we haven’t set up the printing lay out appropriately .
2. By check FD03 , we didn’t find the dunning information updated .
We would appreciate if we may get some advise here . Thank you
Kelly Wang
Customer Email ID set up at General data level for the Customer in customer master data level.