
 Welcome to the tutorial on SAP Absence Quota Configuration. If you haven’t gone through the tutorial on SAP Absence Quotas yet, we recommend that you do so before starting with this one. In this tutorial, we will take you through the creation of Absence quota types for which quota generation is not using Time Evaluation. In other words, we will explain how to configure quota types which are either generated using the Generate Absence Quotas report (RPTQTA00) or granted when the Absence Quotas infotype is created for an employee. Please note that the configuration of Quota generation rules is not within the scope of this tutorial as we will dedicate a separate tutorial to that subject.
SAP Absence Quota Configuration
Set Groupings for Time Quotas
Before proceeding with the actual configuration of absence quotas, you must group Employee Subgroups and Personnel subareas for Time Quotas. If you have read the tutorial on SAP Counting rules, you may recollect that these groupings were covered in that tutorial, both in terms of concept and configuration. Hence, in practice, if you have carried out those steps, you may omit this activity here.
The reason we are including this configuration step here as well, is to convey an alternate IMG path to assign the same groupings.
To group Employee subgroups for Time Quotas, you may follow the IMG path depicted in Figure 1.

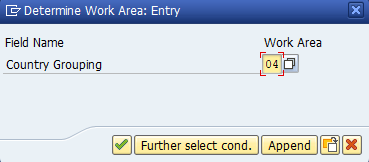
This takes you to the pop-up shown in Figure 2. Here, enter the country grouping and hit Enter.
This takes you to the Overview of Employee Subgroups shown in Figure 3.
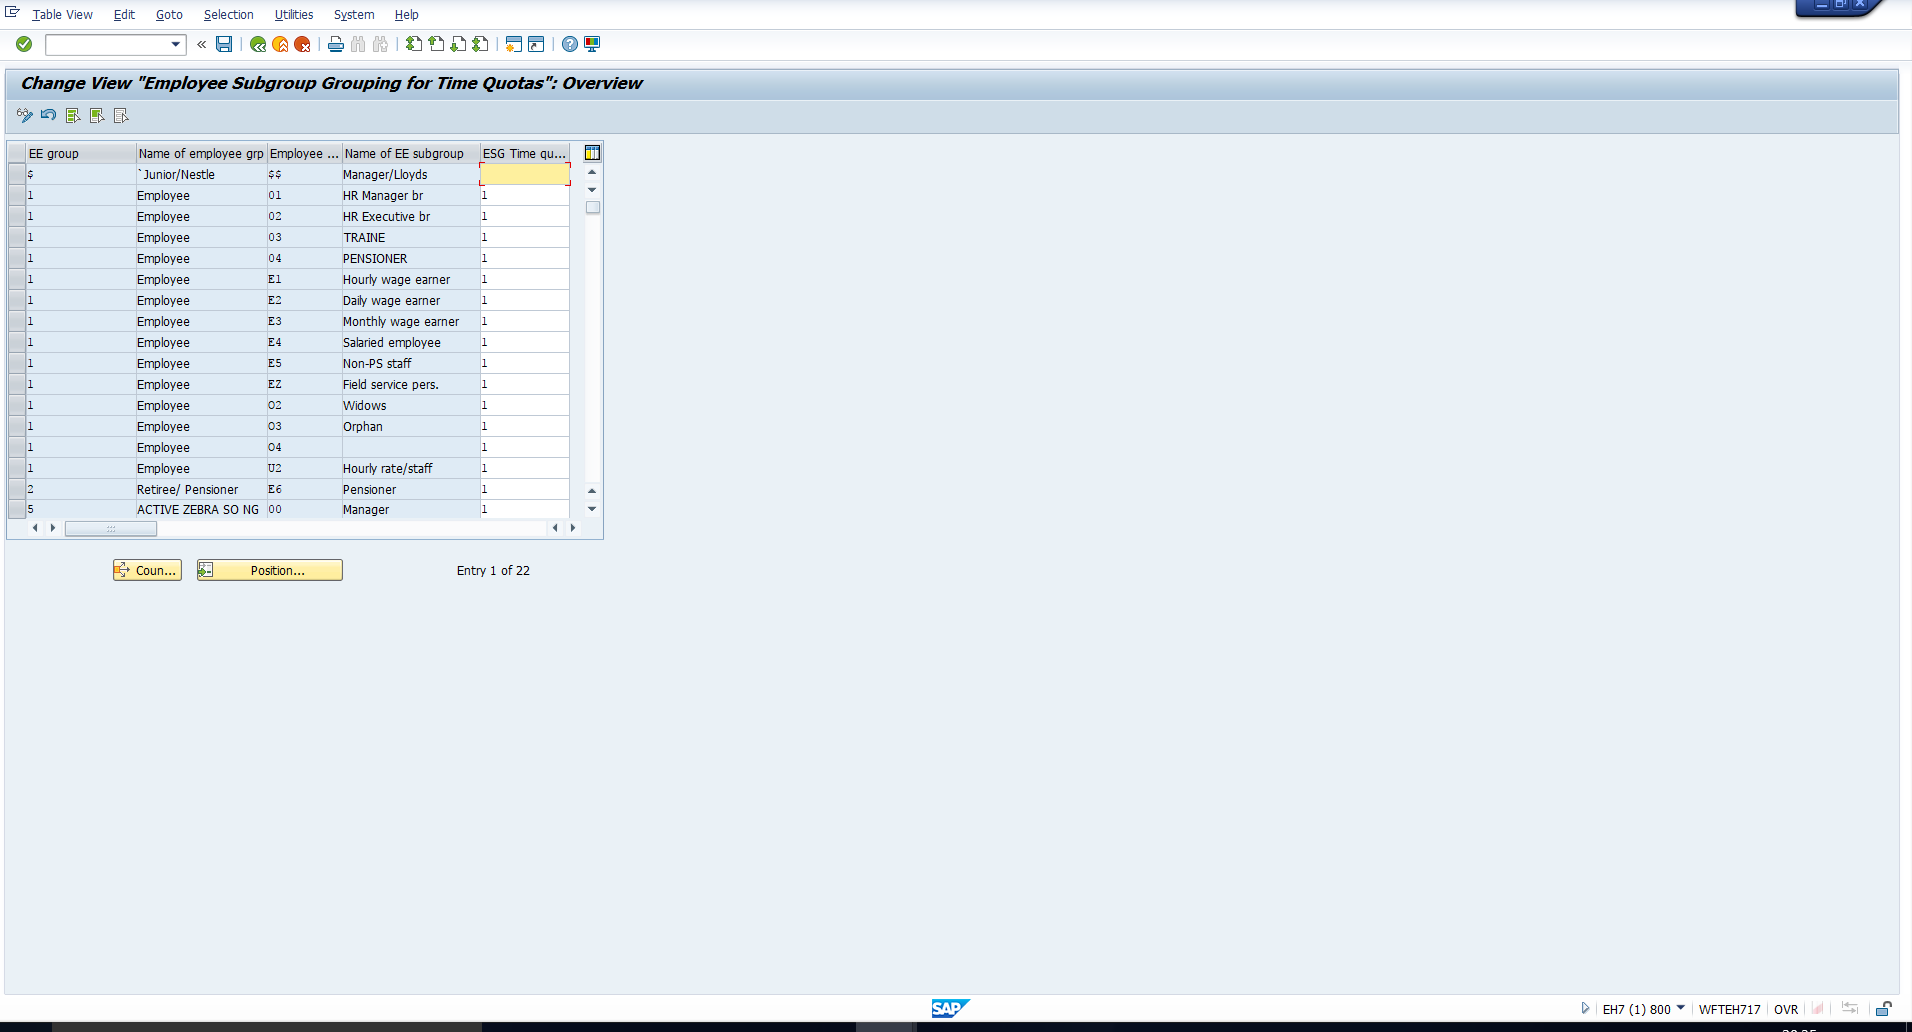
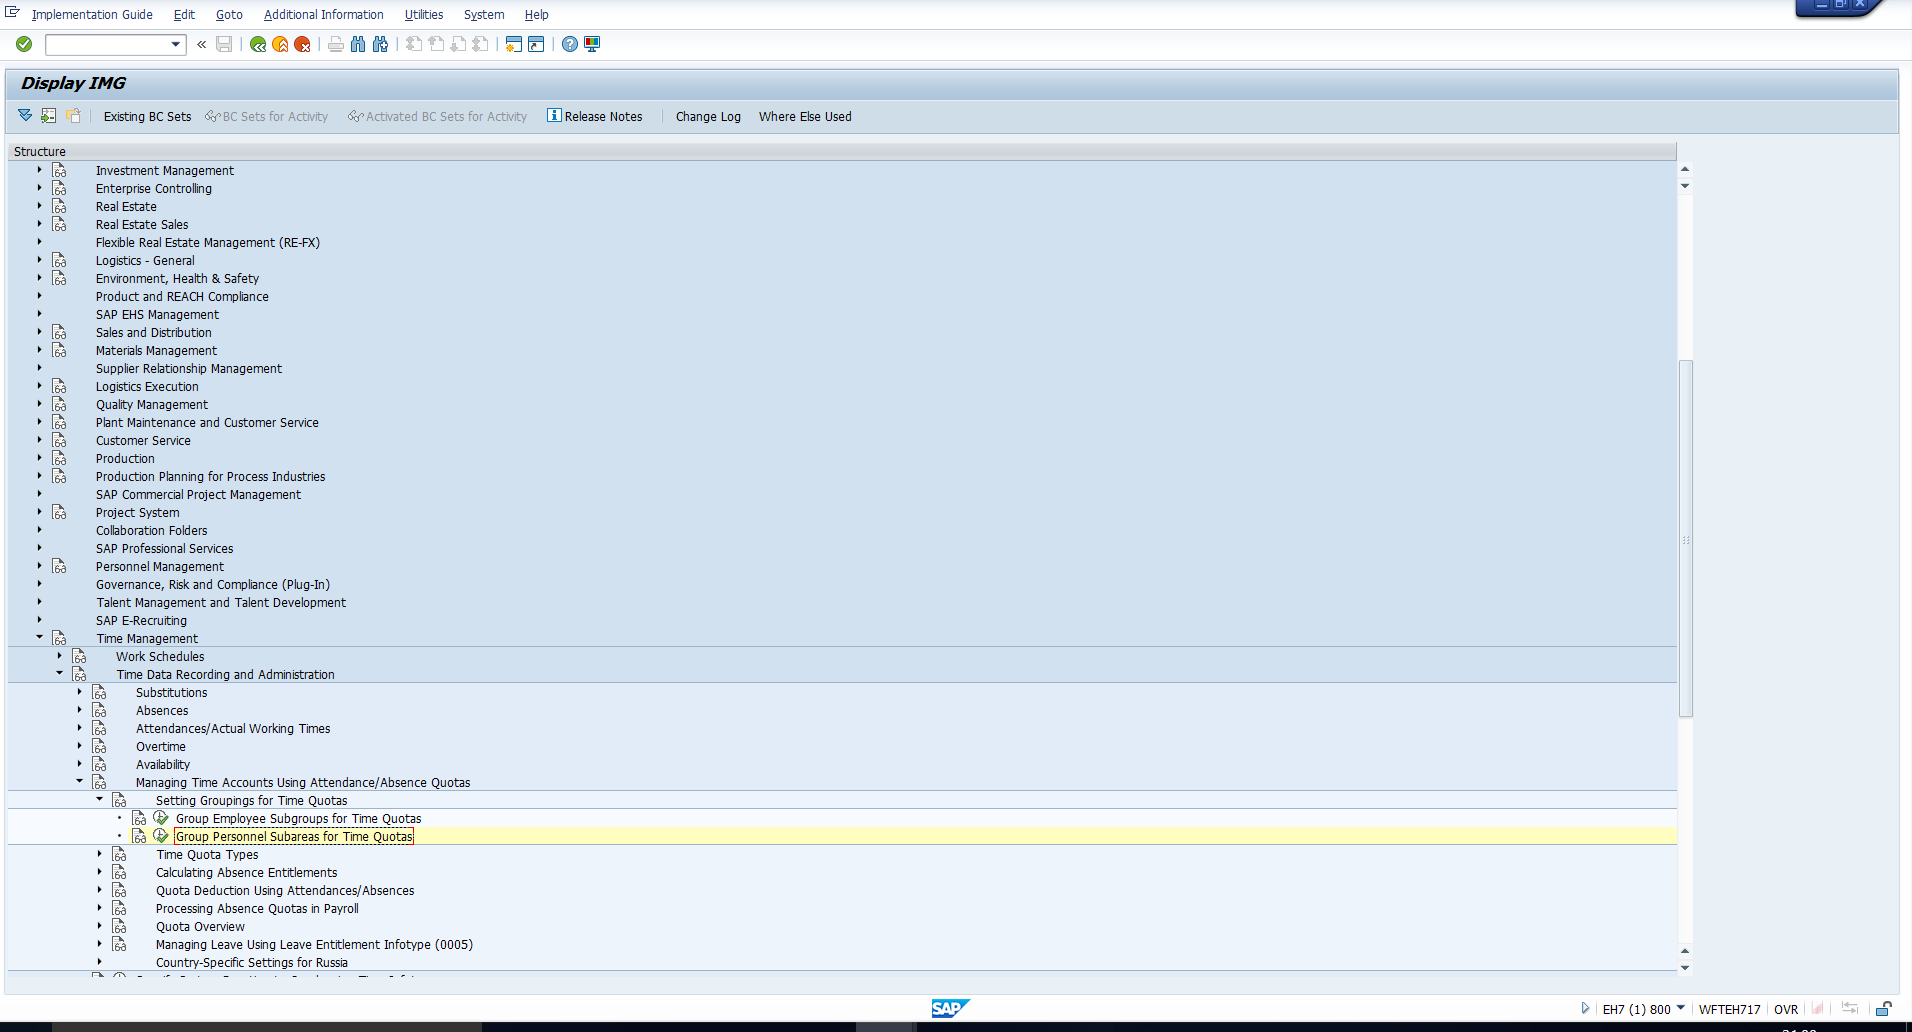
You must assign a suitable one-digit grouping to each Employee subgroup. Then, save the data. To group Personnel subareas for Time Quotas, you may follow the IMG path depicted in Figure 4.
This takes you to the Overview of Personnel subareas shown in Figure 5.
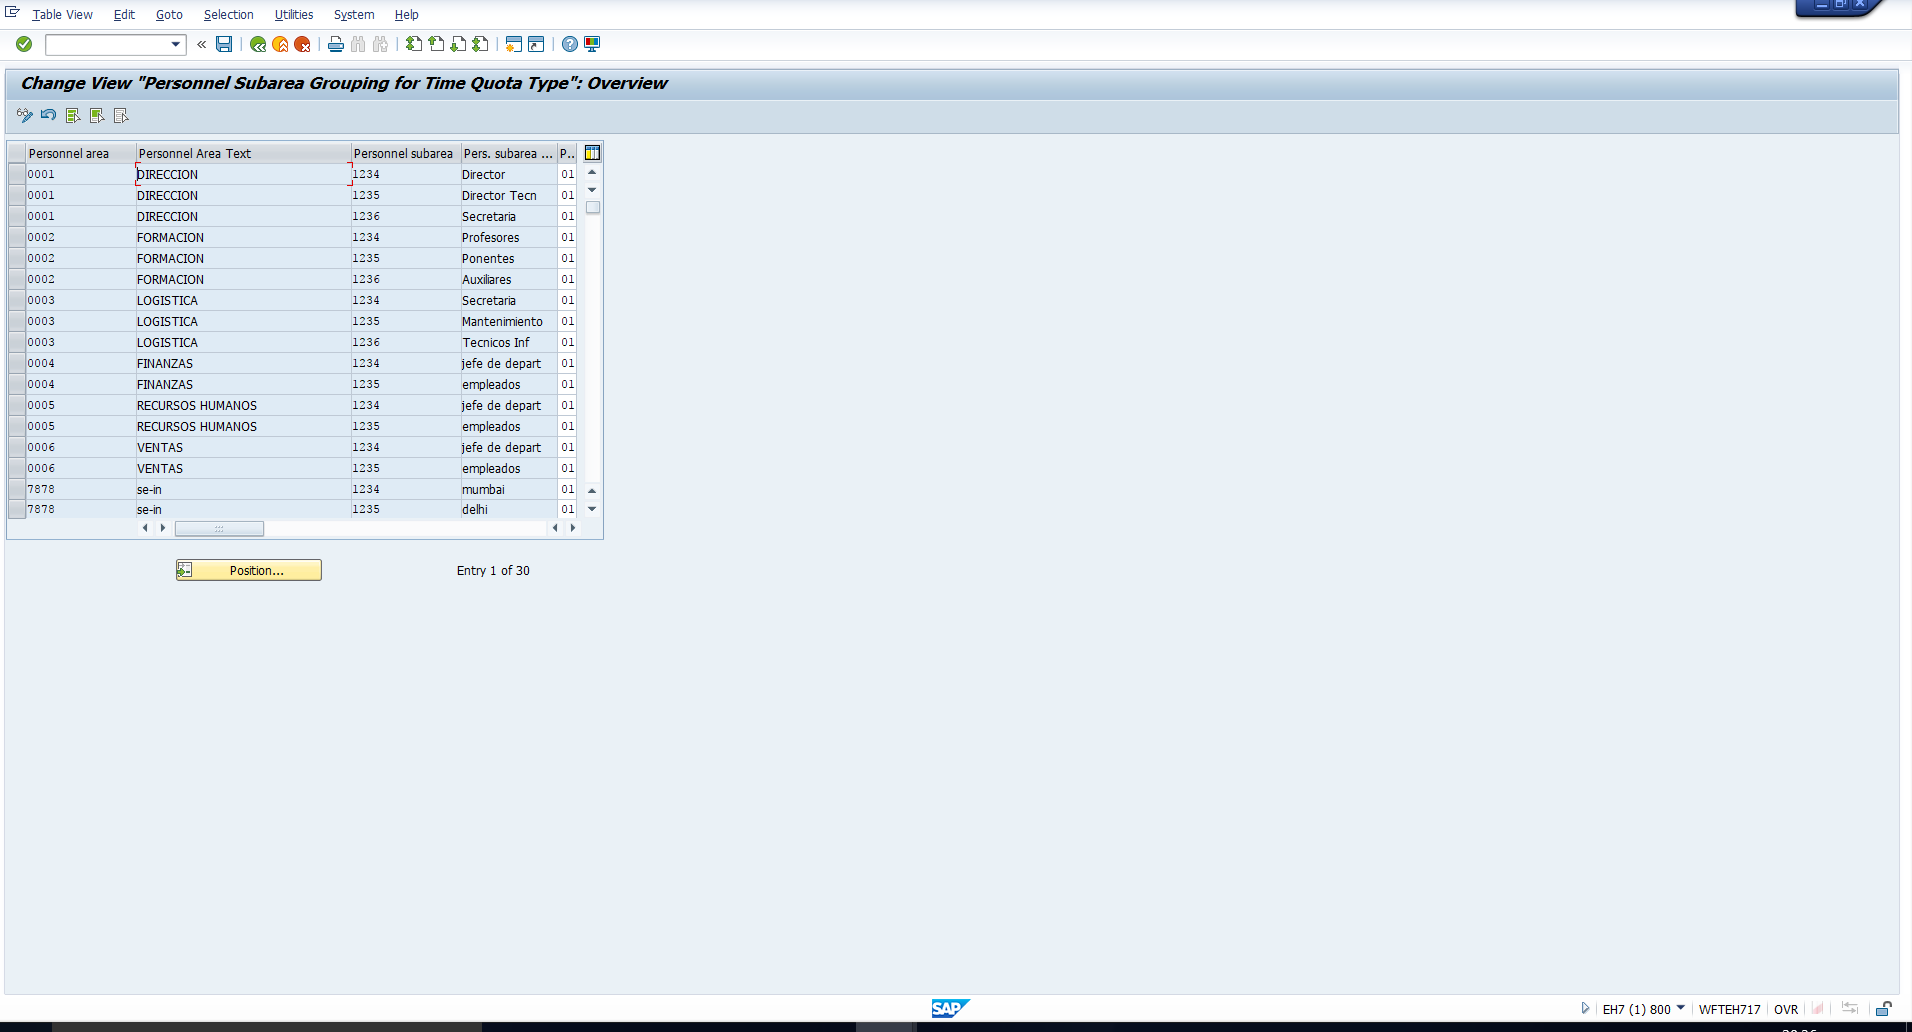
Here, assign a suitable two-digit grouping to each Personnel area and save the changes.
Define SAP Absence quota Types
Once the groupings are in place, you can create the absence quota type by following the IMG path in Figure 6.
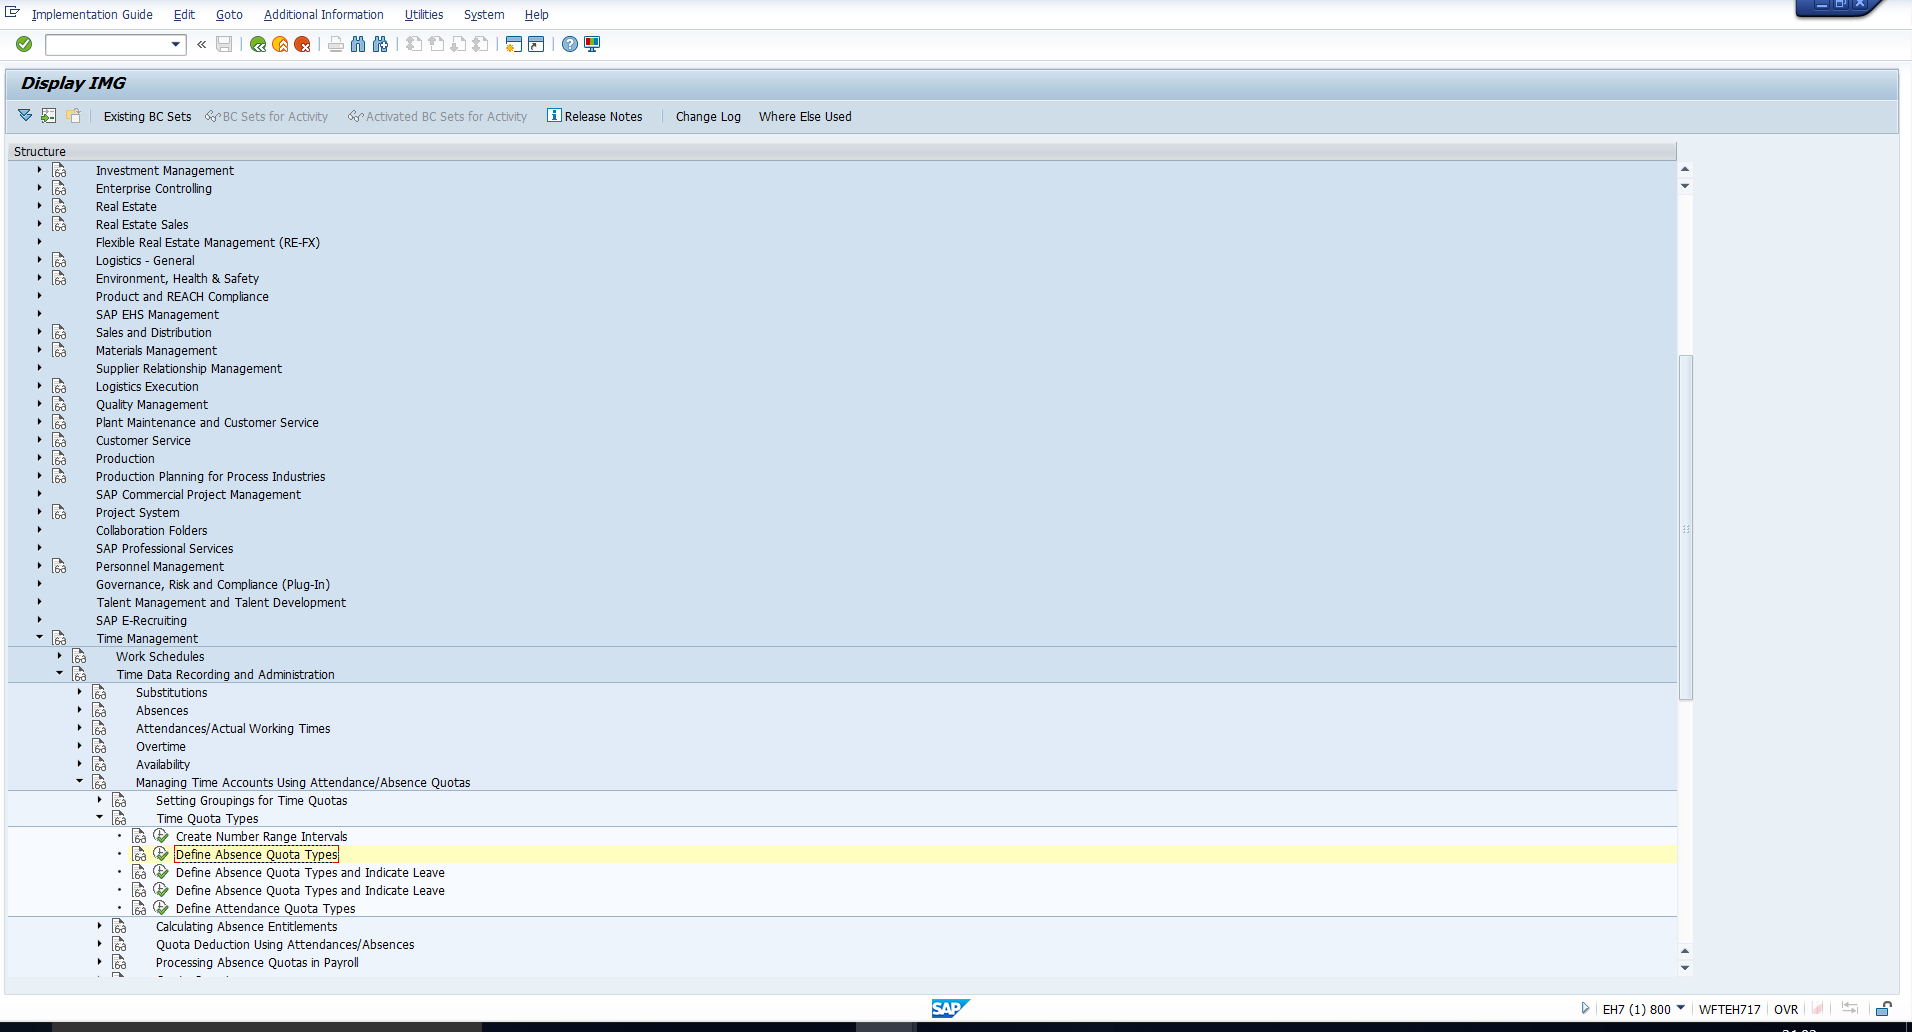
When you execute this activity, it will present an overview of existing absence quota types. You can see this in Figure 7.
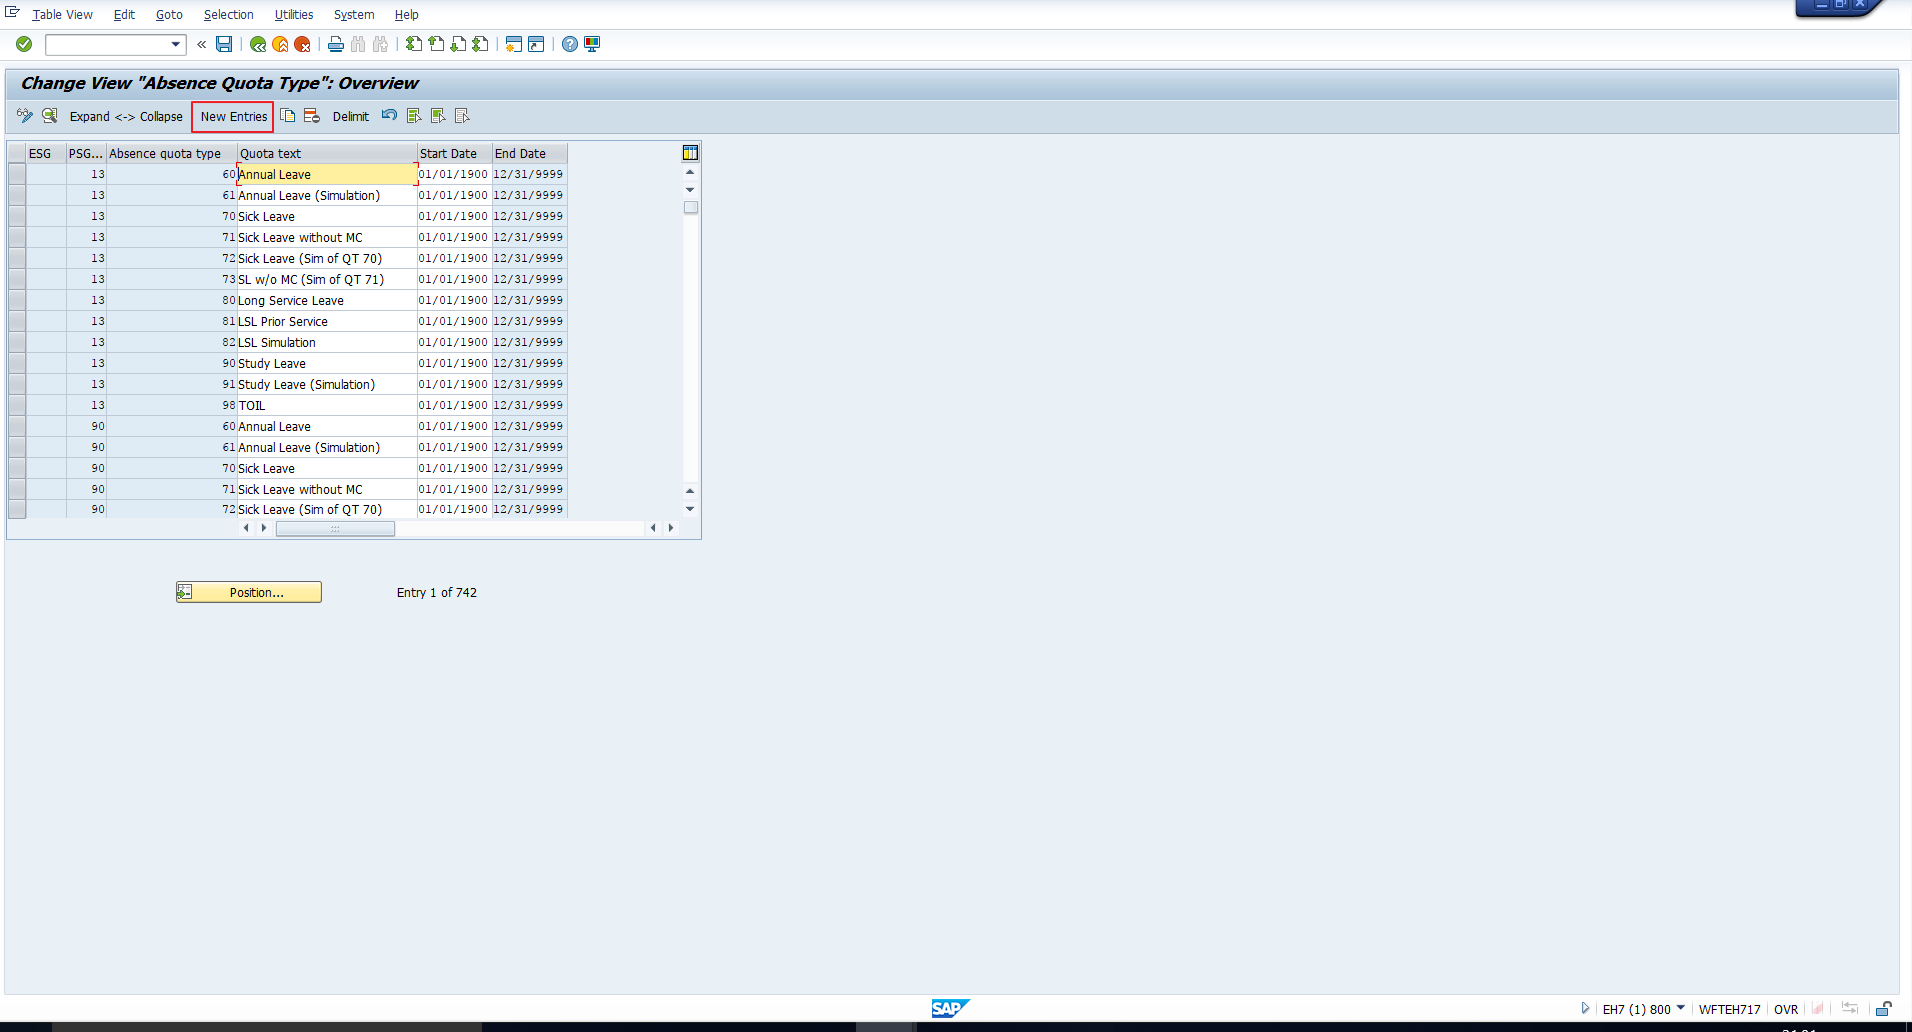
To configure a new quota type, you can either copy an existing one or create a new one. Use the Copy button if you have a reference quota type, and you would like to create one with similar properties. This will save you some amount of effort, both, in configuration and testing.
On the other hand, if you do not have a suitable reference quota type, you can click on the New entries button to create a new quota type from scratch. We will demonstrate this mode of creation of a new quota type.
Upon clicking the New entries button, you will see the screen shown in Figure 8.
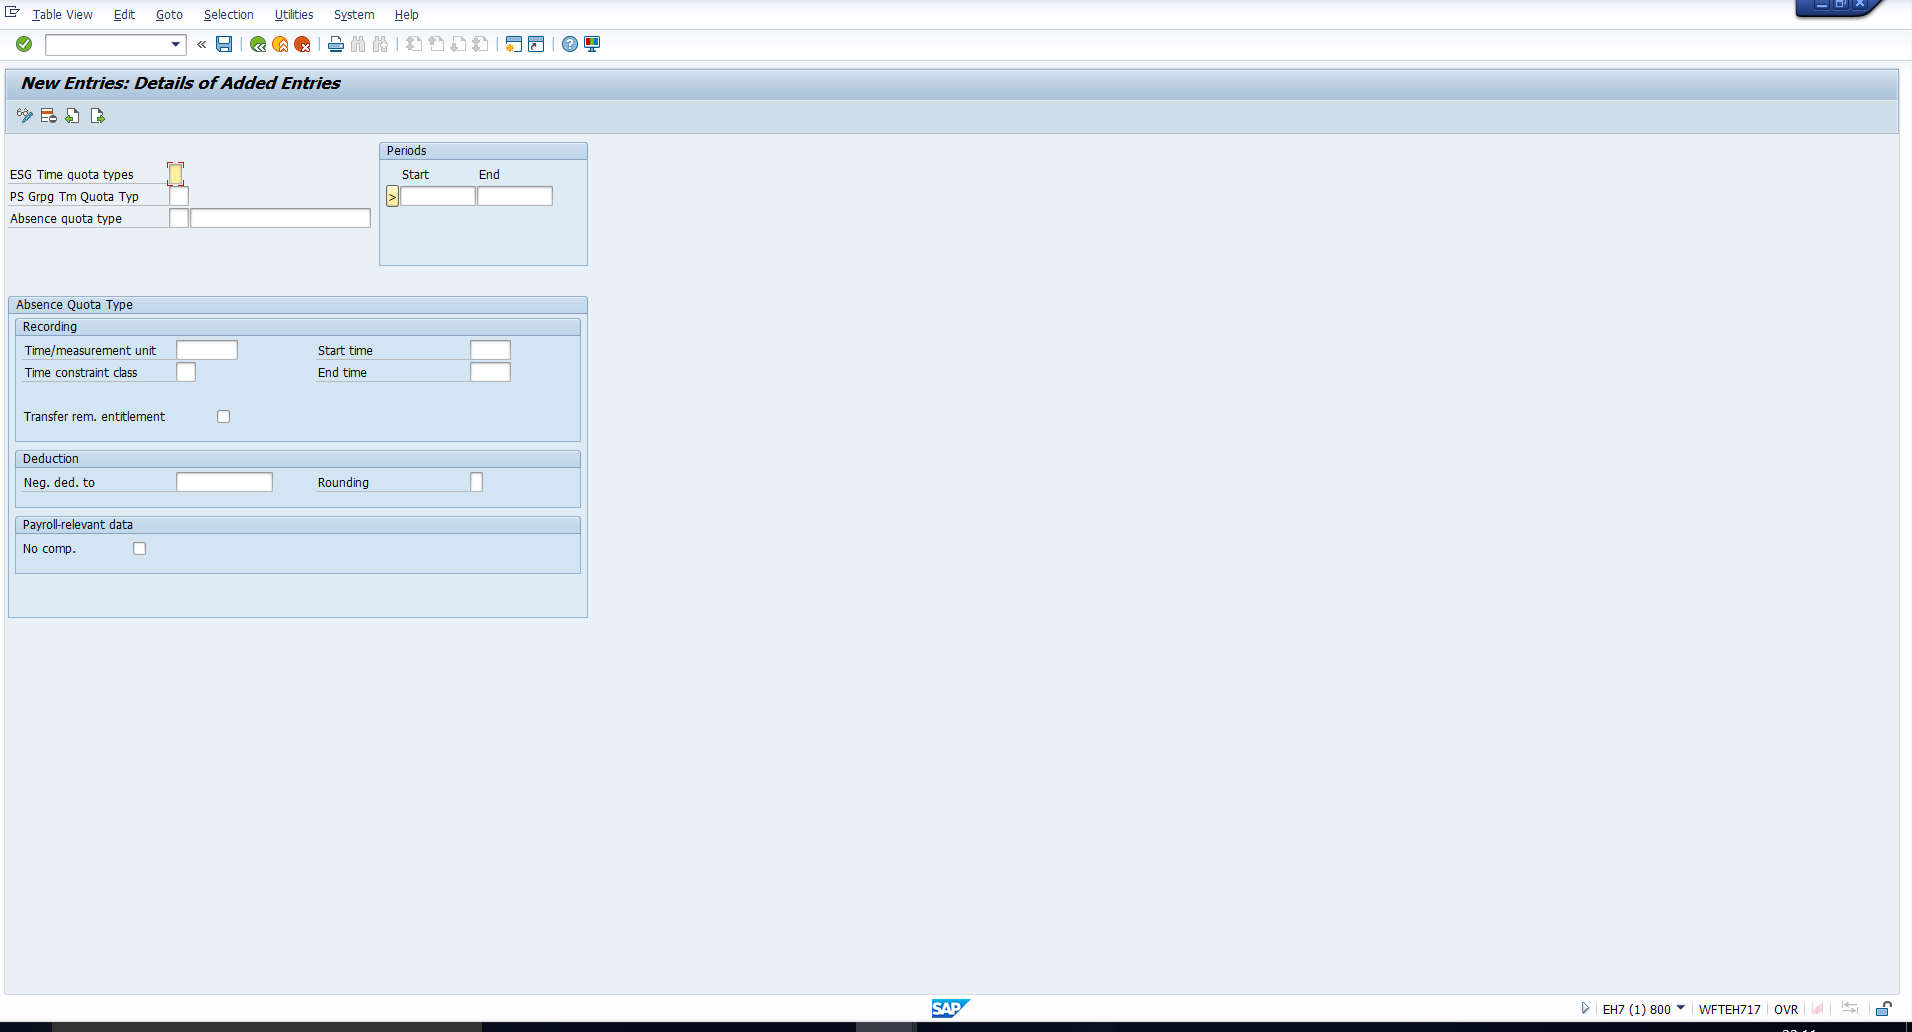
Let us go through the most essential fields:
ESG Time quota types – Enter the Employee subgroup grouping for Time quotas, for which this absence quota type must be applicable.
PS Grpg Tm Quota Typ – Enter the Personnel subarea grouping for Time quotas, for which this absence quota type must be applicable.
Absence quota type – Enter a suitable two-digit code to uniquely identify the absence quota type. Also, enter a text of maximum 25 characters to describe it.
Start & End – Enter the dates to define the validity period of the absence quota type. If it can be open-ended, you can enter the start and end dates as 01/01/1800 and 12/31/9999 (mm/dd/yyyy format) respectively.
Time/measurement unit – We usually select the unit Days in this field, as this is relevant to most absence quota types.
Time constraint class – Assign a suitable Time constraint class in this field. Please go through the tutorial on SAP Time Constraint classes if you are not conversant with this concept.
You can refer to the sample data we have entered, as reflected in Figure 9.
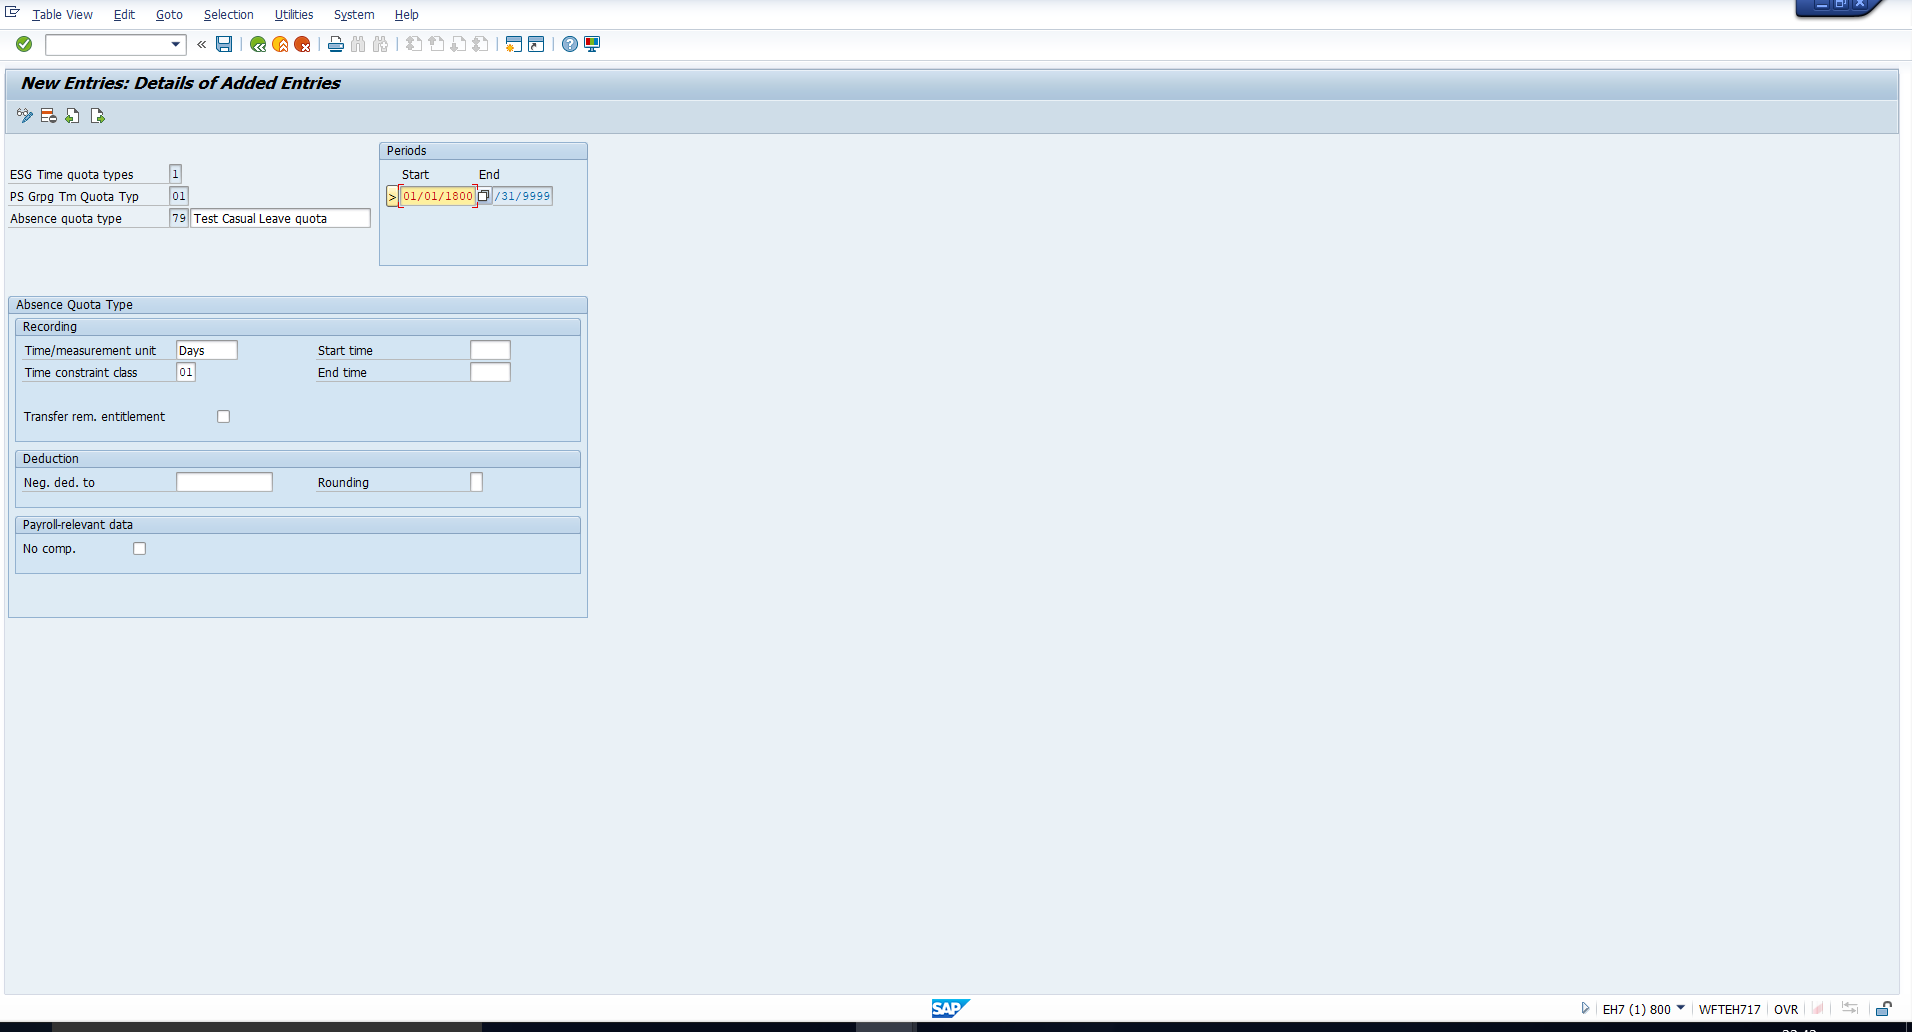
Once you enter the desired inputs, please save the entry.
Set Base Entitlements
The next step involves the definition of a Base entitlement rule. Here, you should specify the theoretical basis for calculating the prorated absence quota entitlement for each period.
For example, using this rule you can specify that the base entitlement for Casual leave is 12 days per Calendar year. So, if an employee joins the organization in February, the system will calculate the prorated entitlement for the period February to December as 11 days.
To define a Base entitlement rule, follow the IMG path depicted in Figure 10.
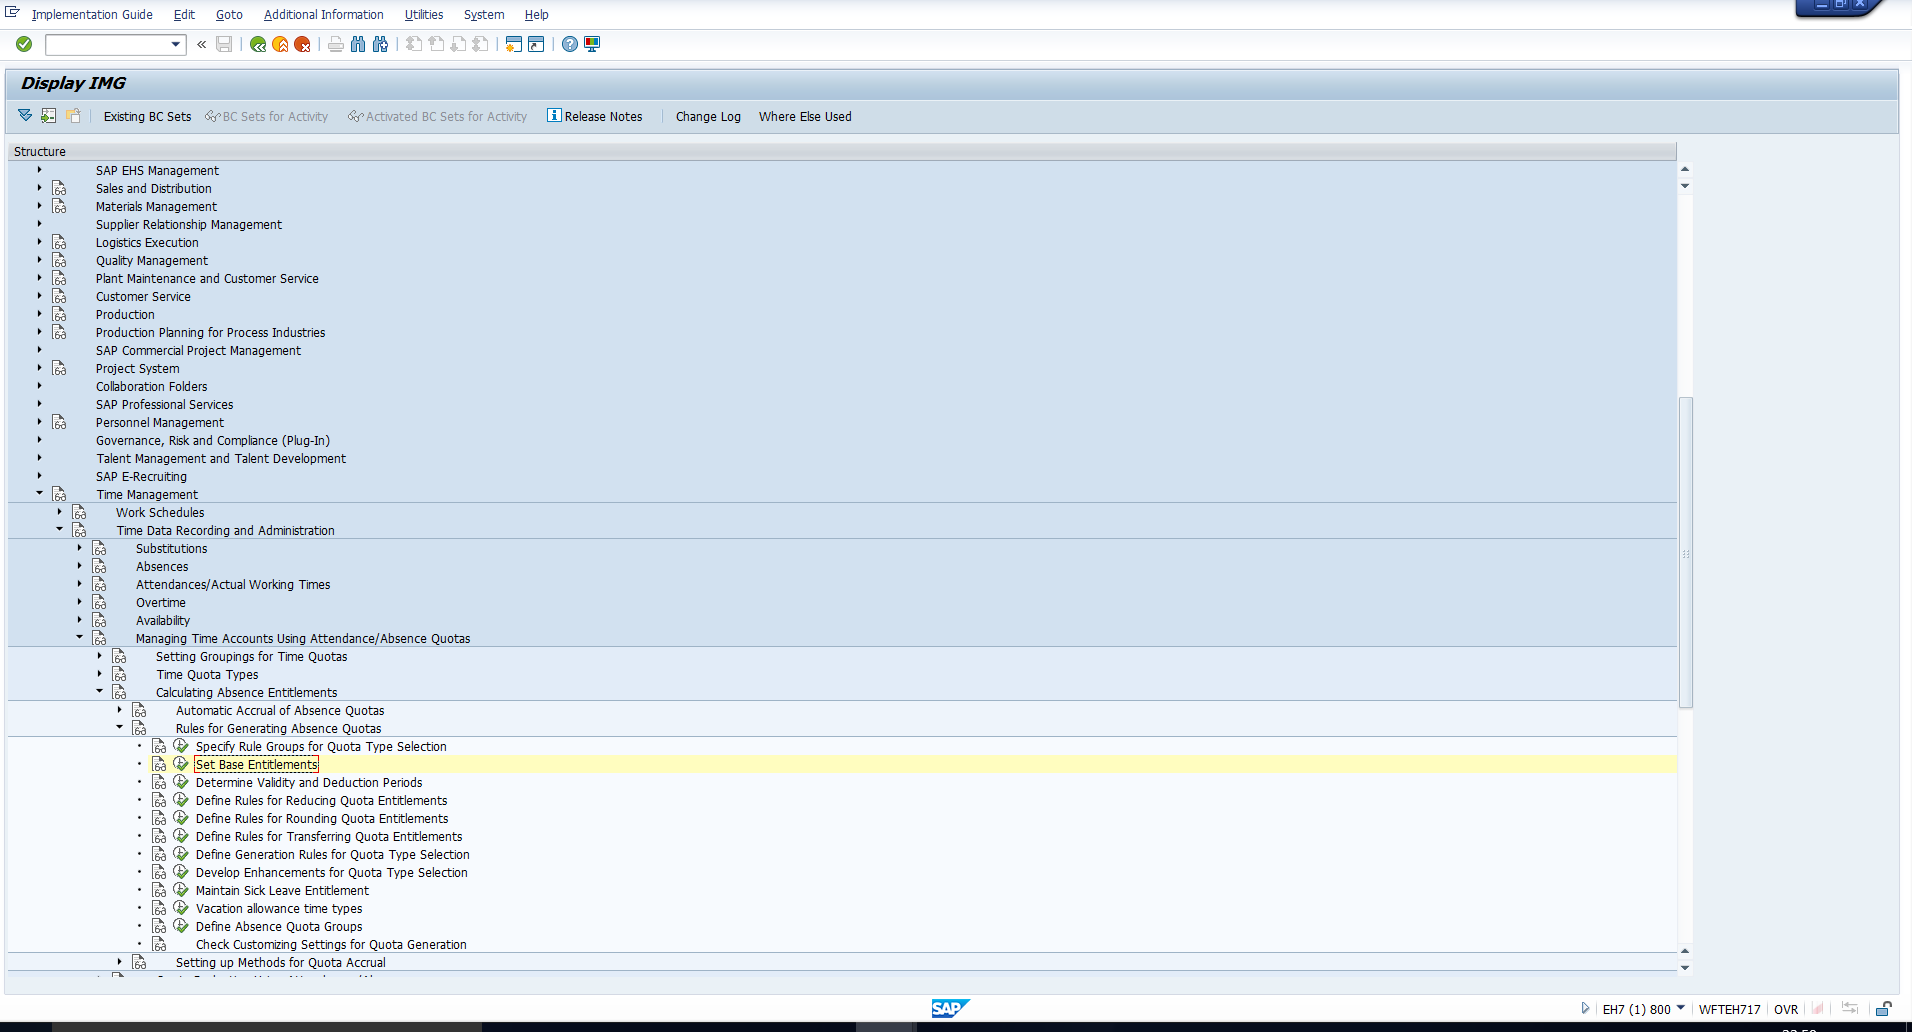
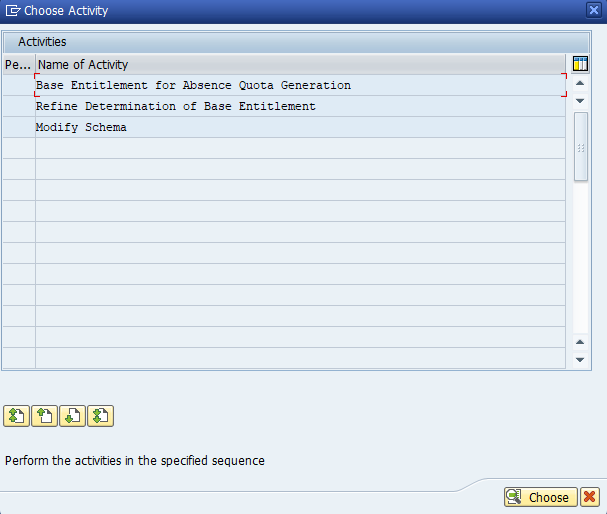
You will then see the list of activities as in Figure 11. To create a Base entitlement rule, double click on the first one.
Next, you will see an overview of Base entitlement rules, as in Figure 12.
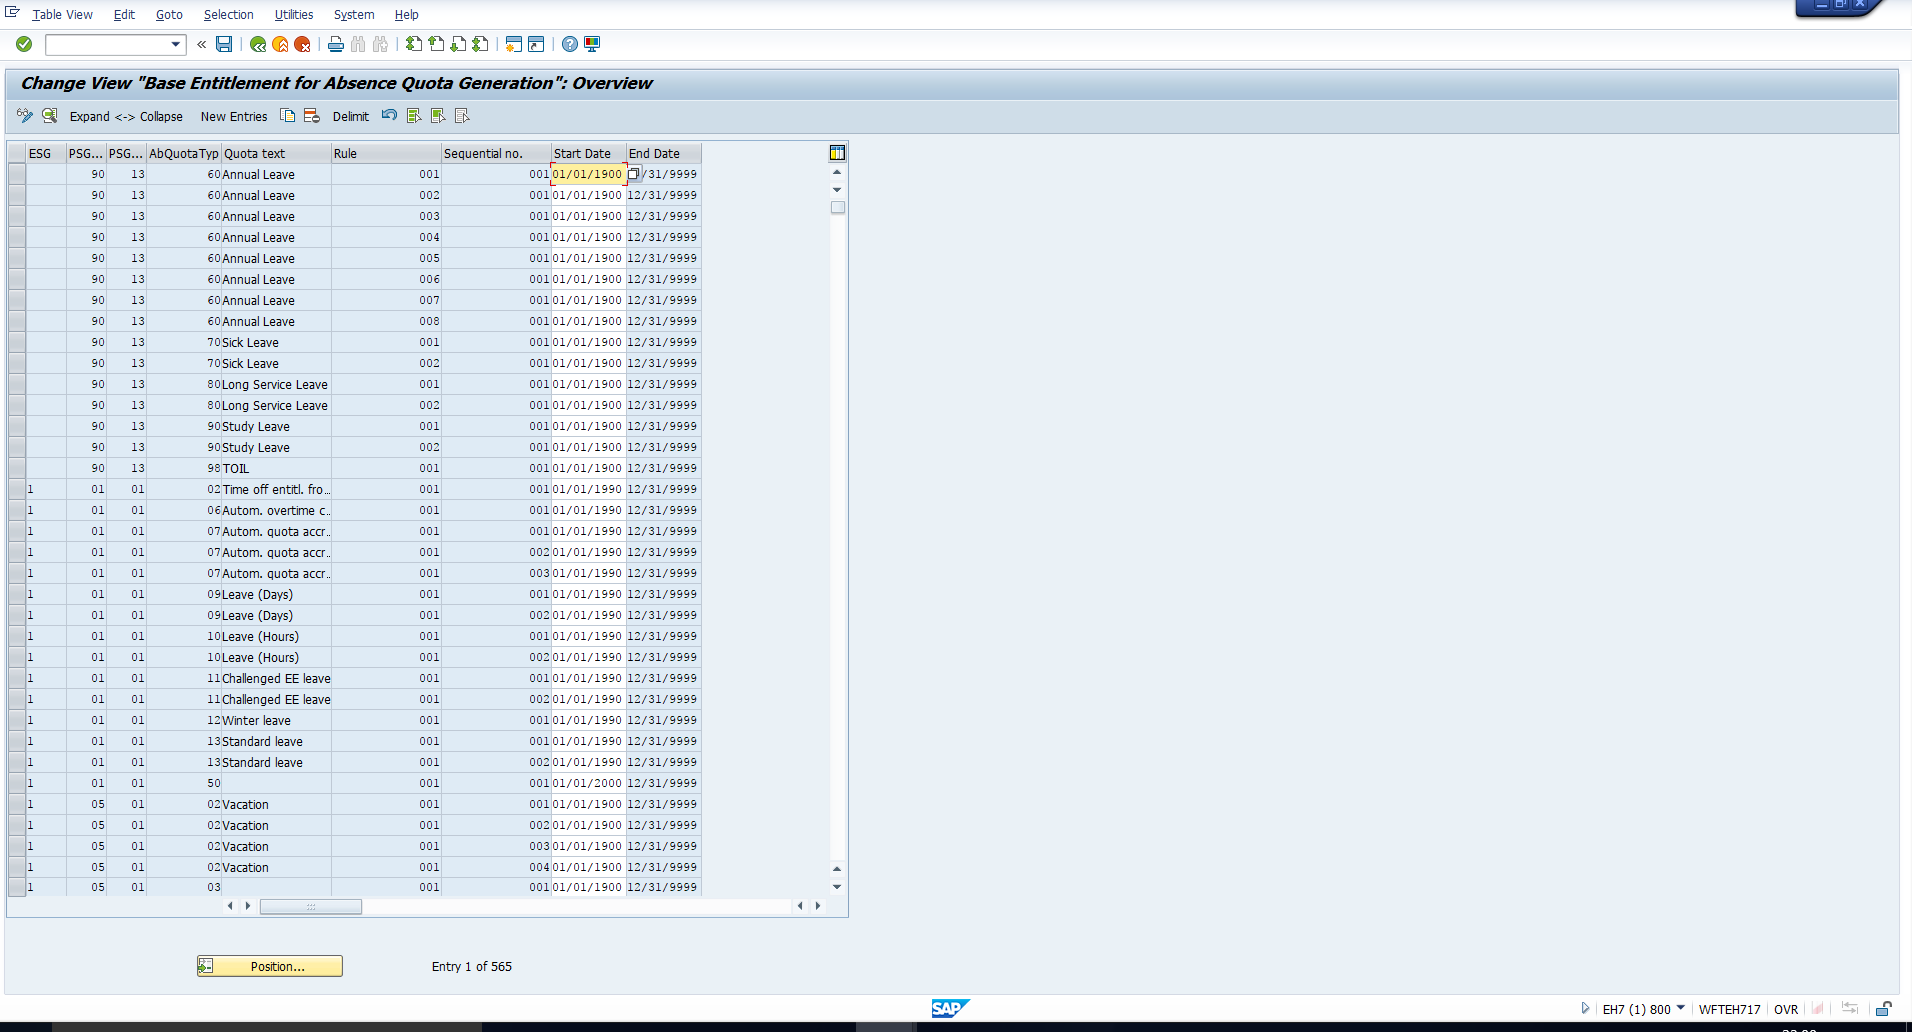
To create a new one, you can copy an existing rule, if there is one with similar characteristics.
Alternatively, click on the New entries button to get to the detailed screen in Figure 13.
We will explain the most important fields:
ES grpg for time quotas – Enter the Employee subgroup grouping for Time quotas, for which this rule is applicable.
PS grpg for time quotas – Enter the Personnel subarea grouping for Time quotas, for which this rule is applicable.
PS grpg for time recording – Enter the Personnel subarea grouping for Time recording, for which this rule is applicable.
Absence quota type – Enter the absence quota type for which this rule is applicable.
Rule for base entitlement – Assign a unique 3-digit code to identify the rule.
Sequential no. – You can create several sub-rules within the rule if you want to specify different base entitlements according to the employee’s seniority or age. In this case, you should assign a different sequential number to each sub-rule.
Start & End – Enter the dates to define the validity period of the rule.
Seniority – You can specify a seniority interval if an employee’s leave entitlement depends upon his or her seniority in the company. If this is specified, the system will check if the employee’s seniority lies within this interval. If yes, this sub-rule is applicable to the employee and the corresponding base entitlement will be valid. Otherwise, the system will search for the next sub-rule until it finds one applicable to the employee. Note that you should leave these fields blank if the base entitlement does not depend on seniority.
Age – You can specify an age interval if an employee’s leave entitlement depends upon his or her age. If this is specified, the system will check if the employee’s age lies within this interval. If yes, this sub-rule is applicable to the employee and the corresponding base entitlement will be valid. Otherwise, the system will search for the next sub-rule until it finds one applicable to the employee. Note that you should leave these fields blank if the base entitlement does not depend on age.
Constant – Enter the base entitlement as a constant value in this field.
Related to period – Here you should select the base period to which the base entitlement is applicable. You can see the options (the radio buttons) in Figure 13. Of these, the most commonly used is the Calendar year option.
So, taking our example forward, for an entitlement of 12 days per calendar year, we would set the Constant as ‘12’ and Period as ‘Calendar year’.
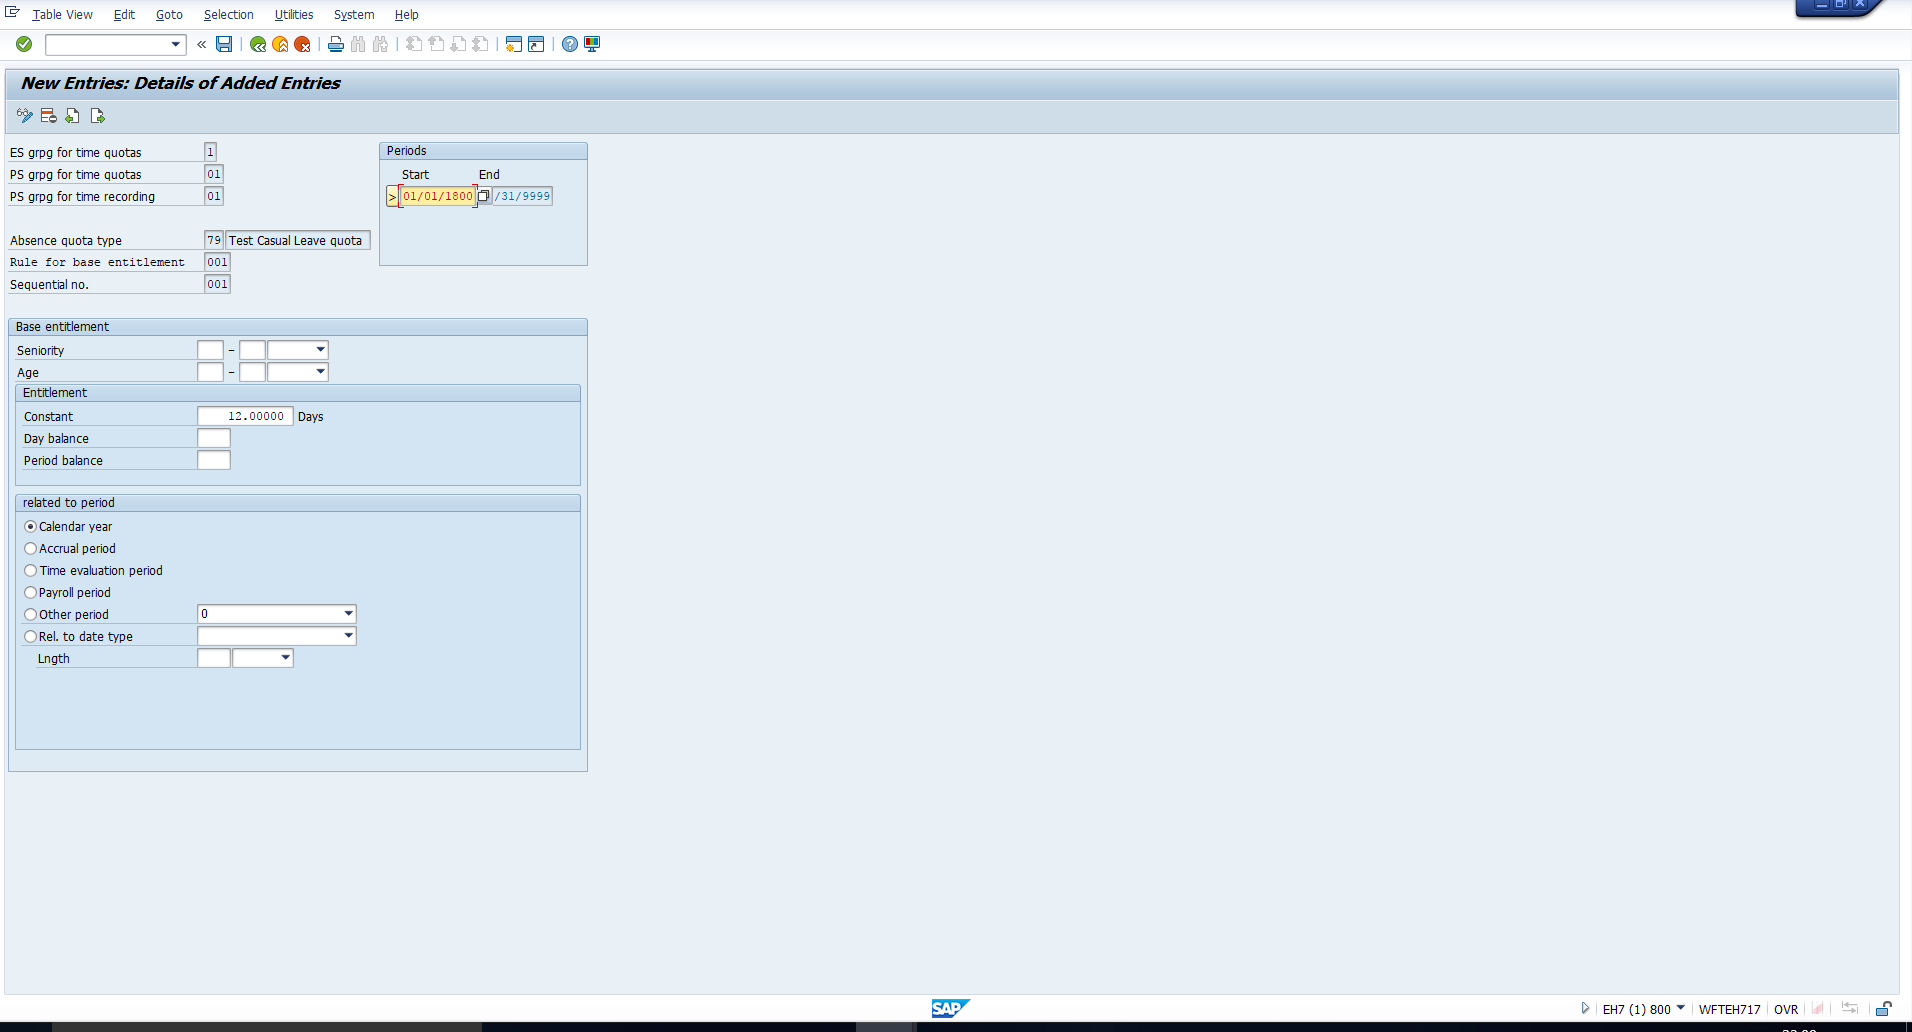
Secondly, let’s assume that the organization’s policy does not depend on the age or seniority of the employee. In this case, a single sub-rule will suffice. You can also see that we have left the age and seniority intervals blank.
Once you enter the required details, save the entry.
Determine Deduction Period
In the tutorial on Absence quotas, we explained the difference between the Validity period and the Deduction period of a quota. With that in mind, look at the IMG path in Figure 14. For quotas that are generated using Time Evaluation, both the validity and deduction periods can be defined through this activity. For other quotas, we can define only the Deduction period of the Quota type through this path. As stated in the introduction, only the latter are within the scope of this tutorial and hence we will only discuss the definition of deduction periods.
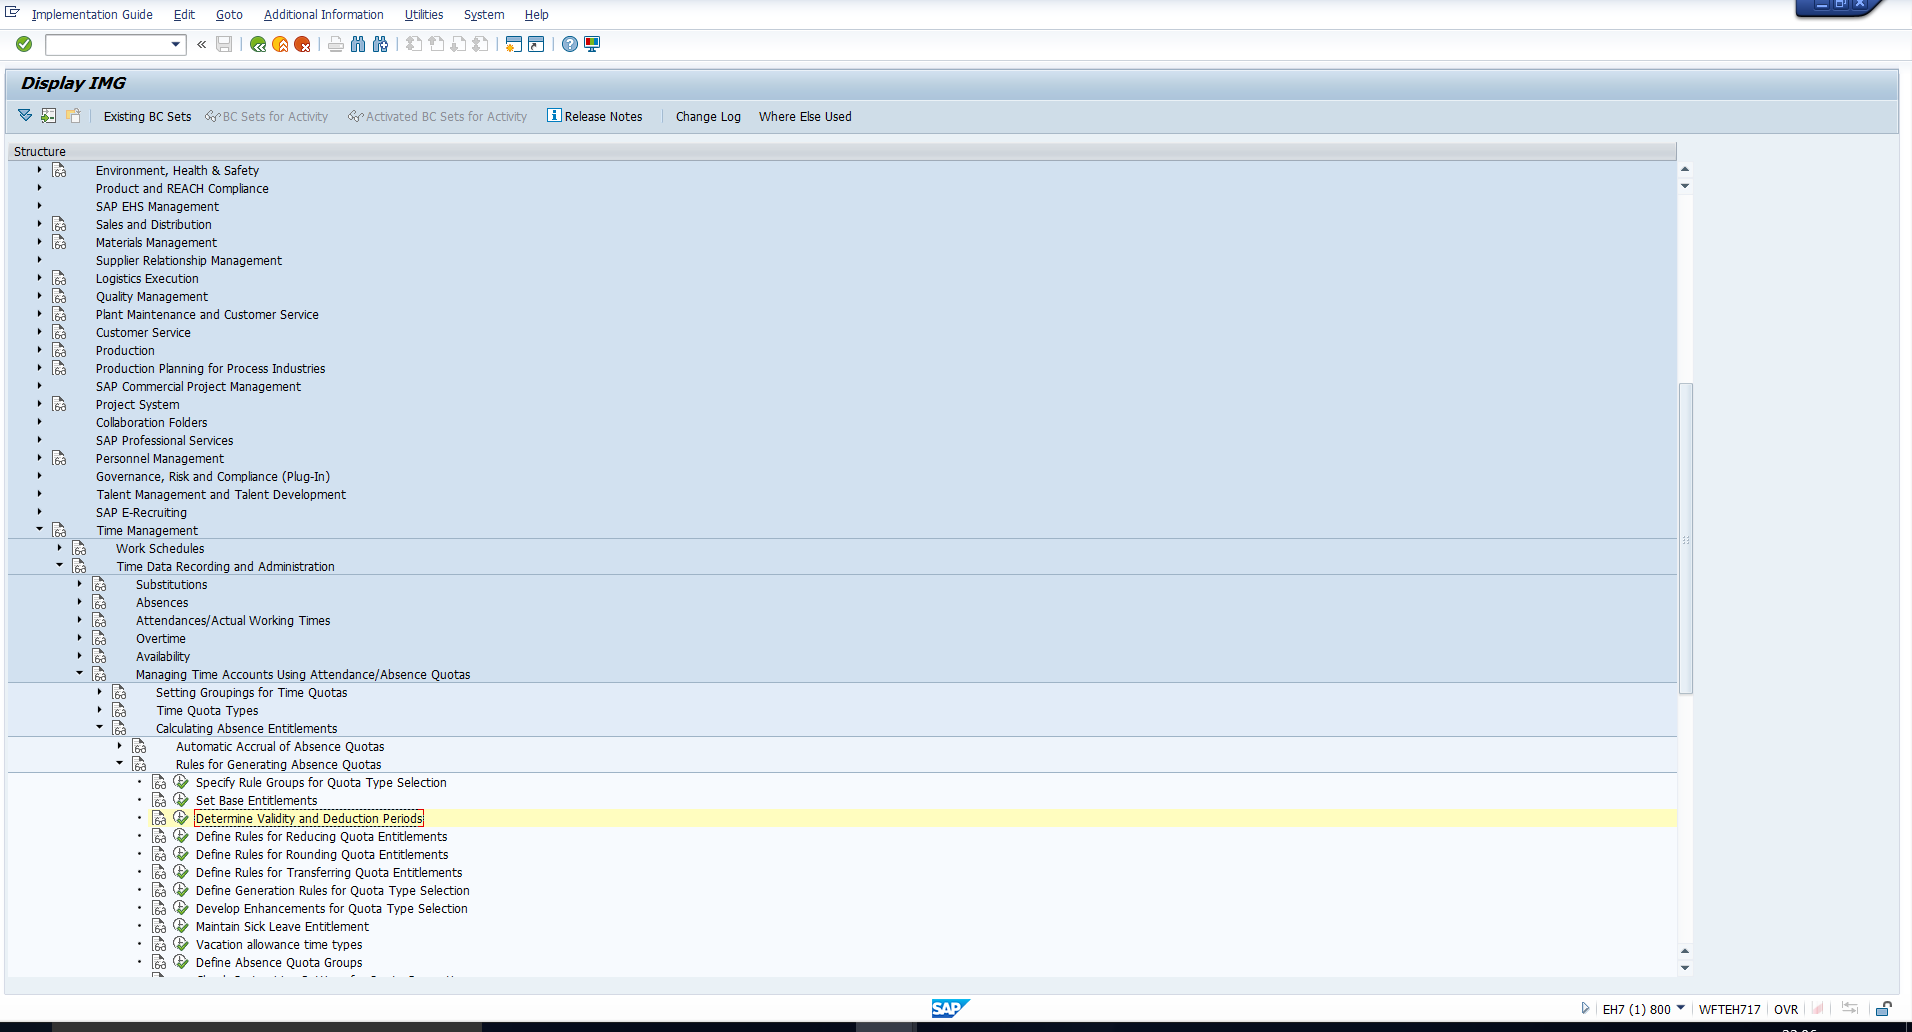
Click on the activity highlighted above to get to the screen in Figure 15.
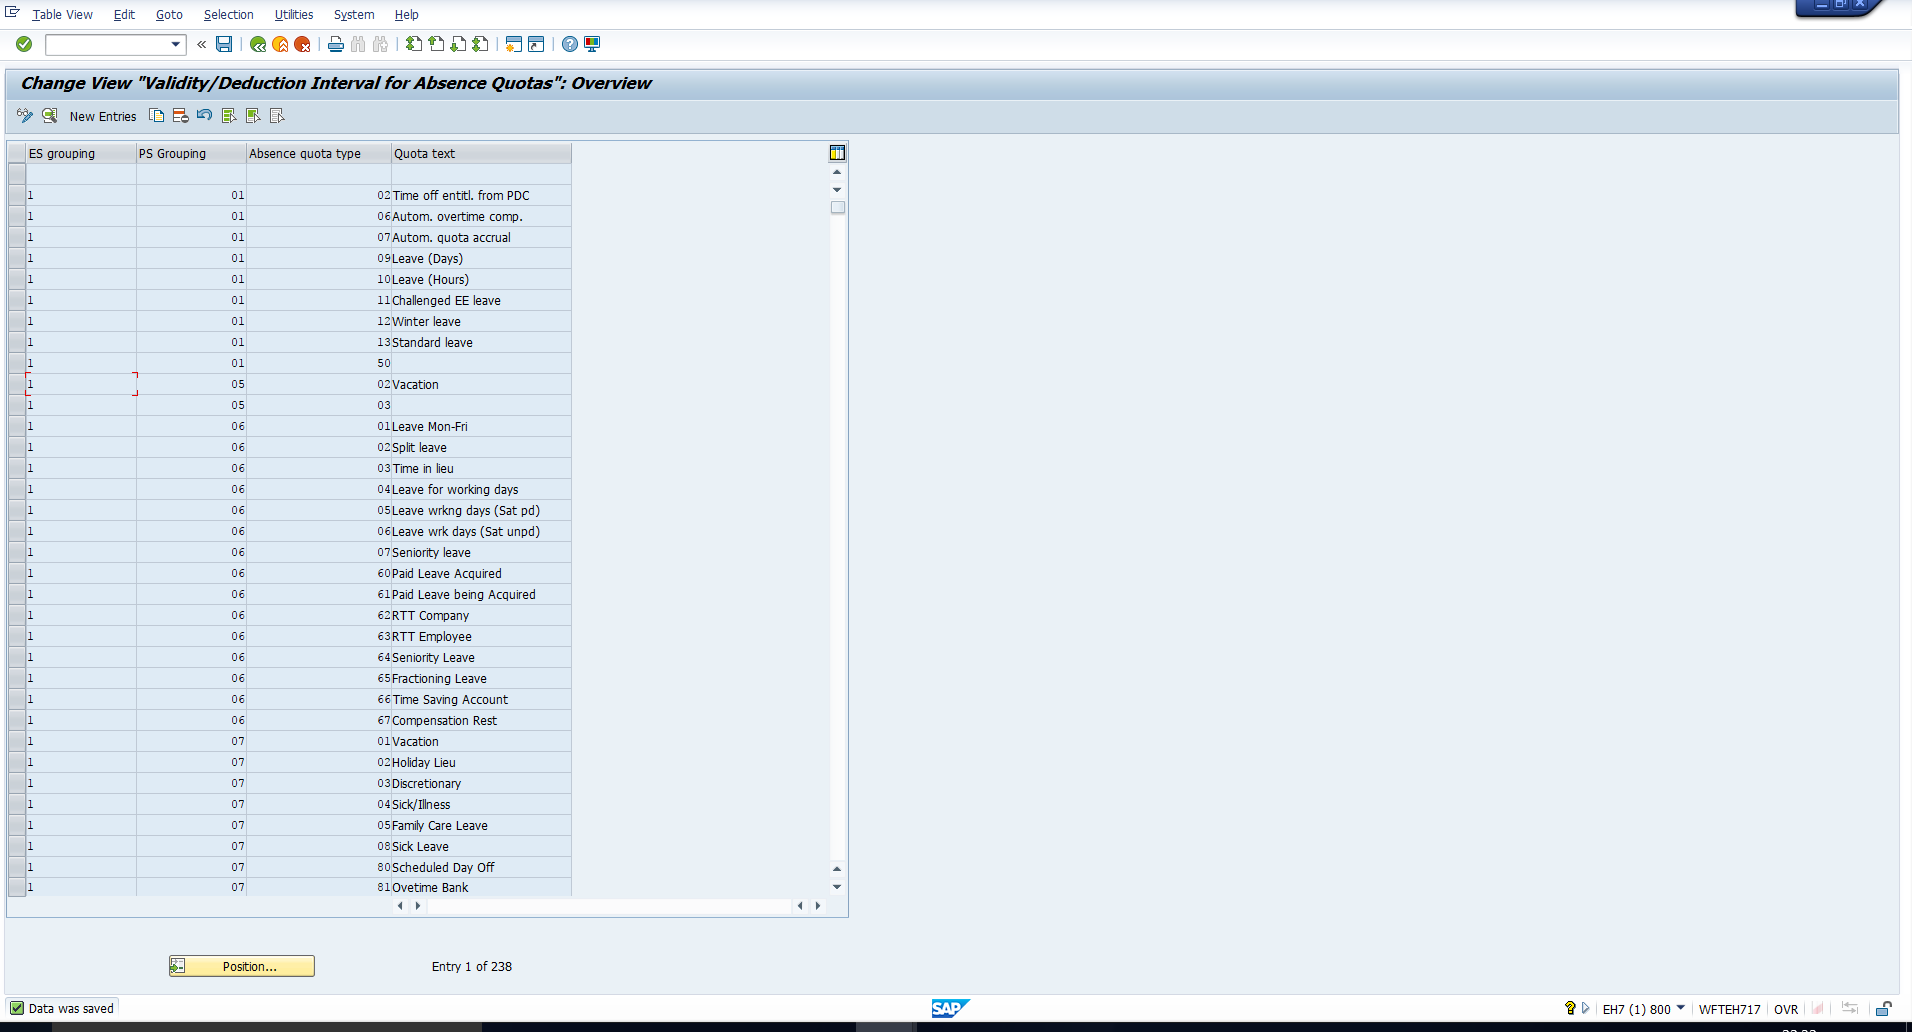
To define the Deduction period for a quota type, click on the New entries button. You will then see the screen in Figure 16.
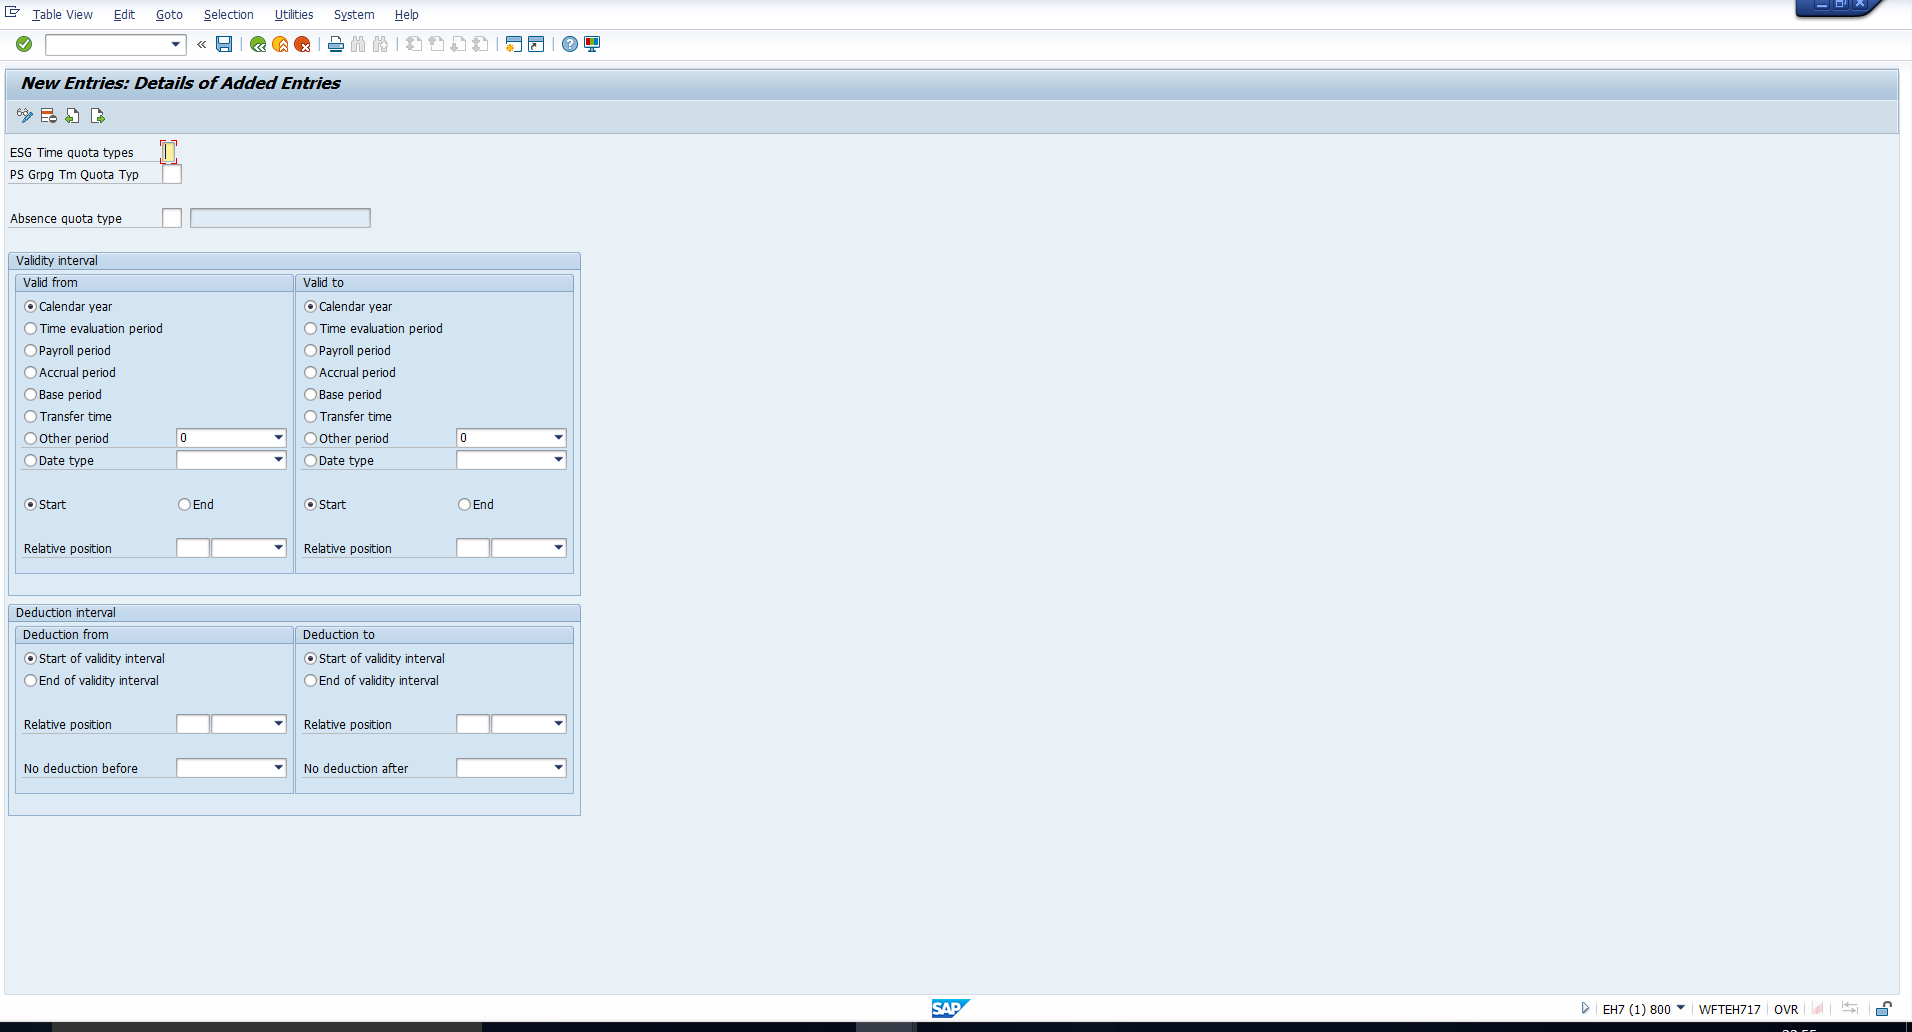
Enter the Employee subgroup and Personnel subarea groupings for Time Quotas, as well as the Absence quota type.
Do not make any entries in the ‘Validity interval’ section.
In the ‘Deduction interval’ section, define the Deduction from and Deduction to fields relative to the validity interval. The settings you make here will depend on your company’s leave policies. For example, Company A may mandate that the Casual Leave quota generated for the calendar year 2017 can only be utilized in the calendar year 2017. In this case, your deduction interval will be the same as the validity interval, and your configuration will look like that in Figure 17.
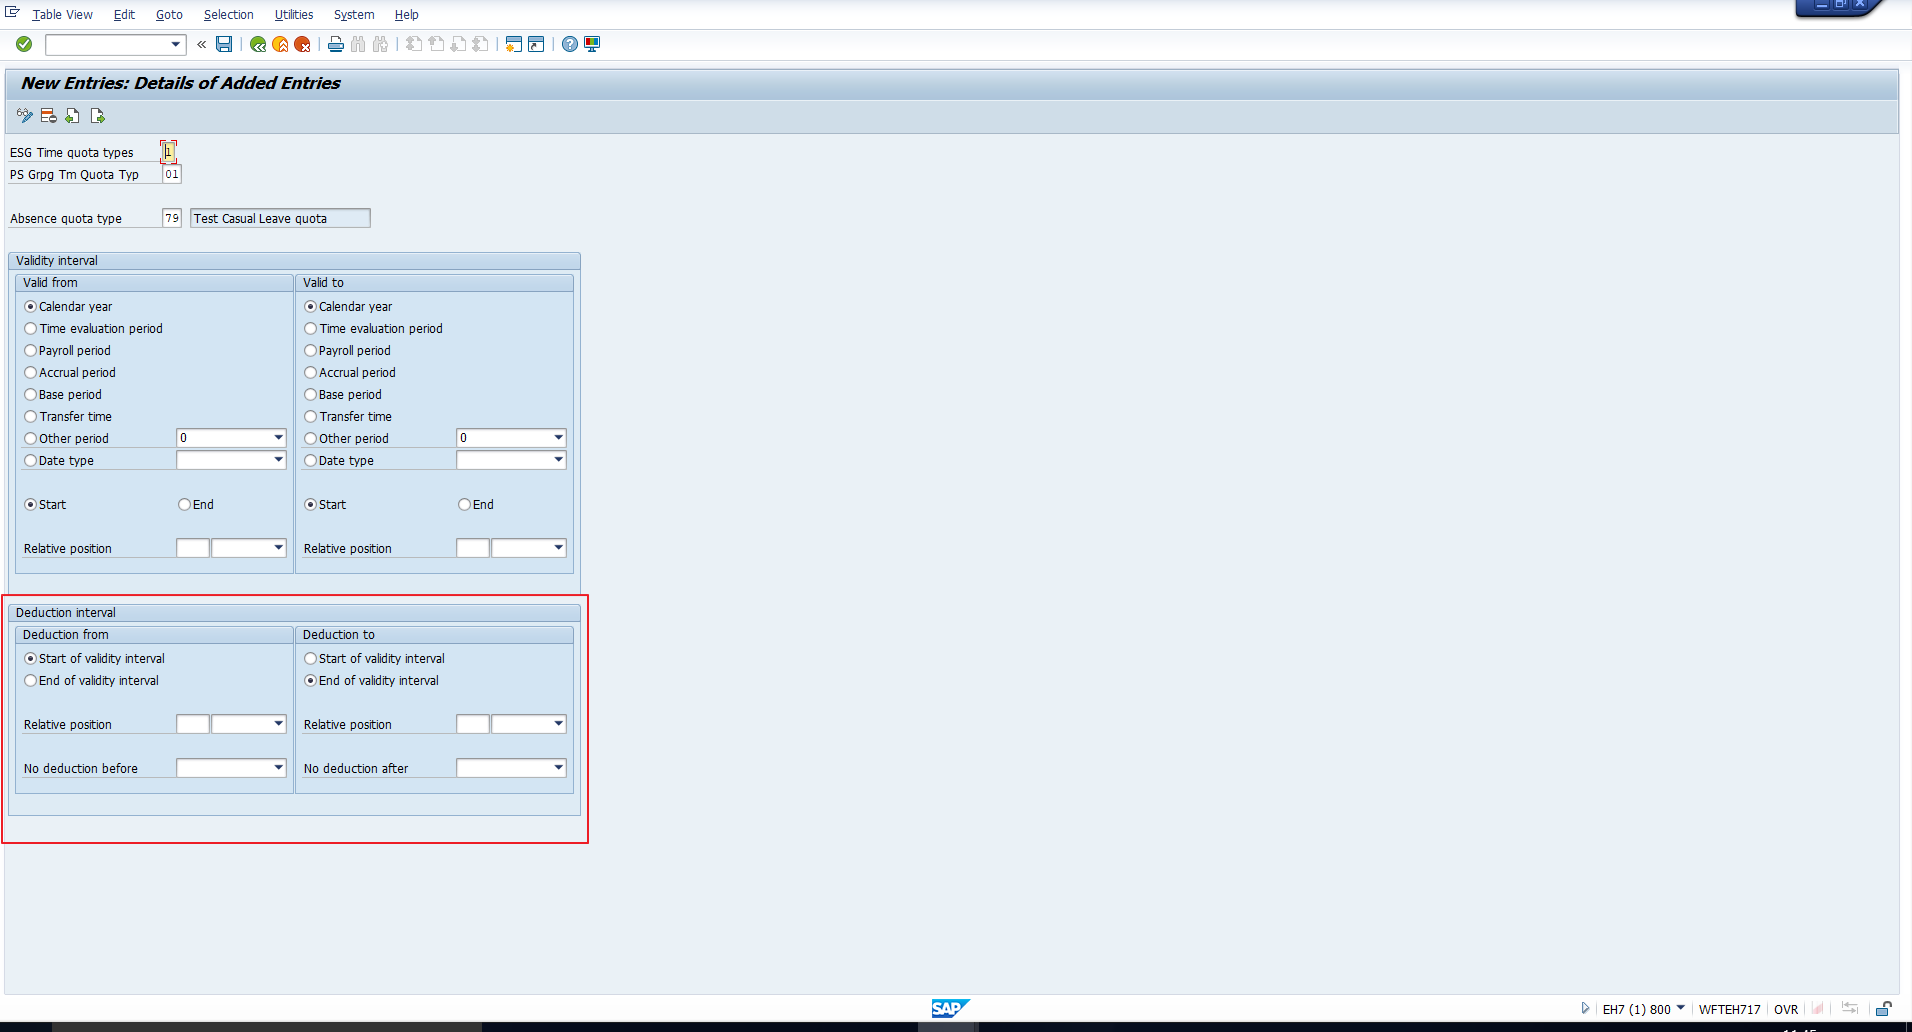
On the other hand, Company B’s policy may state that the Casual leave quota for the calendar year 2017 can be utilized in the following calendar year as well. In this case, the deduction end date should be set as 12/31/2018 (in mm/dd/yyyy format). For this, you would need the configuration depicted in Figure 18.
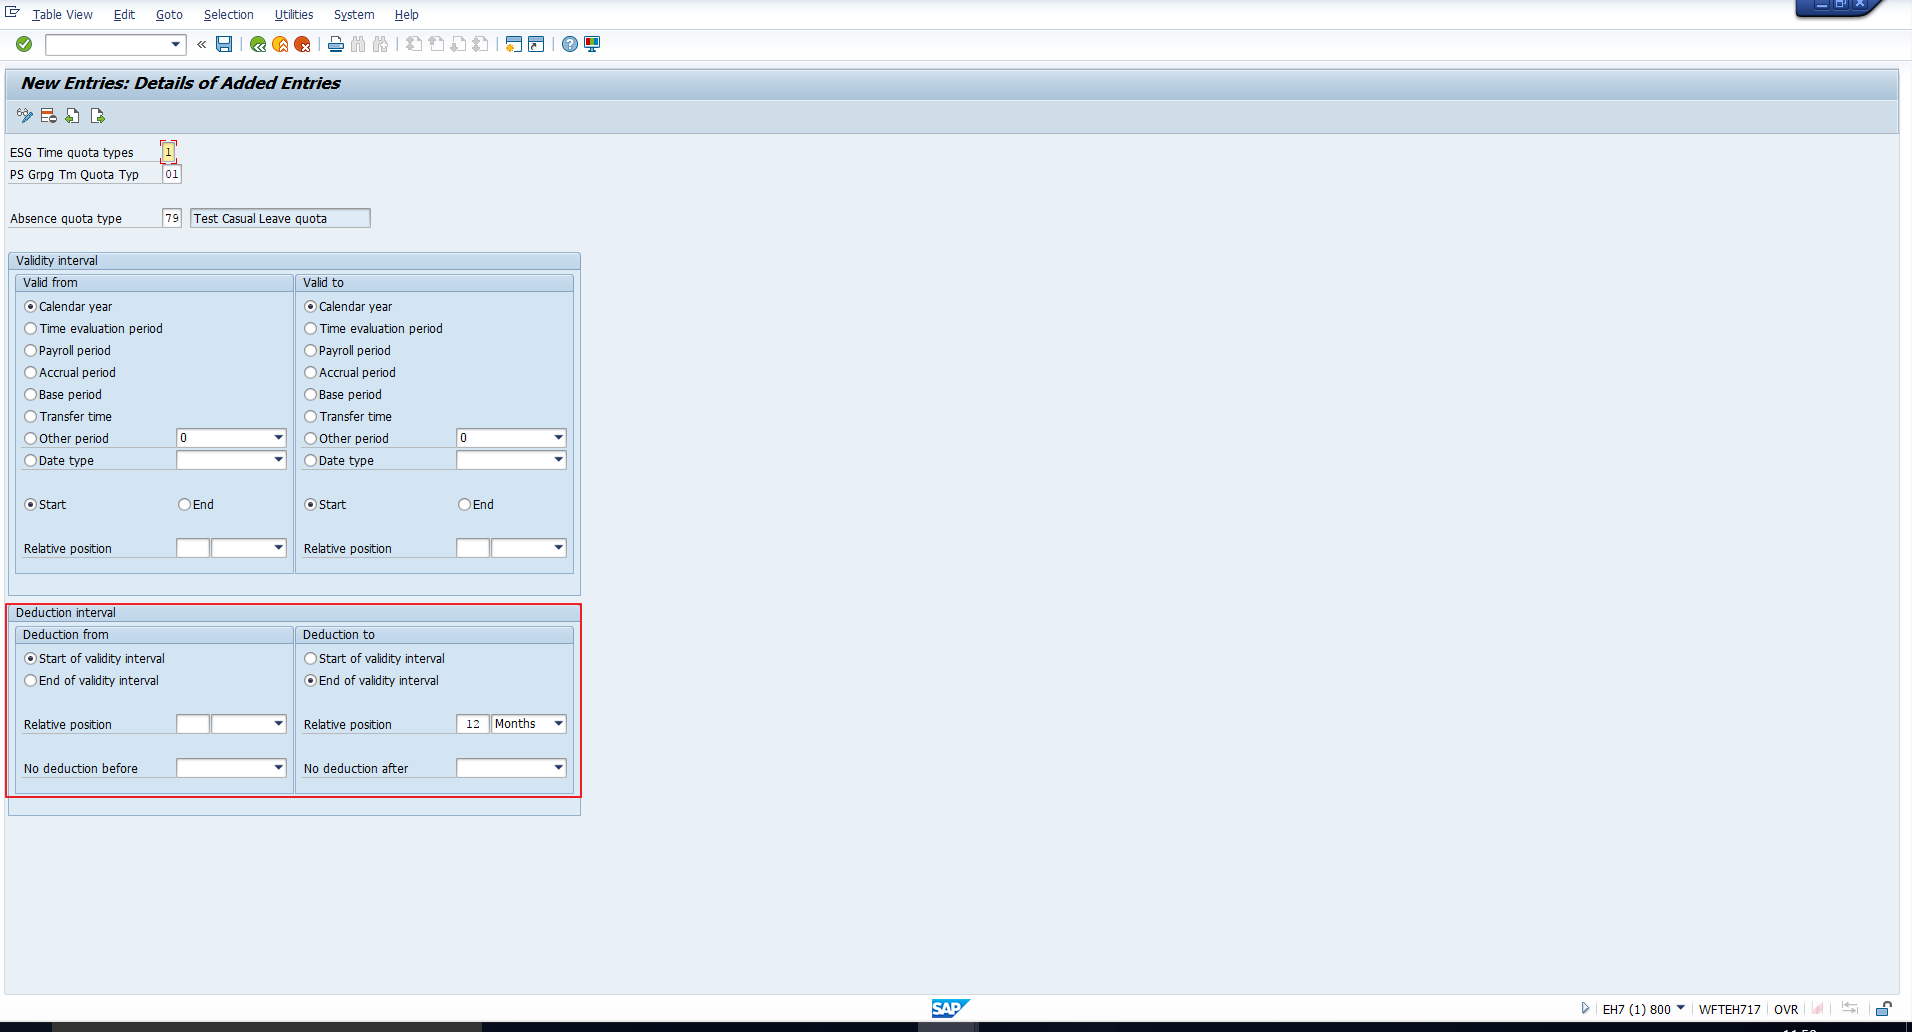
In the above screenshot, you can see that we have entered a Relative position of 12 months from the End of the validity interval. This can be interpreted as:
Deduction end date = Validity end date + 12 months, which is in accordance with the organization’s policy.
Similarly, based on your requirements for individual quota types, you can make the necessary configuration and save the data.
With this, we will wind up this tutorial about SAP Absence Quota Configuration. In our next tutorial, we will discuss the configuration of SAP quota generation rules, which is an essential step before we can generate the absence quota for employees. So stay tuned!
—
Did you like this tutorial? Have any questions or comments? We would love to hear your feedback in the comments section below. It’d be a big help for us, and hopefully it’s something we can address for you in improvement of our free SAP HR tutorials.
Navigation Links
Go to next lesson: SAP Absence Quota Generation Rules
Go to previous lesson: SAP Absence Rounding Rule
Go to overview of the course: SAP HR Training
good afternoon
I copied quota types for old leave that we want to be deducted first before the current leave is deducted. I copied existing vacation leave on quota deduction types with a different start and end date and I put them in the order in which it should be deducted but I get a message saying “an entry already exist with the same key” table v_556R_B
In the record that you are attempting to create, are you changing both the start and end date? You will get this error if you change either of them but not both.
For the sake of clarity, could you specify all the key field values in the existing record as well as the one you are trying to create?
Good Explanation