
 This is a sequel to the tutorial on SAP Absence Quota configuration, in which we explained how to configure absence quota types that should be generated using the Generate Absence Quotas report (RPTQTA00) or granted when the Absence Quotas infotype is created. In this tutorial, we will explain the configuration of SAP Absence Quota Generation rules, also known as Selection rules. Prior to the configuration of SAP Absence Quota Generation rules, you must complete the configuration steps outlined in the previous tutorial. This and previous tutorials are part of our free SAP HCM course.
Specify Rule Groups for Quota Type Selection
If you need to define different SAP absence quota generation rules for different sets of employees based on certain organizational criteria, then you can define different quota type selection rule groups.
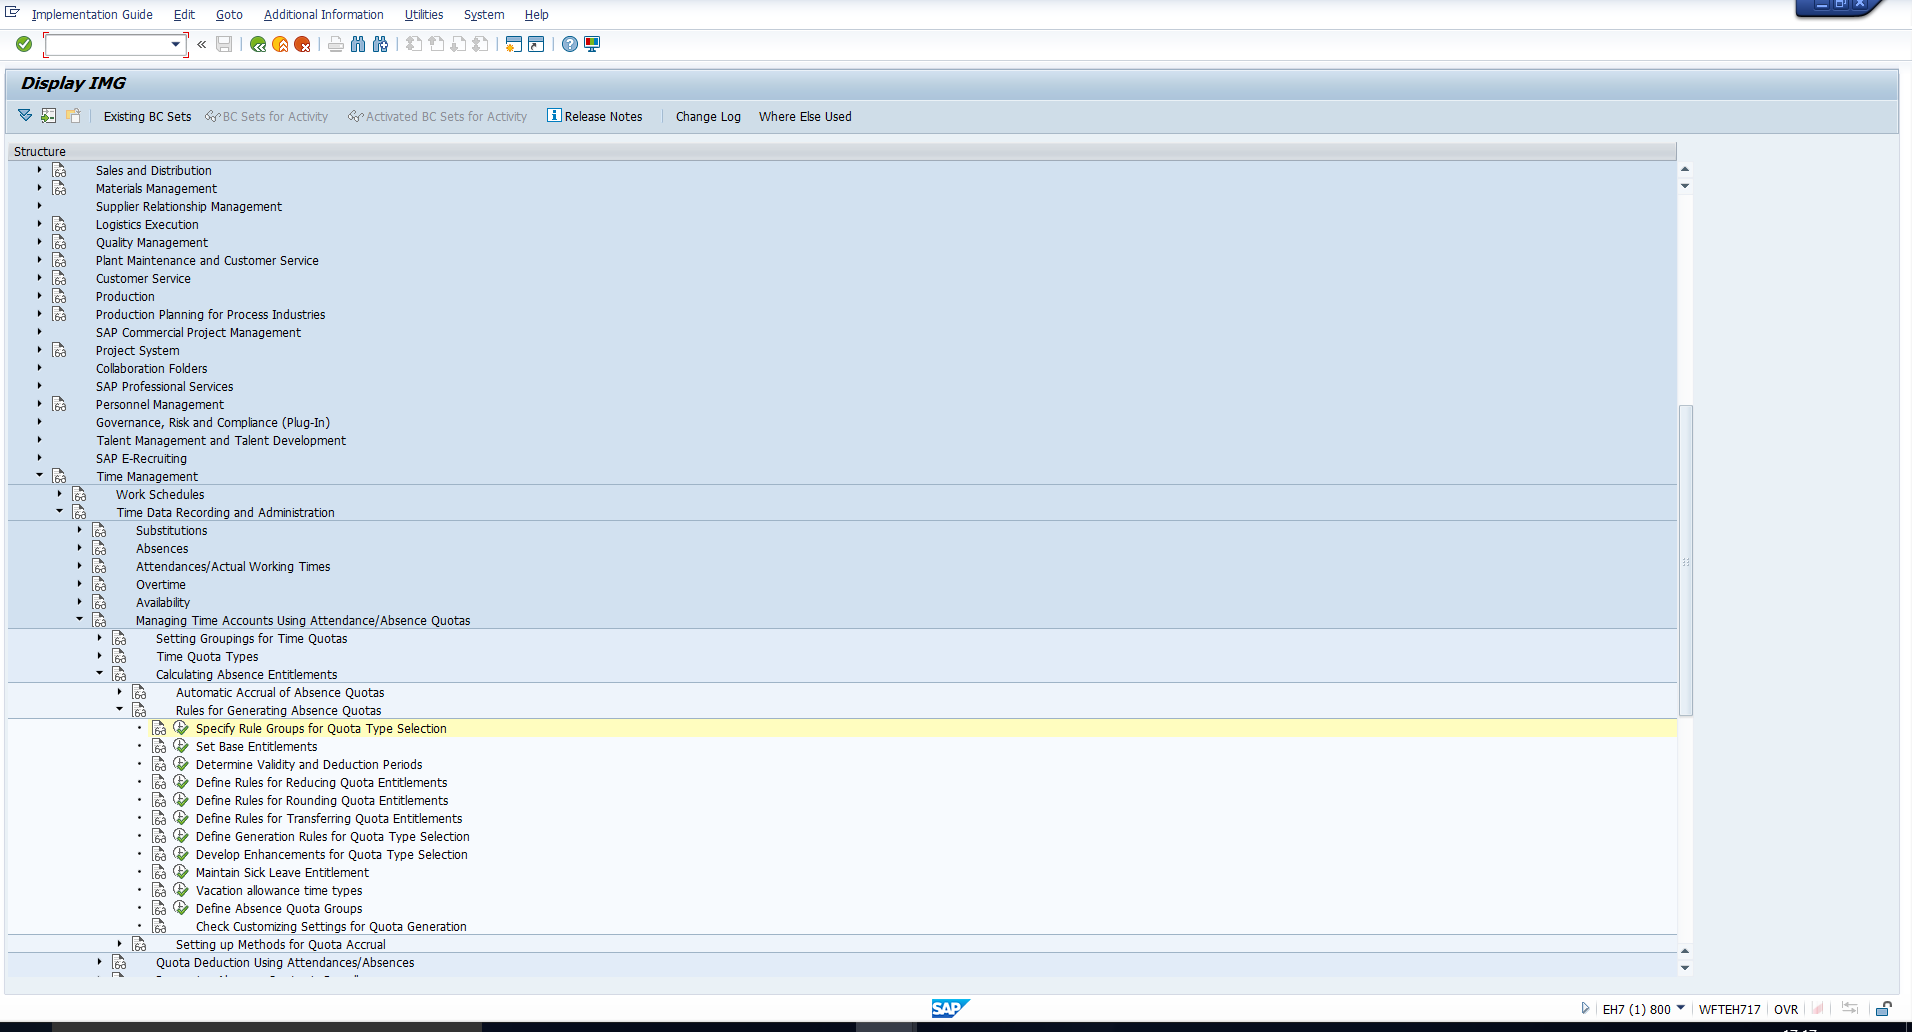
For example, assume that you have several company codes in your system. For Company code 1000, the leave quota policy differs from that of the other companies. For this, you can configure the QUOMO feature to return a different quota type selection rule group for Company code 1000. To define this feature, follow the IMG path in Figure 1.
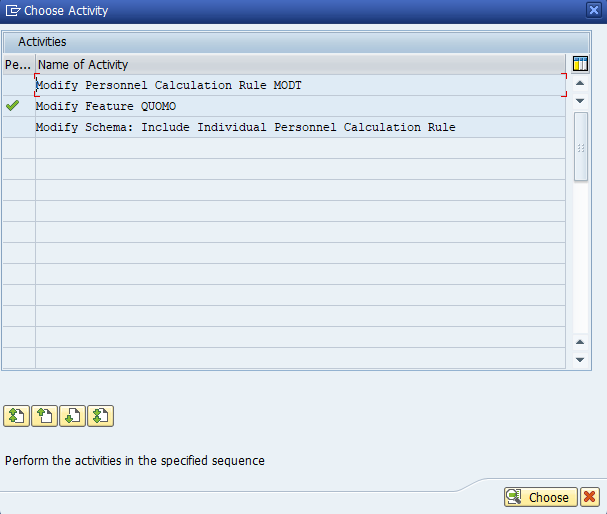
Then, select the second activity in Figure 2.
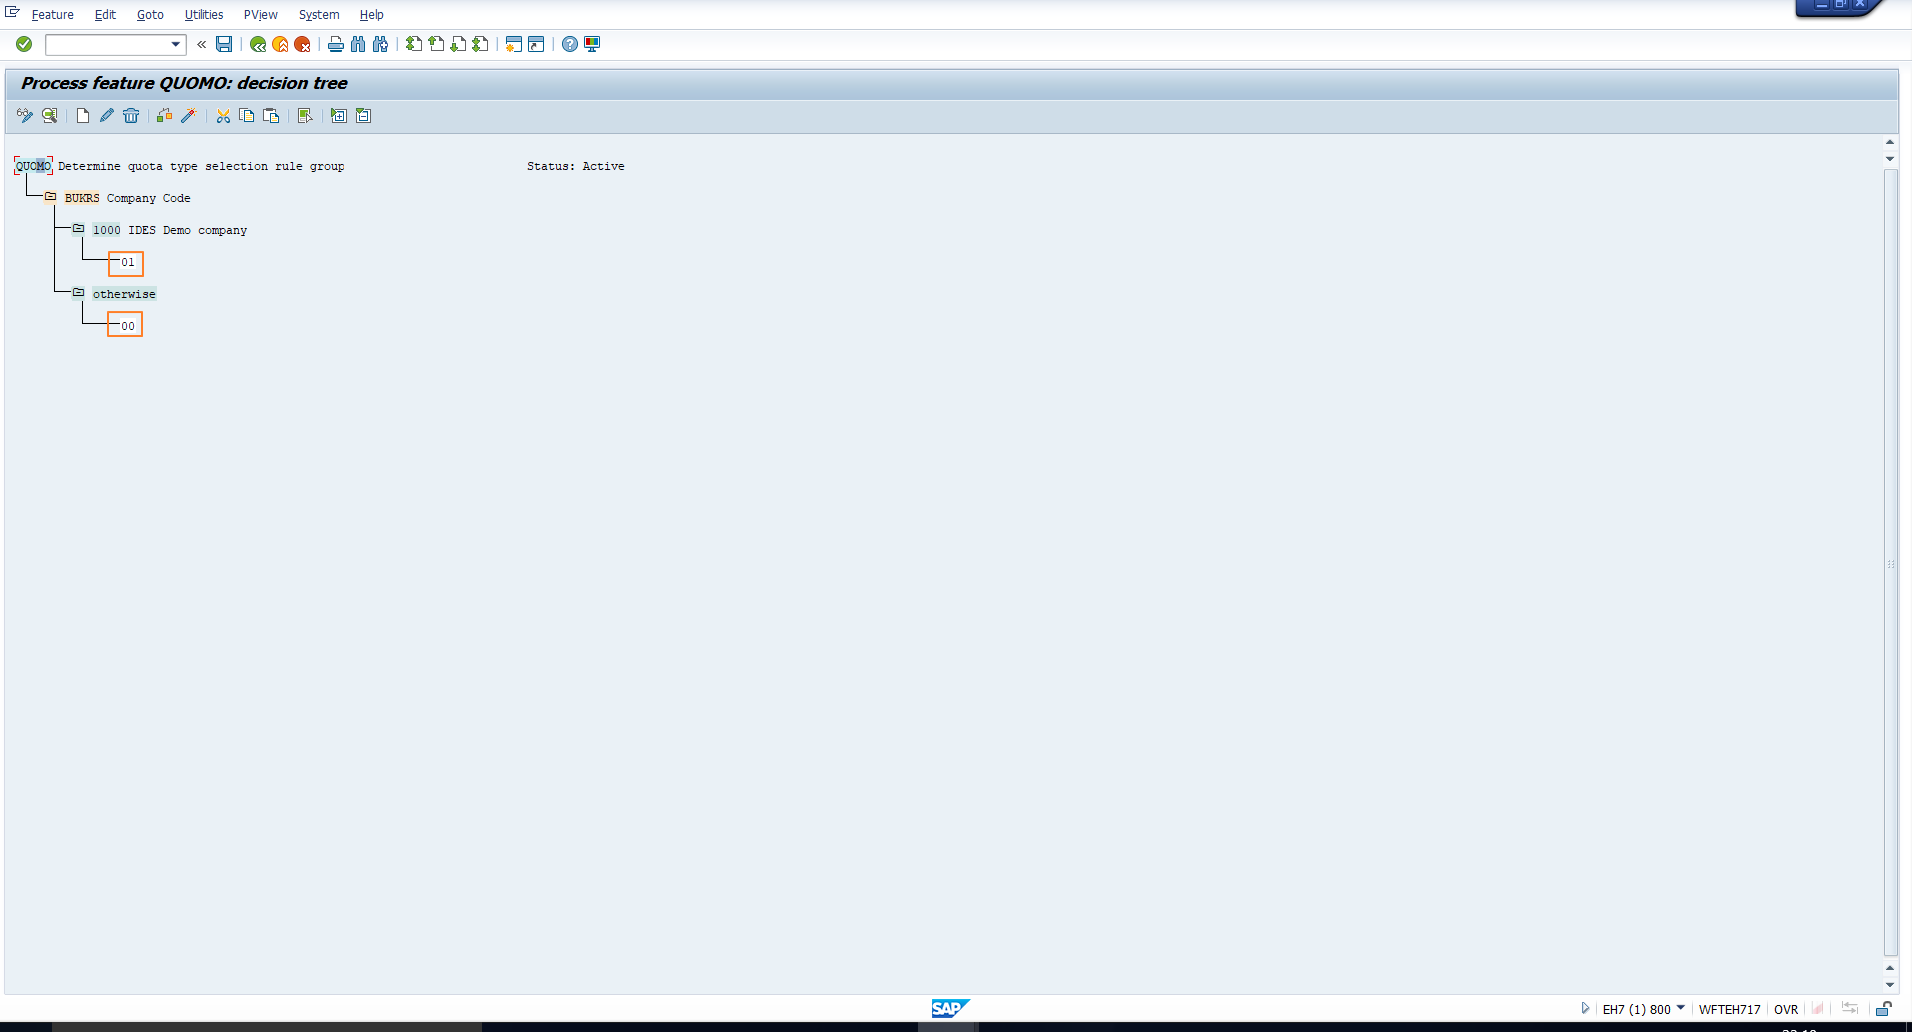
You will see the QUOMO feature. Consider the sample configuration in Figure 3. The two-character highlighted values, which are determined on the basis of the company code, are basically the quota type selection rule groups returned by the feature. If you are not familiar with Features, we recommend that you go through the tutorial on SAP HCM Features before carrying out this configuration.
Configuration of SAP Absence Quota Generation Rules
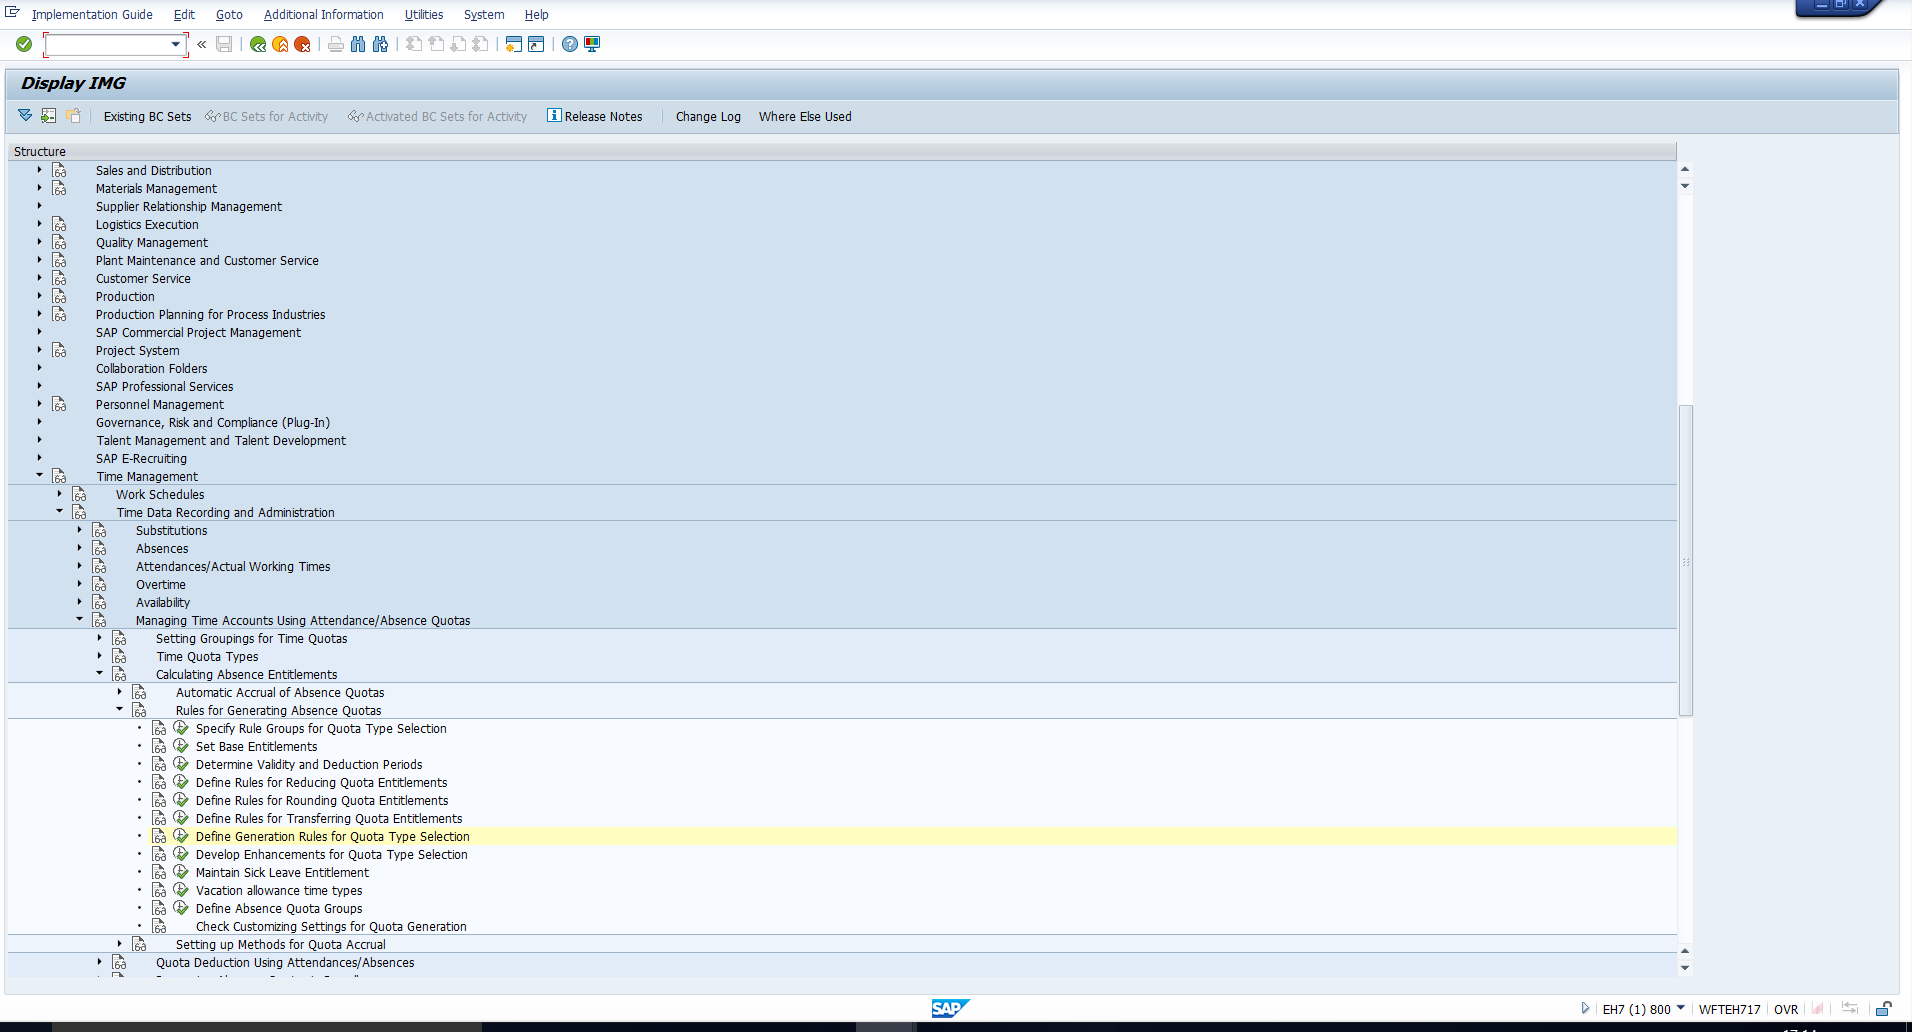
To configure a new quota generation rule, follow the IMG path highlighted in Figure 4.
This opens up the Selection rules overview screen as in Figure 5.
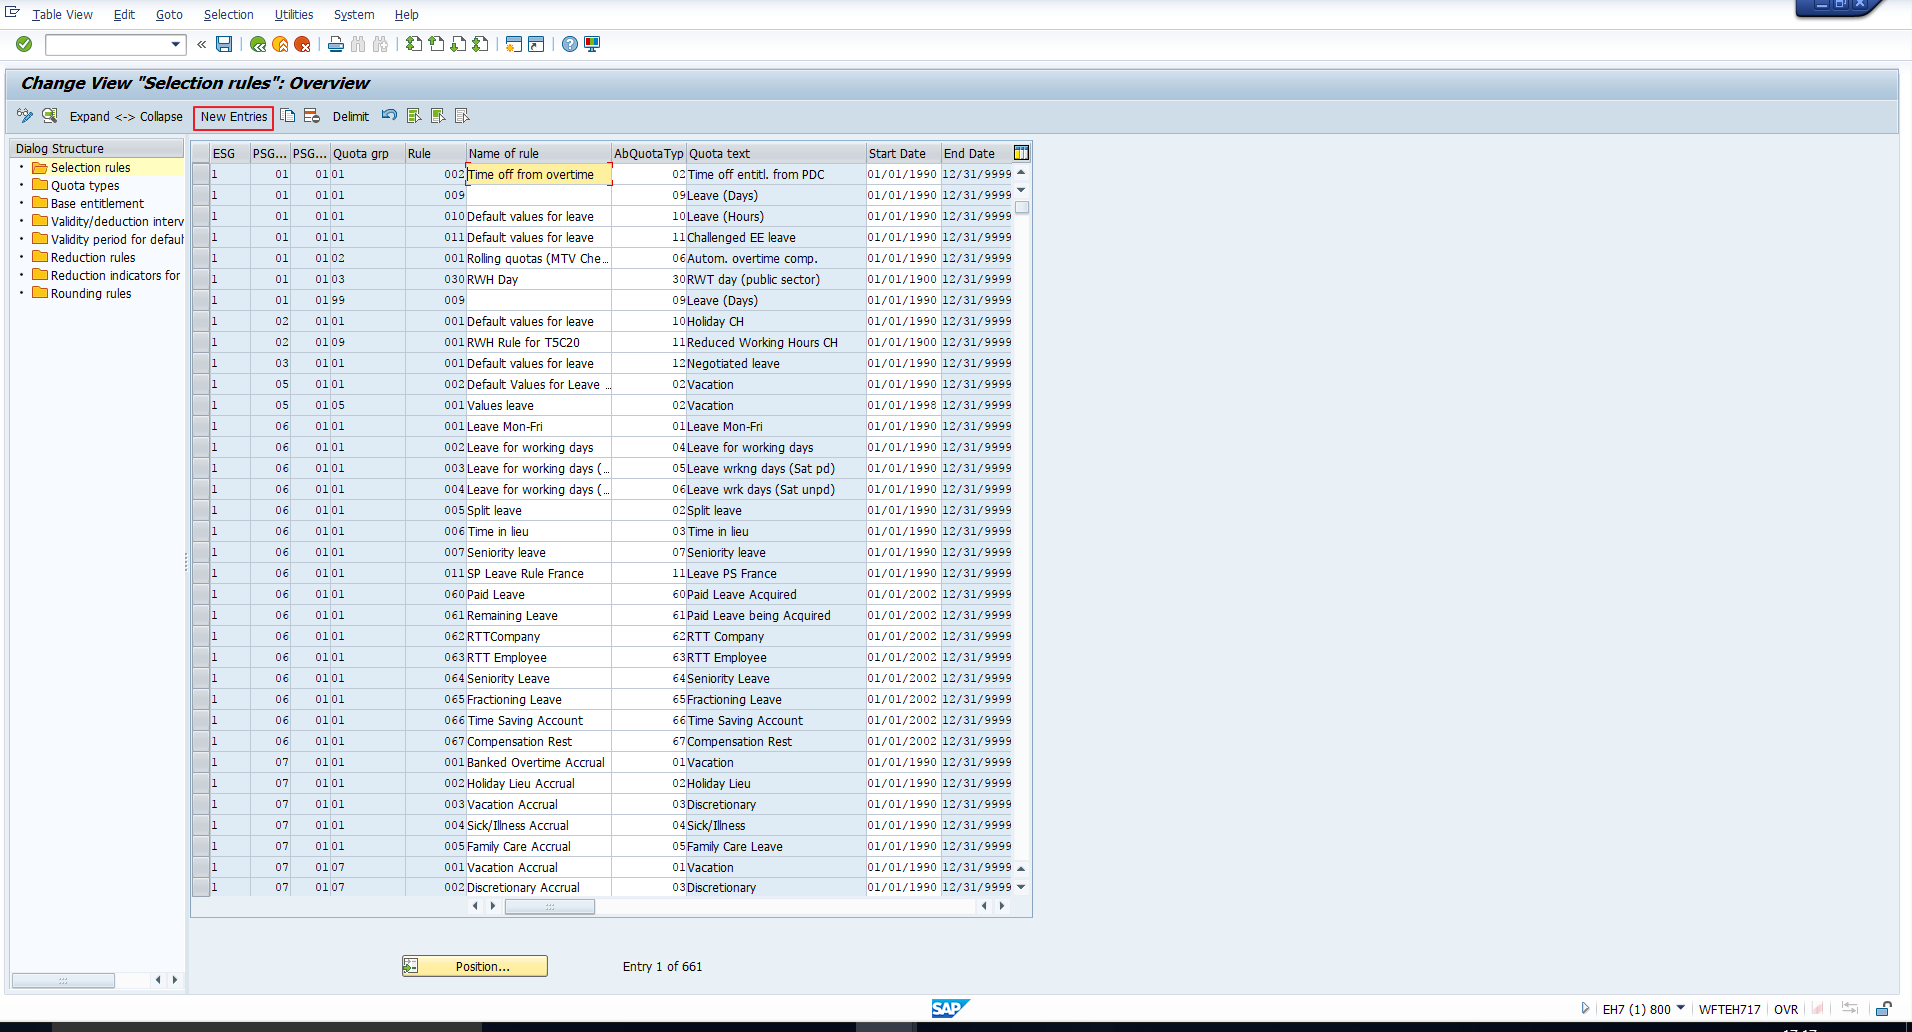
To create a new selection rule, you can copy an existing entry, if you have a suitable reference rule. Alternatively, you can click on the New entries button highlighted above. The screen captured in Figure 6 will follow.
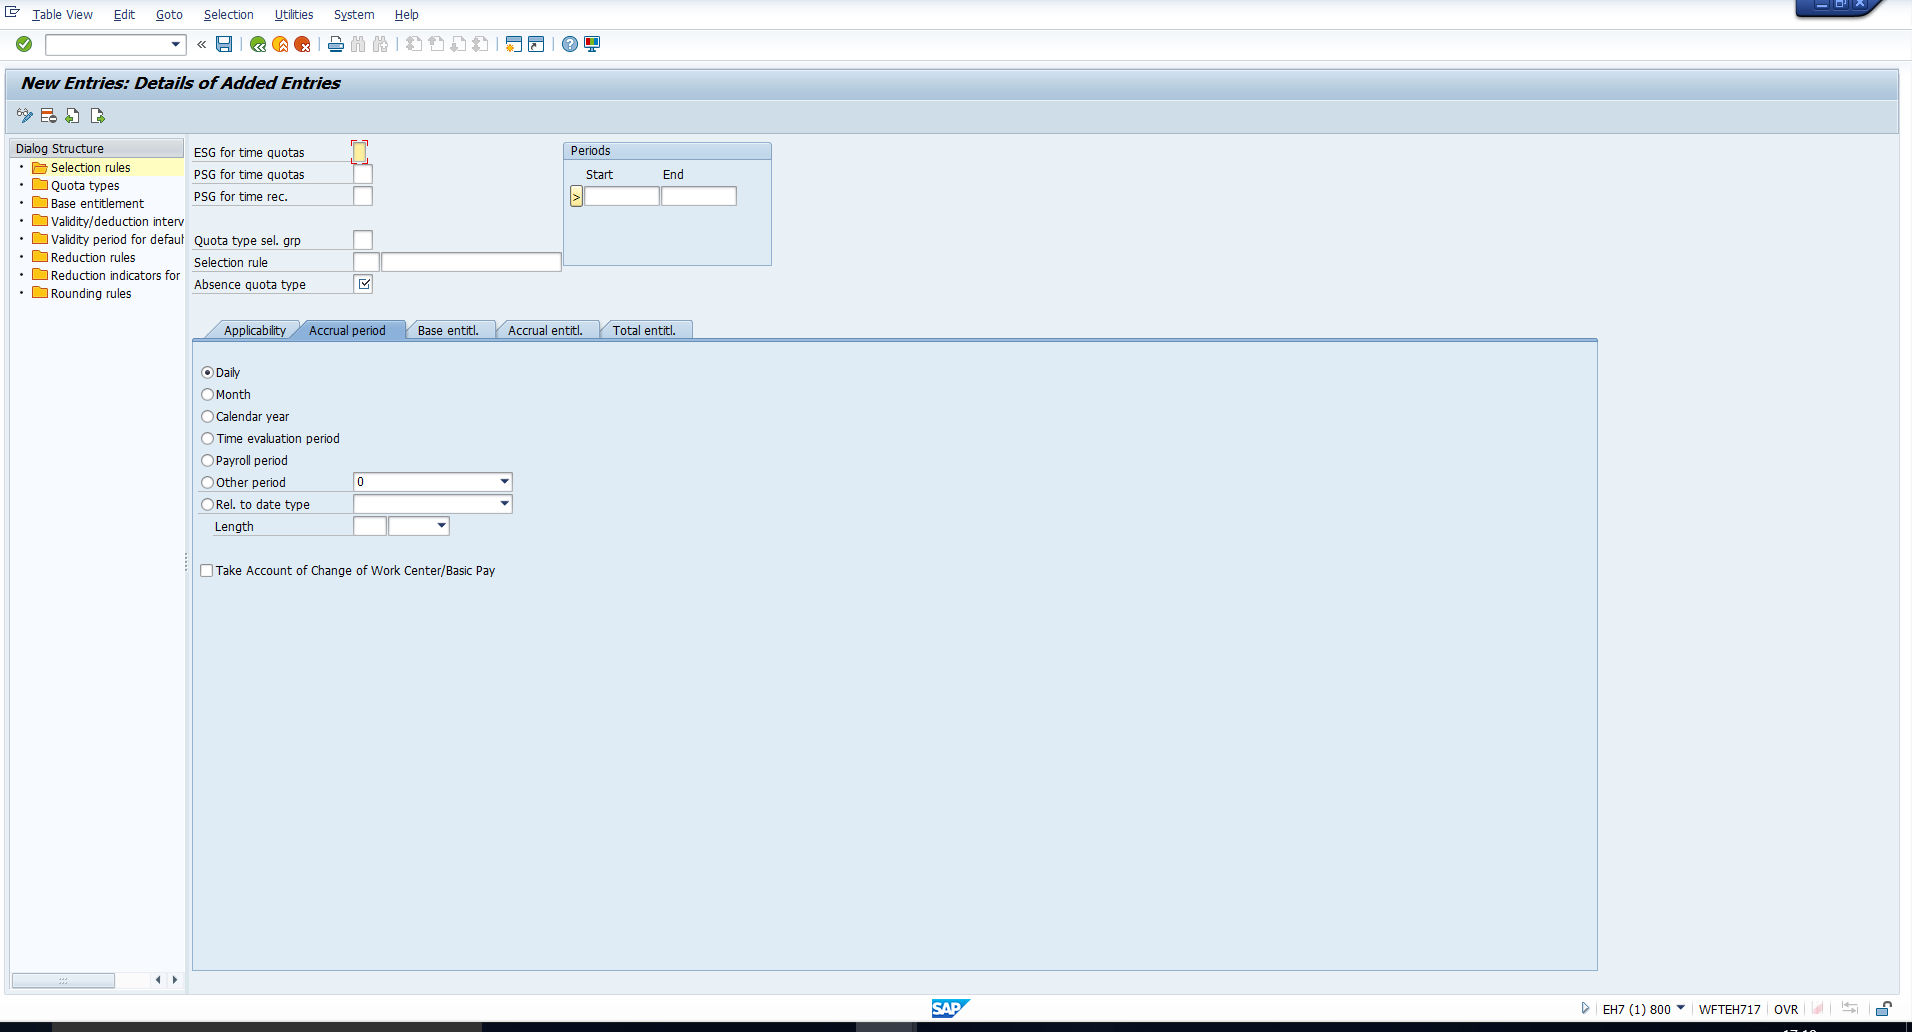
This screen broadly consists of a header and five tabs. Let’s start with the fields in the header and then proceed to the tabs.
Header Fields
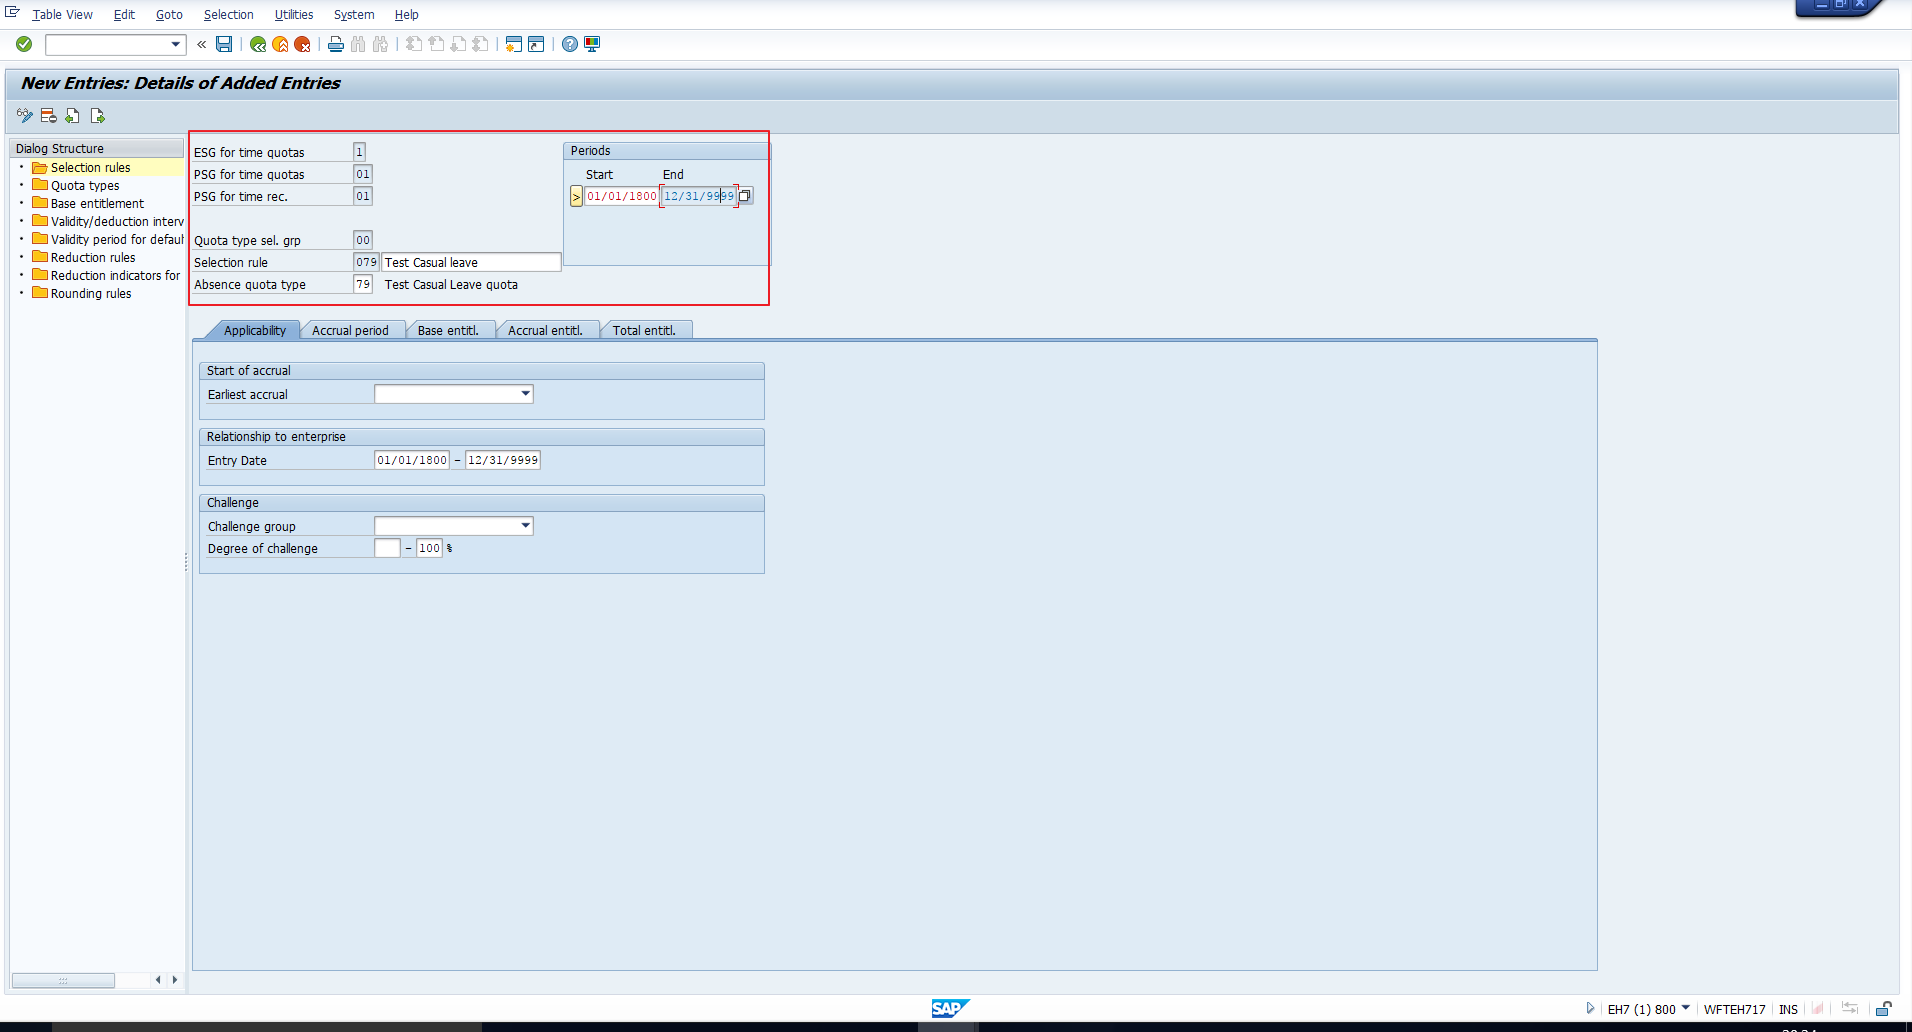
ESG for time quotas – This is the Employee subgroup grouping for Time quotas, for which you want to create this entry.
PSG for time quotas – This is the Personnel subarea grouping for Time quotas, for which you want to create this entry.
PSG for time recording – This is the Personnel subarea grouping for Time recording, for which you want to create this entry.
Quota type selection group – This is the Quota type selection rule group, that is the return value of the QUOMO feature, for which you want to create this rule.
Selection rule – This comprises a unique 3-digit code as well as a meaningful text to identify the rule.
Absence quota type – This is the absence quota type for which you want to create this entry.
Start & End – These dates are required to delimit the validity of the entry.
Take a look at the sample data entered in the header in Figure 6. If you have configured the QUOMO feature explained in the previous section, you must enter the required return value of the feature in this field. This implies that you should create a different selection rule entry for every return value of the feature.
Tabs
Next, let’s understand the significance of each tab.
Applicability
This section, captured in Figure 8, is used to restrict the applicability of the rule. In other words, if the employee satisfies the conditions in this section, the quota will be generated according to the settings in the other tabs. Otherwise, the rule will not be processed for the employee.
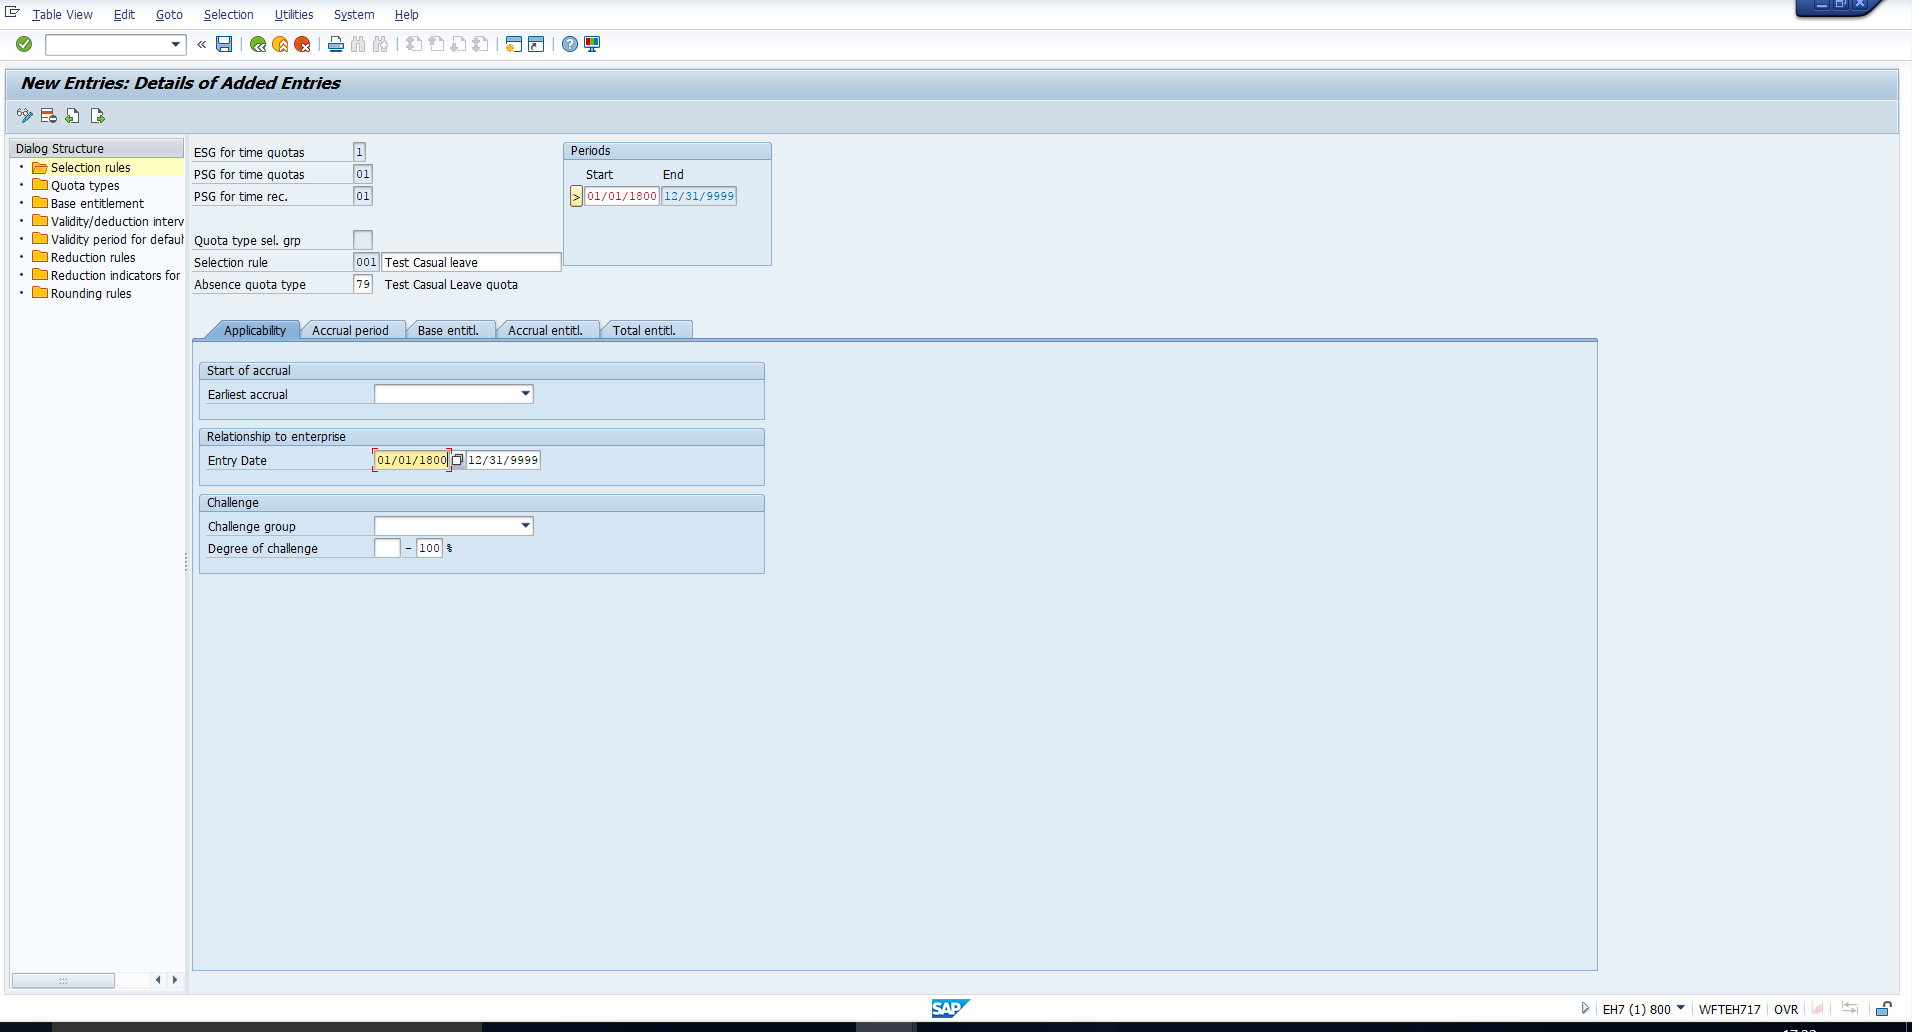
The fields are:
Earliest accrual – You need to use this field only if your policy mandates that the calculation of the accrual entitlements should begin after a certain date. For example, the policy may state that an employee’s accrual entitlement should be calculated only on completion of probation.
To meet such a requirement, you will need to use this field. To understand what must be entered in this field, look at the dropdown list in Figure 9.
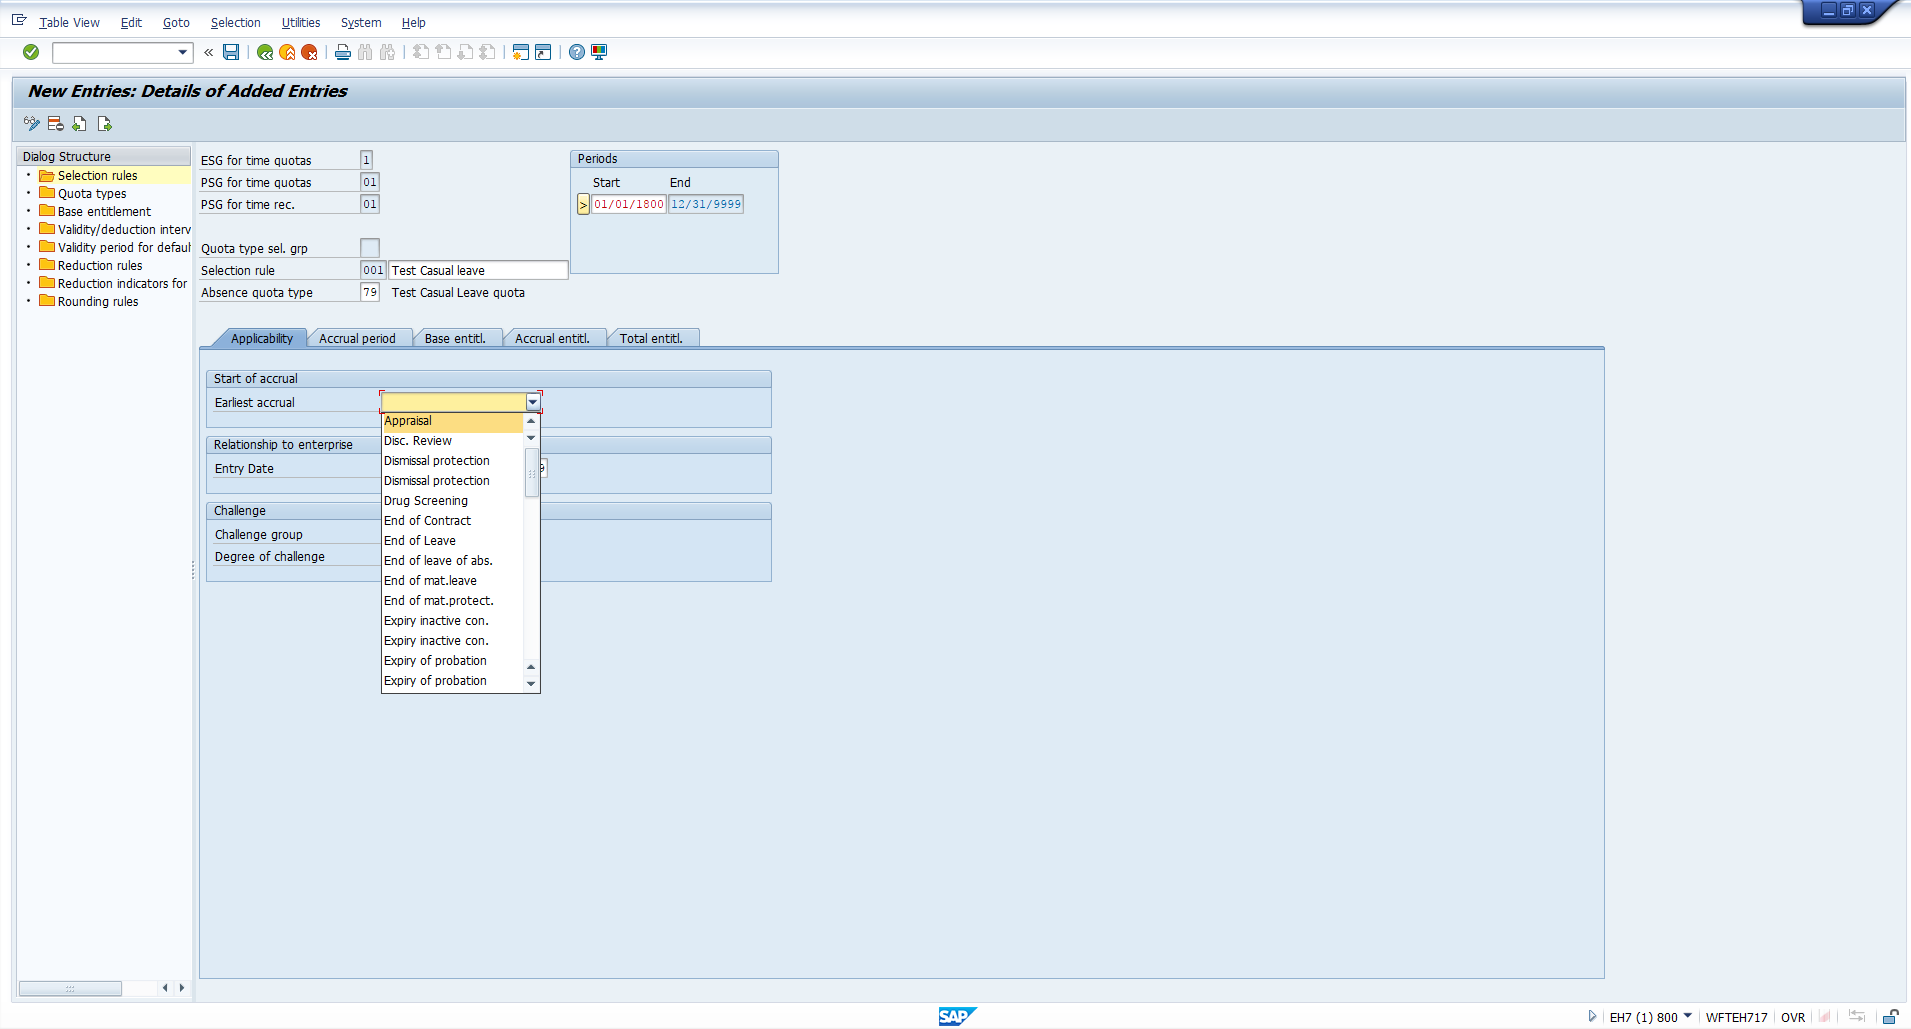
This list consists of the task types in the Monitoring of Tasks infotype. We have displayed a screenshot of this infotype in Figure 10 for your reference. You can see that the list of task types in Figure 10 is identical to the list of values in Figure 9.
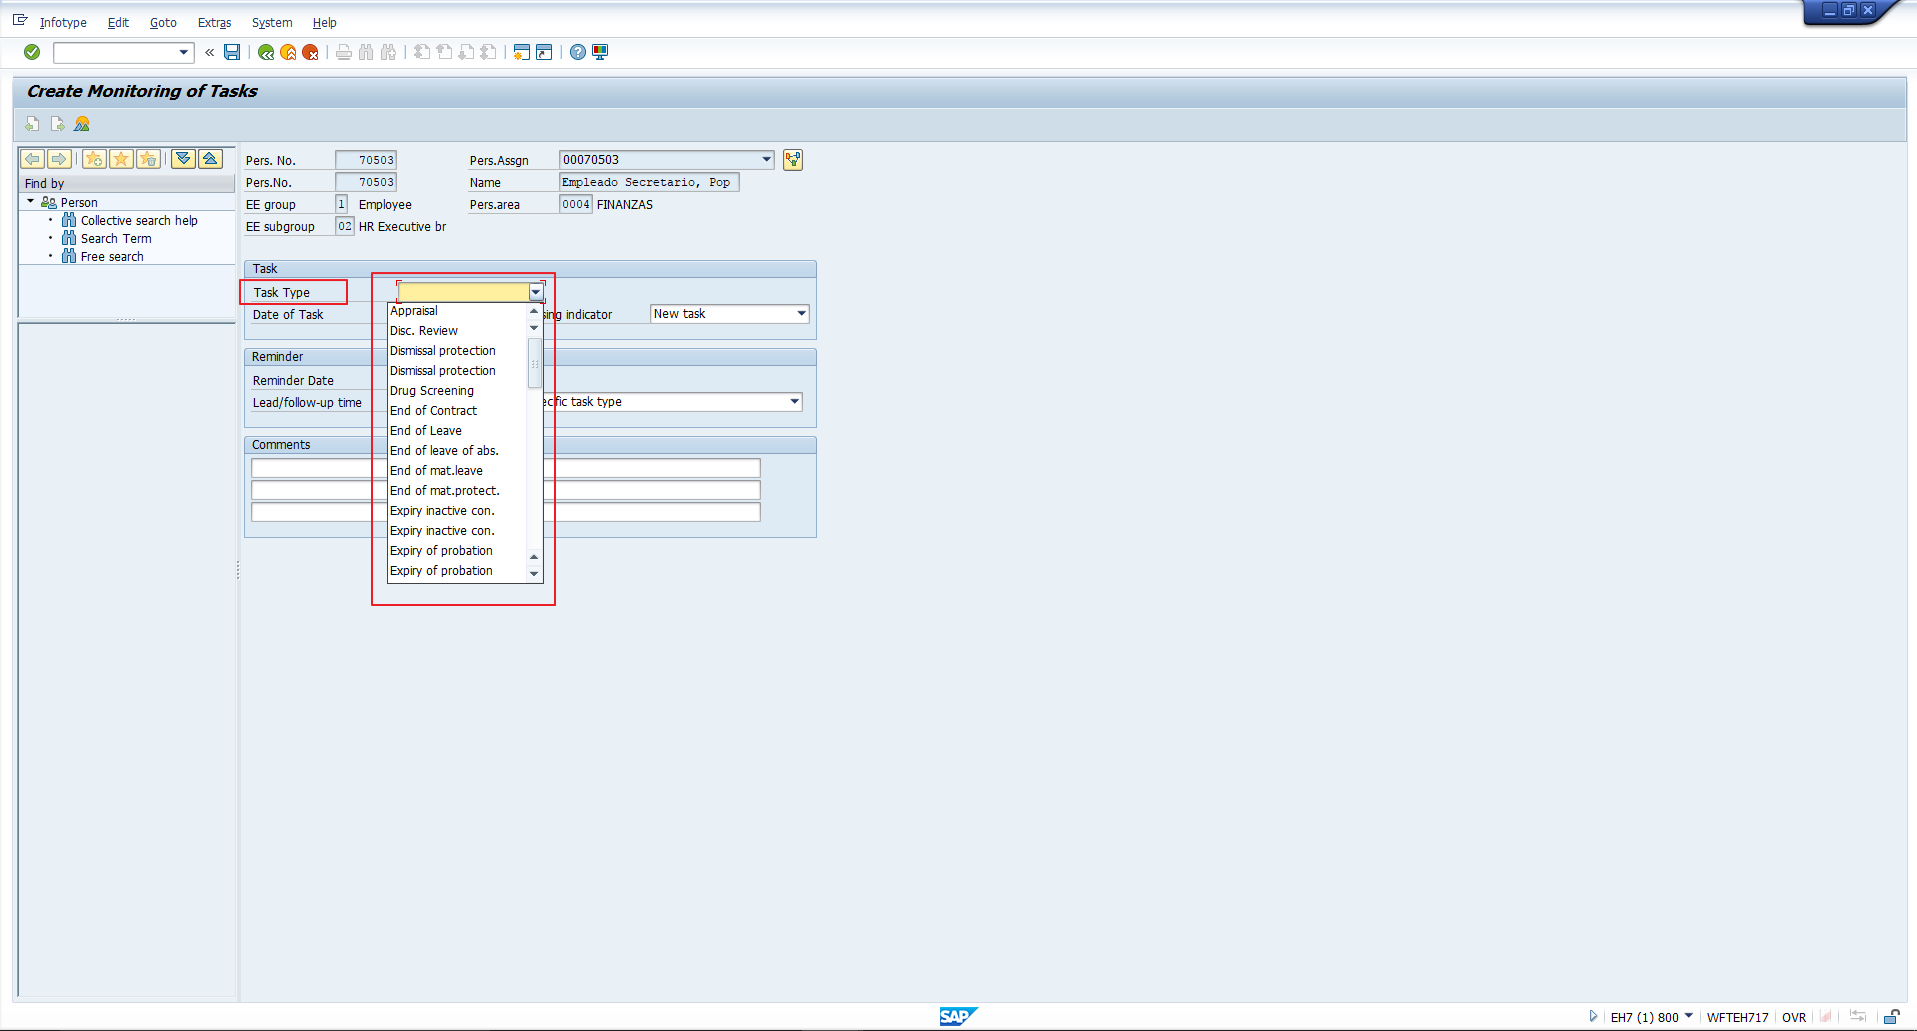
If you choose to maintain a task type in the Earliest accrual field, remember that the date of this task type must be updated in the infotype for each employee. The quota will then be calculated for each employee from this date onwards.
Entry date – Enter an entry interval if the quota policy depends on the employee’s date of joining the organization. Otherwise, leave these fields blank.
Challenge – In this set of fields, you can enter details on the employee’s disability. This is required only if your company has a different leave quota policy for disabled employees.
Accrual Period
Here you should specify the period for which leave quota entitlements should be generated proportionate to the base period. You can see the various options as radio buttons in Figure 11.
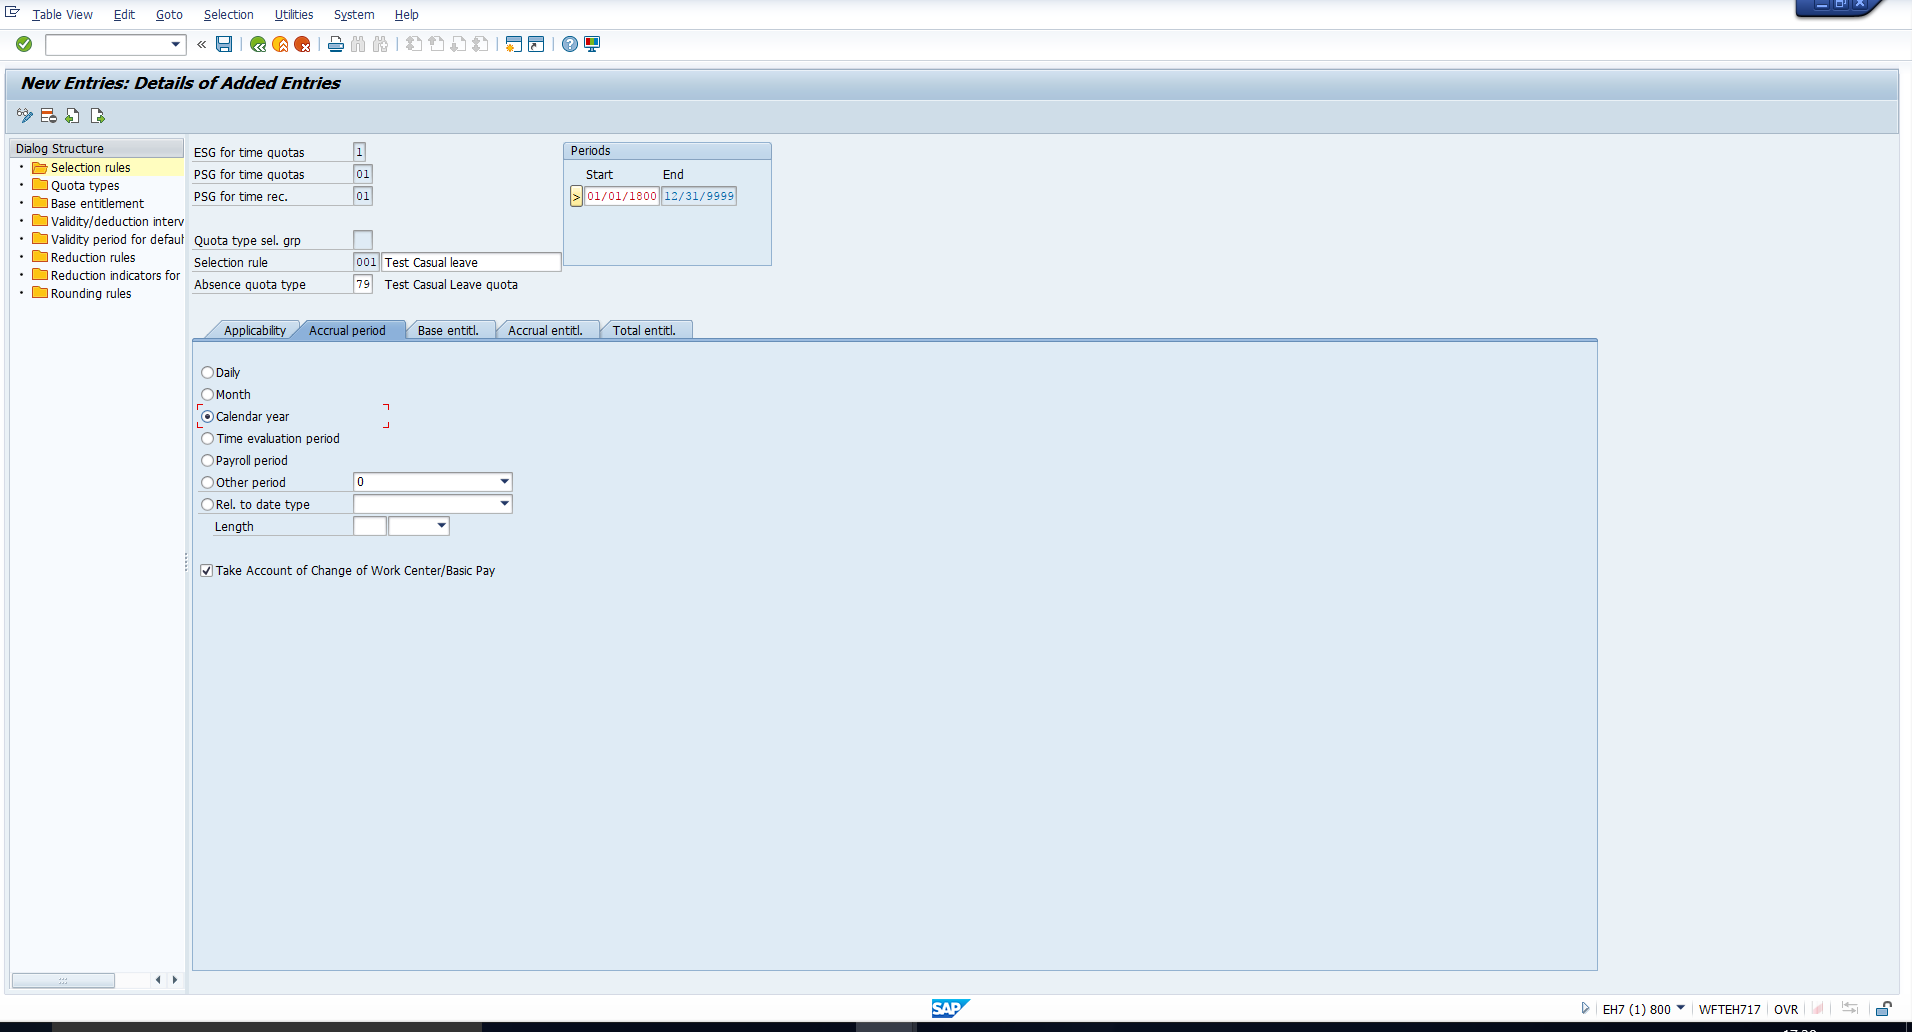
For example, if the accrual period is selected as Daily, the leave entitlement will accrue every day. Alternatively, if the accrual period is selected as Calendar year, the leave entitlement will be calculated every year. Accordingly, select the accrual period that suits your requirement.
In the same screenshot, you can see the checkbox ‘Take Account of Change of Work Center/Basic Pay’ towards the bottom of the screen. Select this box to instruct the system to prorate the accrual entitlement for employees who have an entry, organizational reassignment or leaving action within the accrual period.
For example, consider a company that credits 12 days leave quota per year to each employee. But this entitlement should be prorated in the case of employees who join the organization during the course of the year. So, if an employee is hired in February, he/she should be entitled to 11 days of leave instead of 12. To meet this requirement, the above checkbox must be selected.
On the other hand, if a fixed leave quota of 12 days must be credited to all employees including mid-year joiners, do not select this checkbox.
Base Entitlement
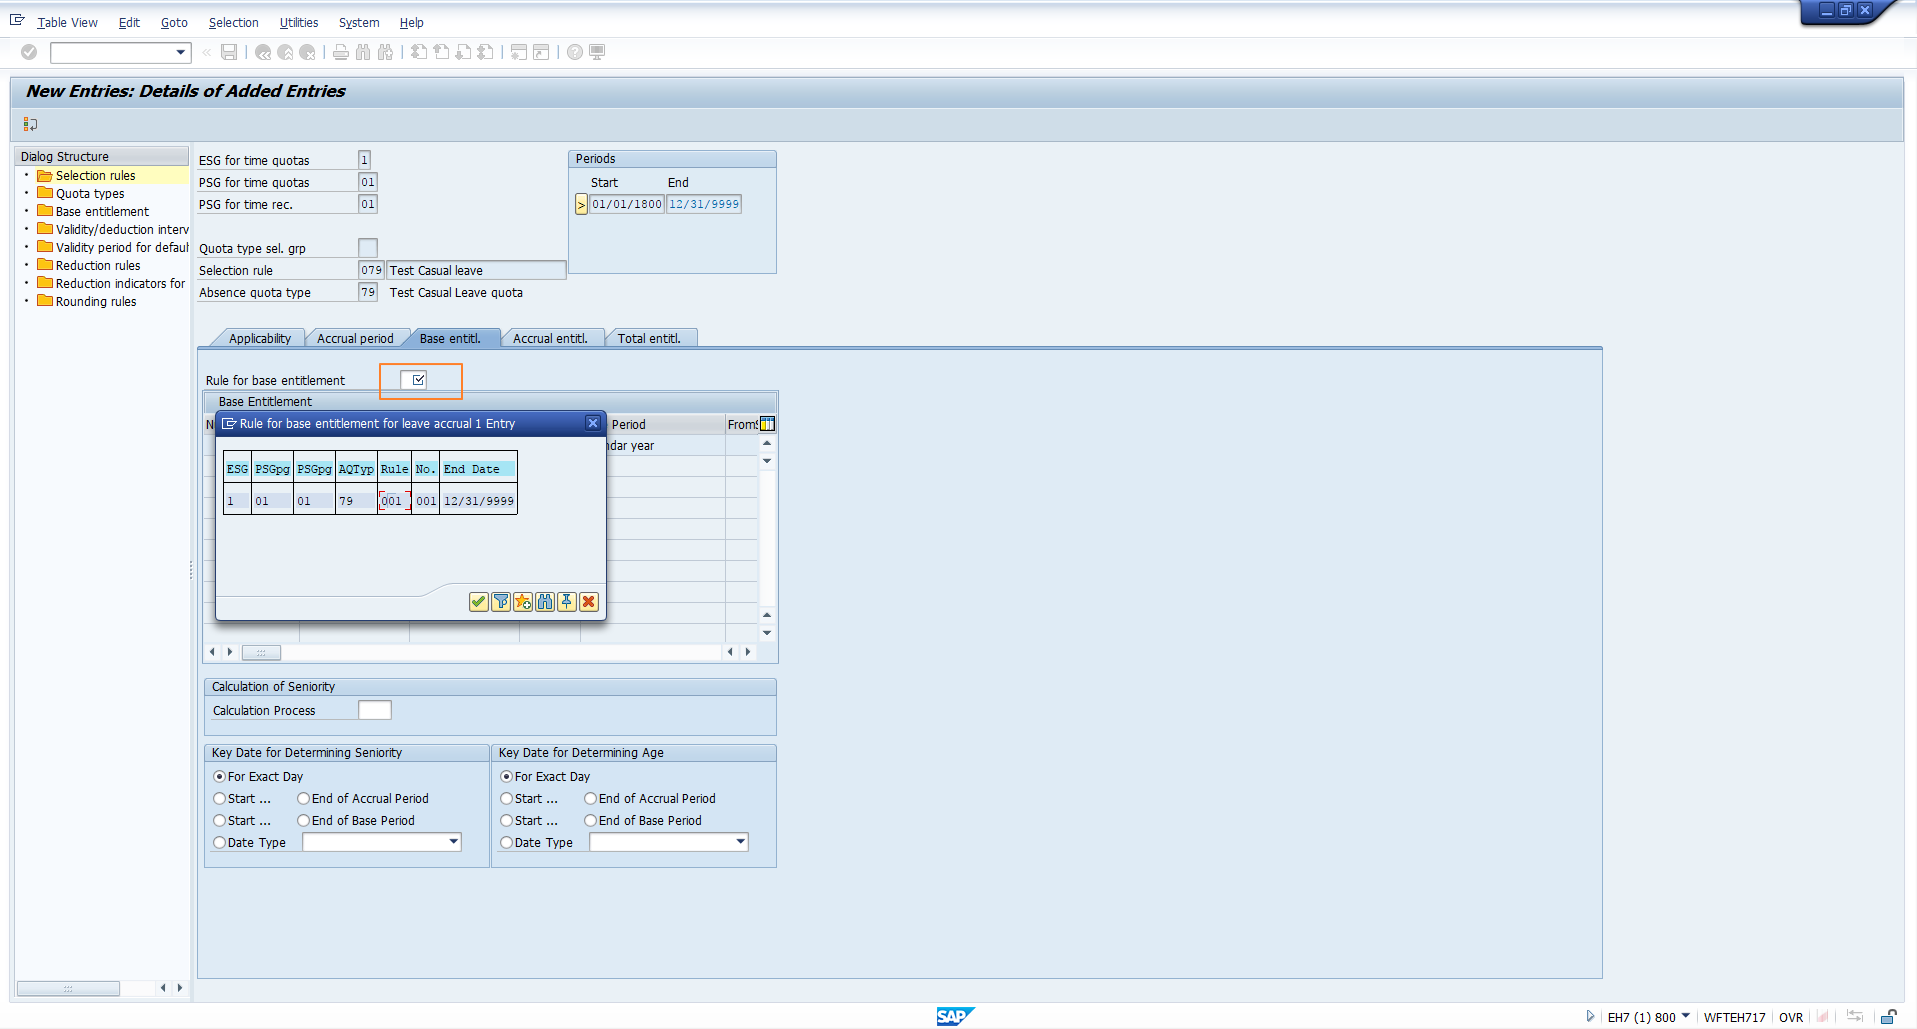
In the tutorial on SAP Absence Quota Configuration, we explained how to configure Base entitlement rules. It is here that the relevant base entitlement rule should be assigned to the generation rule. The theoretical basis for the calculation of the accrual entitlement can then be determined.
Please refer to Figure 12. If you check the list of possible rules that can be entered in this field, the system will only show you the list of Base entitlement rules that exist for the combination of absence quota type, Employee subgroup and Personnel subarea groupings for which the generation rule is currently being created.
Accrual Entitlement
In this section, depicted in Figure 13, you should enter specifications for processing the accrual entitlement.
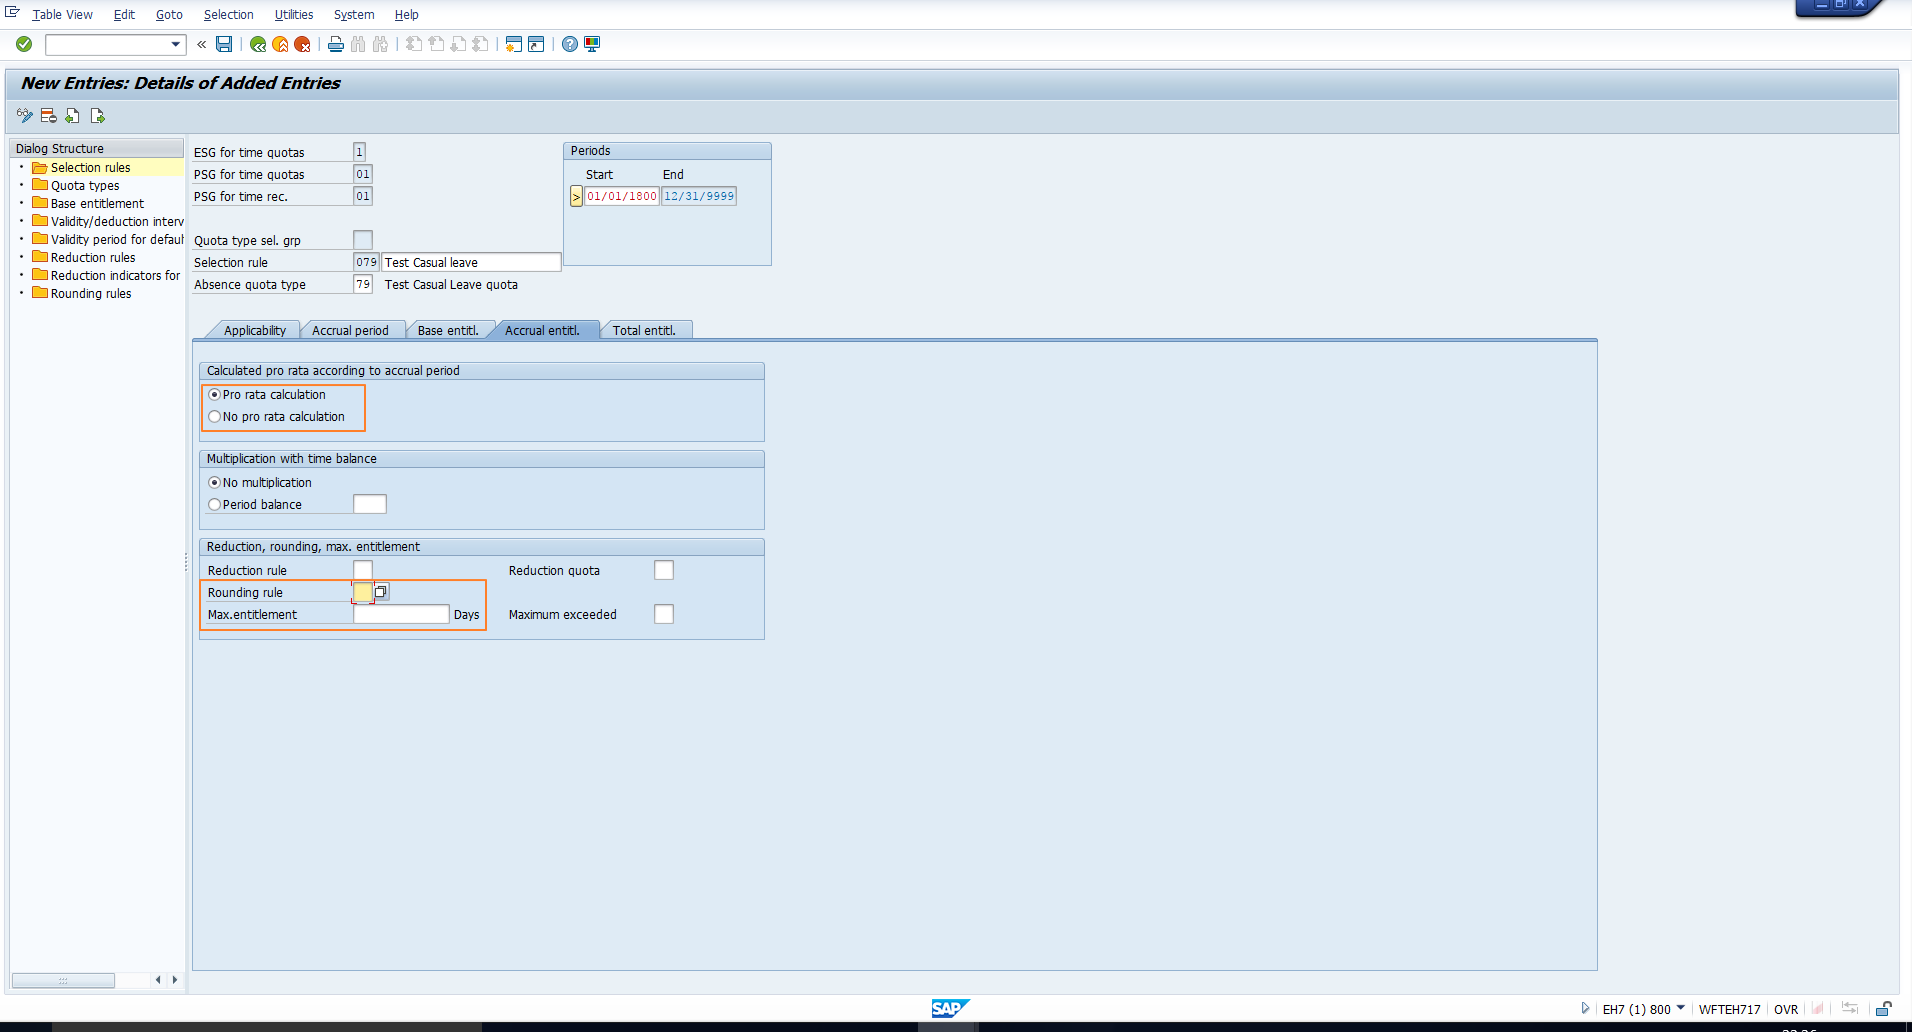
The main fields are explained below:
Pro rata calculation – Select this radio button if, when the accrual point is reached, the accrual period should be compared to the base period, and a proportionate accrual entitlement should be determined.
No pro rata calculation – Select this radio button if, when the accrual point is reached, the theoretical base entitlement should be used as the basis for the accrual entitlement.
Rounding rule – You can assign a Rounding rule if the accrual entitlement should be rounded as per company policy. Please go through the tutorial on SAP Rounding rules if you’d like some insight into this subject.
Max. entitlement – You can specify an upper limit for the accrual entitlement in this field.
Total Entitlement
Again, the fields Rounding rule and Max. entitlement have the same function as above, the only difference being that here they control the processing of the total entitlement rather than the accrual entitlement.
The total entitlement refers to the quota entitlement that is to be transferred to the Absence Quotas infotype.
Once you enter the required values in the header and in each tab, please save the changes. The quota type can now be generated and credited to employees. We will demonstrate how this is done in the next tutorial.
—
Did you like this tutorial? Have any questions or comments? We would love to hear your feedback in the comments section below. It’d be a big help for us, and hopefully it’s something we can address for you in improvement of our free SAP HR tutorials.
Navigation Links
Go to next lesson: SAP RPTQTA00 Quota Generation Report
Go to previous lesson: SAP Absence Quota Configuration
Go to overview of the course: SAP HR Training