
 In the previous two tutorials of SAP HR course, we explained how to set up SAP absence quotas in customizing. In this tutorial, we will demonstrate how these quotas can be generated and credited to employees. We will begin with a simple business scenario, for which we shall design SAP quota generation rule. Subsequently, we will demonstrate how the standard report SAP RPTQTA00 can be used to credit quota entitlements to employees in the Absence Quotas infotype (infotype 2006) in accordance with the rule.
A Business Scenario
Assume that a company gives 12 days leave quota per year to each employee. The entitlement should be accrued annually, and it must be prorated in the case of employees who join the organization during the course of the year.
Let’s implement the learnings from the SAP Absence Quota generation rules tutorial to configure a suitable generation rule. To configure a new quota generation rule, we should follow the IMG path highlighted in Figure 1.
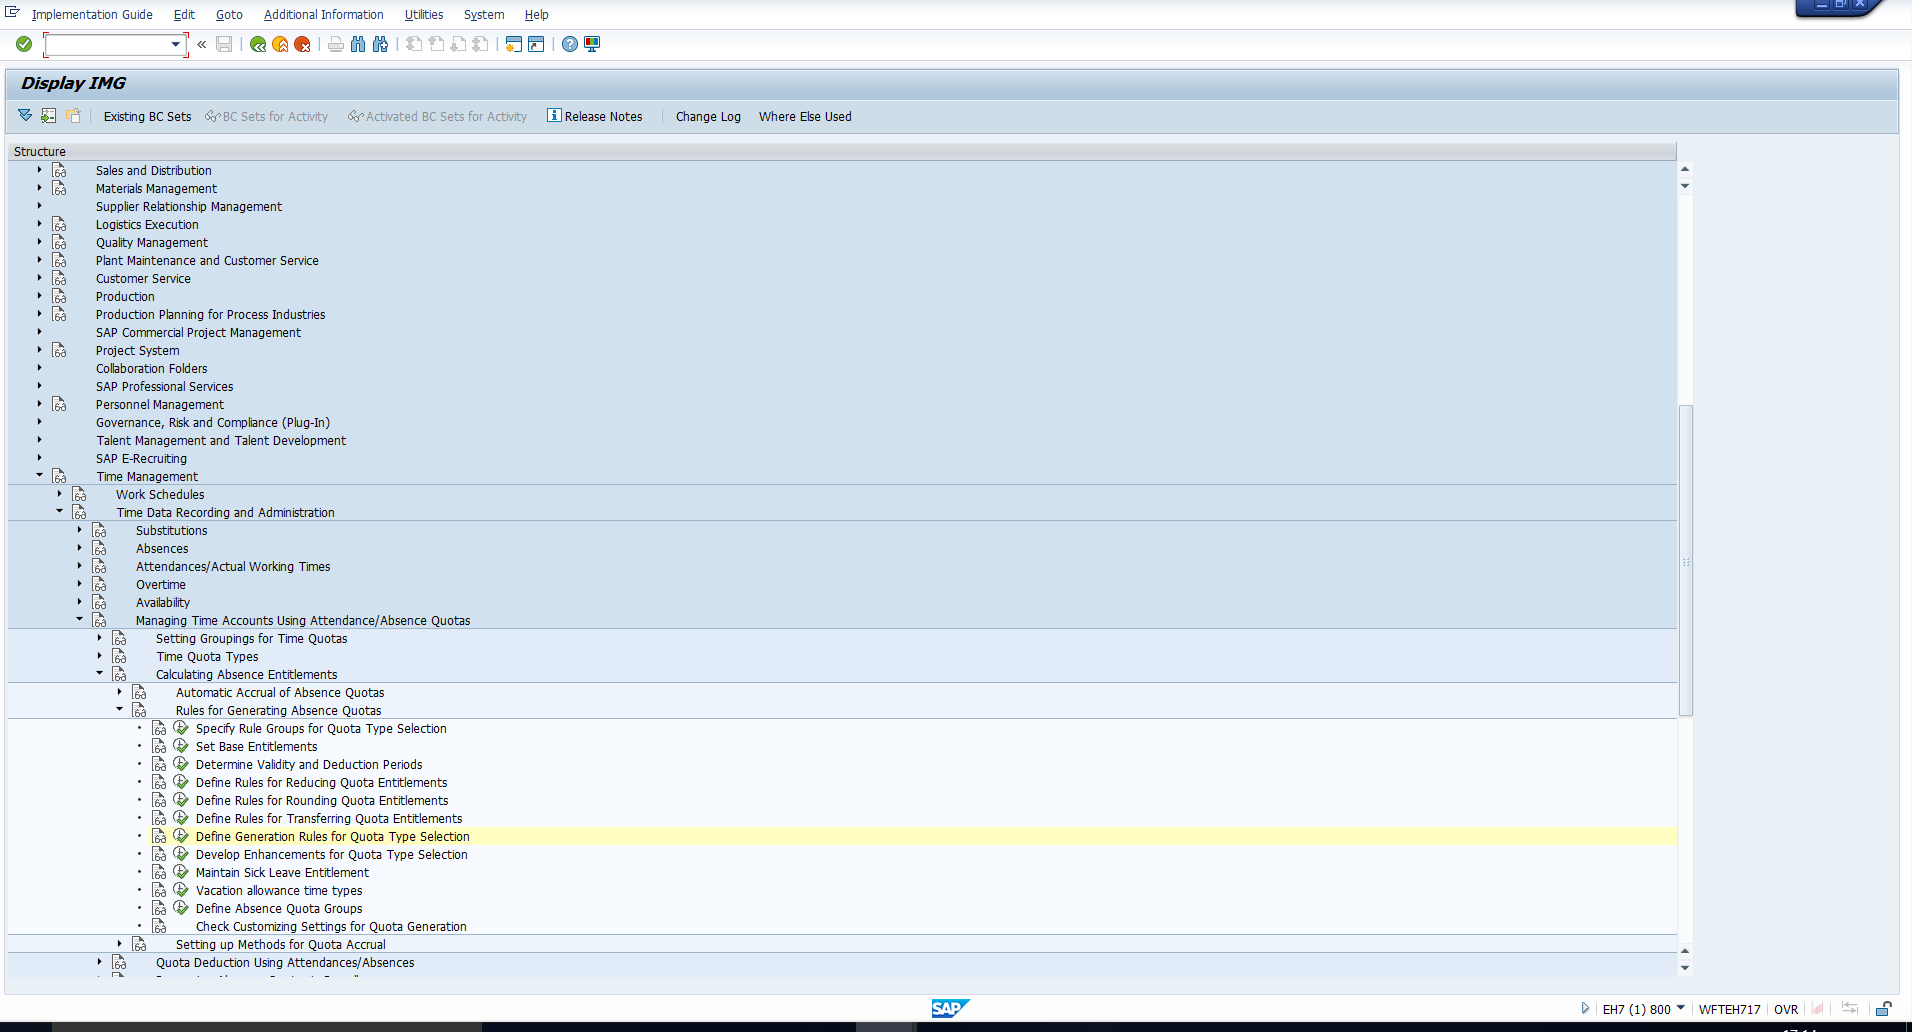
Then, create a new generation rule with the entries as depicted in the following screenshots.
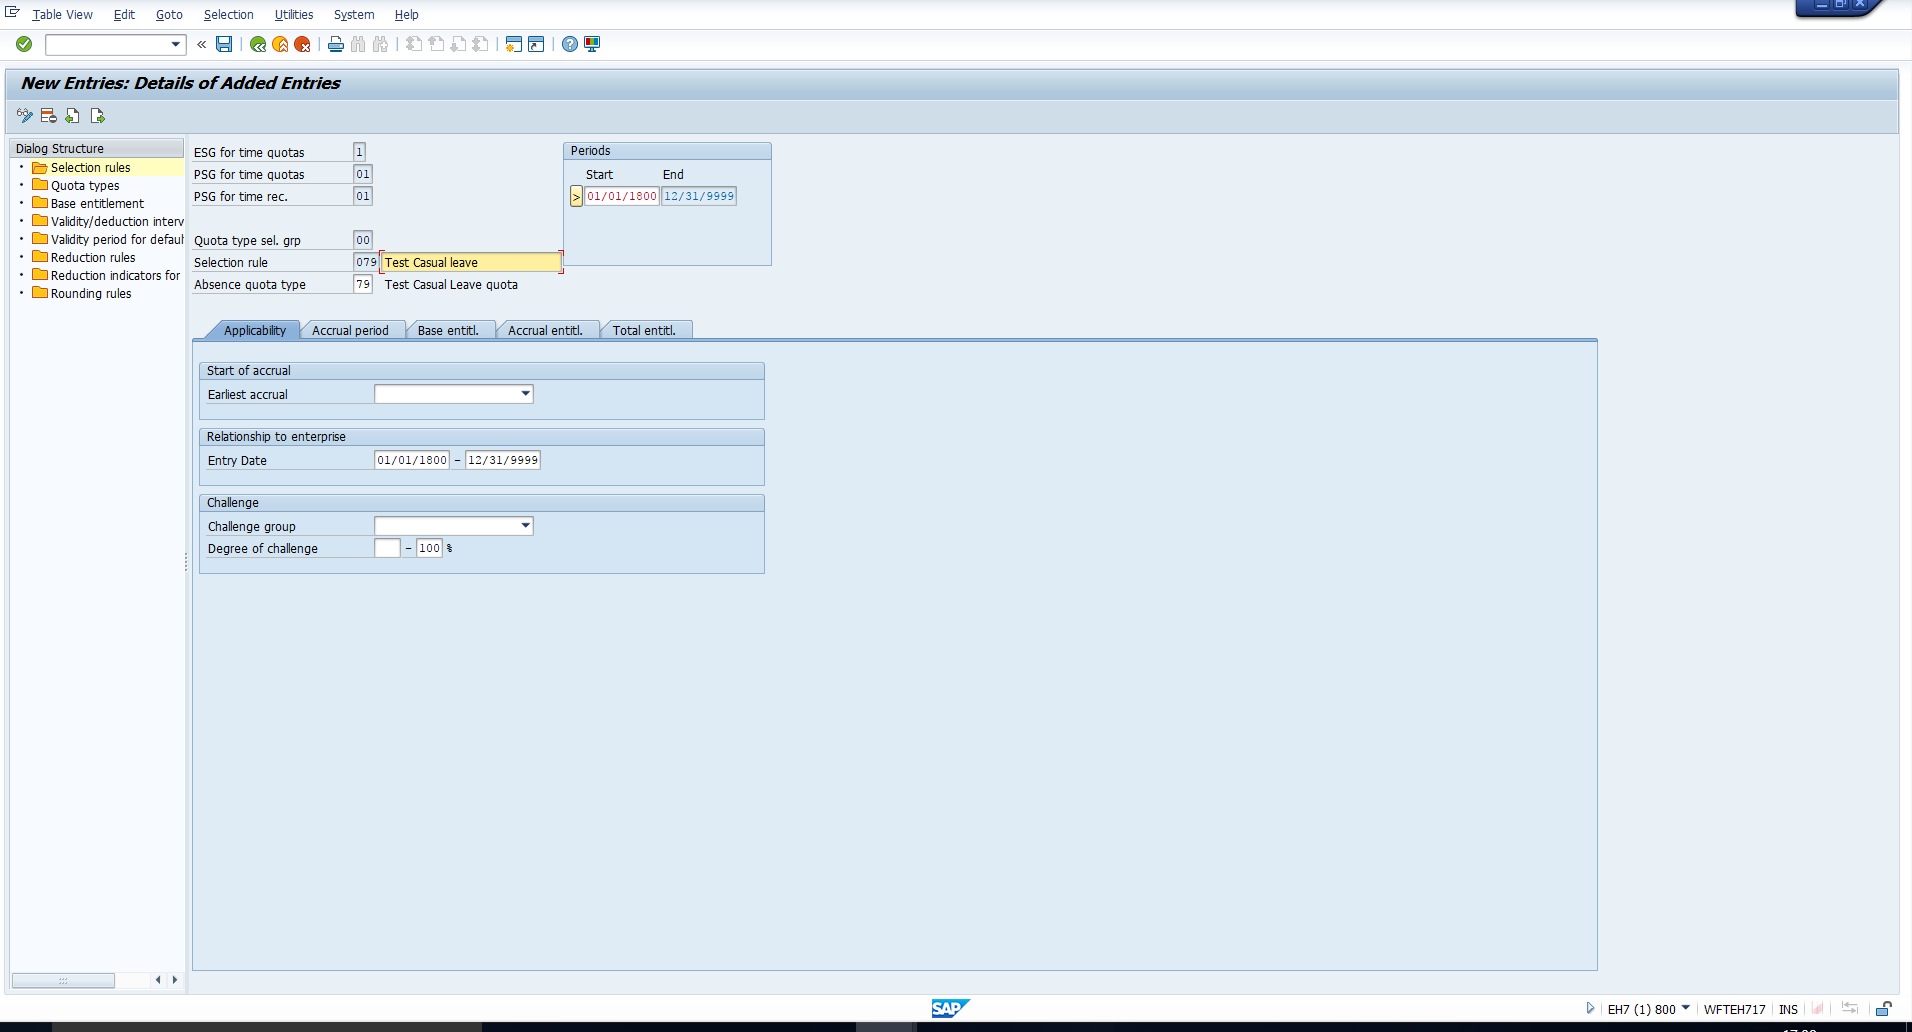
Let’s start with Figure 2. Look at the values entered in the header. These indicate the quota type, quota selection rule group and the employee subgroup and personnel subarea groupings for which the rule is applicable.
Also, note that we have not entered anything in the Applicability tab, as the policy does not specify any restrictions or differentiation. The values you see here are the default system values.
In Figure 3, you can see the Accrual period settings. We have selected ‘Calendar year’ as the accrual period, as it is specified that the quota should accrue annually. In addition, we have selected the ‘Take Account of Change of work center/Basic pay’ checkbox, so that the entitlement will be calculated proportionately for mid-year joiners.

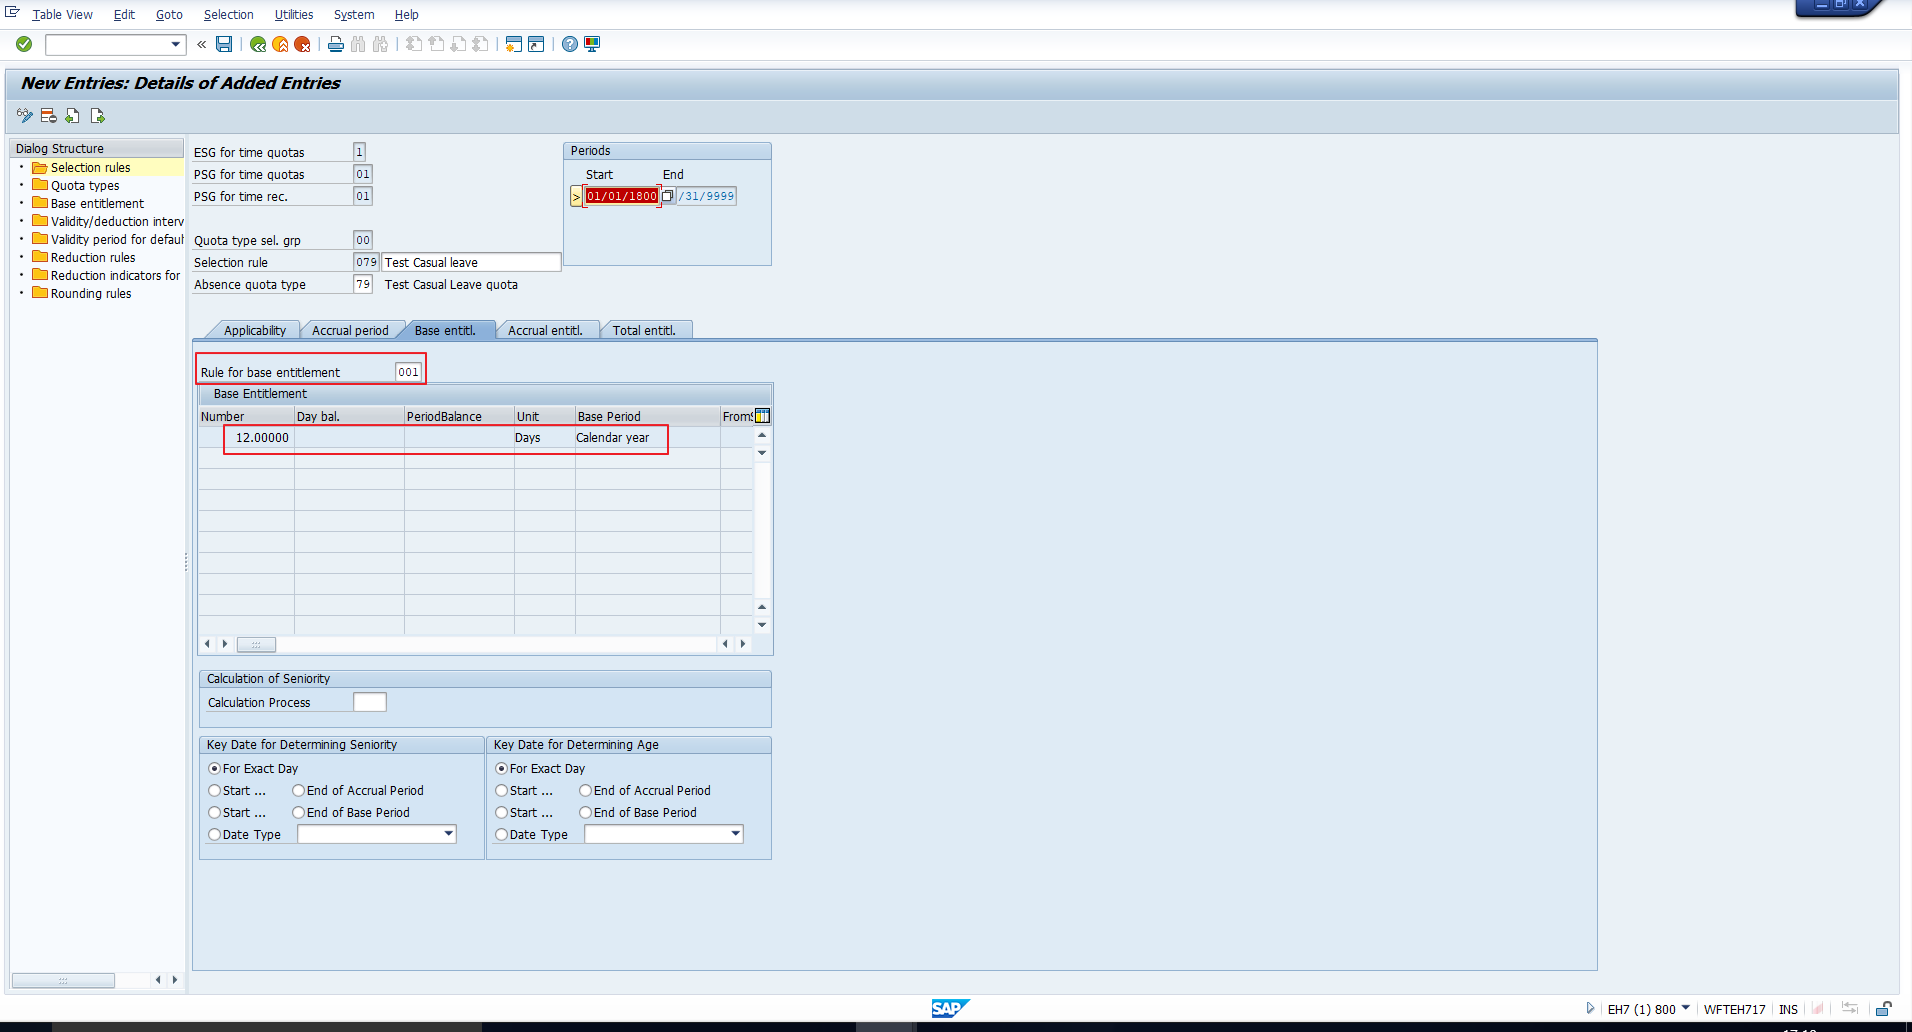
Figure 4 depicts the Base entitlement tab. Here we have selected the previously created Base entitlement rule 001. By doing so, the details in the Base entitlement section get populated. We can see that the Base entitlement is 12 days per calendar year.
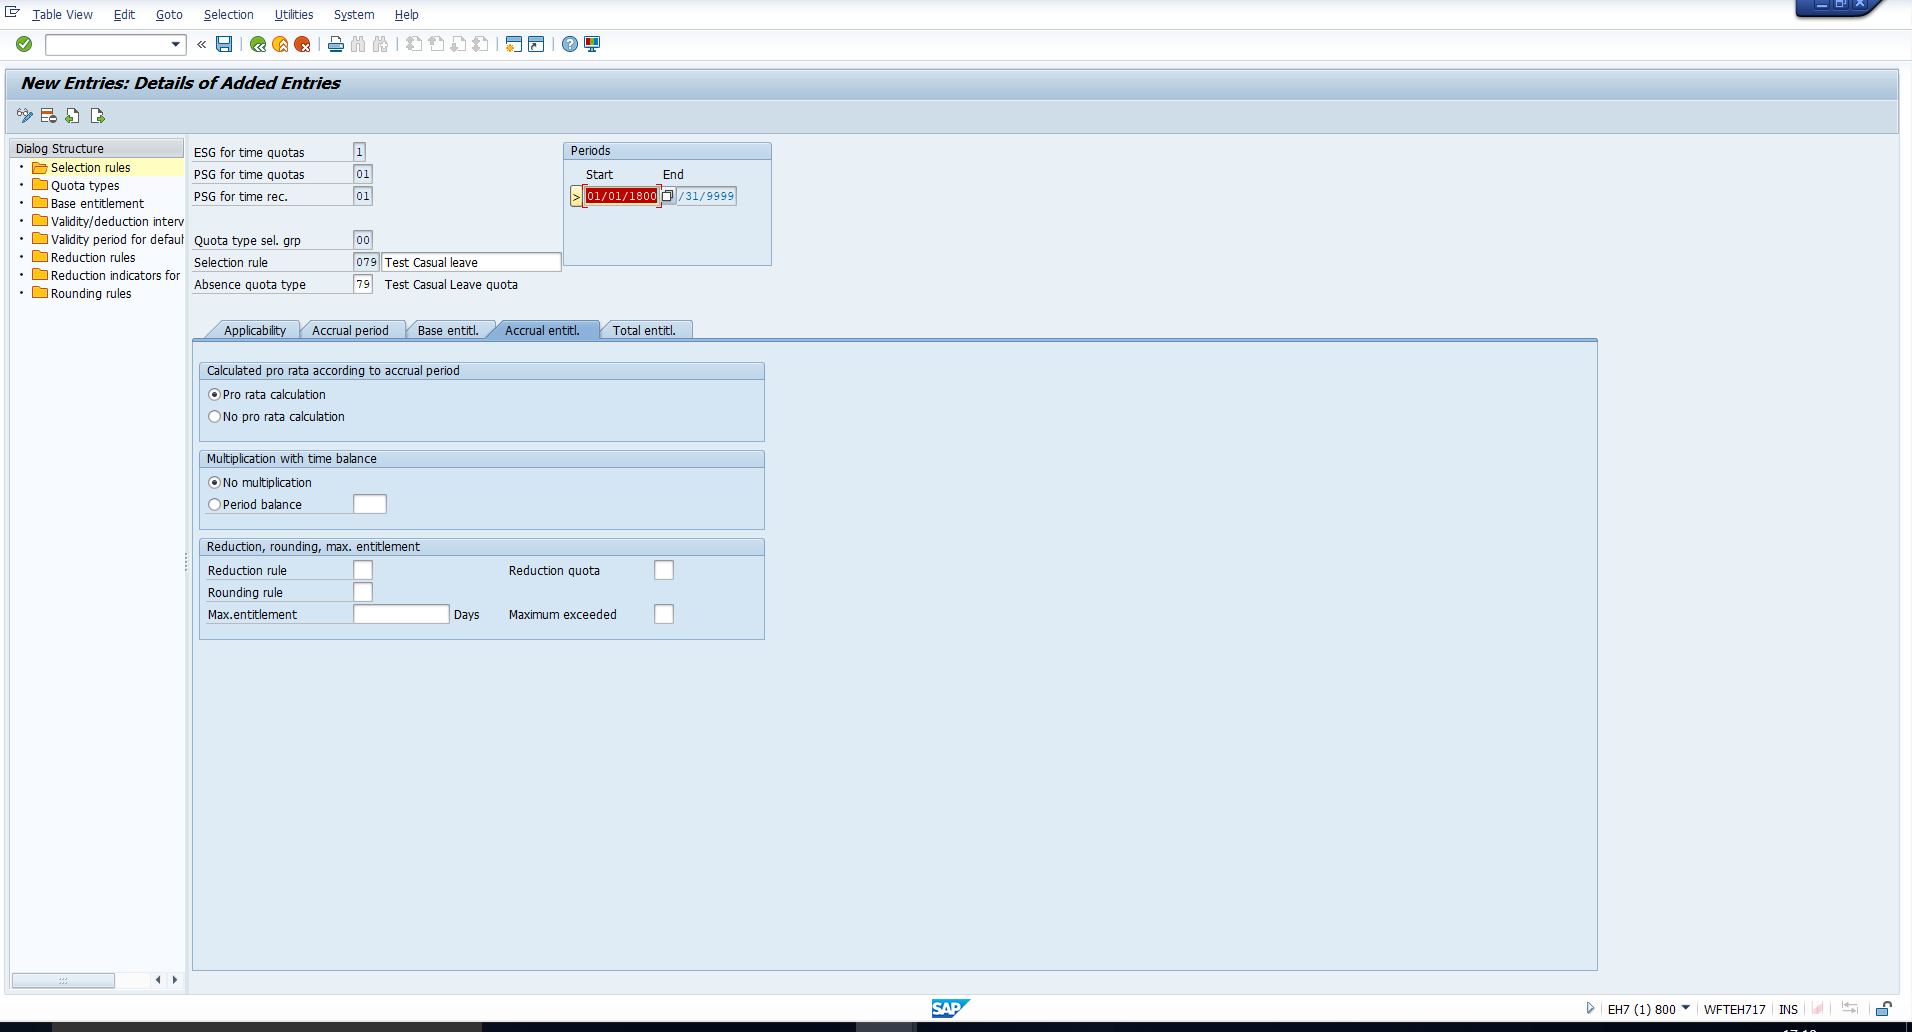
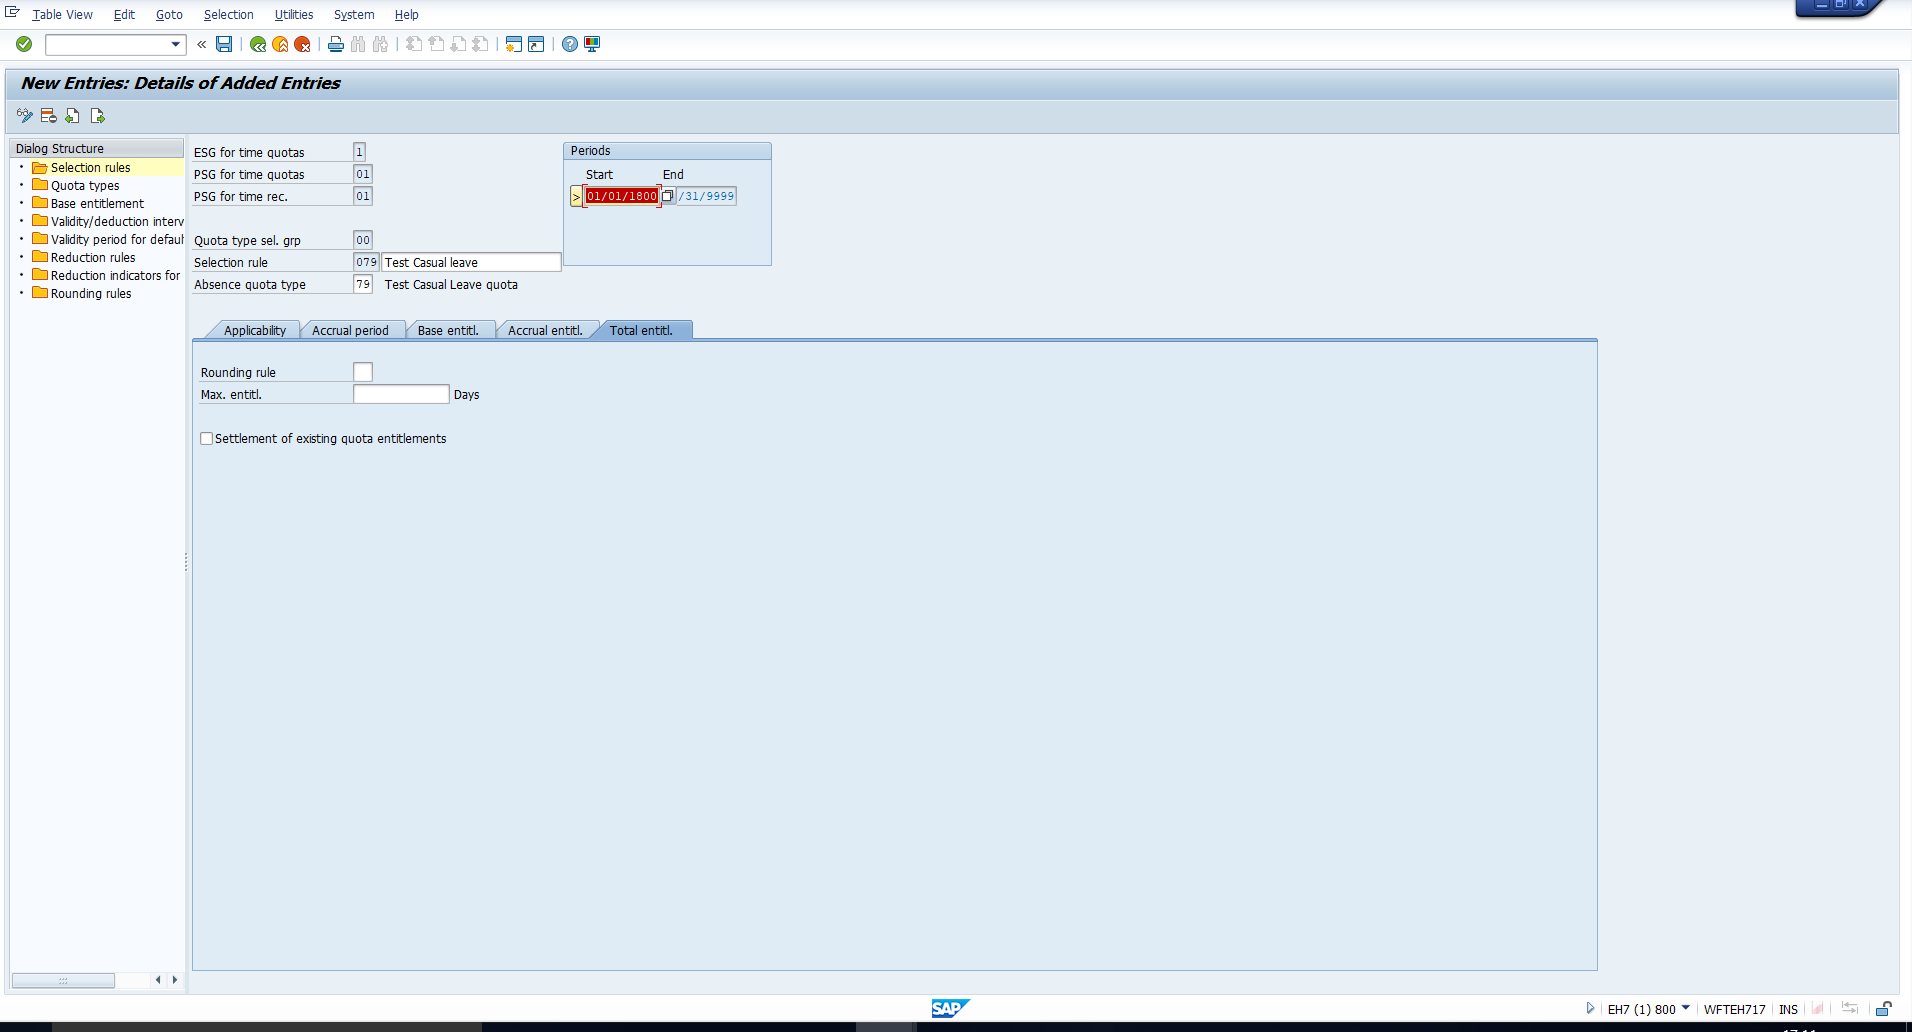
We have not entered any specific values in either the Accrual entitlement (Figure 5) or the Total entitlement (Figure 6) tabs, as no requirement has been specified.
Save the rule. The quota type 79 (Test Casual leave) can now be generated and credited to employees for whom the relevant groupings are applicable. In the next section, we will test this with the help of SAP RPTQTA00 report for generation of absence quotas.
SAP RPTQTA00 Quota Generation Report
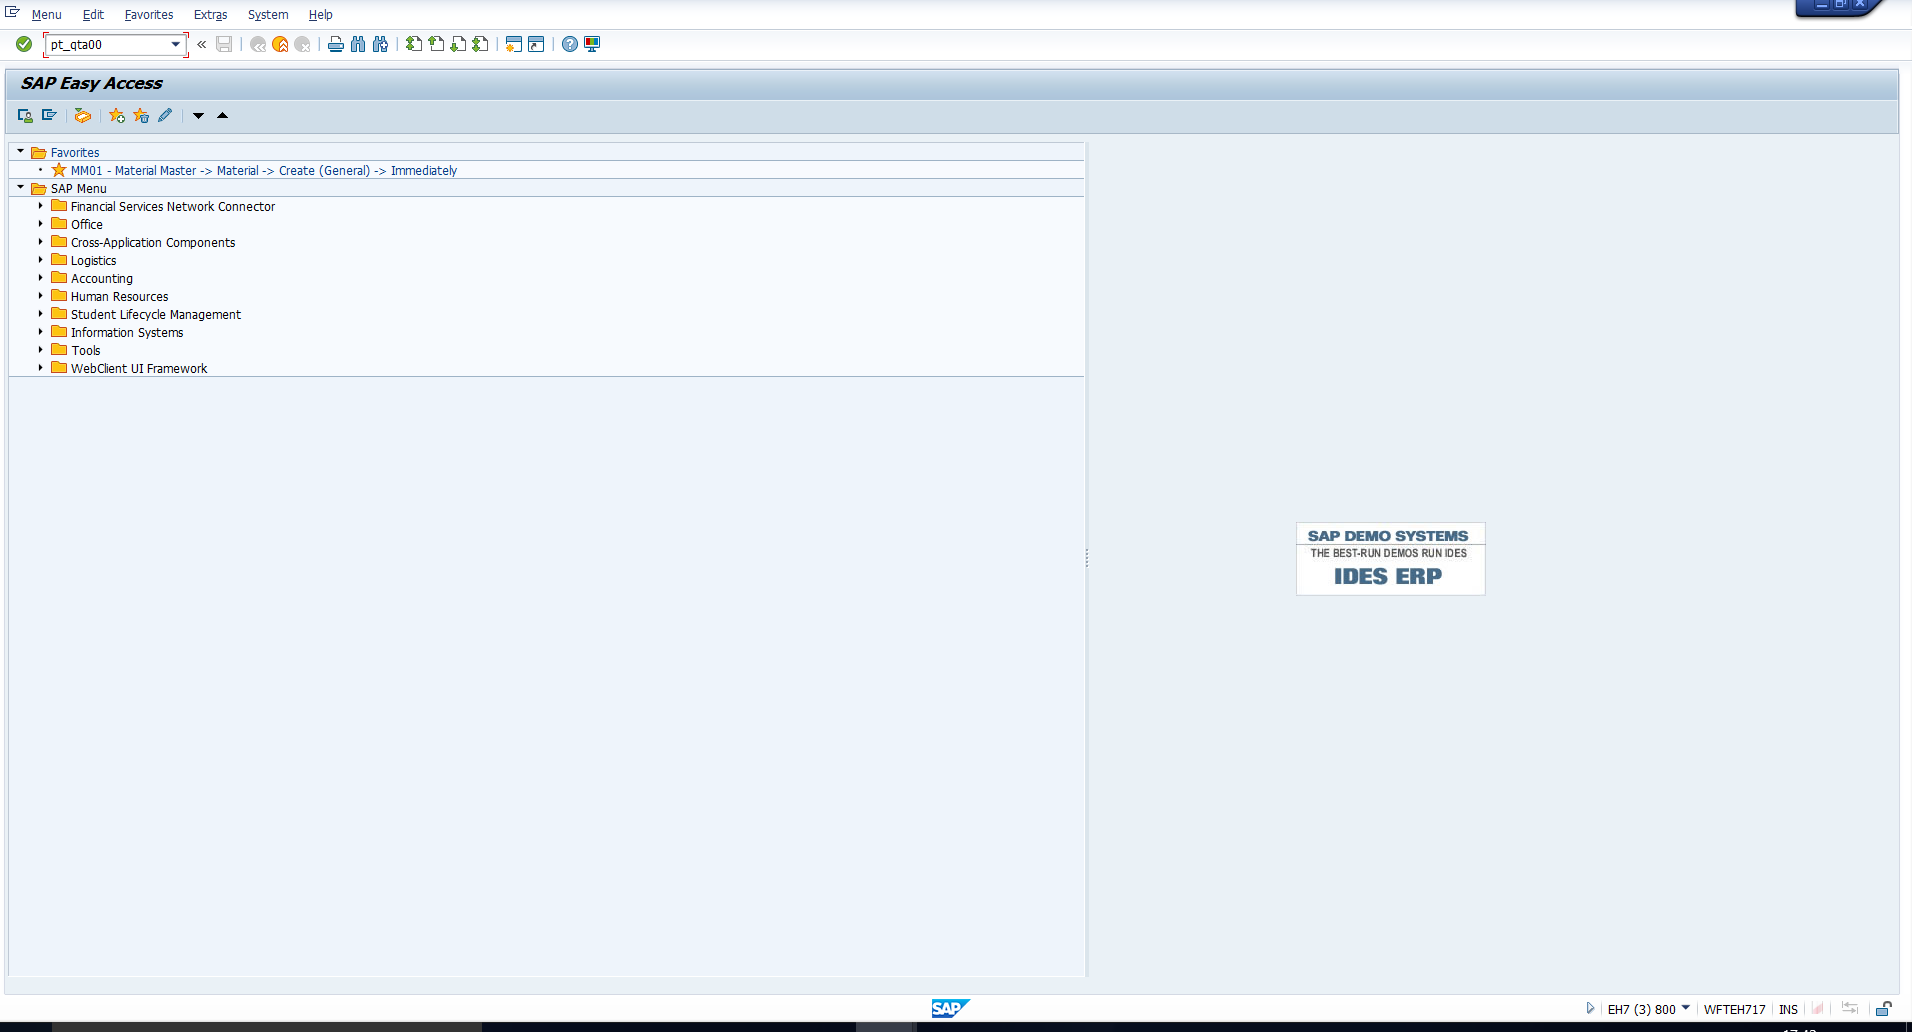
SAP RPTQTA00 quota generation report is a standard SAP report which is used to automatically accrue quota entitlements for employees. The calculated entitlement is updated in the Absence Quotas infotype. You can execute this report by entering the transaction code PT_QTA00 in the SAP Easy Access menu, as depicted in Figure 7.
You will then see the selection screen shown in Figure 8.
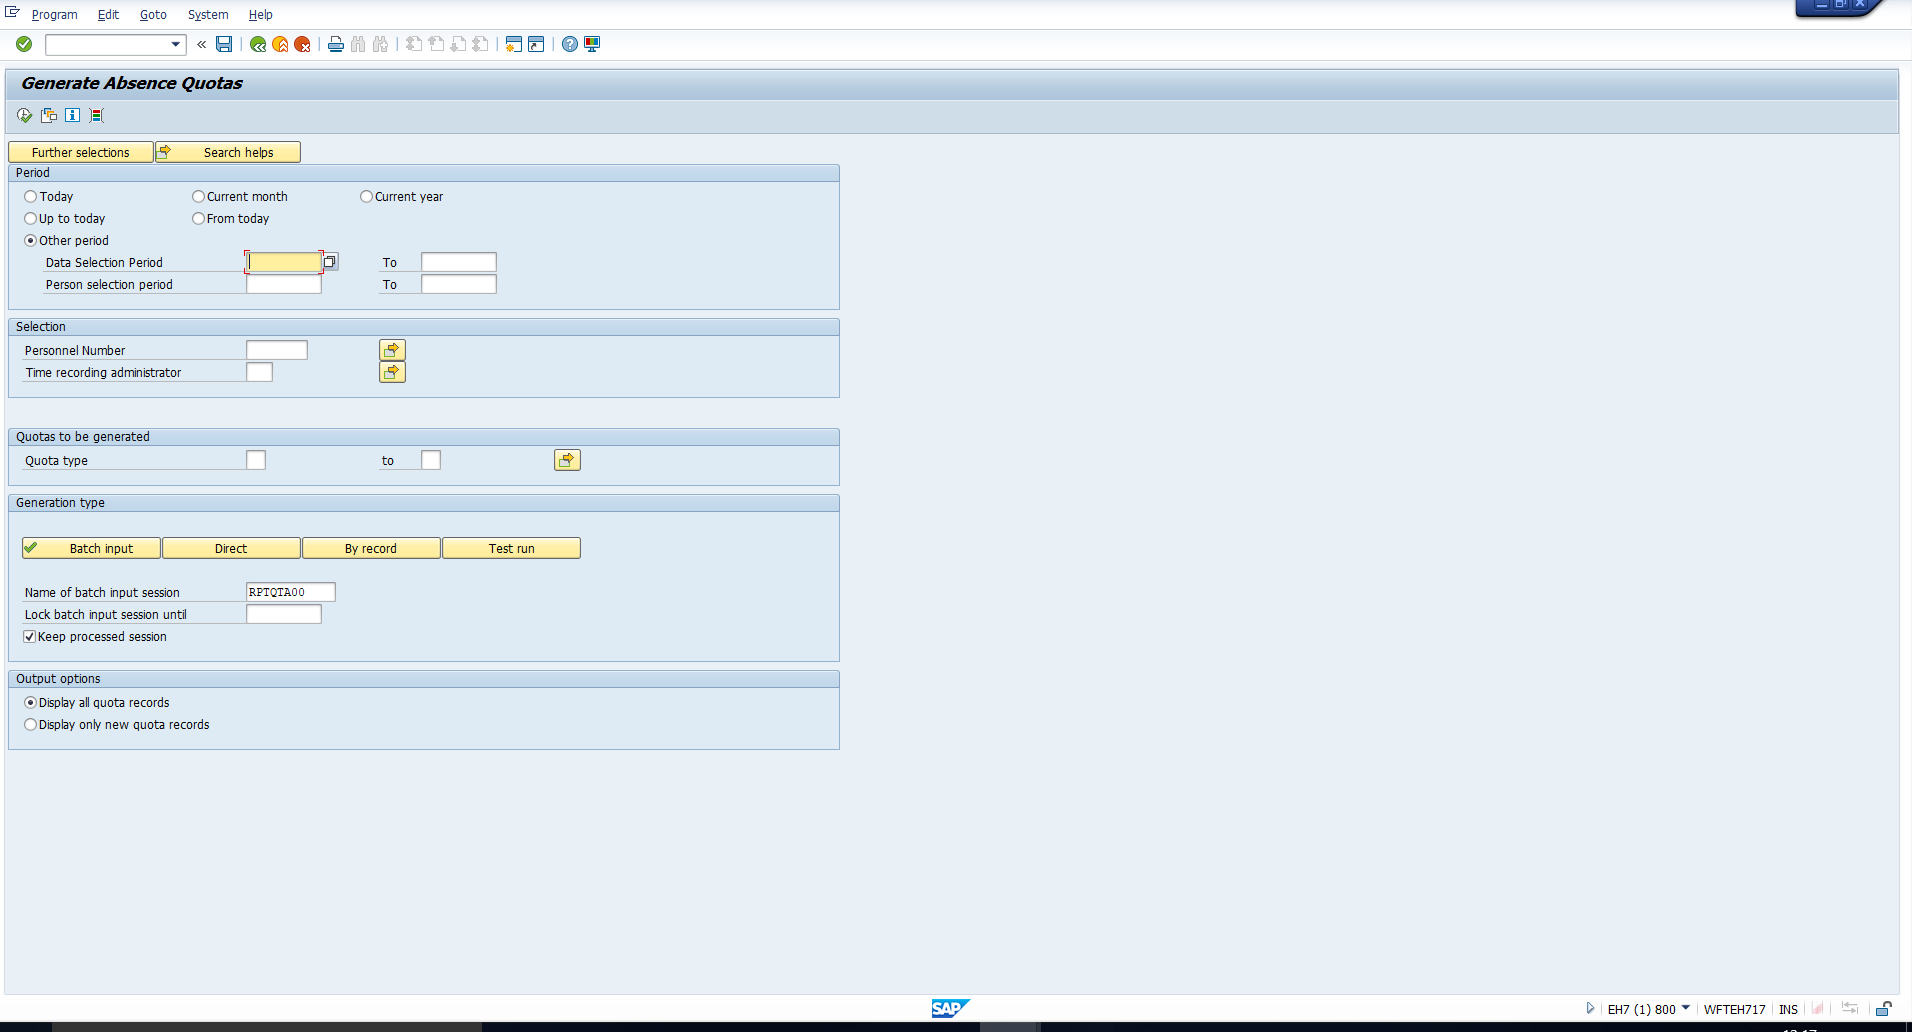
It broadly comprises the following sections:
Period
Here, you must define the interval for which quota must be generated. The generation interval determines the validity period of the absence quota record being created. You can enter the start and end dates in the Other Period fields, as depicted in Figure 9.

Selection
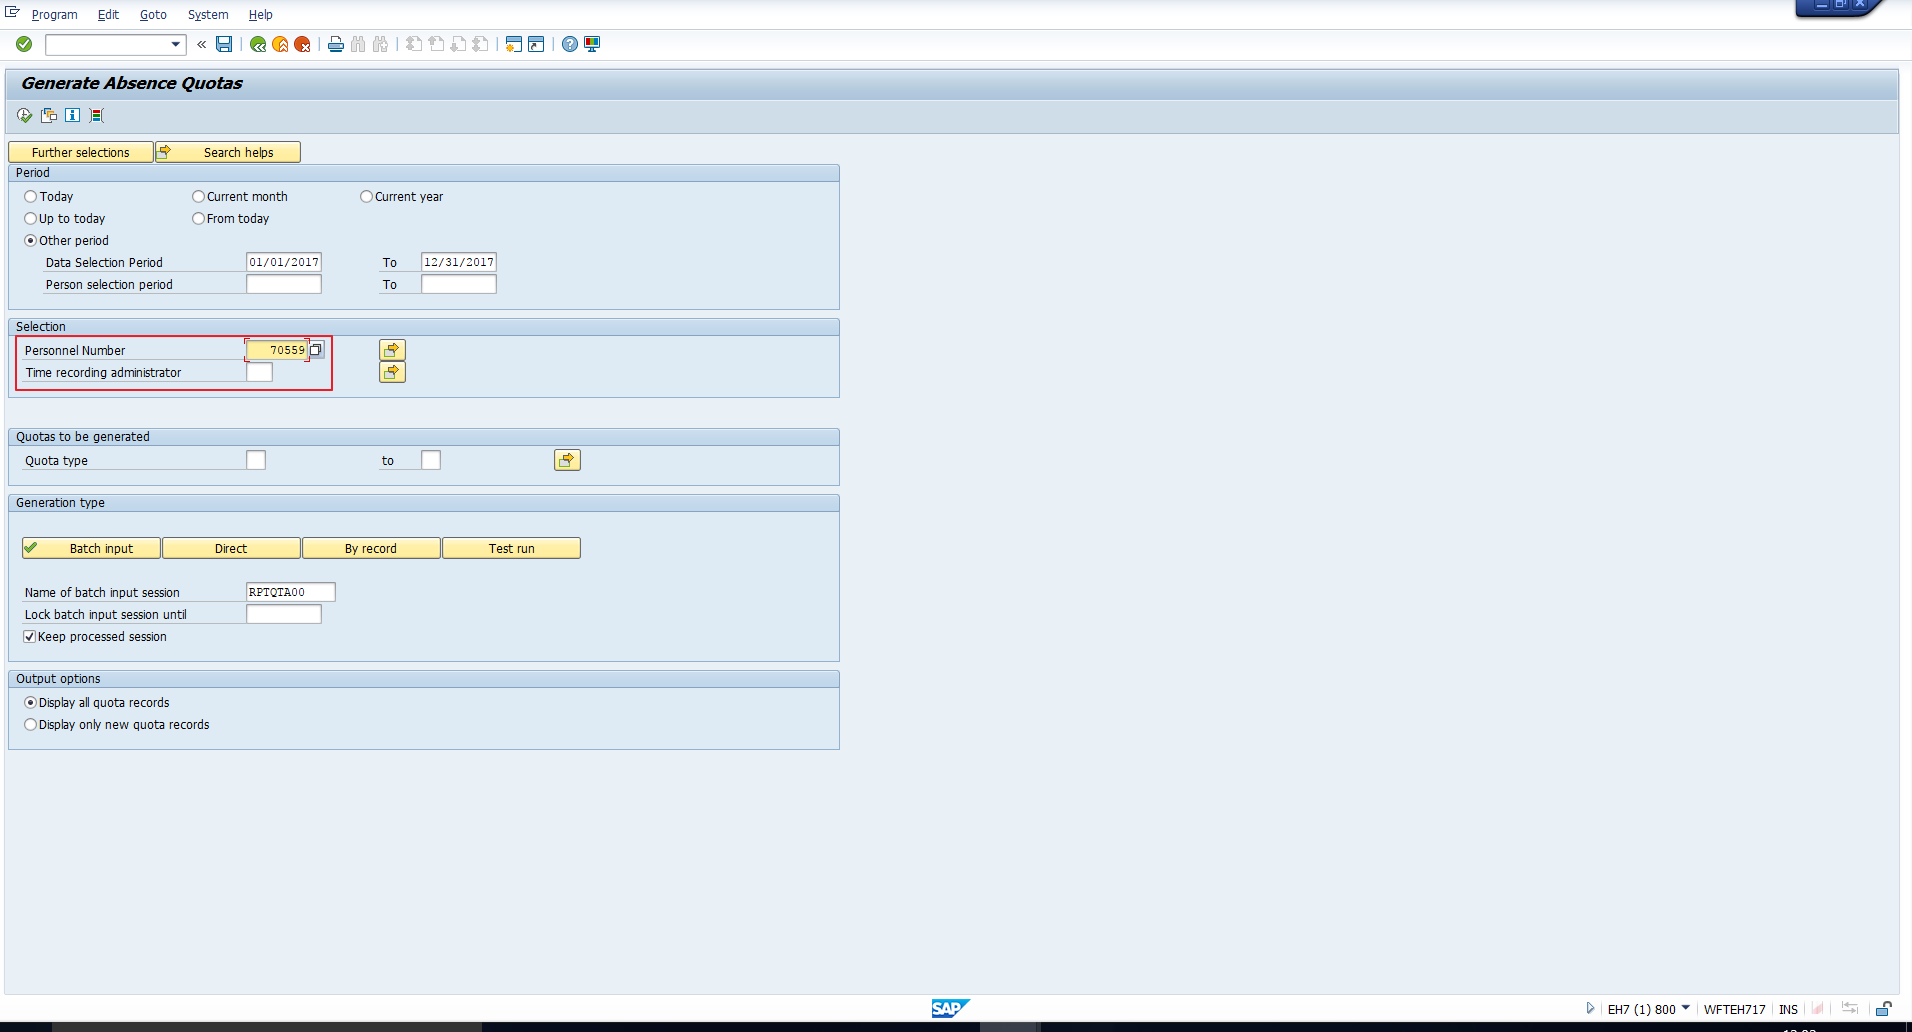
If you know the Personnel number(s) for which the quota must be generated, you can directly enter the value(s) in the Personnel Number field, as demonstrated in Figure 10.
Alternatively, you can select employees based on certain criteria. For example, you can select all the employees under a certain Time recording administrator by entering a value in the field Time recording administrator.
You can also select employees based on various other selection fields using the Further selections button, highlighted in Figure 11.
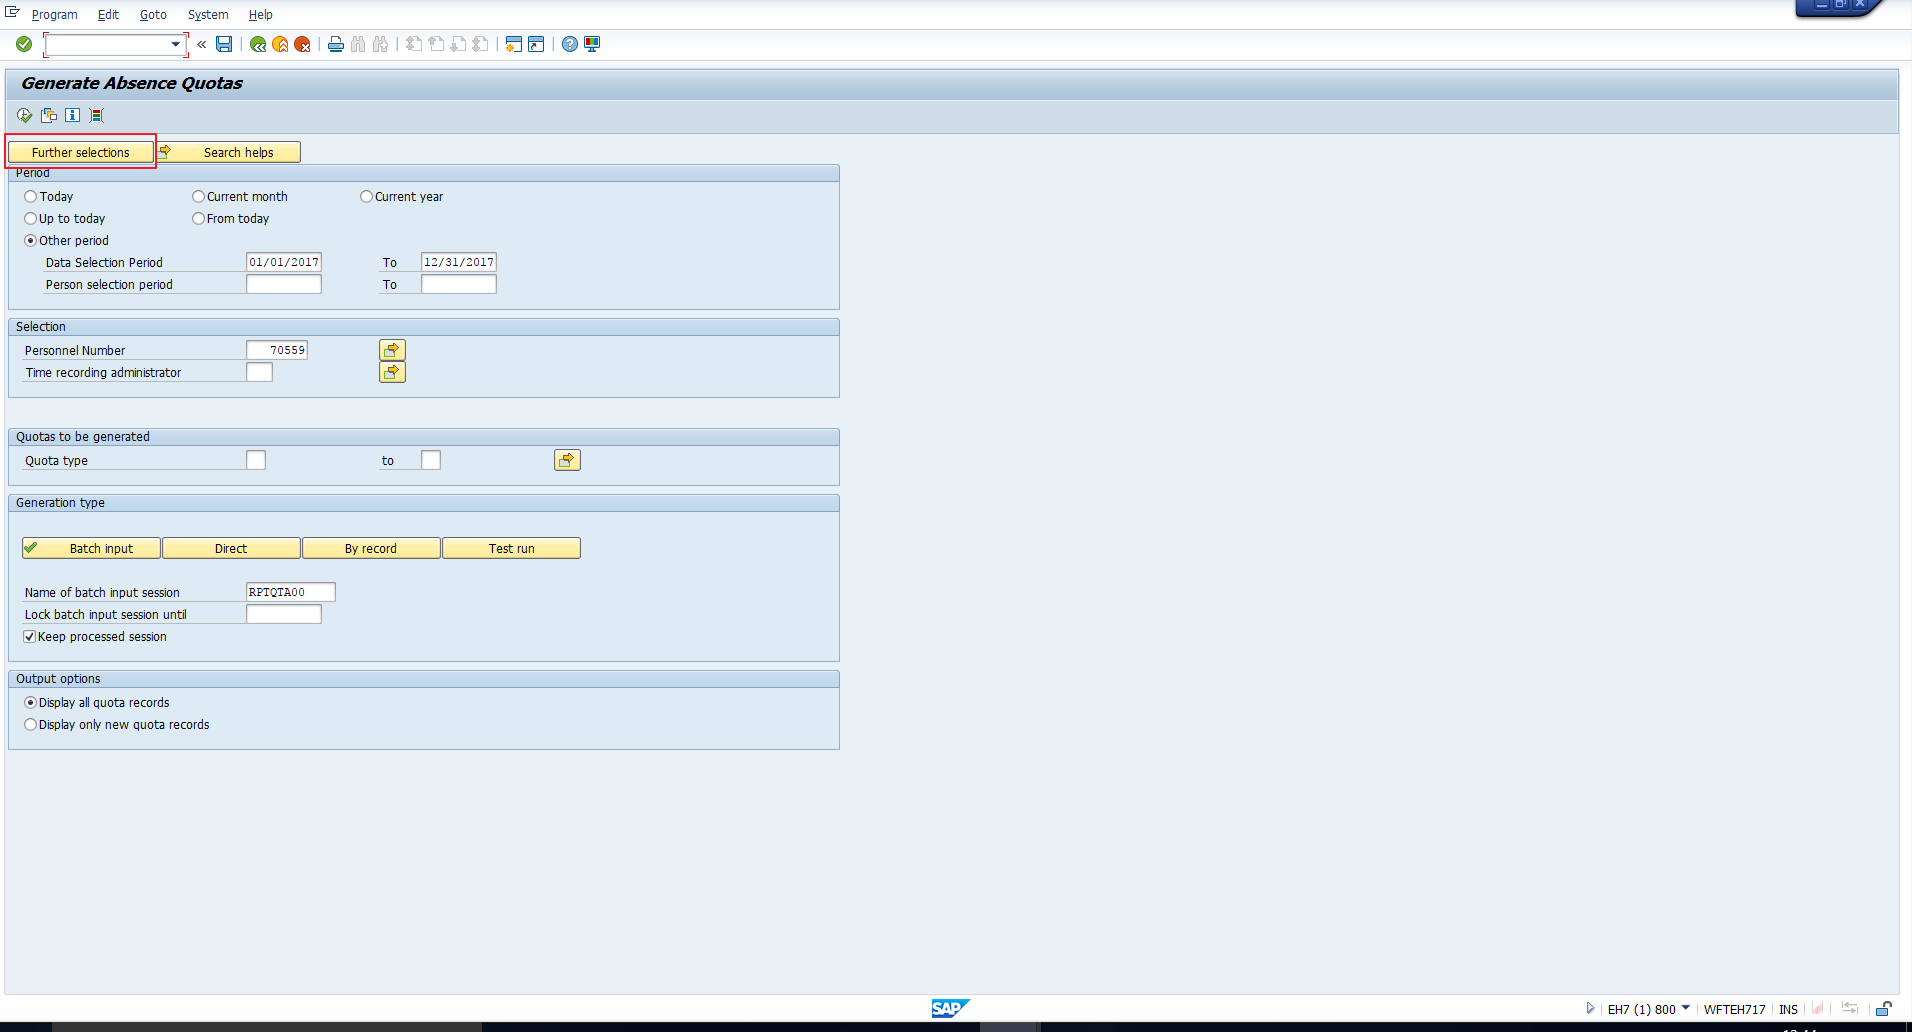
Click on this button to check the possible selection fields that can be added. You can see these in Figure 12.
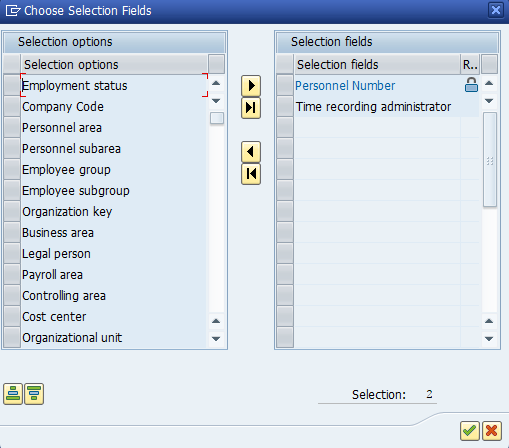
The box on the right contains the selection fields, which are the fields already included in the Selection screen. You can verify that the contents of this box tally with the fields highlighted in Figure 10.
The box on the left contains the list of Selection options. These are the fields that have not yet been activated as Selection fields. You can convert a Selection option into a Selection field if you want it to be displayed on the selection screen.
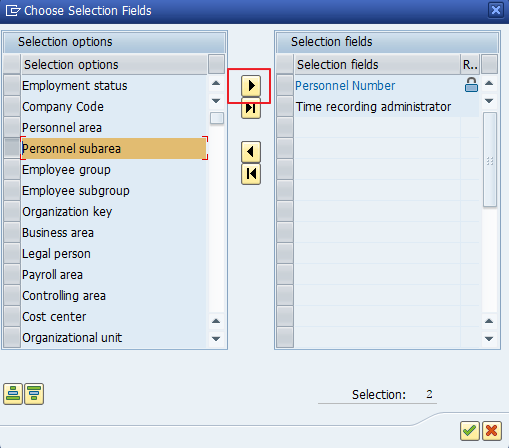
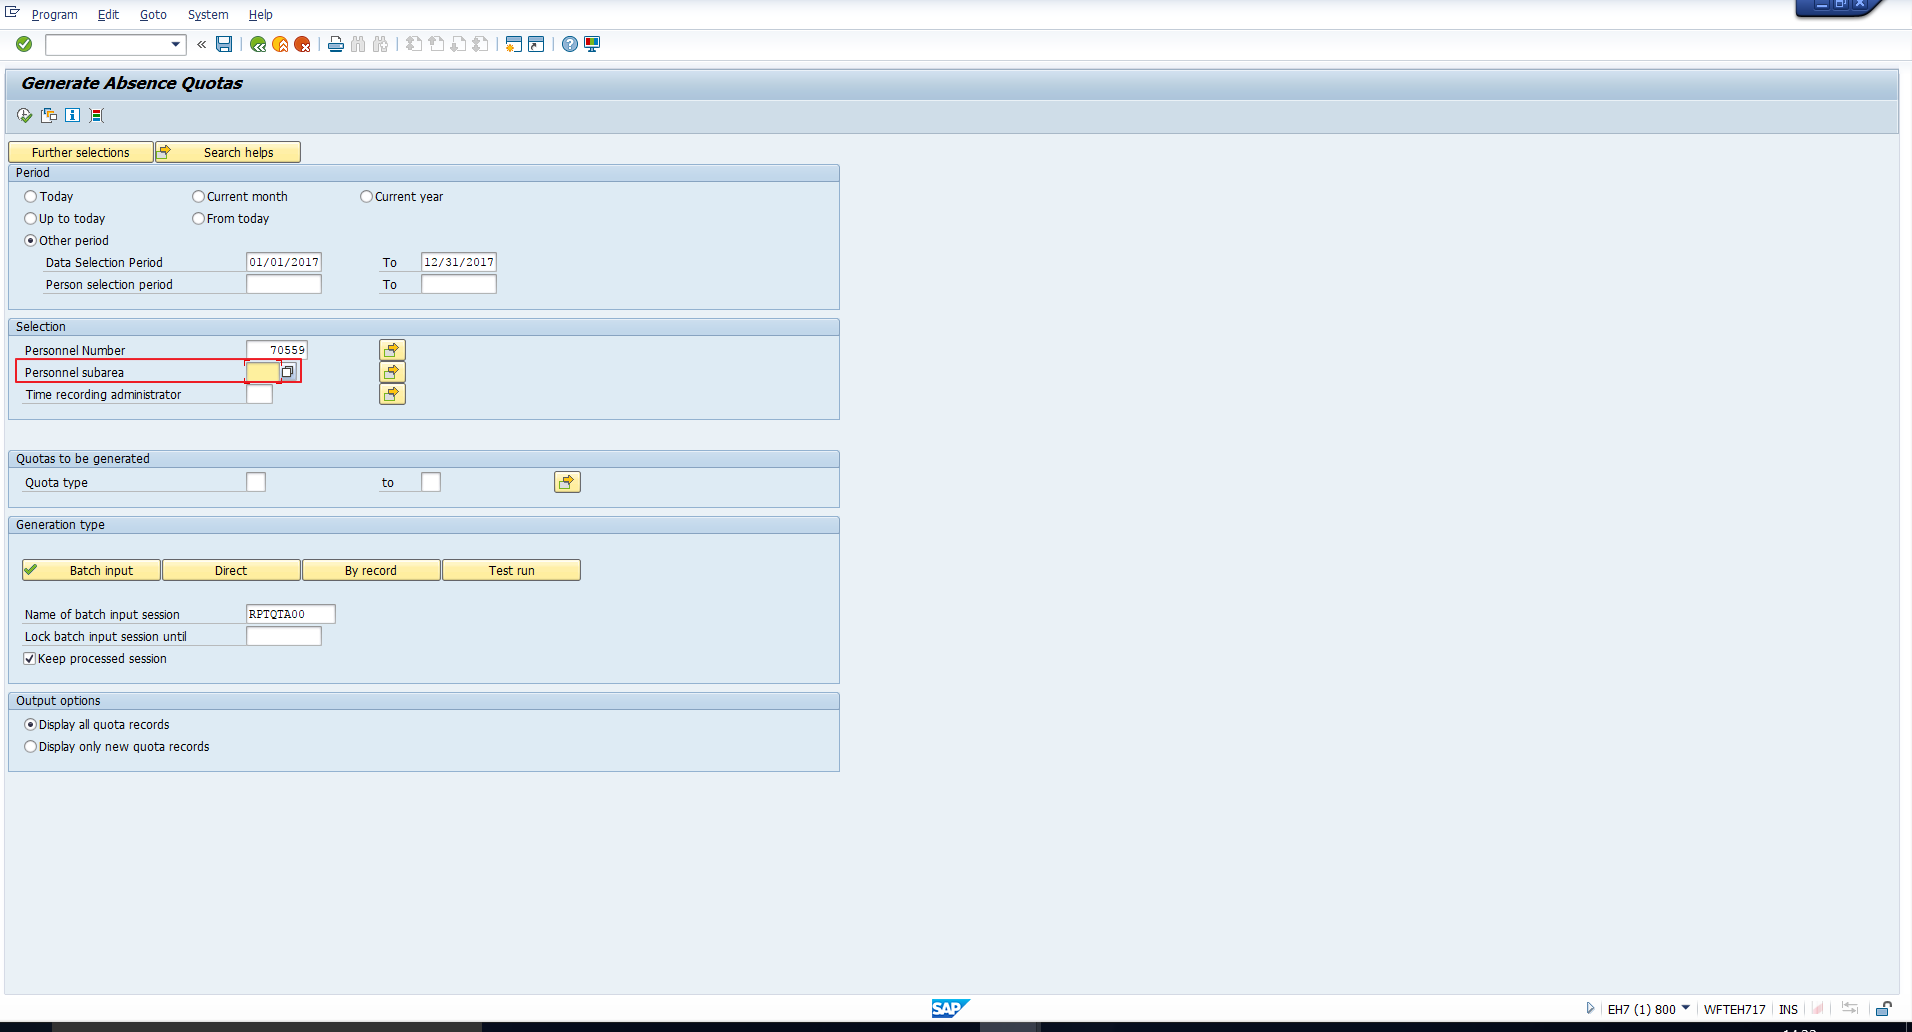
For example, assume that you want to generate quota for all employees belonging to a certain Personnel subarea. In this case, the field Personnel subarea must be displayed on the selection screen as a selection field. To do this, first select the field as shown in Figure 13. Then click on the Right arrow button highlighted in the screenshot.
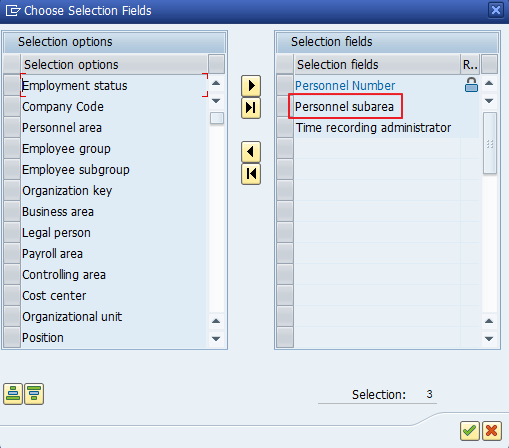
This transfers the field from the left box to the right box, as shown in Figure 14.
Consequently, the field becomes visible on the selection screen as shown in Figure 15.
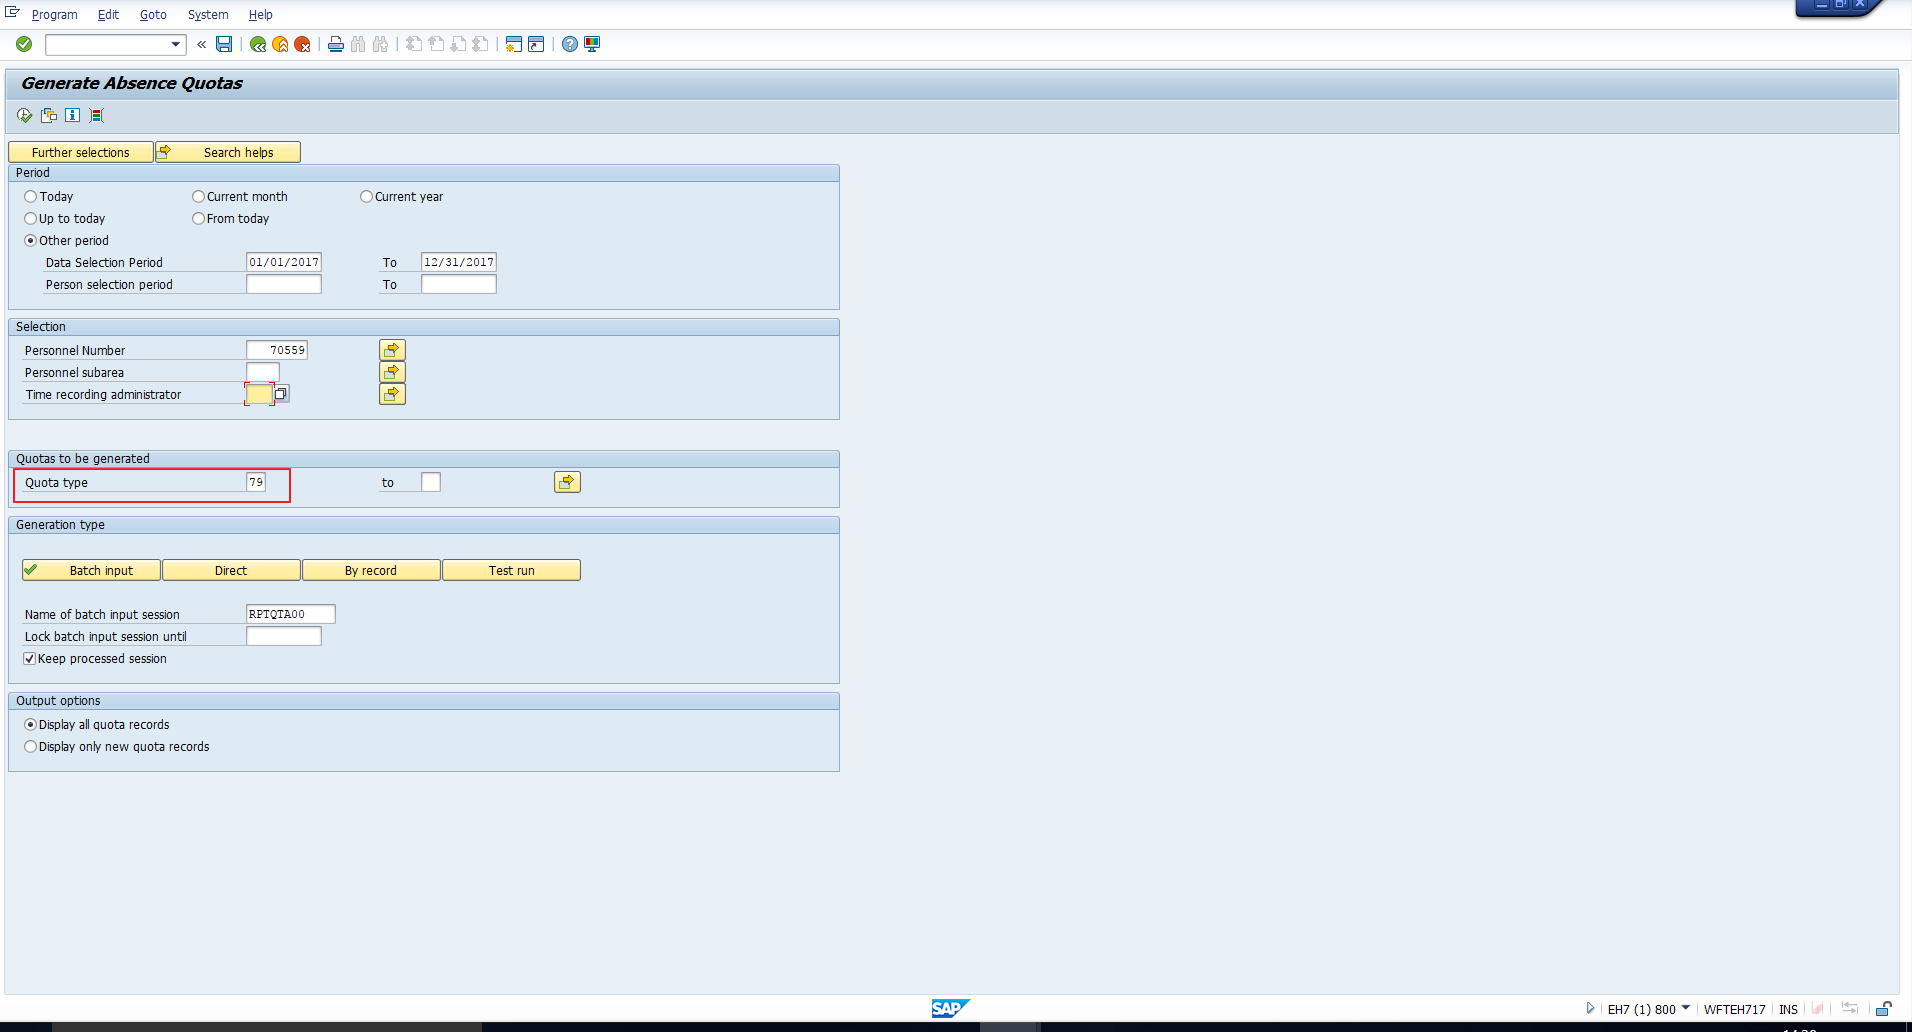
Quotas to be Generated
Enter one or more absence quota types that need to be generated. You can leave this blank, in which case the system will consider all applicable quota types. We will enter the quota type 79 (Test Casual Leave quota) for which we created the generation rule. You can see this in Figure 16.
Generation Type
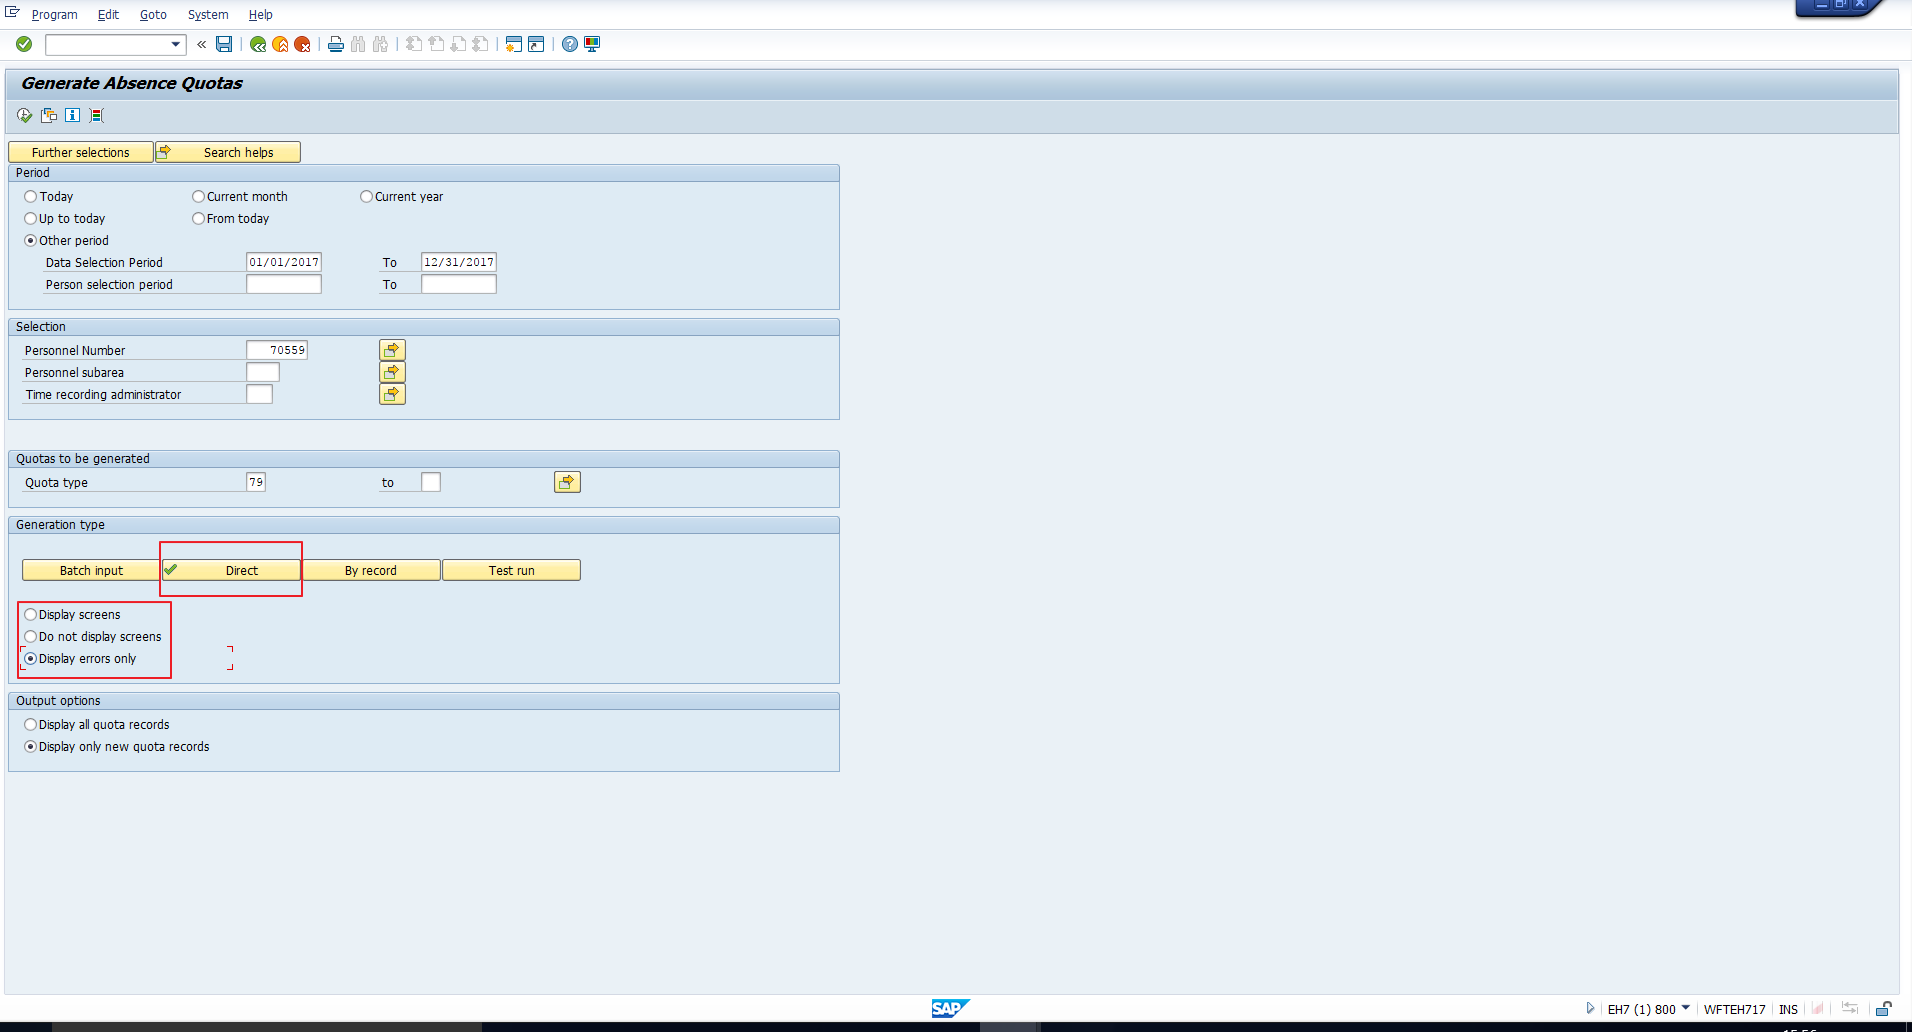
In this section, you should specify how quota should be generated in the SAP Absence Quotas infotype. You can opt for Batch input, where a session is generated during the program run, which can be processed later using transaction code SM35. This is recommended if you are processing a large amount of data.
Alternatively, you can select the Direct option, wherein the infotype records are updated directly. This is suitable if you are generating quota for a small number of employees.
You can also click the Test run button to execute SAP RPTQTA00 report in test mode. We have depicted this in Figure 17.
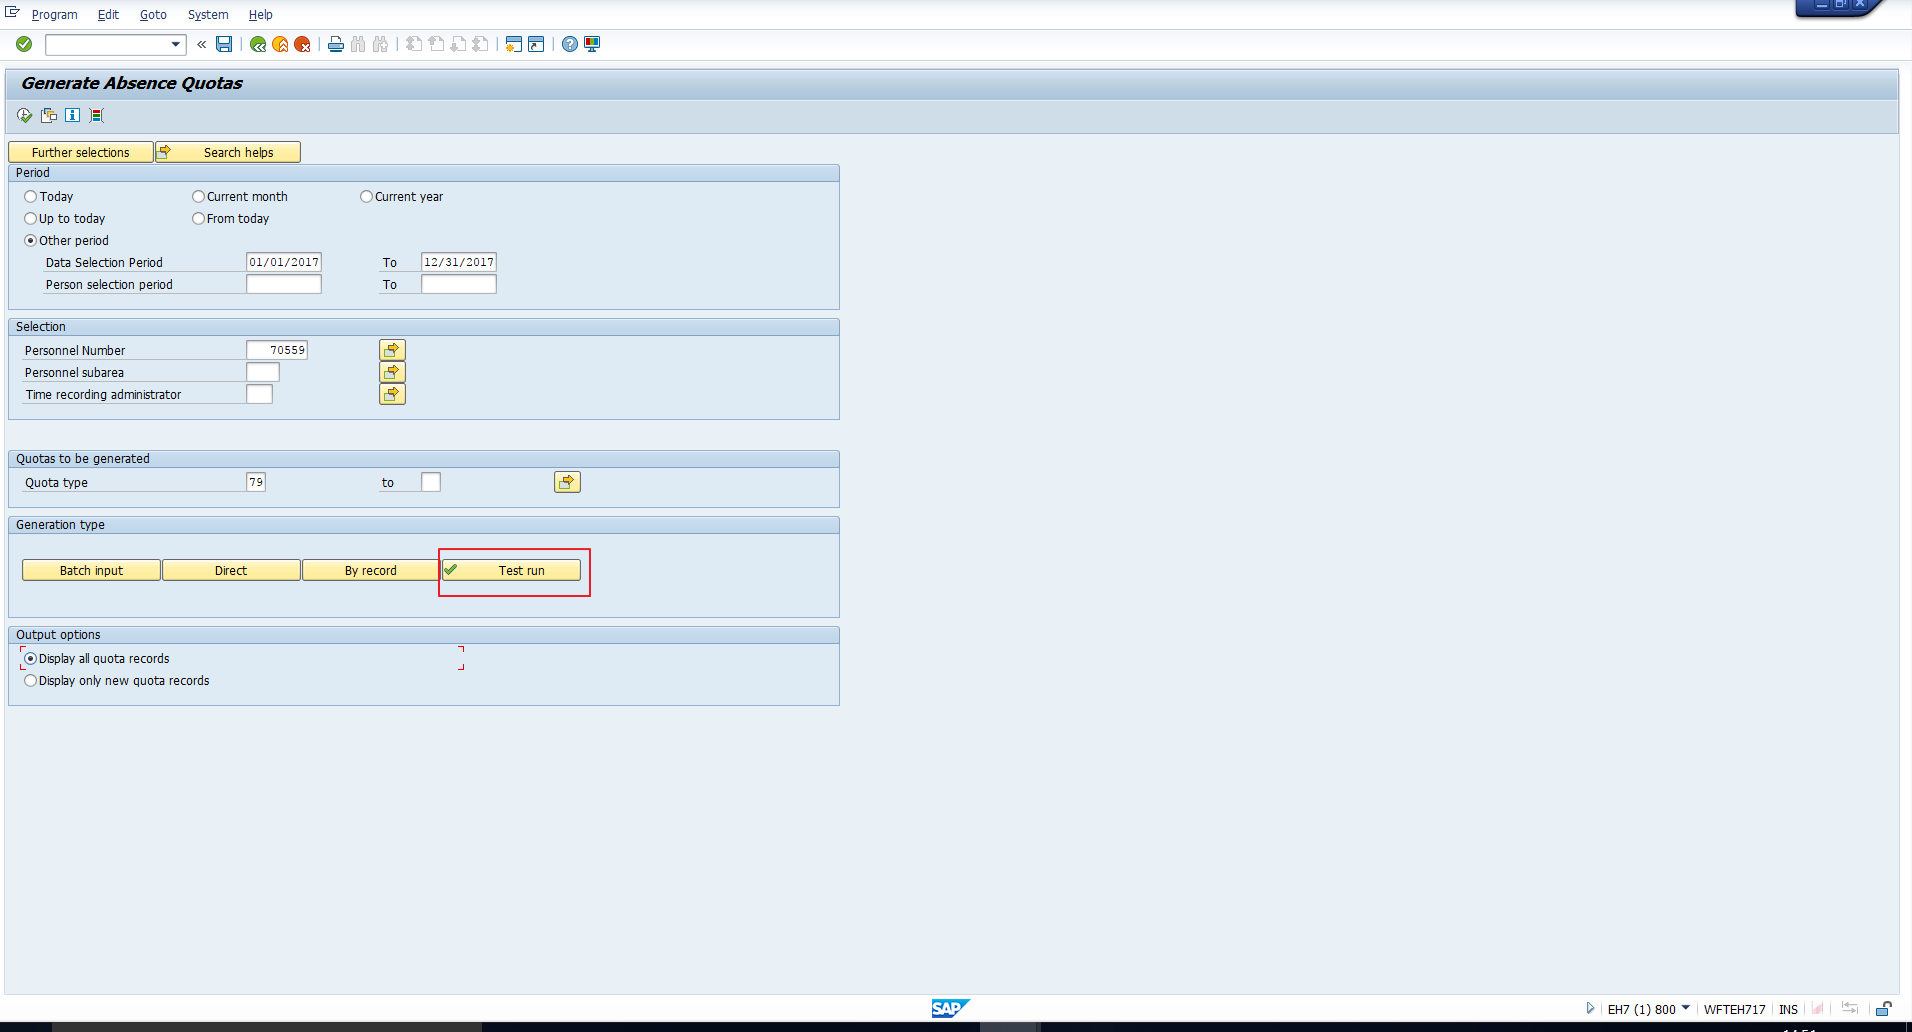
This will allow you to verify the calculated entitlements in the output before the data is actually transferred to the infotype.
Output Options
You can choose between displaying only the newly created quota records or displaying all quota records for an employee. Displaying only the new records makes it easier to verify the calculated entitlements in the output, hence we have selected this option as seen in Figure 18.
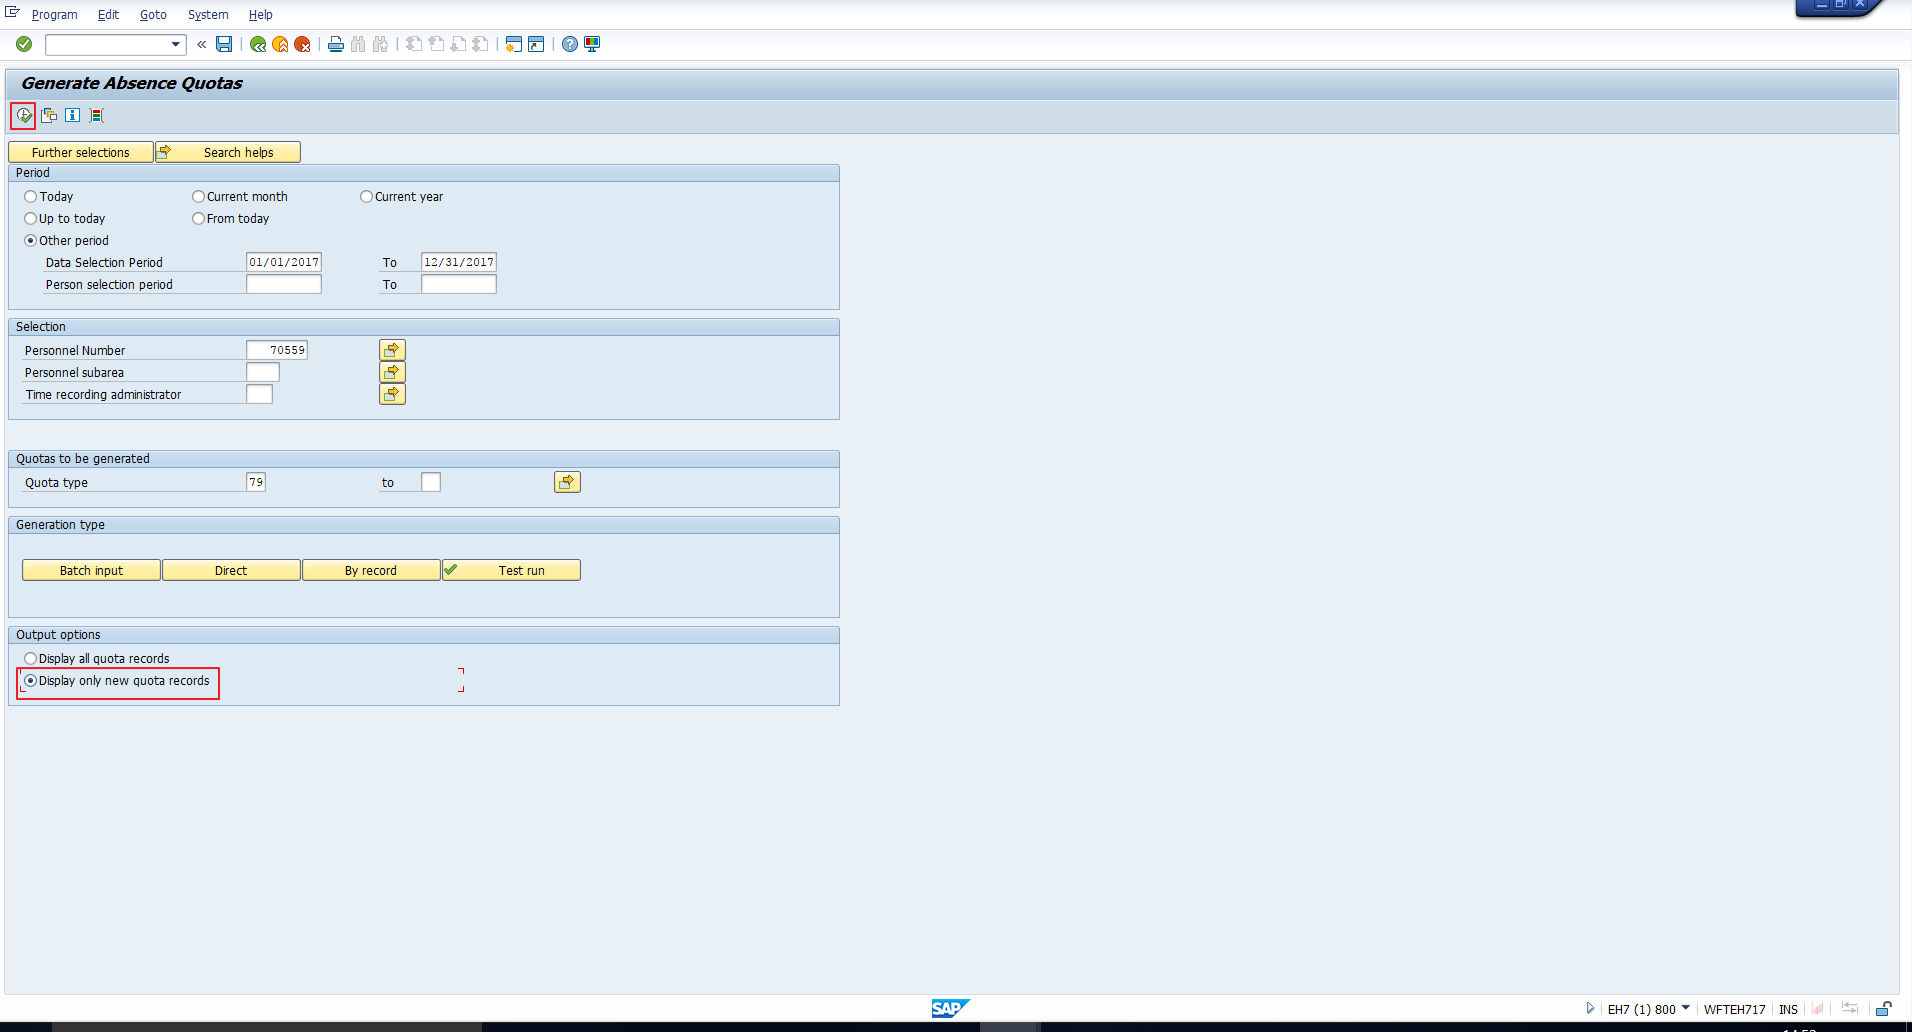
Now, before we proceed with the execution of SAP RPTQTA00 report, let’s quickly interpret the selection screen values in Figure 18. We will be generating entitlements for quota type 79 for the Personnel number 70559. In mm/dd/yyyy format, the generation period is 01/01/2017 to 12/31/2017. We have opted for a test run and the display of only the newly generated quota records.
Now, click on the Execute icon highlighted in Figure 18. The output of SAP RPTQTA00 report is displayed in Figure 19.

Let’s first verify the Validity and Deduction intervals, highlighted in Figure 20.
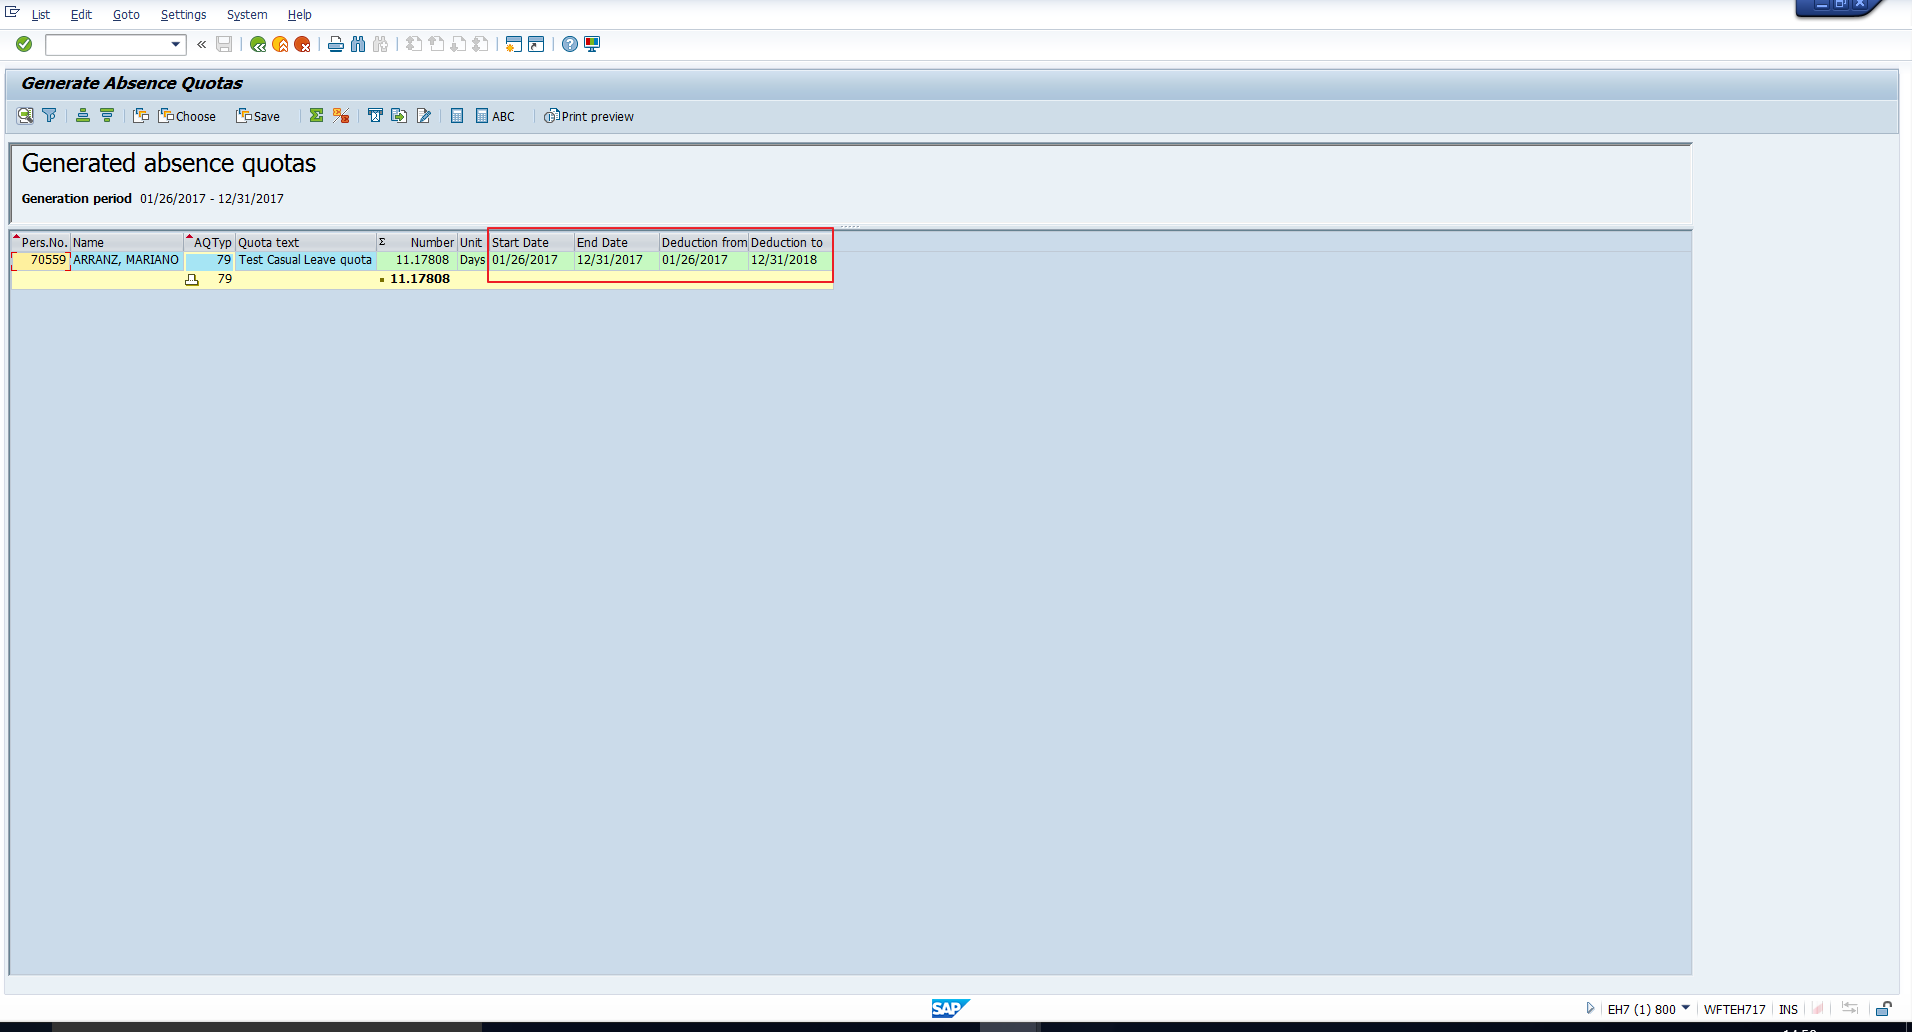
We can see that the Validity interval is from 01/26/2017 to 12/31/2017. However, in the selection screen, we had entered the interval as 01/01/2017 to 12/31/2017. To understand why the validity start date is 01/26/2017 instead of 01/01/2017, let us check the employee’s hire date in the Actions infotype.

In Figure 21, it is evident that the employee’s date of joining is 01/26/2017. This explains why the validity start date of the absence quota has been set to this date.
The deduction interval is from 01/26/2017 to 12/31/2018. If you’ve gone through the tutorial on SAP absence quota configuration, you may recollect that we had configured the scenario where the deduction end date should be a year greater than the validity end date.
Next, look at the calculated entitlement of 11.17808 days, highlighted in Figure 22.
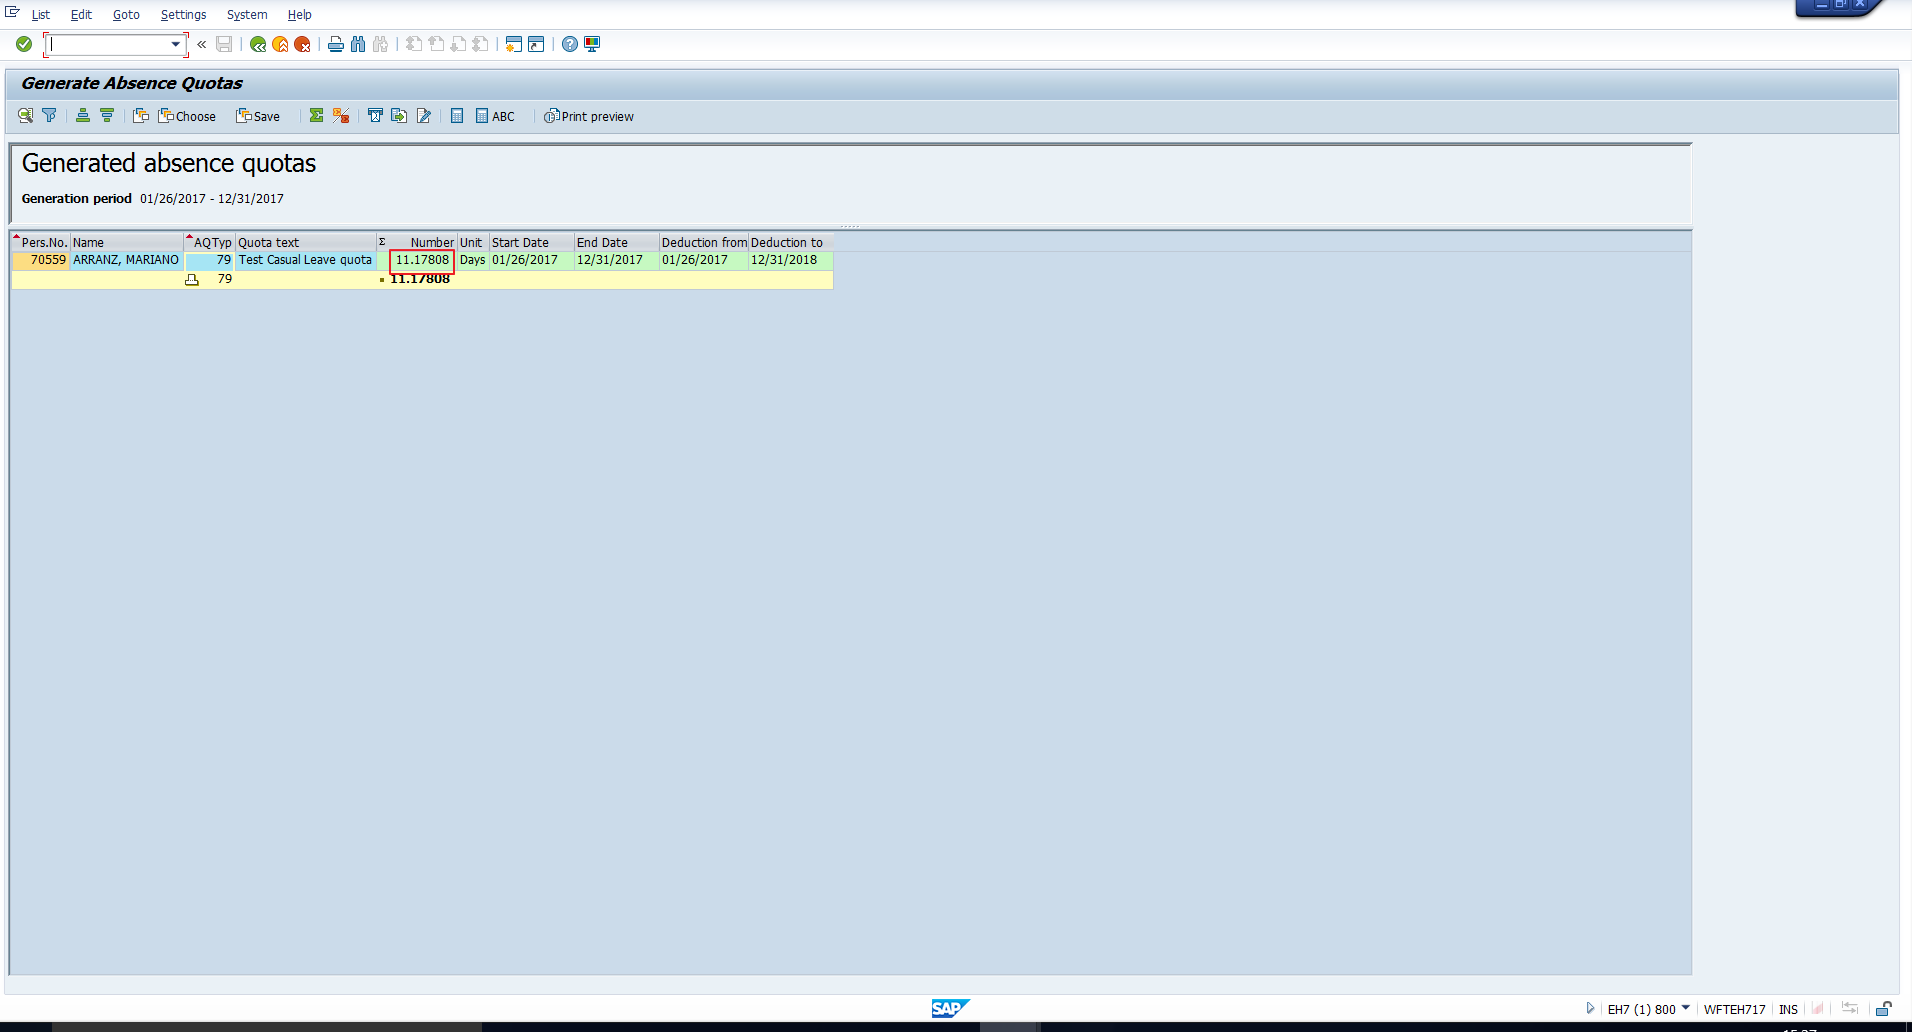
Let’s understand how SAP RPTQTA00 report has arrived at this figure.
Base entitlement = 12 days, Base period = 365 days (Calendar year)
The employee has joined the organization on 01/26/2017, hence the Accrual period = 340 days
This is because we have selected the ‘Take Account of Change of work center/Basic pay’ checkbox, so that the entitlement will be calculated proportionately for mid-year joiners.
Now, apply the formula,
Accrual entitlement = (Base entitlement / Base period) * Accrual period
Accrual entitlement = (12 / 365) * 340 = 11.17808
Hence, the entitlement displayed in Figure 22 is correct.
Having verified this, we can proceed with an actual run so that the quota is updated in the Absence quotas infotype. For this, go back to the selection screen and select the Direct option. On doing so, a new set of radio buttons get displayed as shown in Figure 23. These radio buttons control whether the screens should be displayed during the infotype update. If you want to see each screen, select the first radio button. Otherwise, select the Display errors only option as depicted in the screenshot.
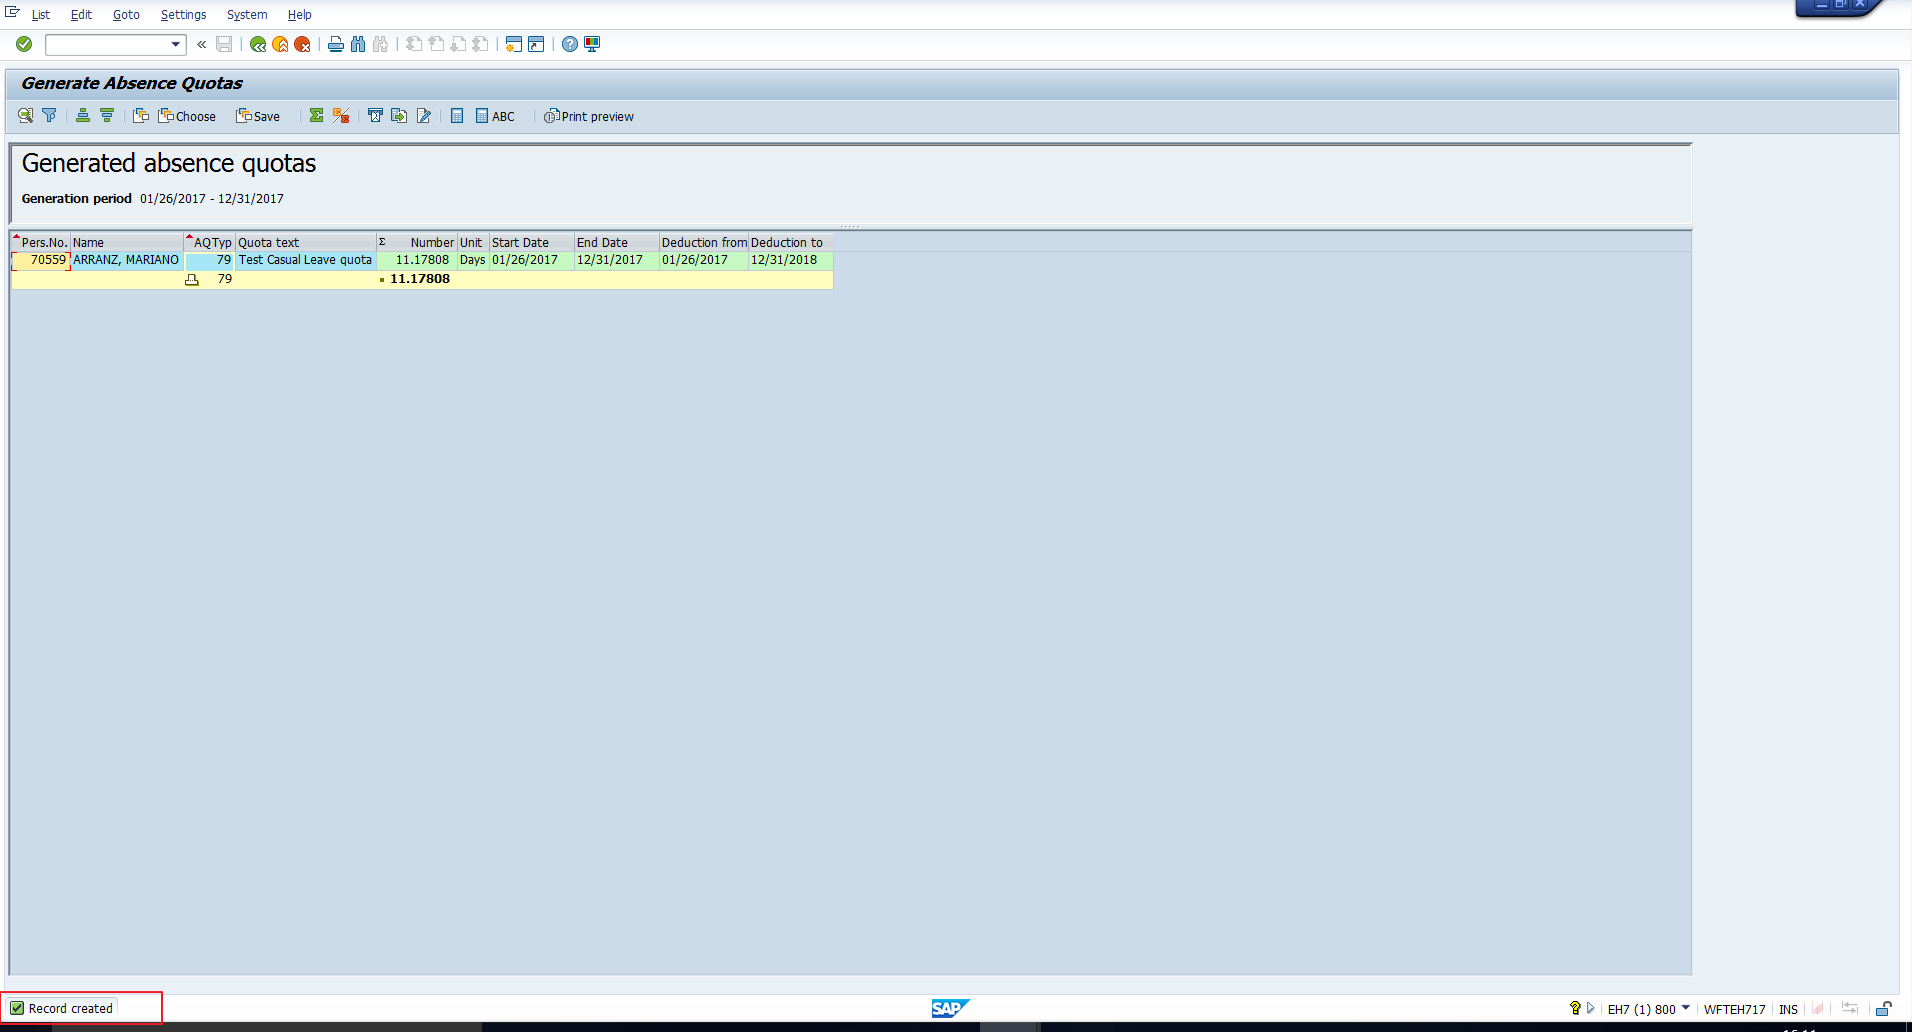
Now, execute the report again. If the update is successful, you will see a ‘Record created’ message at the bottom of the screen. This has been highlighted in Figure 24.
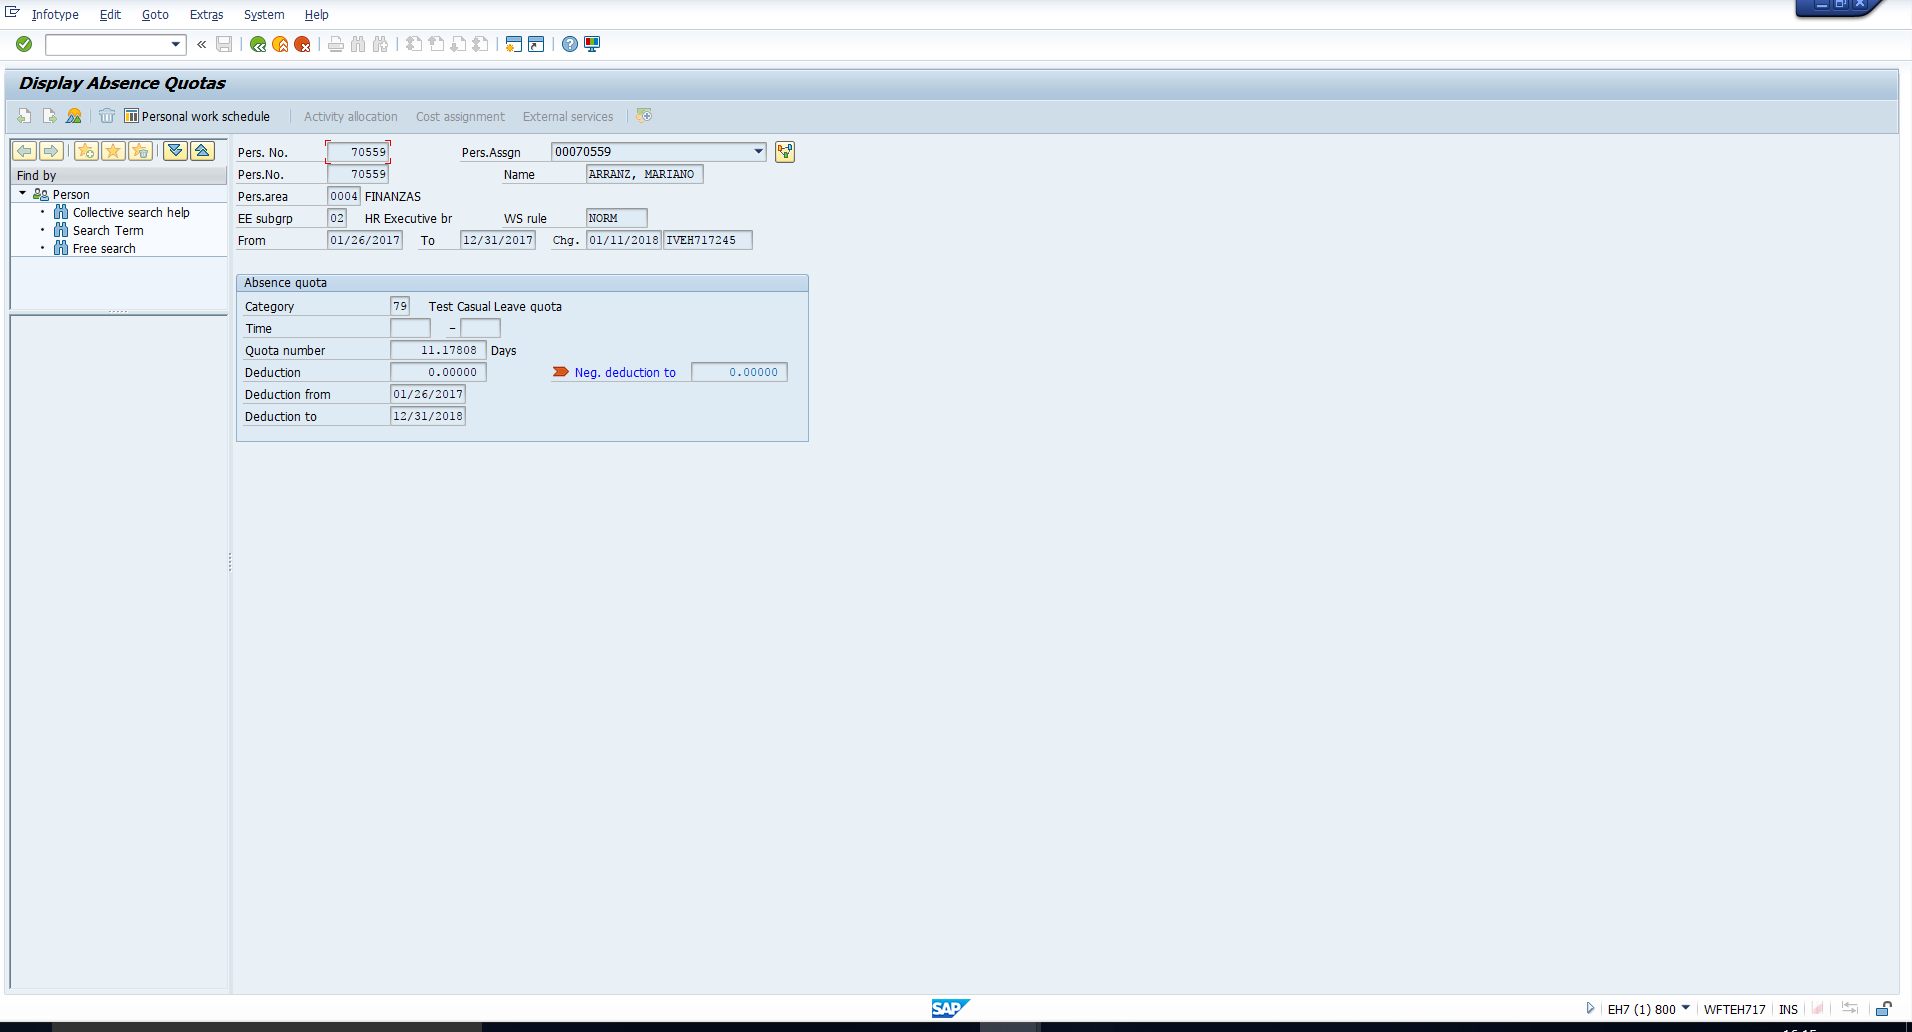
Using transaction code PA20, you can check the newly created quota in the SAP Absence quotas infotype. This can be seen in Figure 25.
—
Did you like this tutorial? Have any questions or comments? We would love to hear your feedback in the comments section below. It’d be a big help for us, and hopefully it’s something we can address for you in improvement of our free SAP HR tutorials.
Navigation Links
Go to next lesson: SAP Quota Deduction
Go to previous lesson: SAP Absence Quota Generation Rules
Go to overview of the course: SAP HR Training
Dear Tania, Thank you so much for all these Lessons.
When i try to run the SAP RPTQTA00, with Quota type filled in, i receive an error message “You have not selected any generation rules”. And no quota is generated. Do you have any clue what goes wrong?