
 Welcome to the tutorial on SAP time management reports. This tutorial is part of our SAP HR training course. There are several standard SAP time management reports which are delivered by SAP. Of these, we find three reports to be particularly useful from a business perspective. The objective of this tutorial is to introduce you to these. Please note that Time Evaluation reports are not within the scope of this tutorial.
Personal Work Schedule Report
This is the first of SAP time management reports that we will discuss. You can use this report to obtain an overview of the planned working time specifications for one or more employees. The details will be displayed for each employee for each day in the selected period.
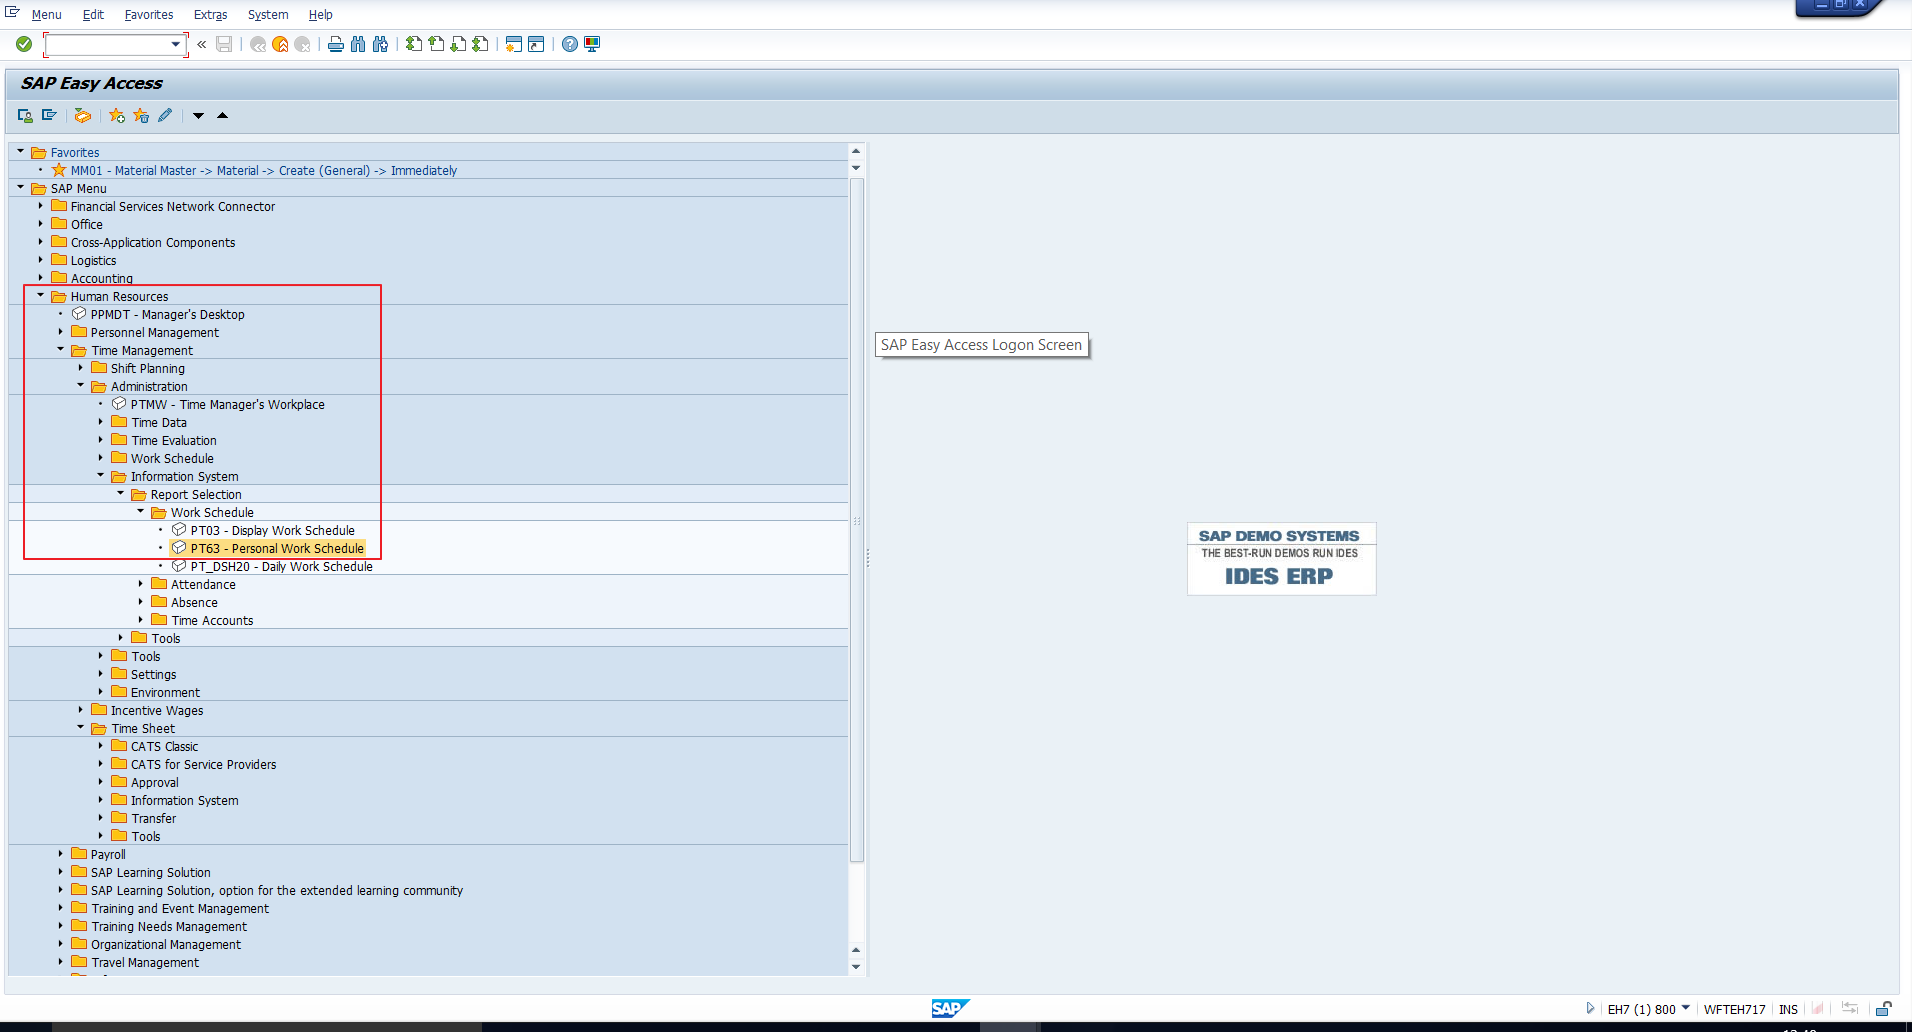
To execute this report, follow the SAP Easy Access menu path depicted in Figure 1. Alternatively, you can directly enter the transaction code PT63.
The selection screen shown in Figure 2 will follow.
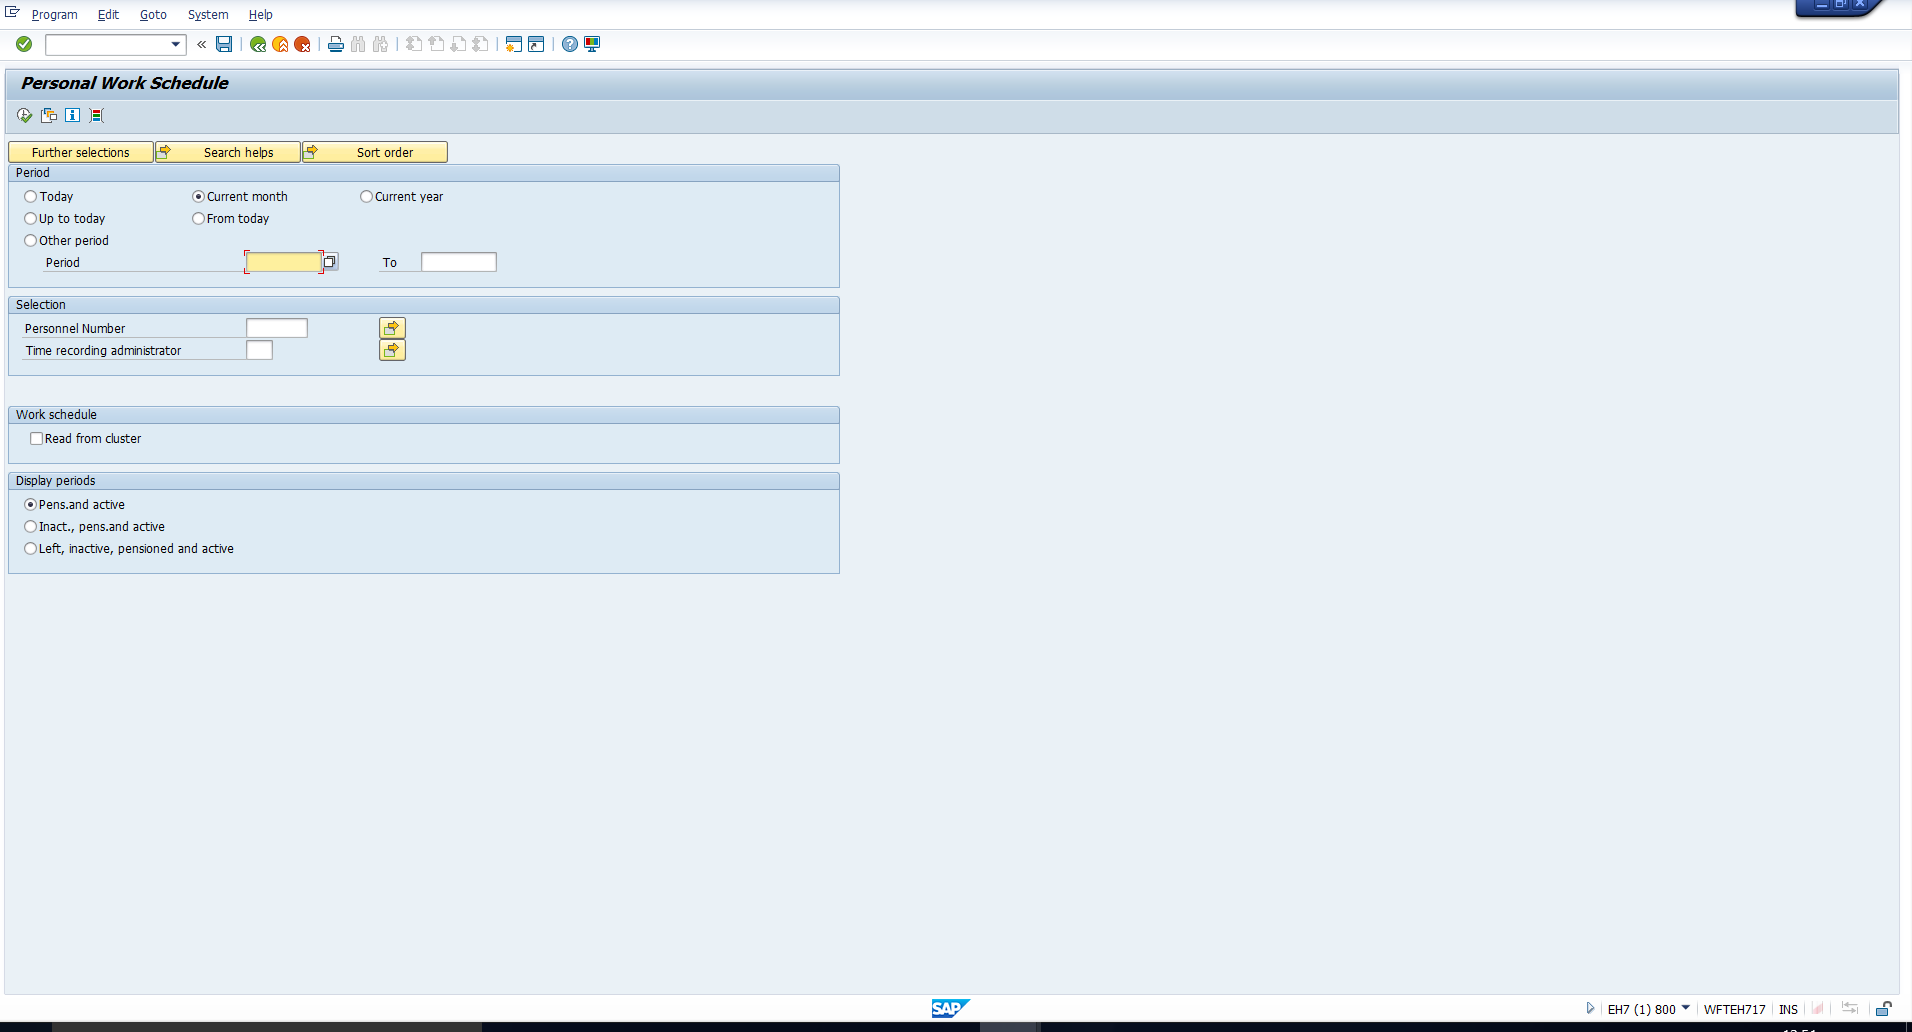
In the Period section, enter or select the period for which you want to extract the planned time data for the employee(s). In the Selection section, you may directly enter the Personnel number(s) for whom the data is required. Alternatively, you can select the employees based on other selection fields by using the Further selections button. If you are not familiar with the usage of this button, please go through the tutorial on SAP Report RPTQTA00, where this has been explained.
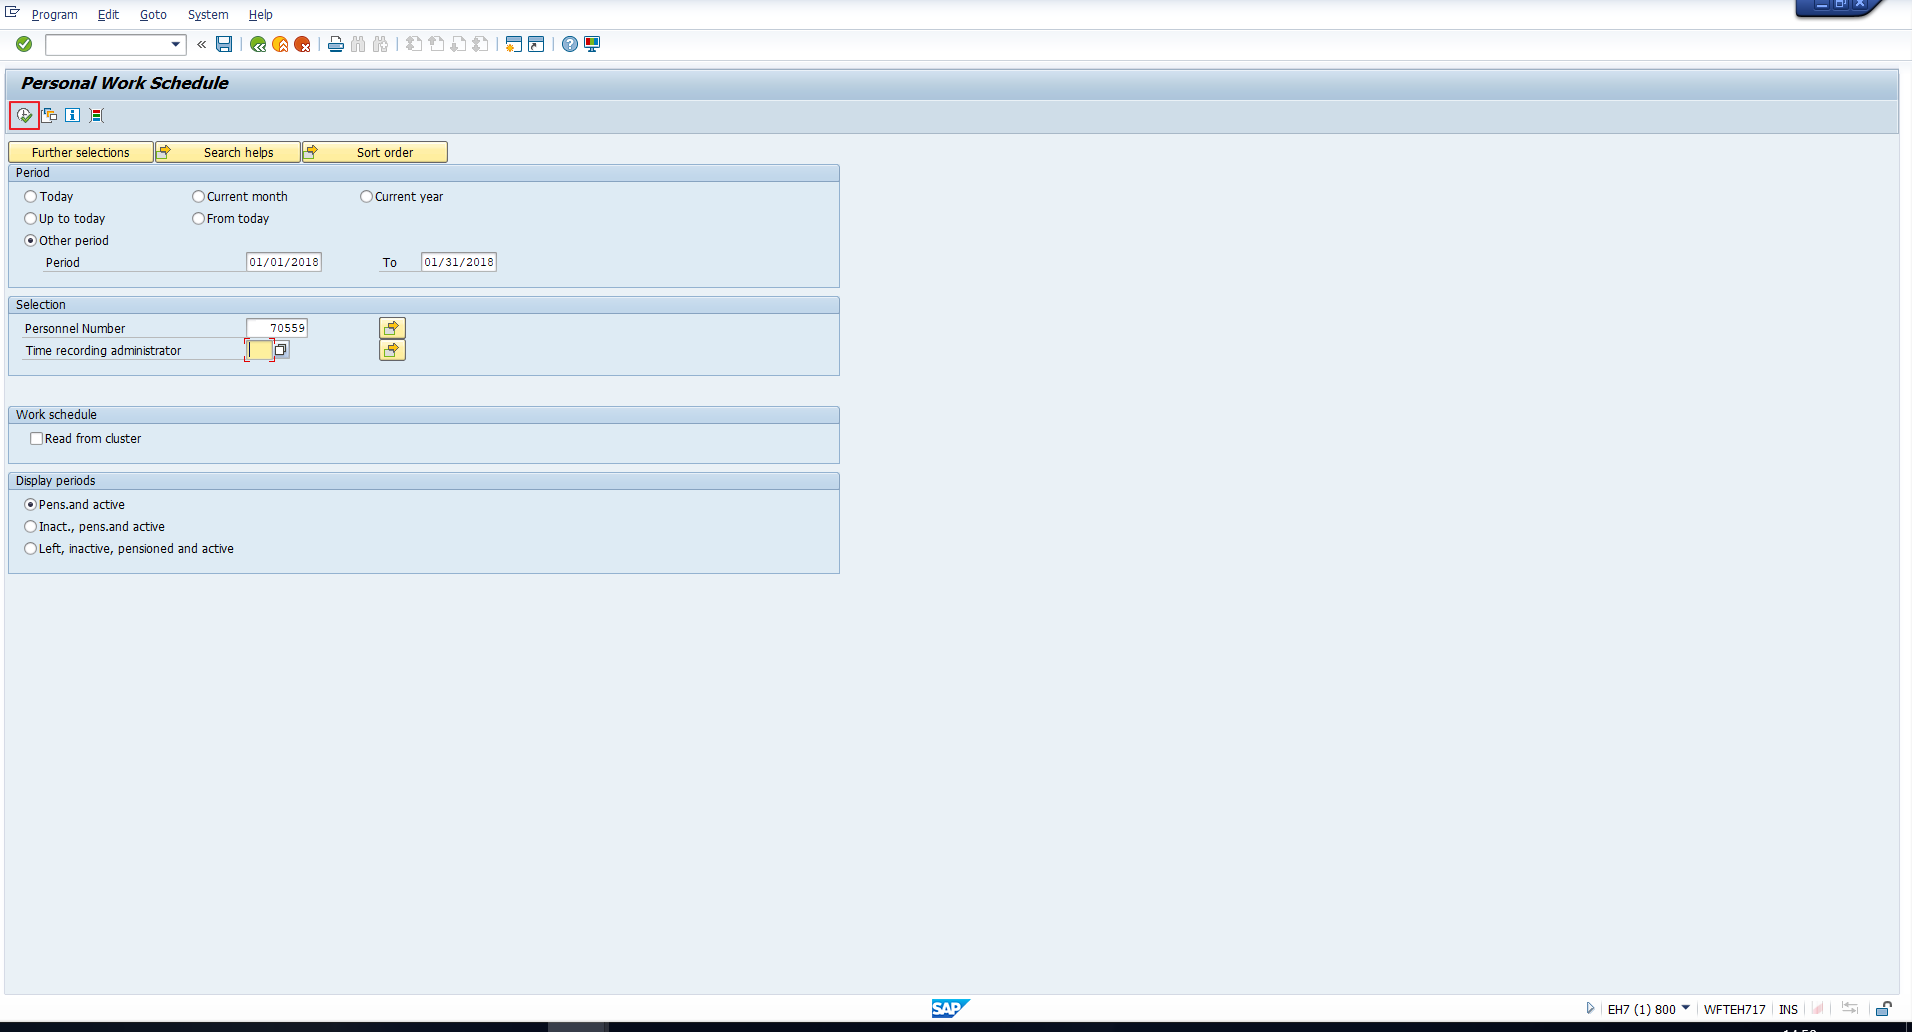
For example, assume that we want to generate the planned working time details for Personnel number 70559 for the month January 2018. For this, you should enter the selection values shown in Figure 3. Then click on the Execute button highlighted below.
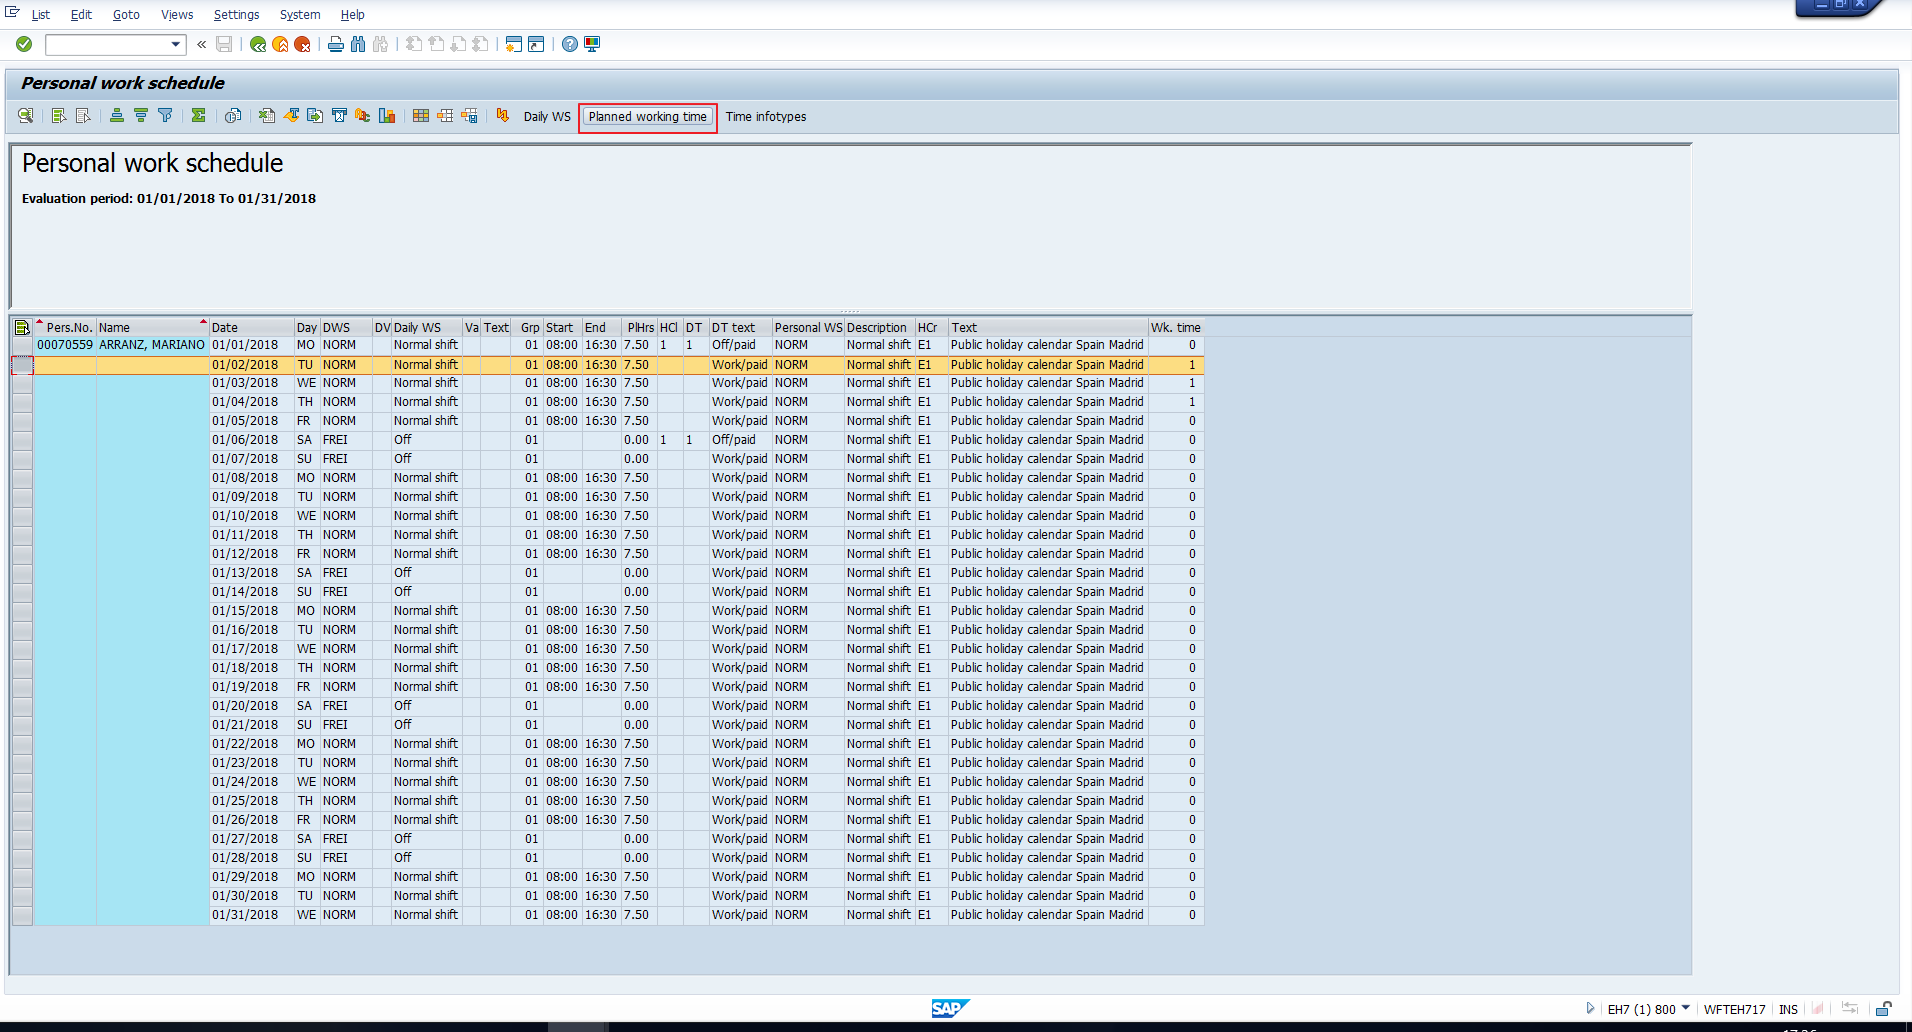
The output will be similar to the illustration in Figure 4.

Here, each row in the output corresponds to a unique calendar day, as indicated by the Date column. For each day, you can see the planned Daily Work schedule details as highlighted in Figure 5. Note that these details are picked from the employee’s Planned Working Time infotype. However, if there is a different Daily work schedule specified for the employee in the Substitutions infotype for that day, then these specifications override those of the Planned Working Time infotype, and consequently, will be displayed here.
If you are not familiar with the Substitutions infotype, please go through the tutorial on Time management infotypes.
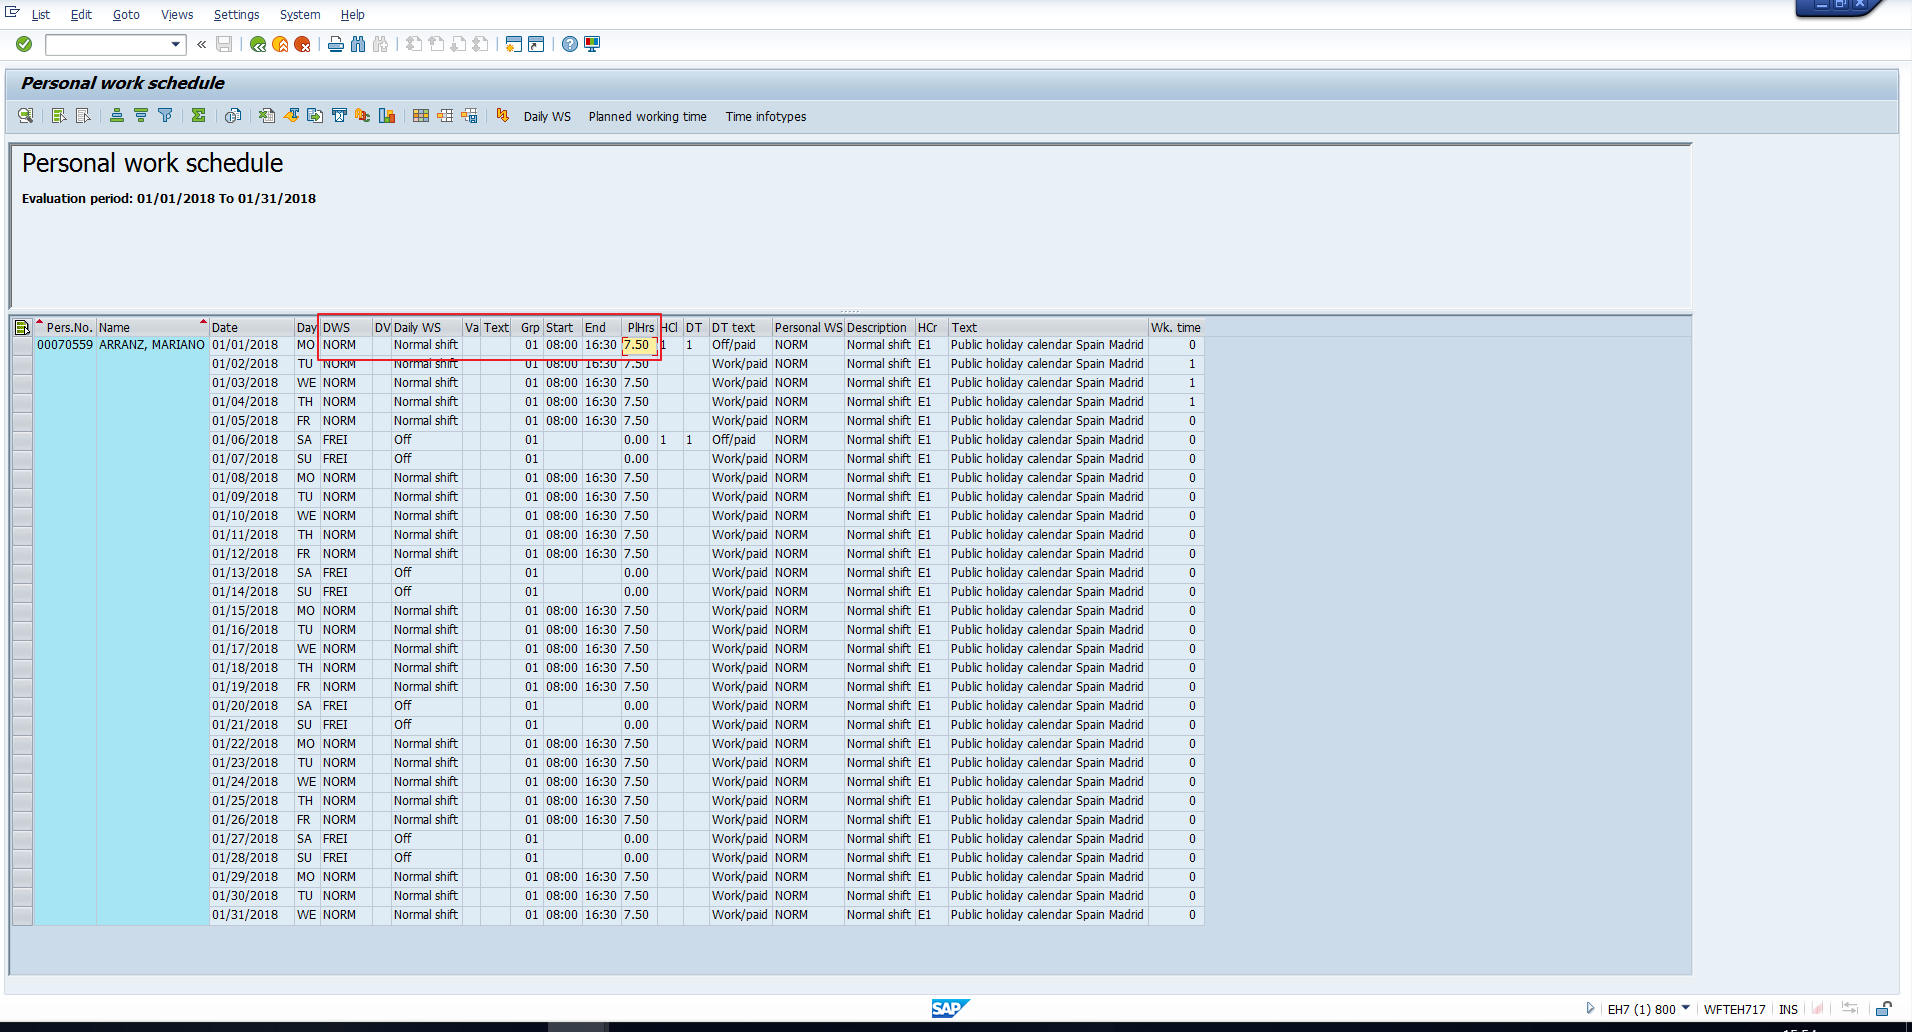
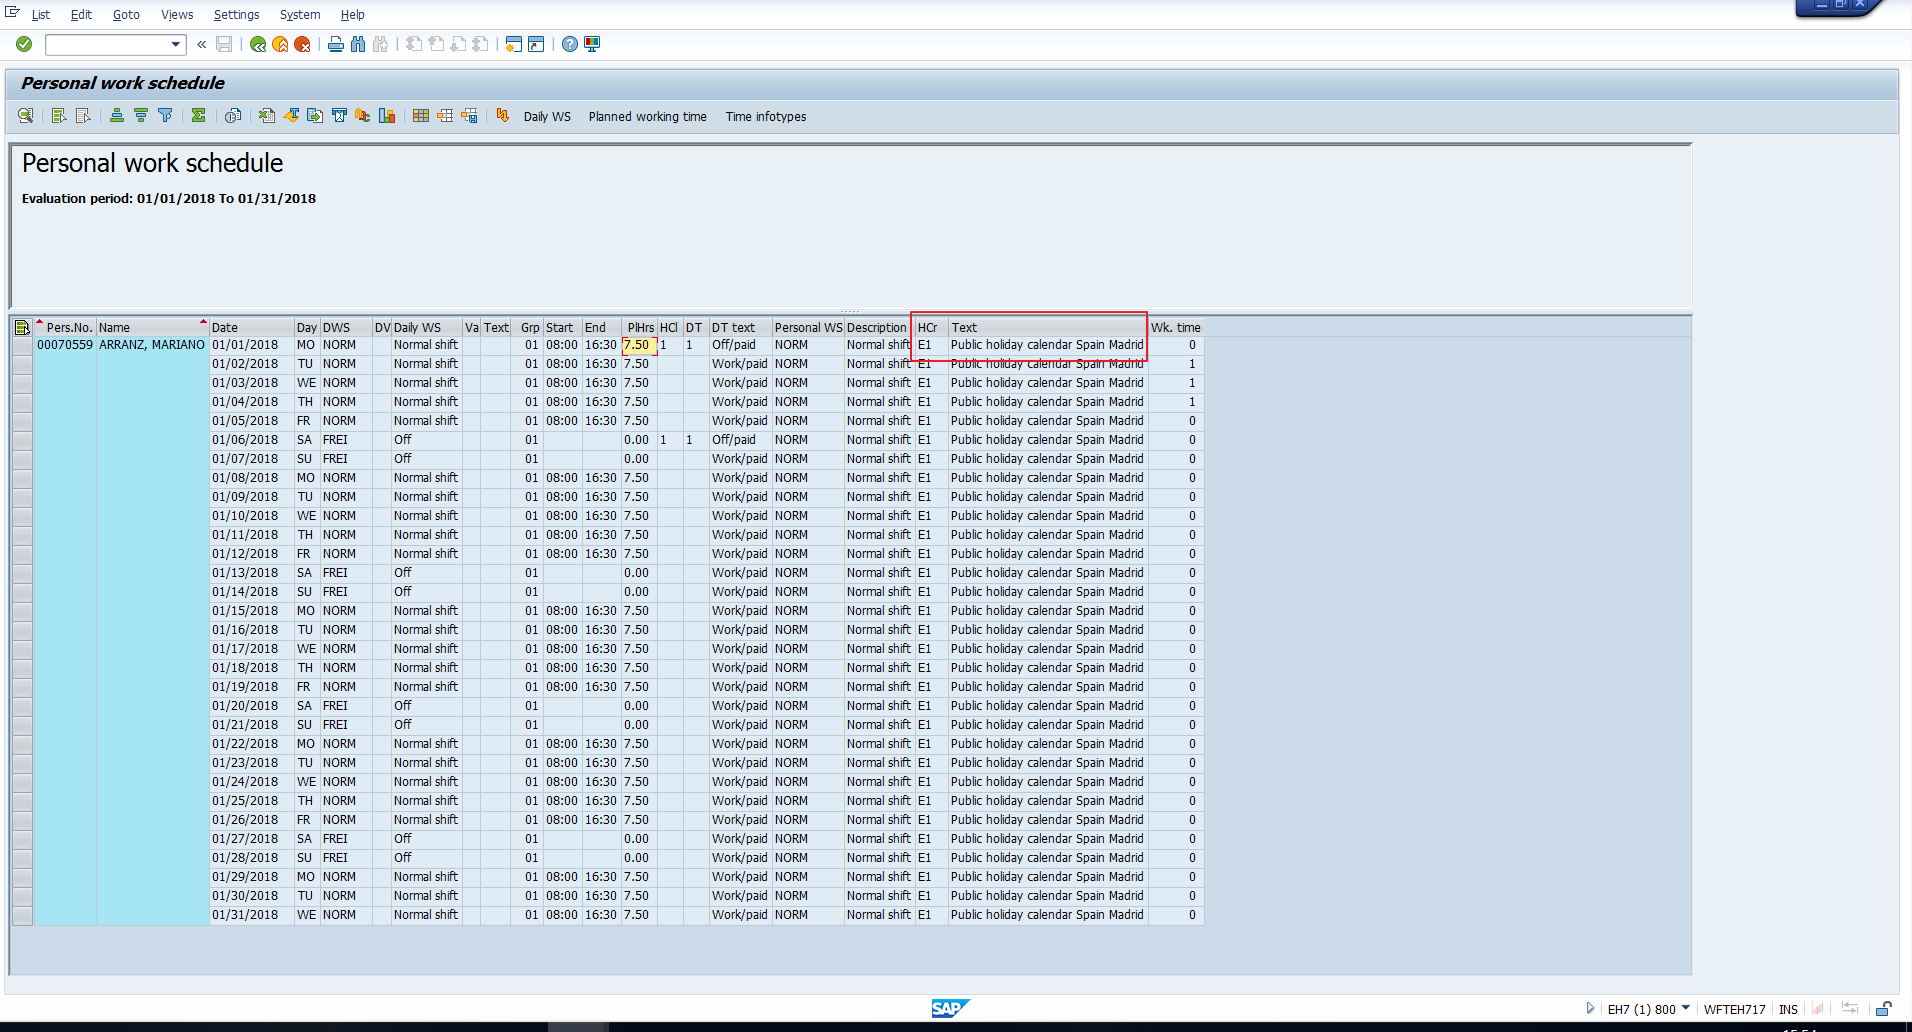
In Figure 6, you can see that the Holiday Class and Day type are also displayed for each day.

Figure 7 highlights the relevant Period Work schedule details, while Figure 8 conveys the Holiday calendar details.
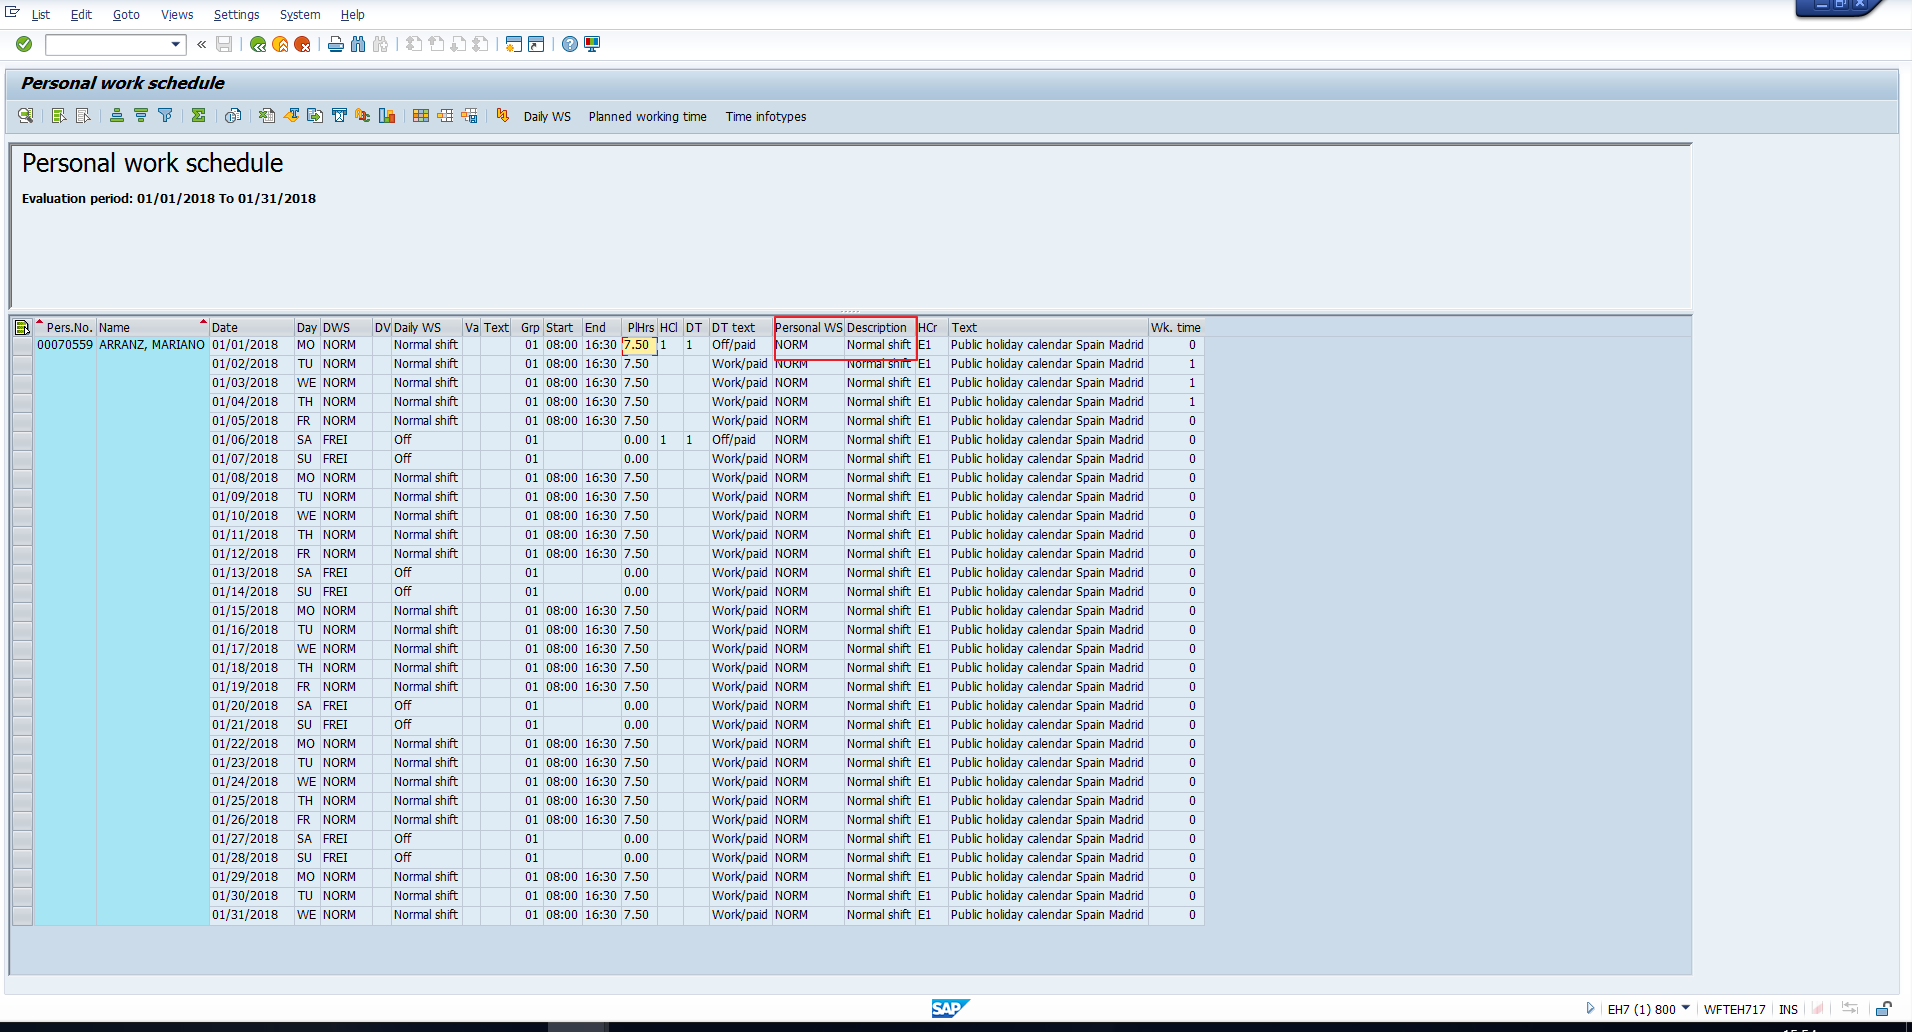
The last column in the output indicates the number of Time Infotypes that have been maintained for the employee for that day. If you refer to Figure 9, you can see that the value is 1 for 3 days. This means that one Time Infotype has been maintained for each of these days.
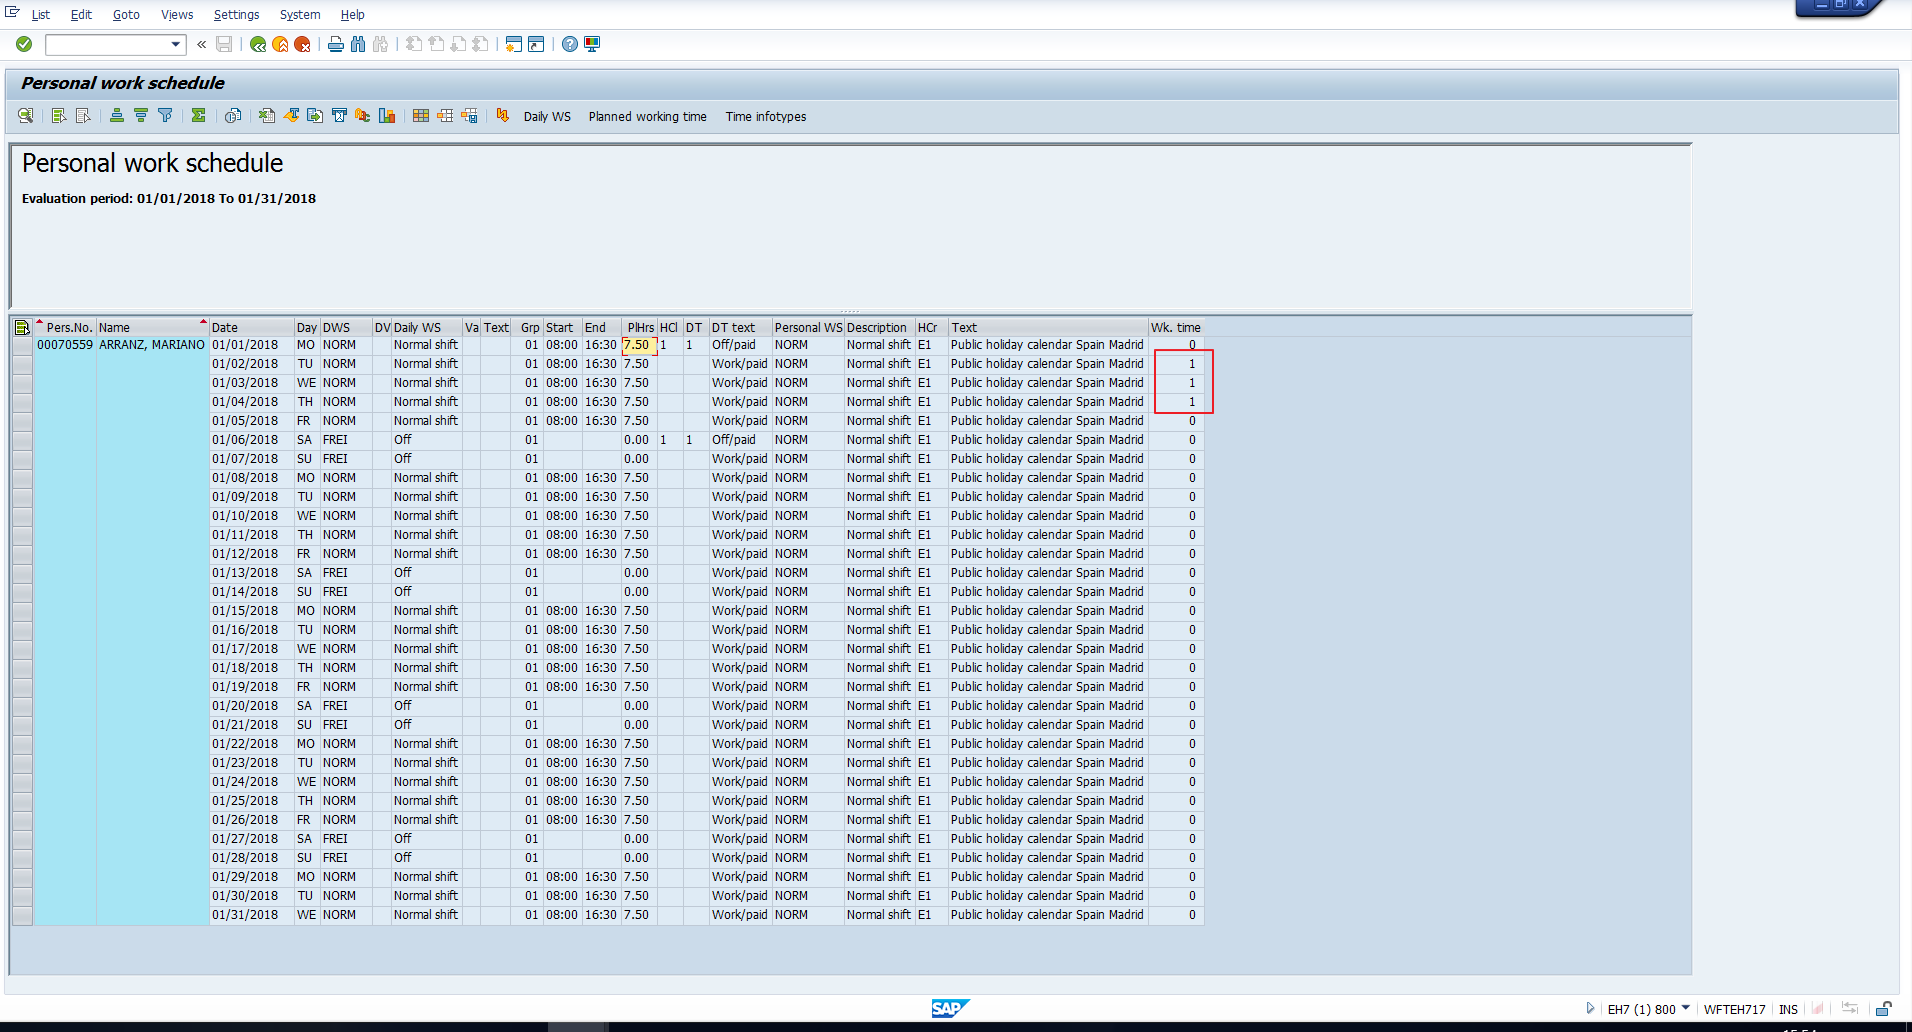
If you would like to know which Time infotype has been maintained for a given day, select the corresponding row and then click on the Time infotypes button. This has been illustrated in Figure 10.

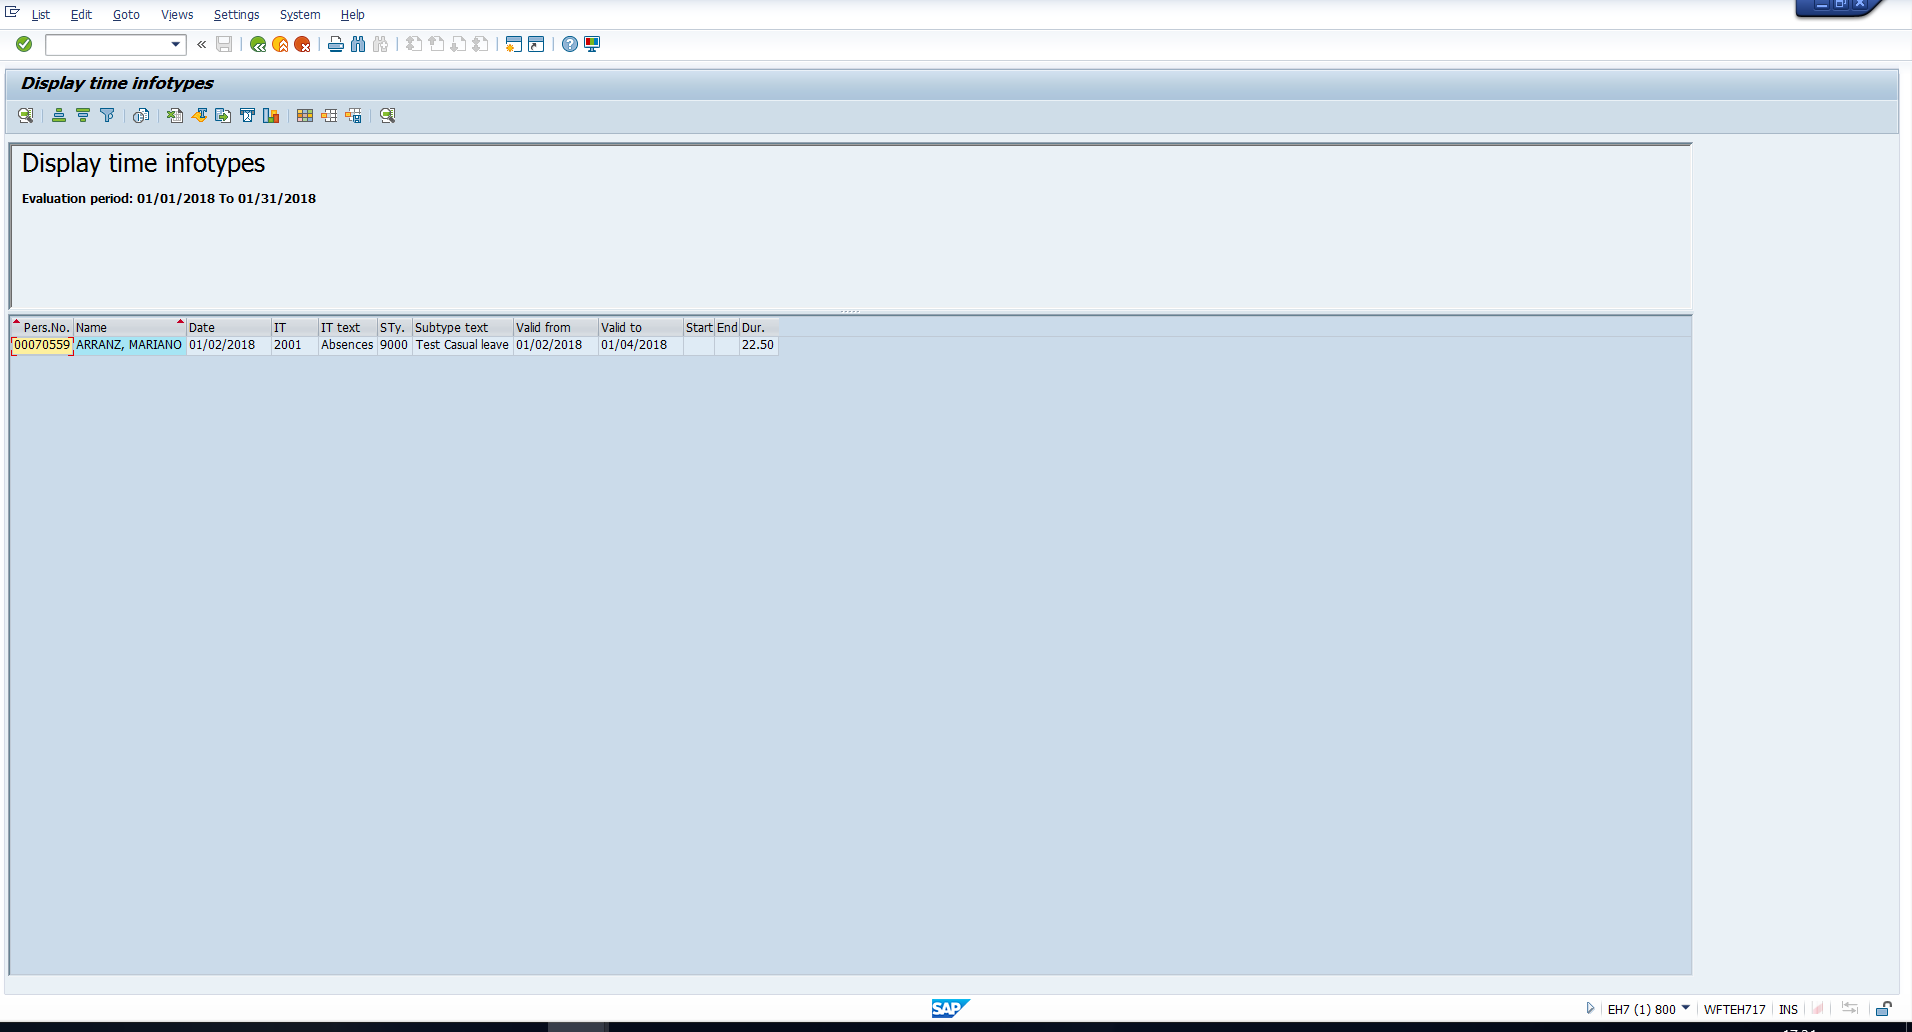
The Display Time infotypes screen will then be displayed, which will list all the Time infotypes created for the employee for that day. In our example, the Absences infotype has been maintained as depicted in Figure 11.
You can click on the Back icon to return to the previous screen.
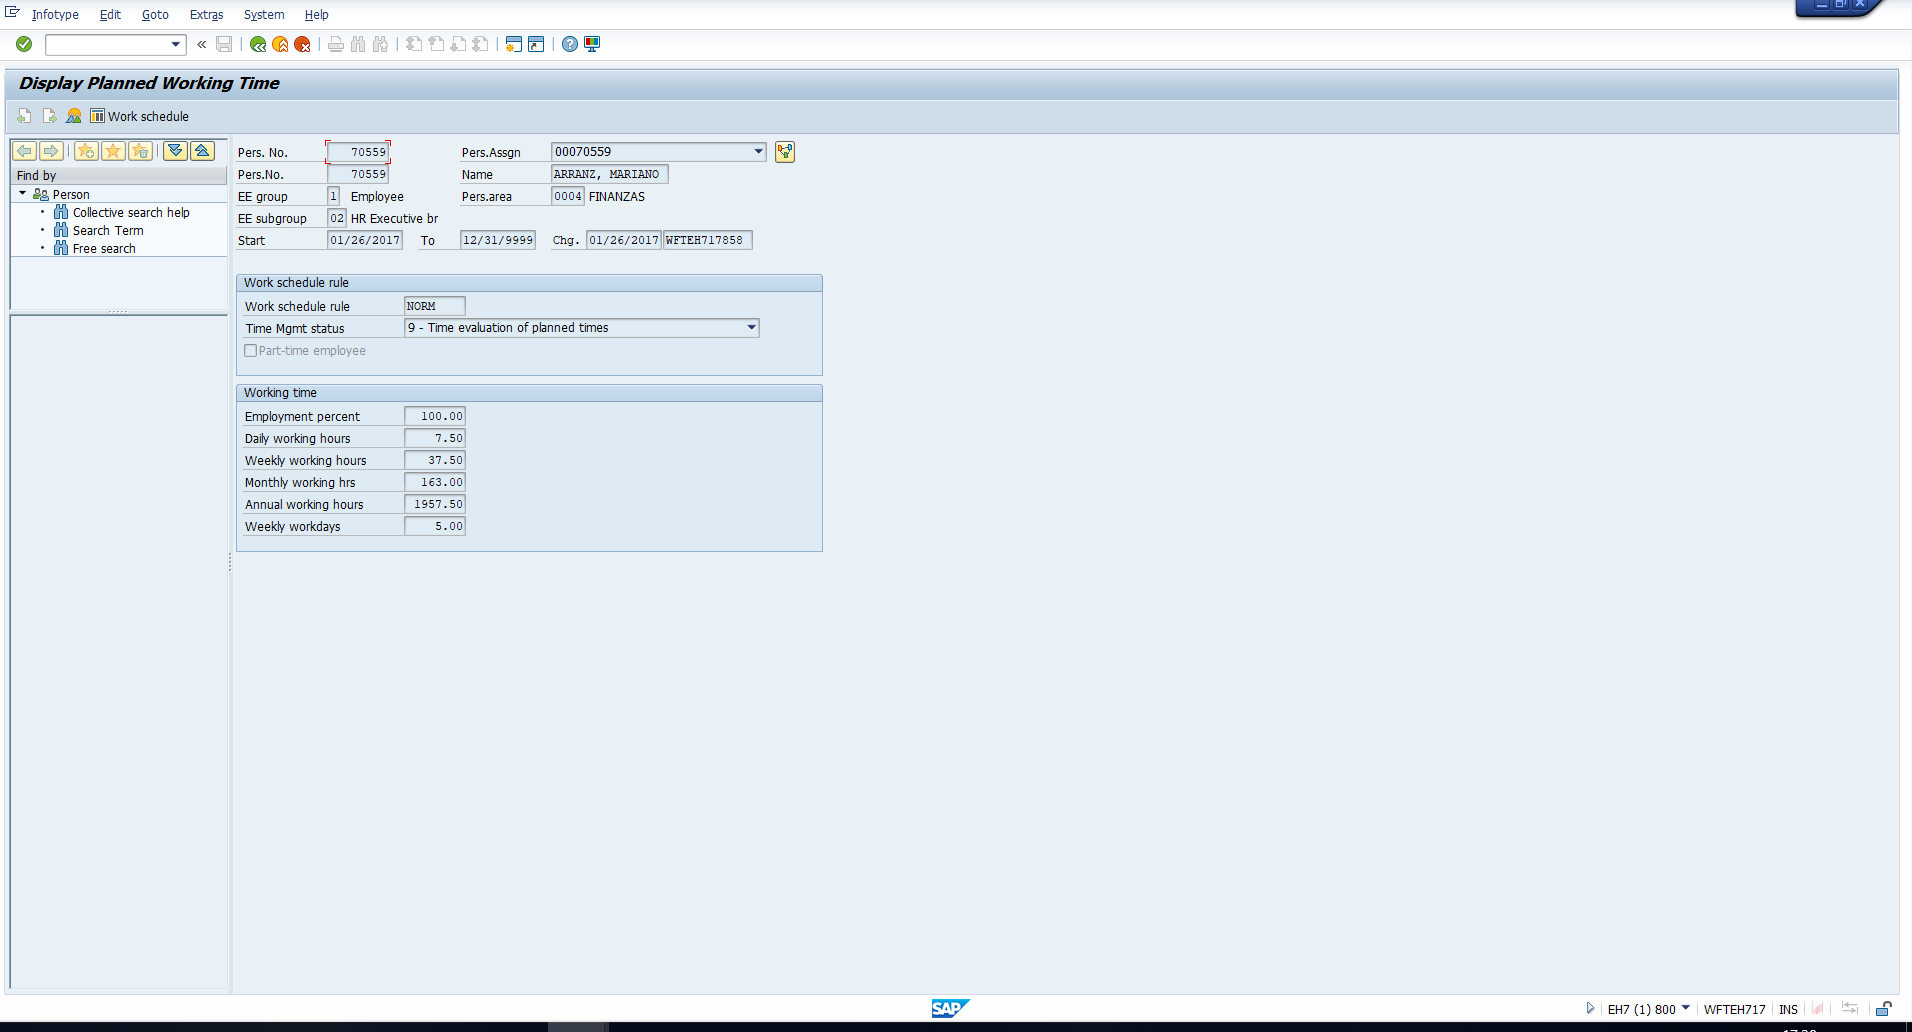
Secondly, from the main output screen, you can check the details of the employee’s Planned working time, by clicking on the button highlighted in Figure 12.
As shown in Figure 13, this takes you directly to the employee’s Planned working time infotype record that is valid on that day.
Again, click on the Back icon to return to the report output.
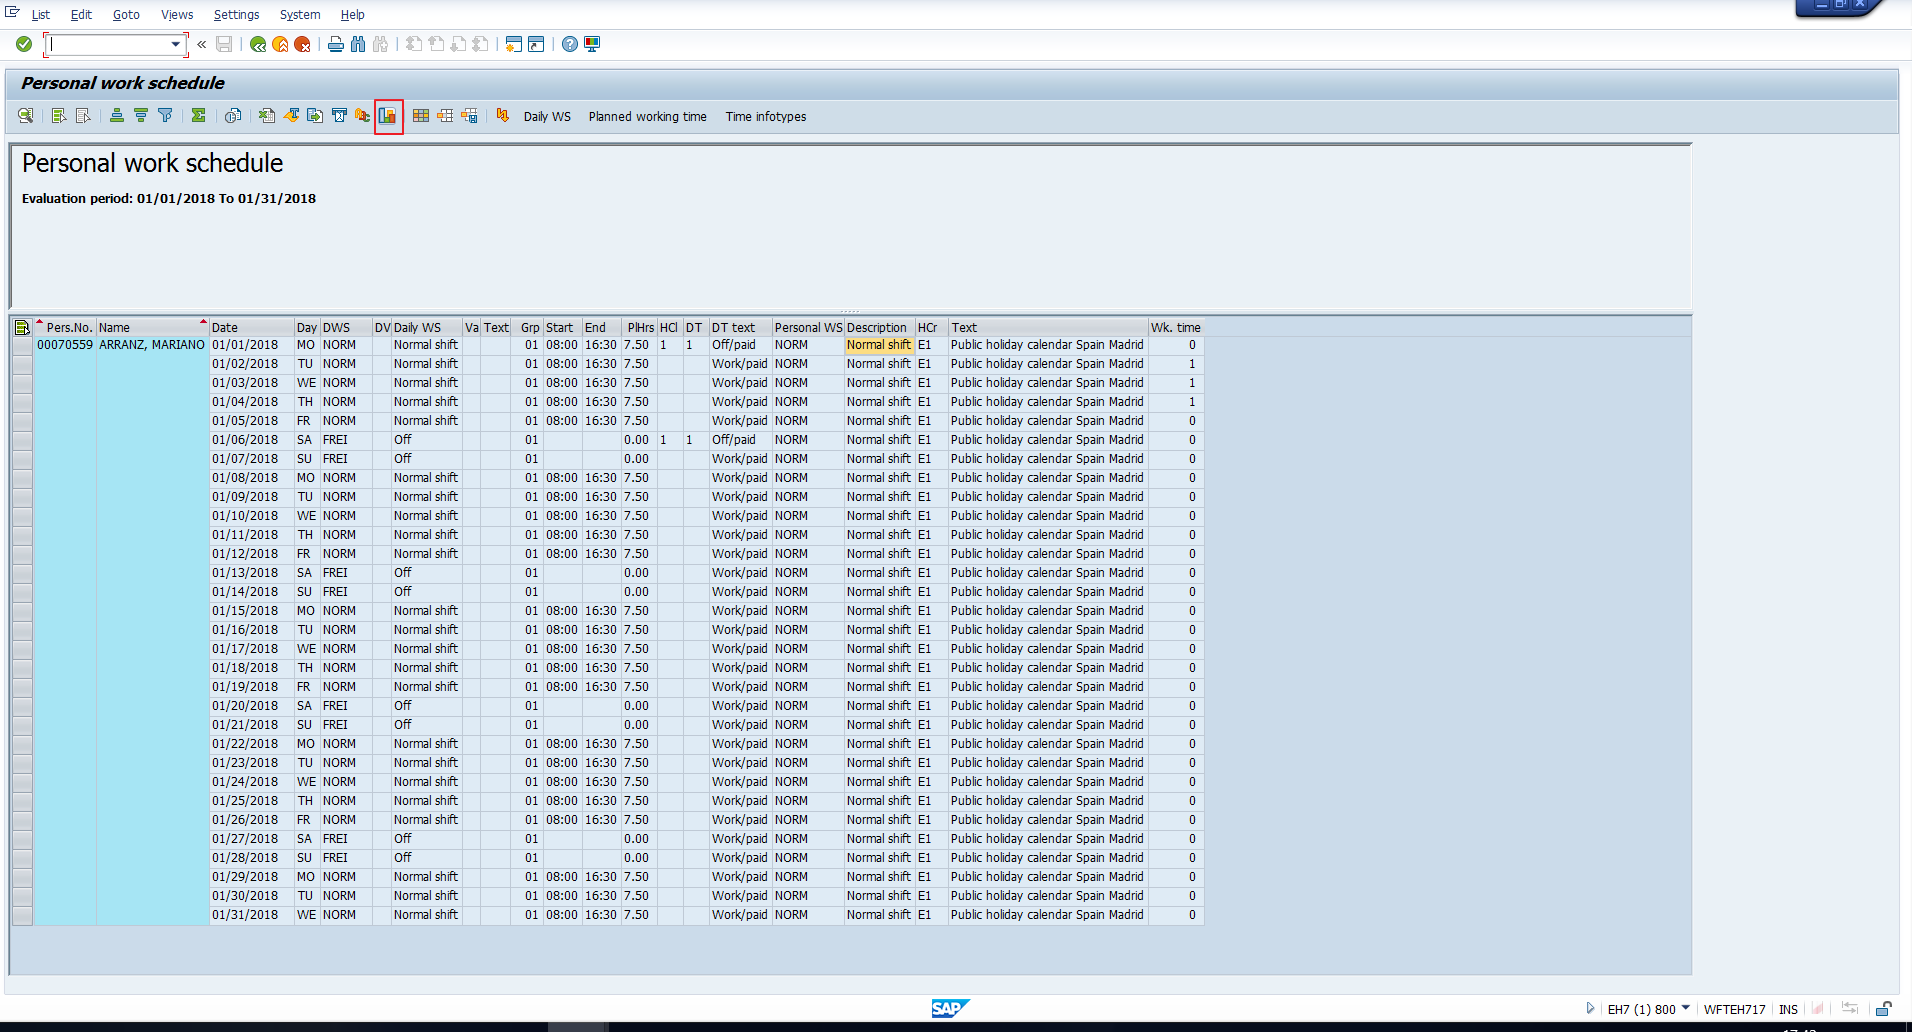
If you’d like a graphical view of the output, click the Graphic icon that has been highlighted in Figure 14.
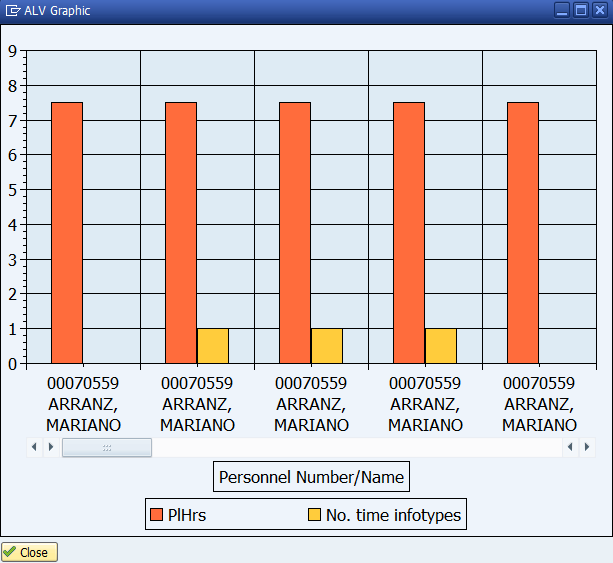
You will see a graph depicting the number of planned working hours and the number of time infotypes for each day in the period. This has been illustrated in Figure 15.
Absence Overview Graphic Report
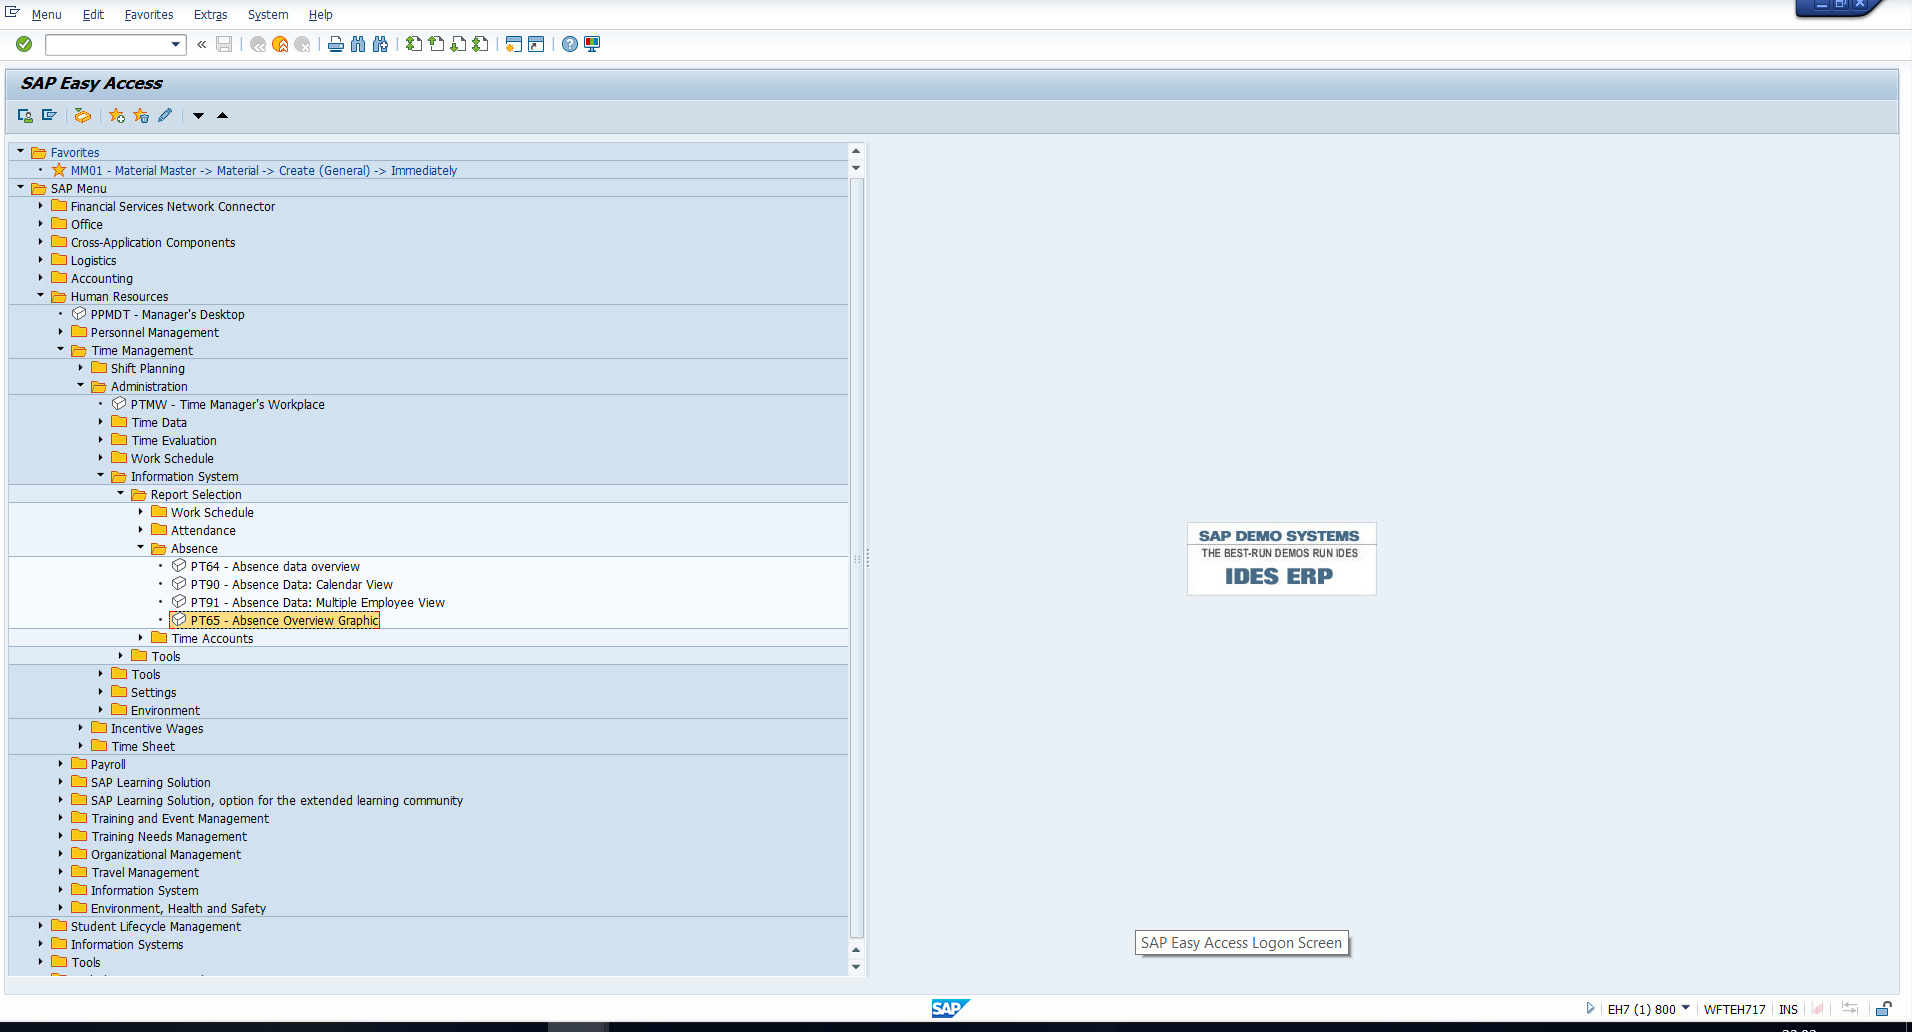
Now, let’s have a look at other SAP time management reports. For example, Absence Overview Graphic Report. Use this report if you need a graphical overview of an employee’s absences over a period. To execute it, enter the transaction code PT65 or follow the path depicted in Figure 16.
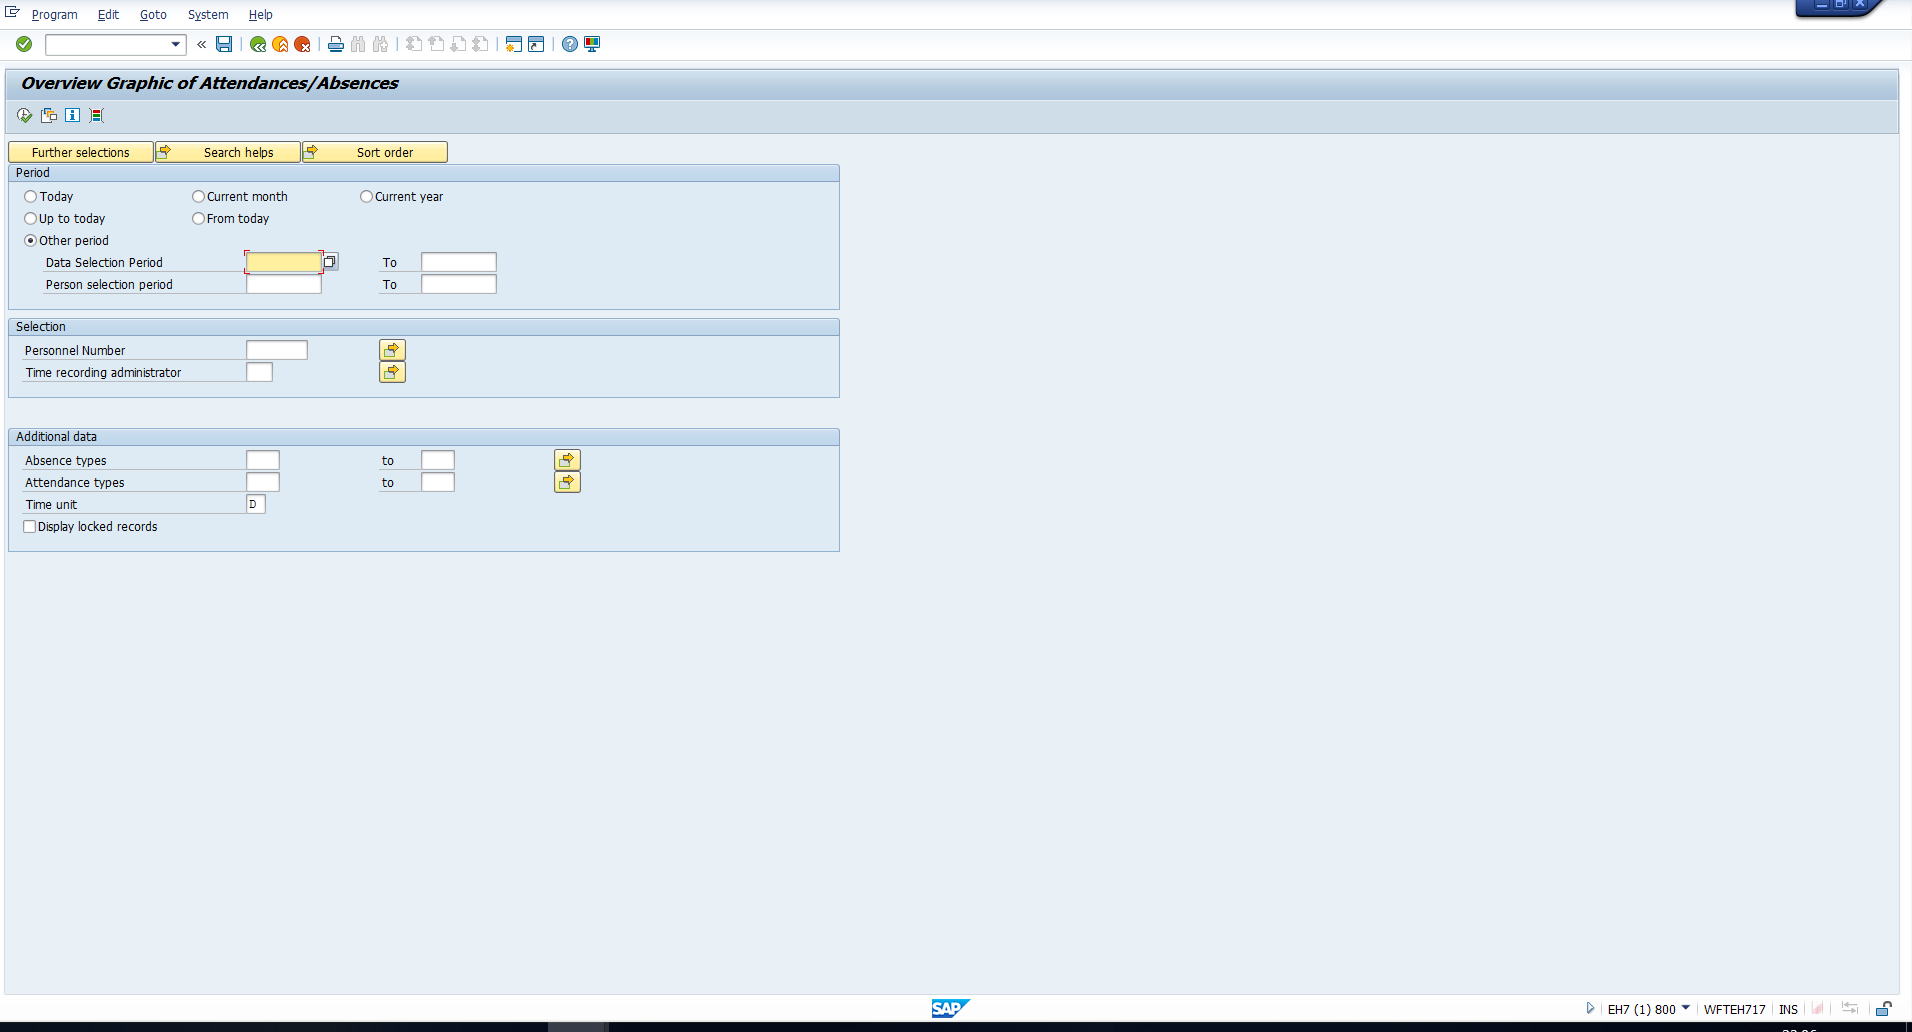
You will see the selection screen depicted in Figure 17.
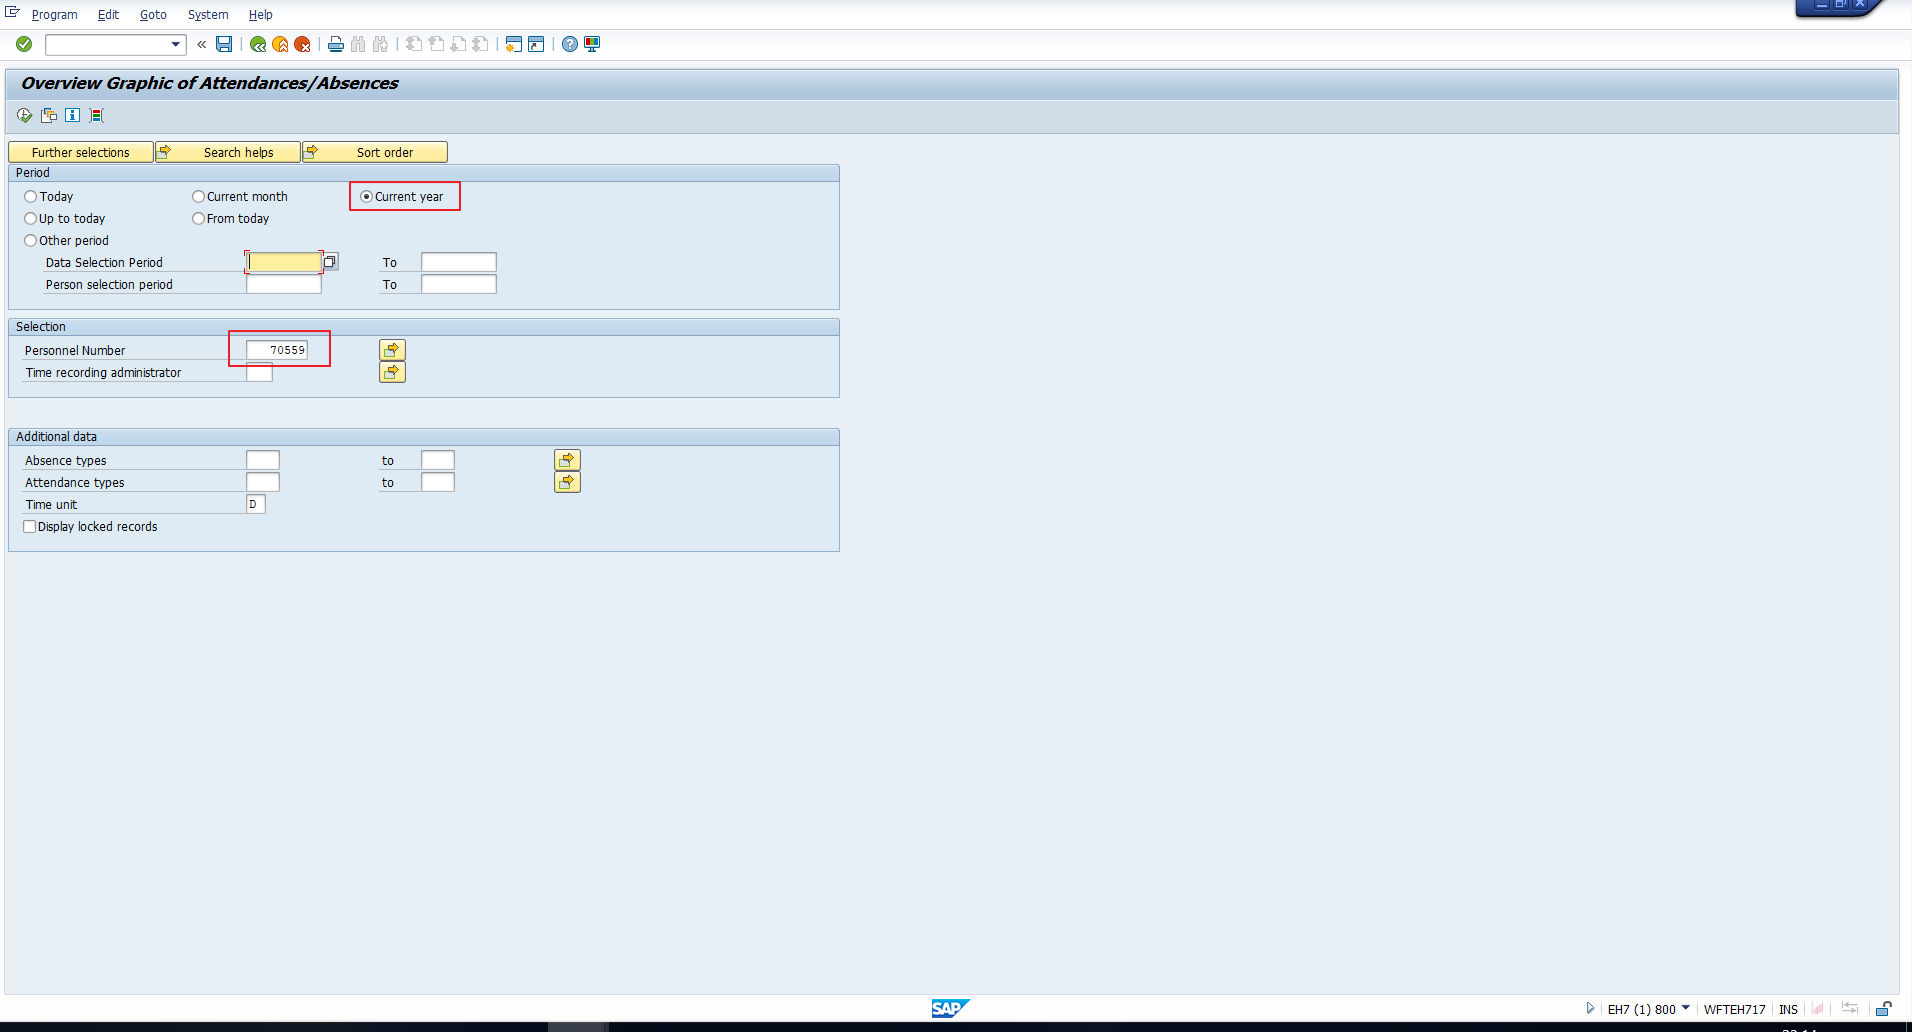
Assume that we want to extract all the Absence data for Personnel number 70559 for the current year. To address this requirement, enter the selection values as shown in Figure 18.
On executing the report, you will be presented with a graphical overview of the employee’s absences, like that in Figure 19.
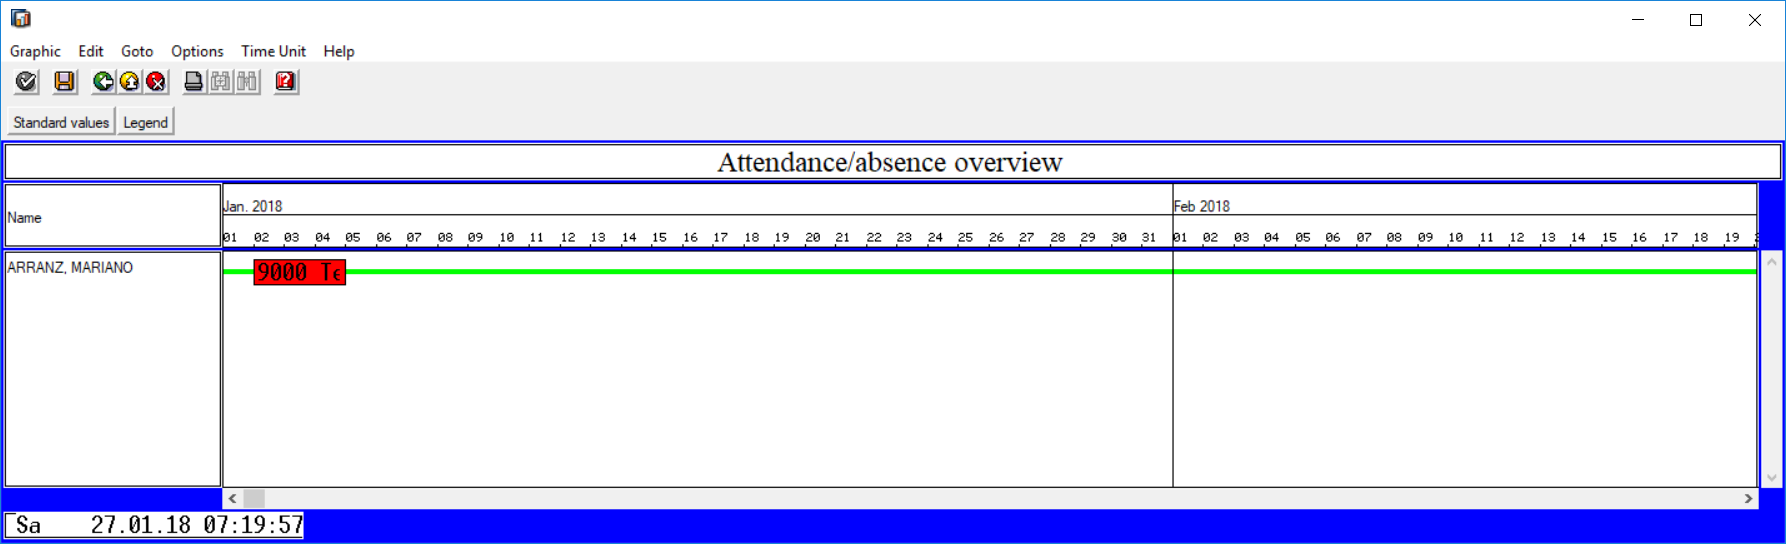
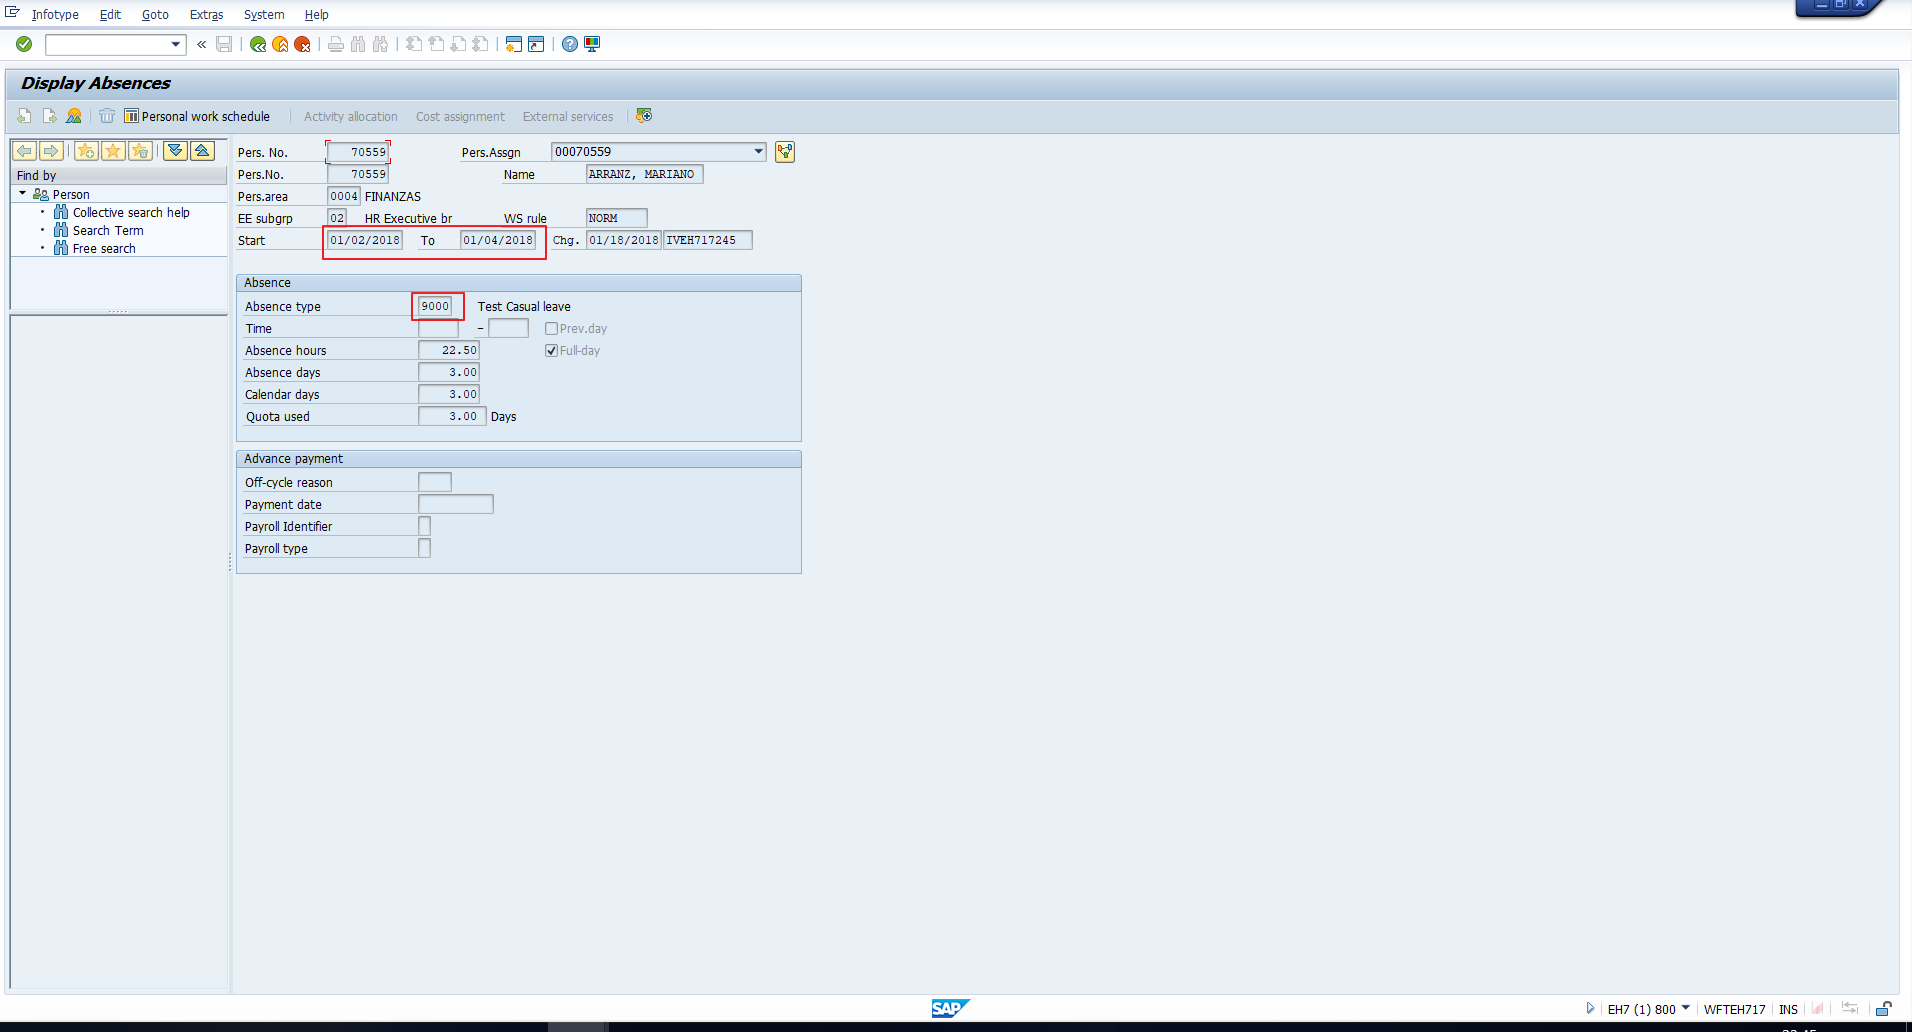
You can see the absence ‘9000’ highlighted in red for the period 2nd Jan to 4th Jan. Double clicking on the red box will direct you to the Absences infotype, as you can see in Figure 20.
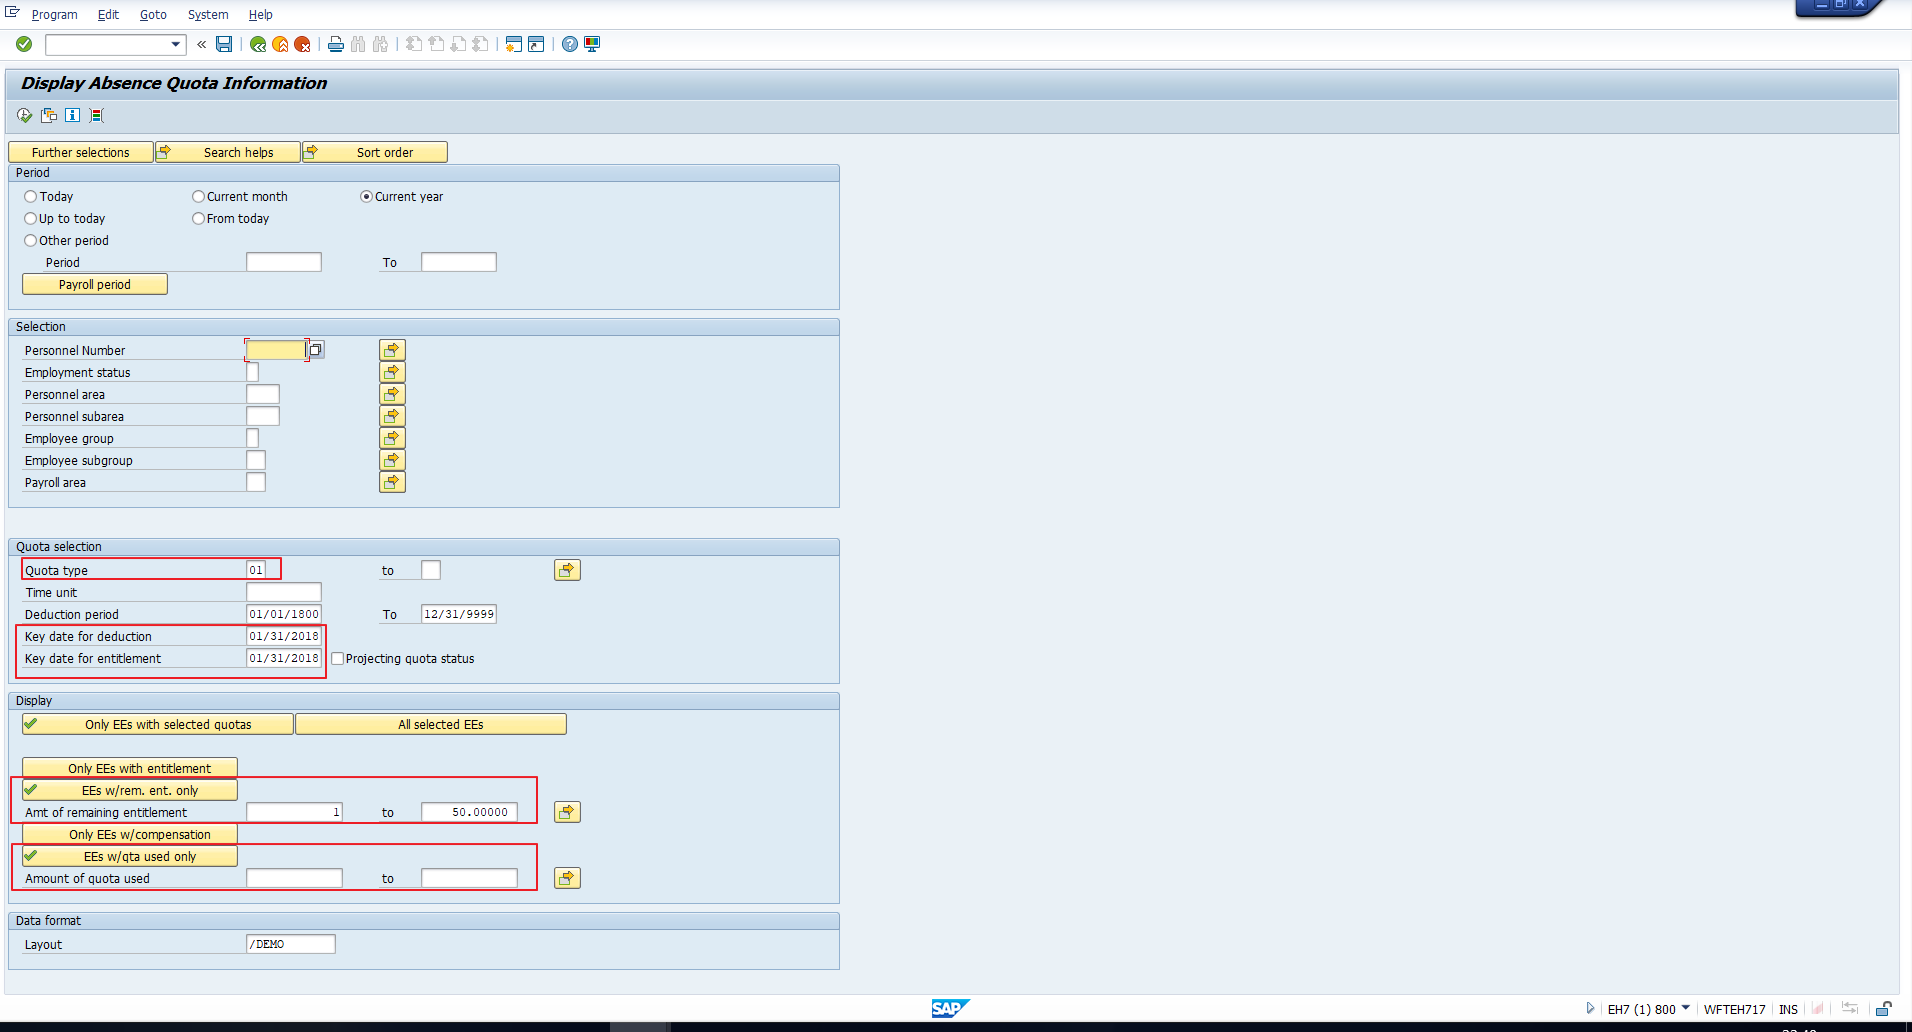
Display Absence Quota Information Report
One of the most useful SAP time management reports, this report generates an overview of employees’ absence quotas. For example, you can download the remaining quota entitlement and compensation for one or more employees.
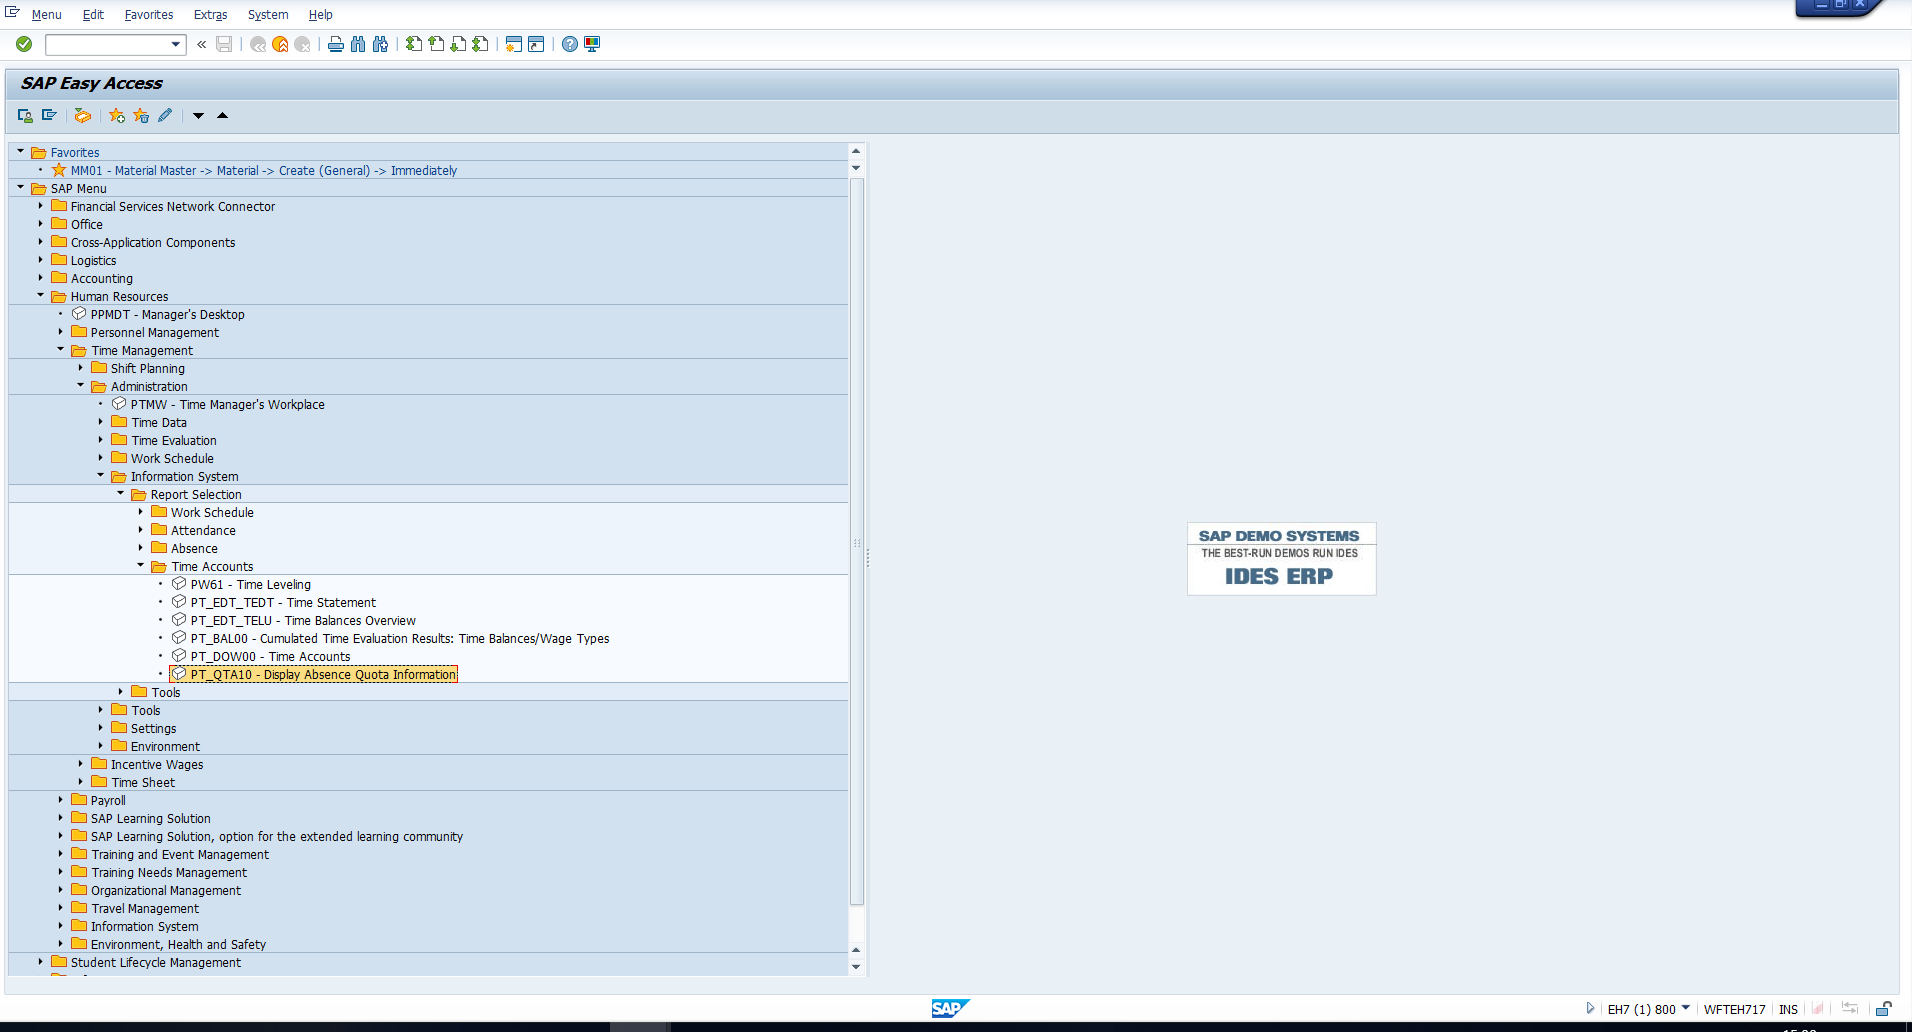
This report can be accessed with the transaction code PT_QTA10 or through the menu path depicted in Figure 21.
Next, look at the selection screen in Figure 22.
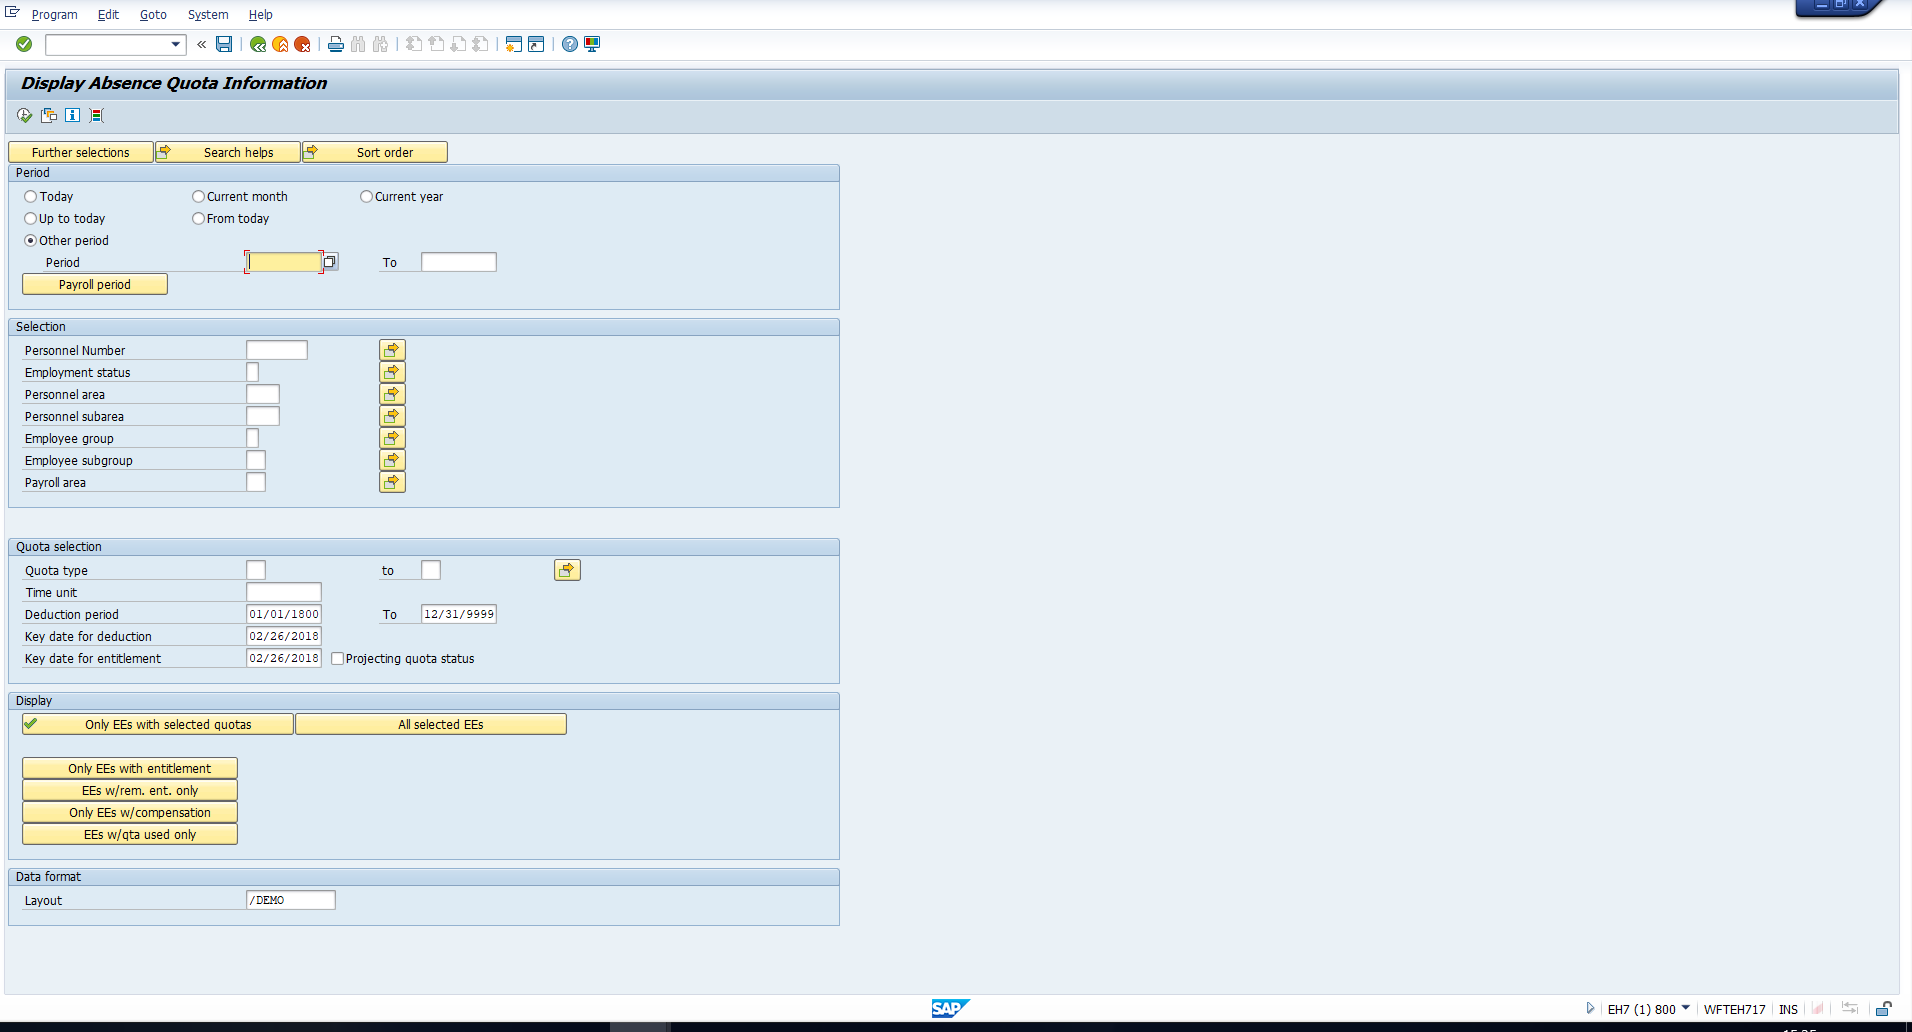
In the Period section, you must specify the period for which the quota information must be generated.
In the Selection section, you may enter values to limit the employee selection. Additionally, the Display section allows you to further limit the employee selection. It comprises the below options:
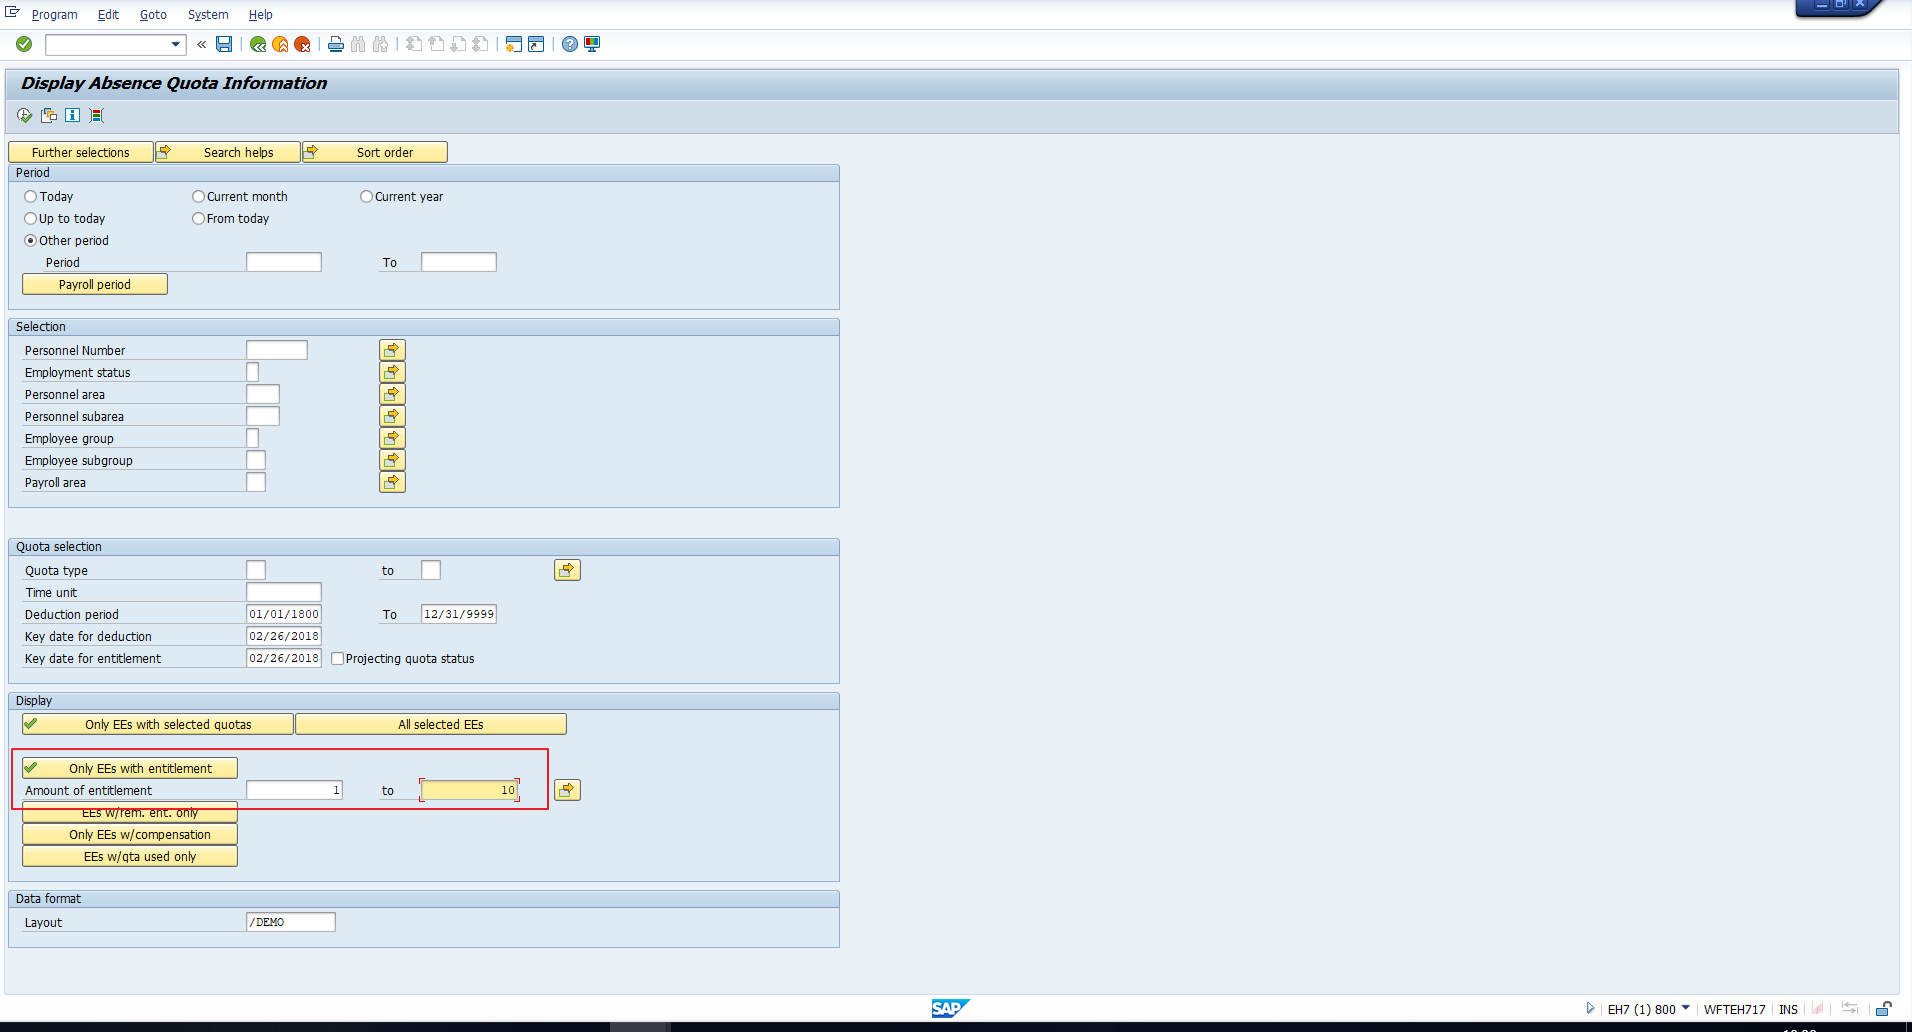
Only employees with entitlement – Select employees whose total entitlement is greater than zero, or whose total entitlement is within the specified interval, if an interval has been specified. This has been illustrated in Figure 23.
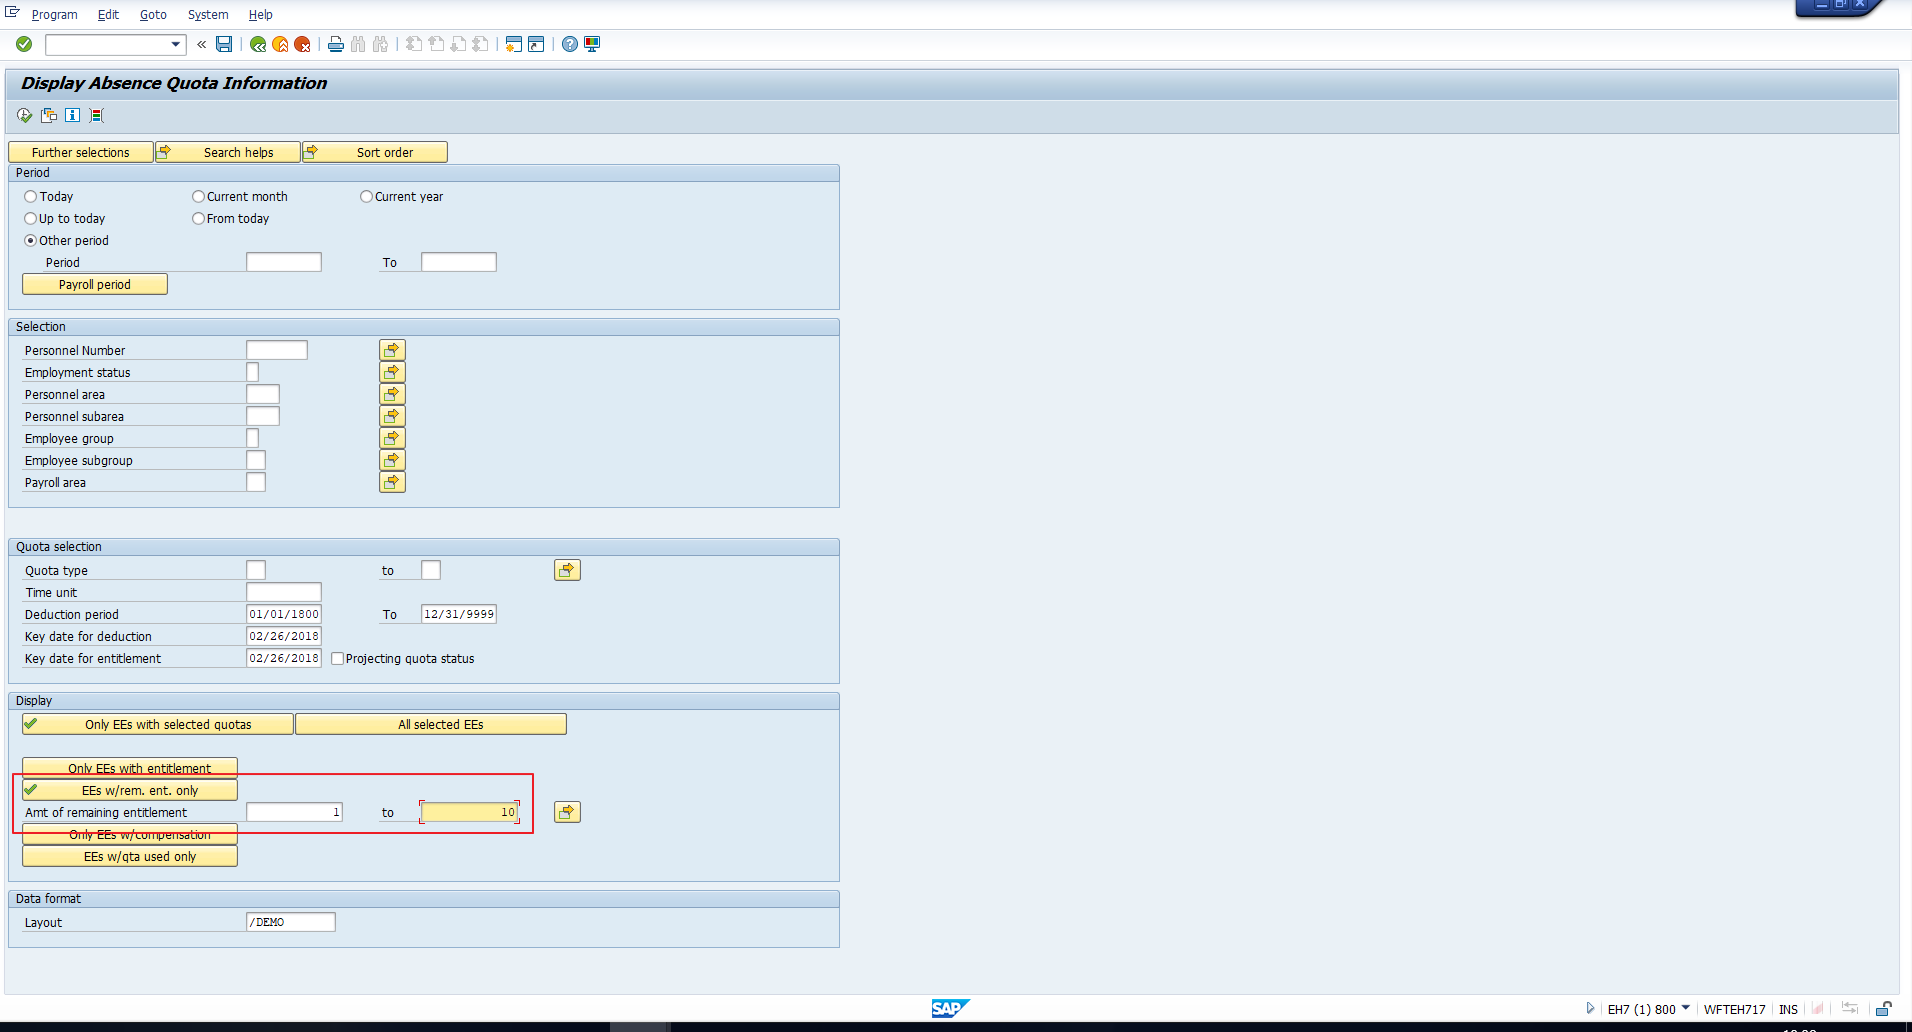
Only employees with remaining entitlement – Select employees whose remaining entitlement is greater than zero, or whose remaining entitlement is within the specified interval, if an interval has been specified. This has been illustrated in Figure 24.
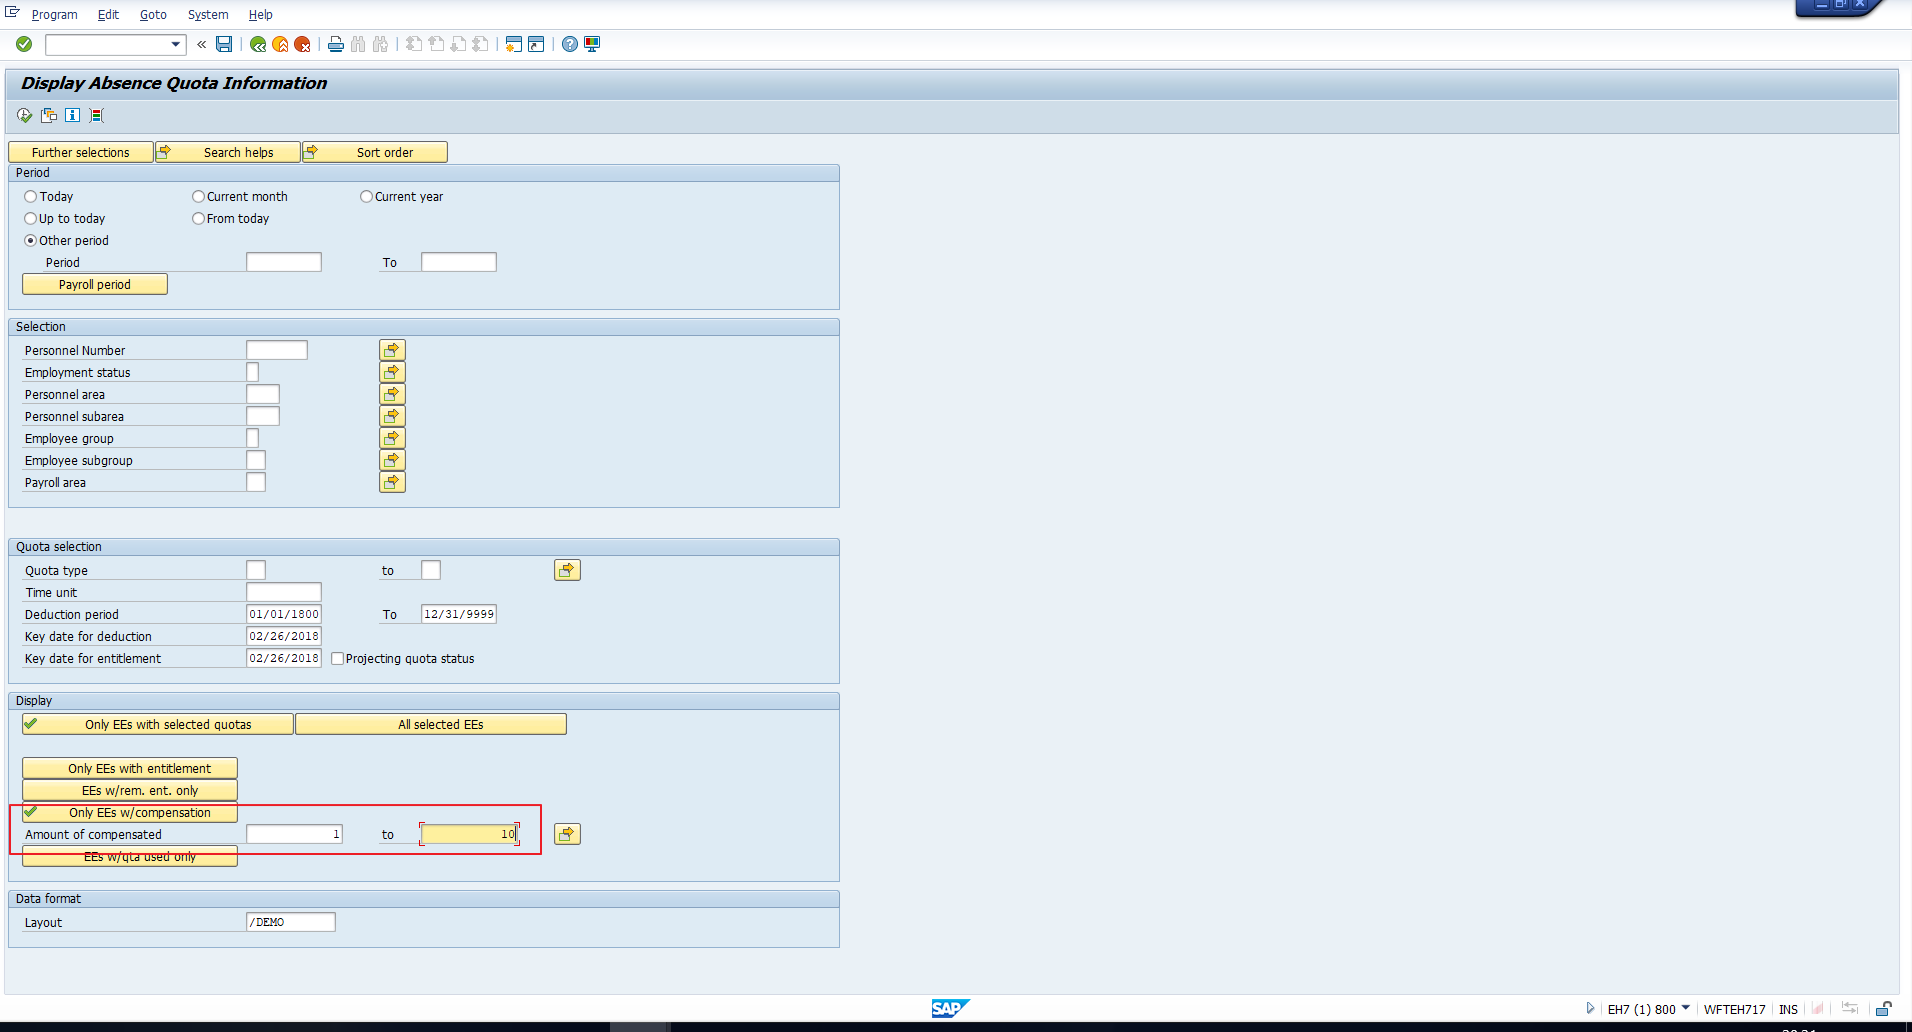
Only employees with compensation – Select employees whose quota compensation is greater than zero, or whose compensation is within the specified interval, if an interval has been specified. This has been illustrated in Figure 25.
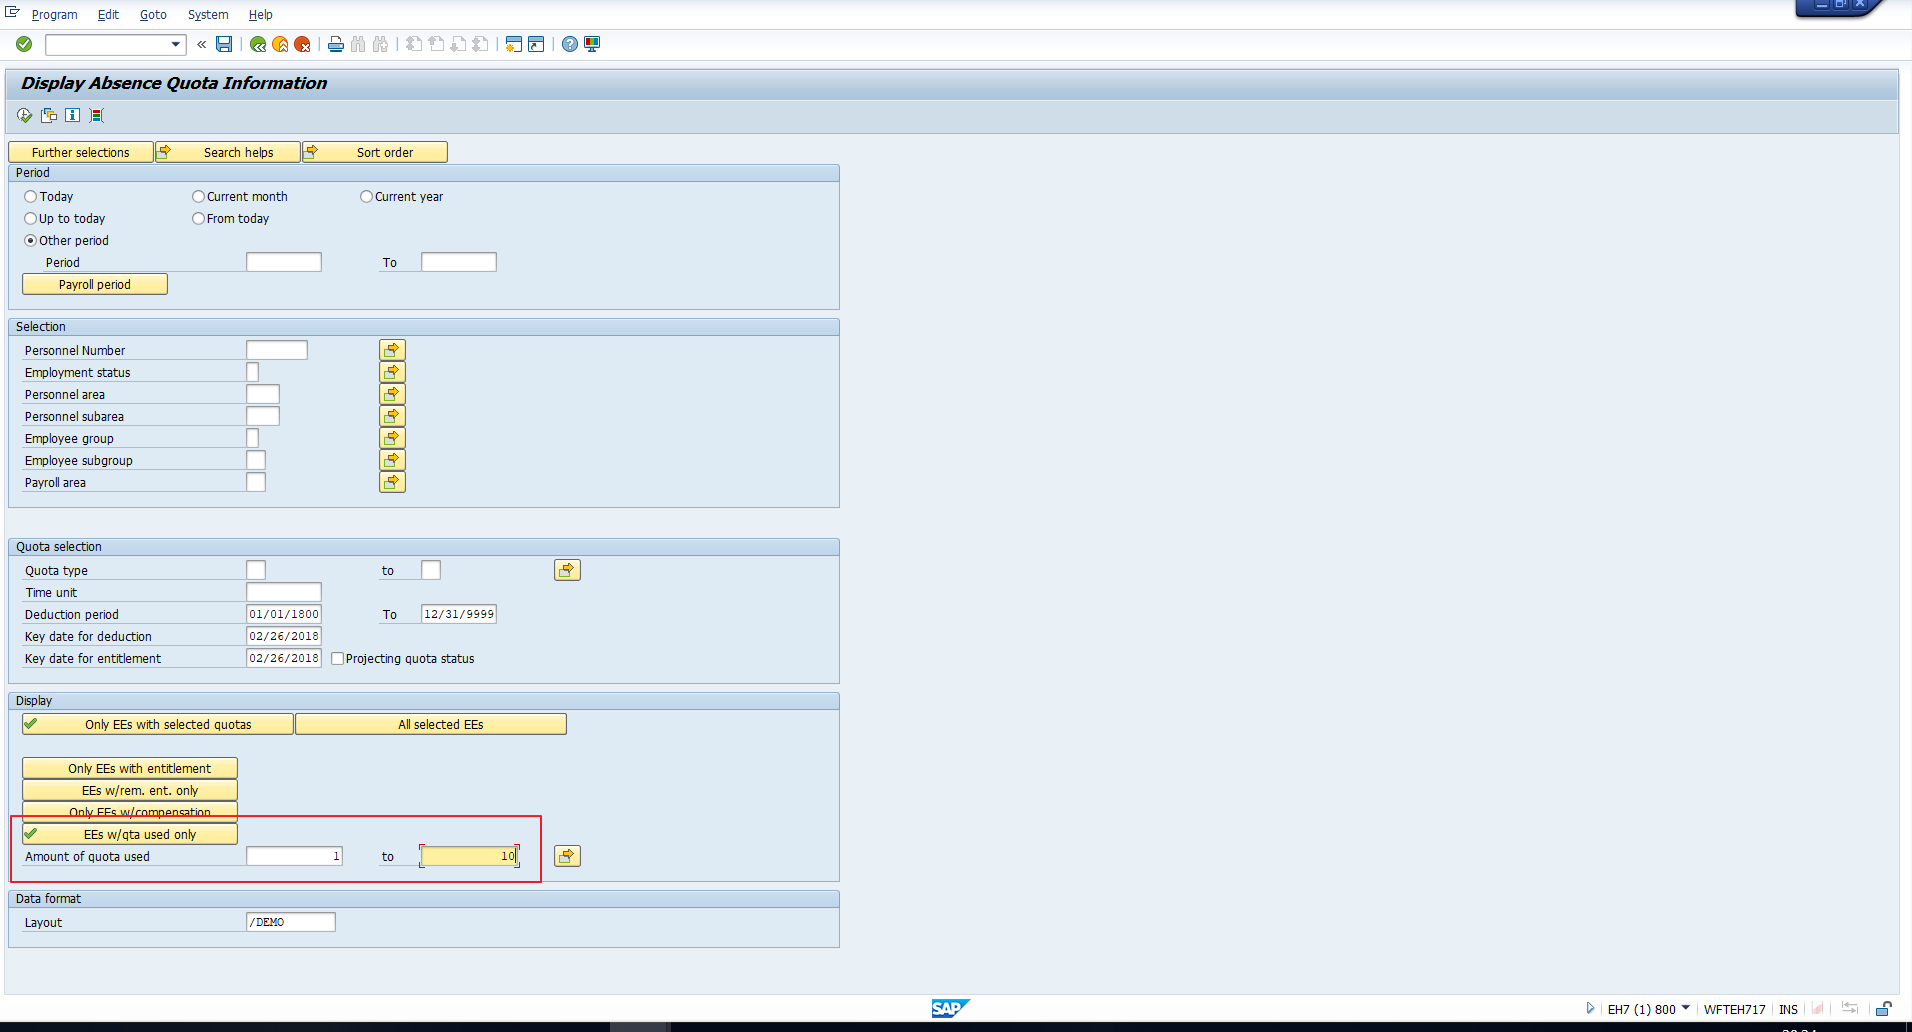
Only employees with quota used – Select employees whose quota consumption is greater than zero, or whose consumption is within the specified interval, if an interval has been specified. This has been illustrated in Figure 26.
If more than one of the above conditions has been specified on the screen, the system will select the employees who satisfy all of these conditions.
There are two other important selection fields, which enable the display of past or future quota statuses, in addition to current quota statuses. These are Key date for deduction and Key date for entitlement, that have been highlighted in Figure 27.
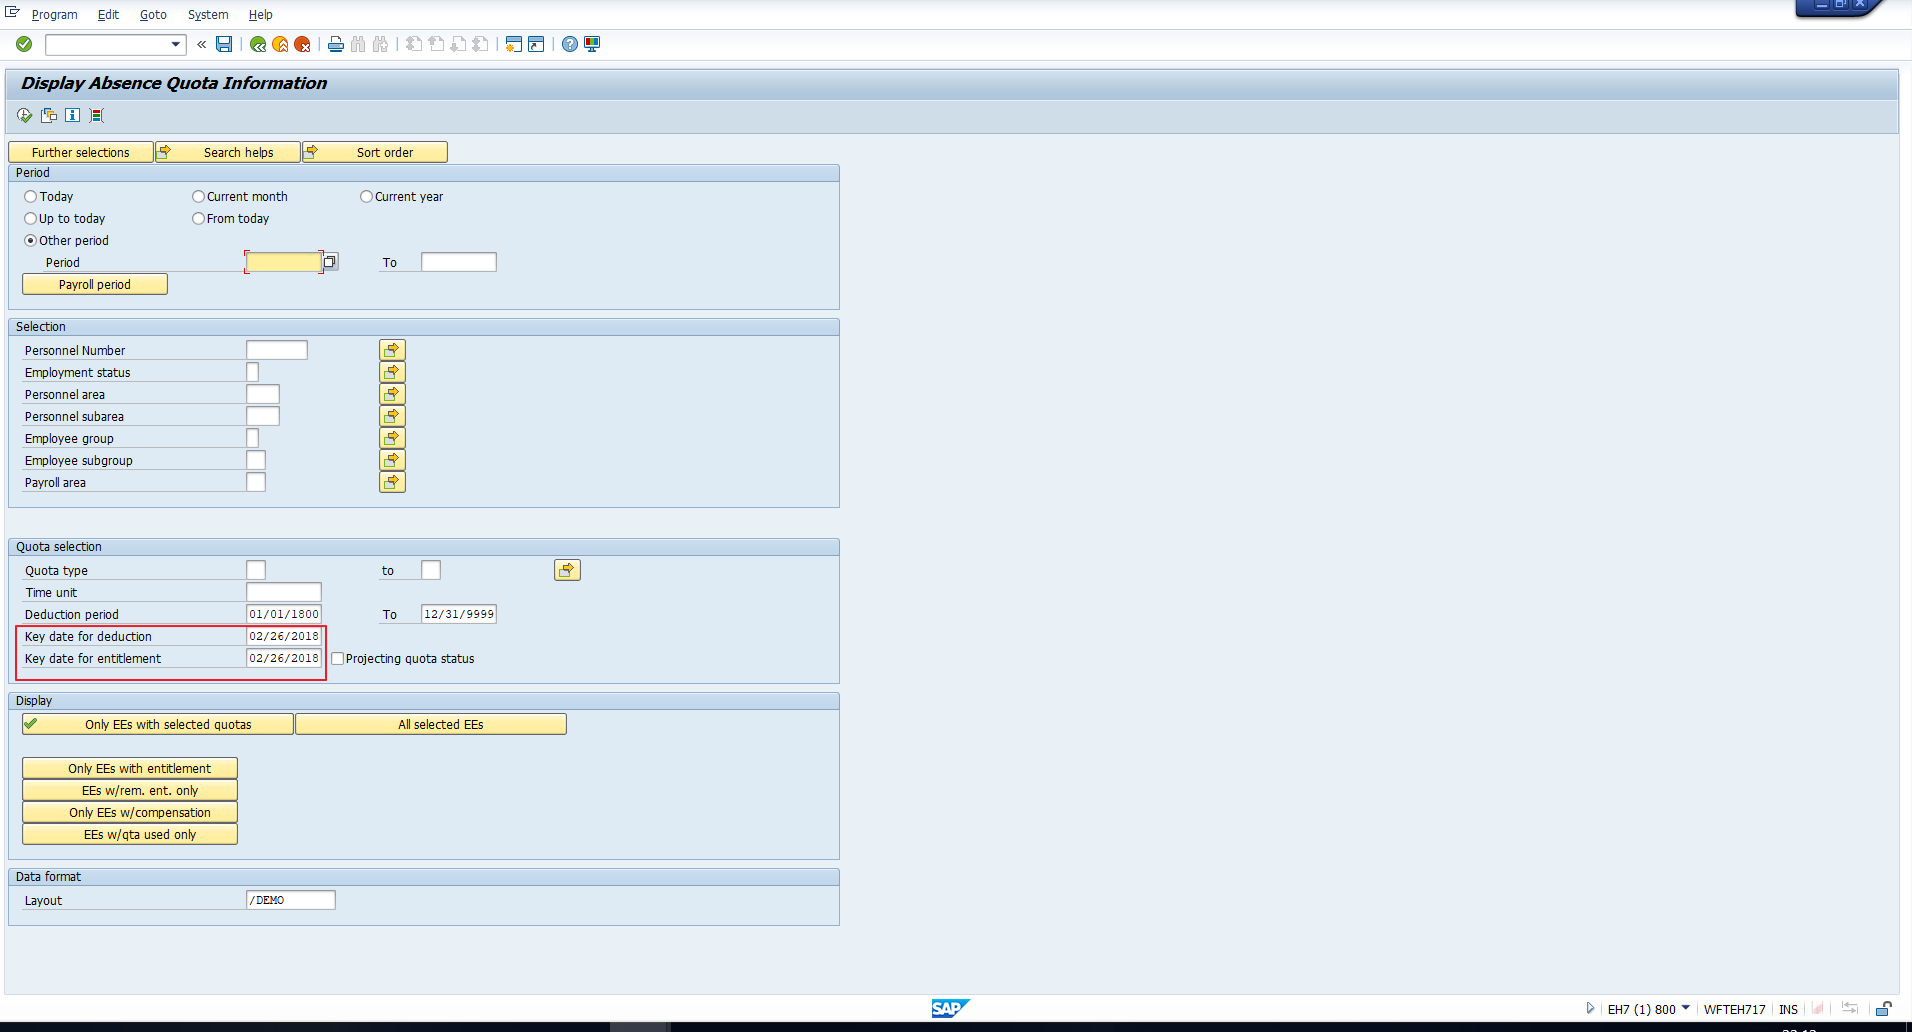
If you enter a date in the Key date for entitlement field, then the Quota entitlement value will be evaluated up to this date.
If you enter a date in the Key date for deduction field, then the Quota deduction, Remaining quota, and Compensation values will be calculated up to this date.
For example, consider that we need a download of the Vacation leave quota with quota type ‘01’ for all employees who, as on 31st January 2018, have used this quota as well as have a quota balance between 1 and 50 days. To meet this requirement, we have entered the selection values as in Figure 28.
On execution, you will see the output shown in Figure 29.
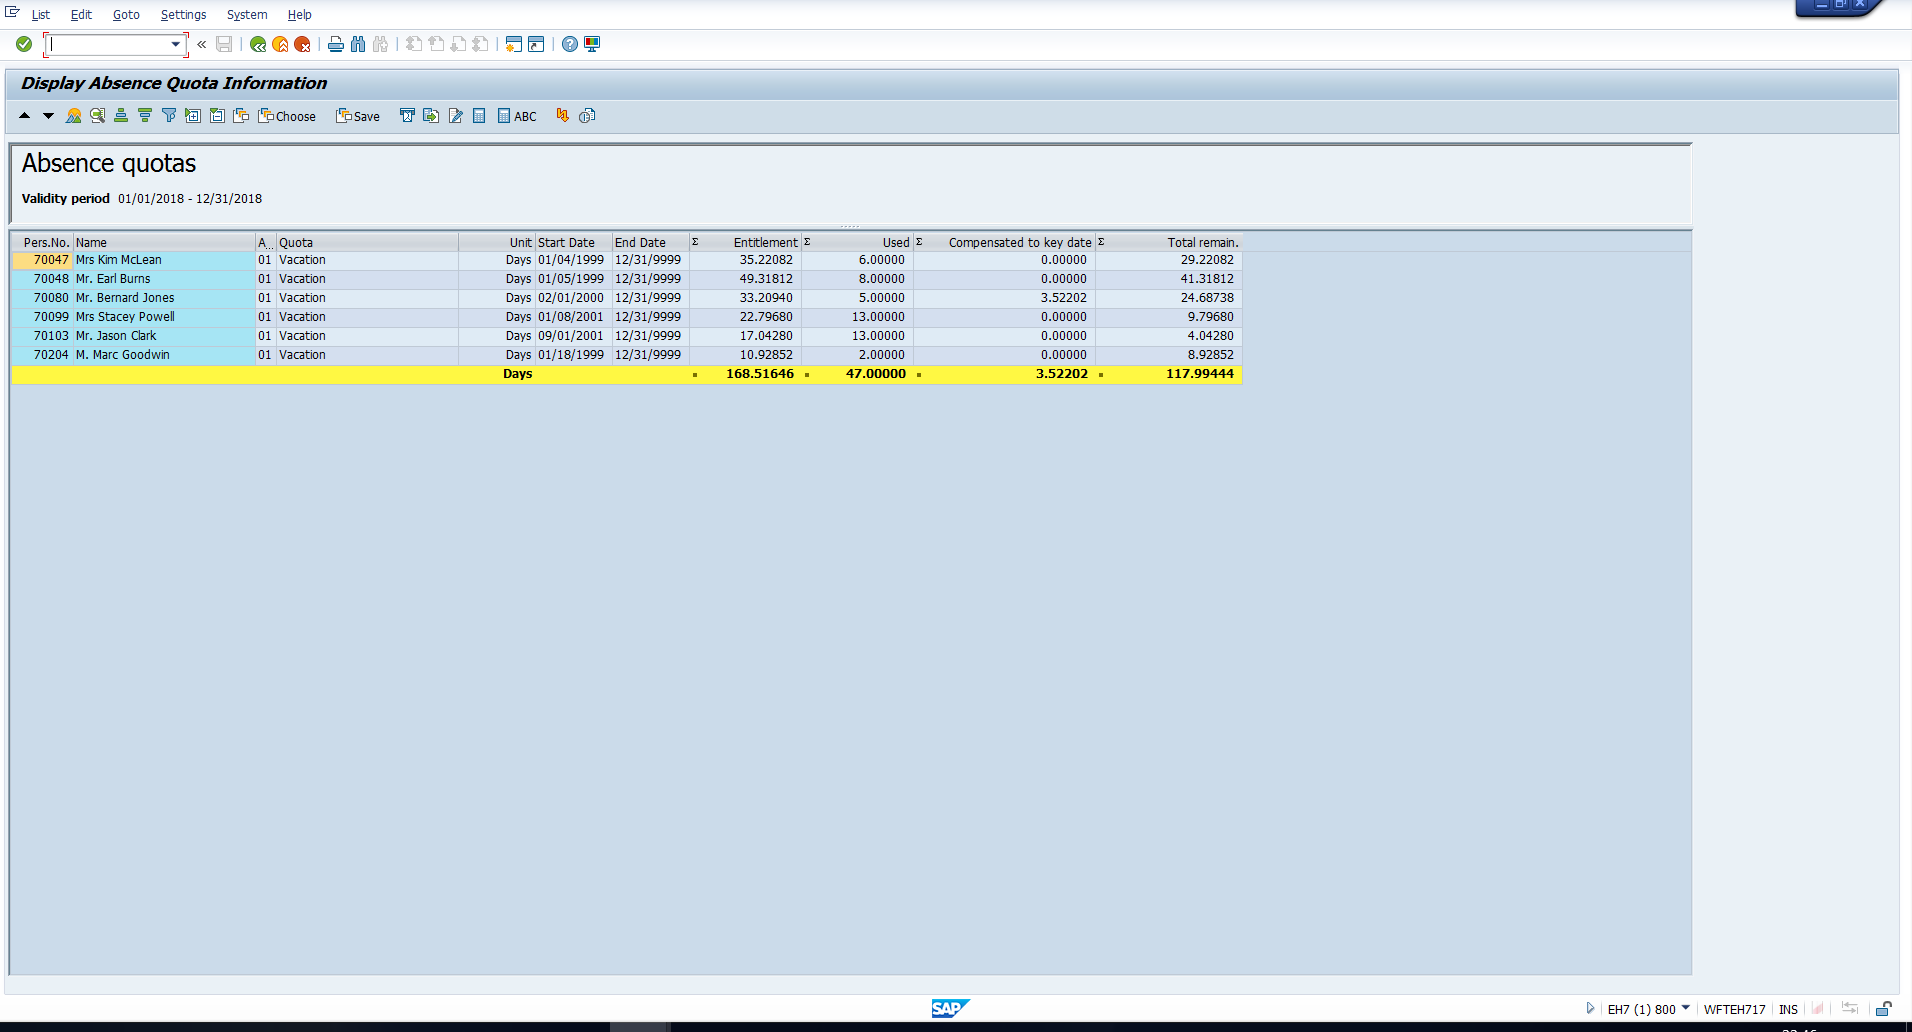
The values in the last column are calculated using the formula:
Total remaining entitlement = Entitlement – (Used + Compensated)
Here,
Entitlement – The employee’s total leave quota as on the Key date for entitlement. This value is picked from the Absence Quotas infotype (infotype 2006).
Used – The number of days of leave availed by the employee upto the Key date for deduction. This value is picked from the Absences infotype (infotype 2001).
Compensated – The number of days the employee has encashed upto the Key date for deduction. This value is picked from the Time Quota compensation infotype (infotype 416).
We hope that you liked this tutorial about SAP time management reports. If you have some other favourite SAP time management reports that we didn’t include in this tutorial, please suggest them using the comments section.
Navigation Links
Go to next lesson:
Go to previous lesson: SAP Quota Deduction
Go to overview of the course: SAP HR Training
I liked your all tutorials. Can you please share the Payroll Module as well?
Your Explanation is next level.
may i connect with you in linkedin!!