
 Welcome to the tutorial about SAP Advanced Returns Management. In today’s world, the company is expected to have a reliable after sales process which includes complaints processing, repair, and return processing. There is an old phrase which is still relevant in the business world, “customer is the king, and service wins the game.” Making new sales every now and then is good, but to retain the current customer is also crucial.
Because the customer expects high quality products, the return process is also expected as a service process which will be handled transparently, efficient with an immediate refund process.
We have learned that customer returns could be processed in SAP by creating separate documents (return order, return delivery, return stock, credit memo, etc.). However, this is not sufficient because we can lose track in regards with the follow-up documents. Also, if we face a complex situation which involves third-party supplier, the efficiency of the process will become an issue.
SAP Advanced Returns Management integrates the whole process from creation of a return order, to inspection management, followed by creation of a credit memo. SAP Advance Returns Management has two types: customer and supplier return. This tutorial will only address the customer return process.
This tutorial assumes you have familiarity with SAP terminologies especially with Sales and Distribution module. You should have basic understanding how to create order to cash process followed by complaint handling processing creation (credit memo / debit memo / invoice correction request). This tutorial is part of our SAP SD course.
You also should make the prerequisite customizing in SAP Advanced Returns Management via:
- IMG – Sales and Distribution – Sales – Advanced Return Management
- IMG – Logistics General – Advance return Management
SAP Advanced Returns Management Features
What are the features of SAP Advance Returns Management? What makes it advanced compare to its brother, the “regular” returns processing? Let’s have a look for the general process flow first.

- The Return Order is the main entry point. The data entry will be integrated once you save the Return Order document. The Delivery Order will be also created automatically.
- The warehouse inspection will be done based on the value setting from the return order.
- The logistics follow-up documents will be created automatically (goods receipt, goods issue document, etc.).
- Customer refund will be processed faster through a credit memo (which you will define at the return order creation).
- We can monitor the whole customer return process via a single transaction code that has statuses for each process plus the tree process of each item.
SAP Advanced Returns Management Step by Step
In this section, I am going to explain how to create the whole SAP advanced returns order process with a simple scenario. A customer wants to return the goods he already bought because they don’t have more space for the remaining item. He decided to return the material by himself to our premise (one of the sales counter). The sales representative will be immediately advised to create a refund for this process.
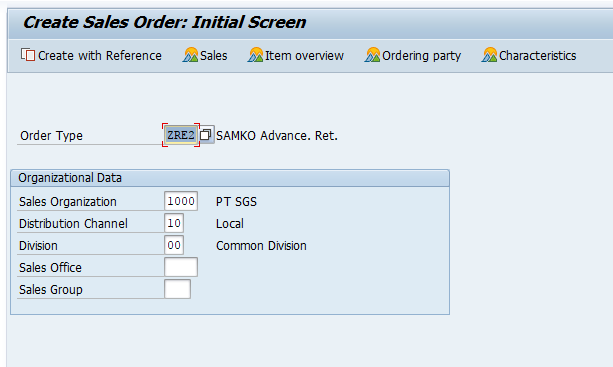
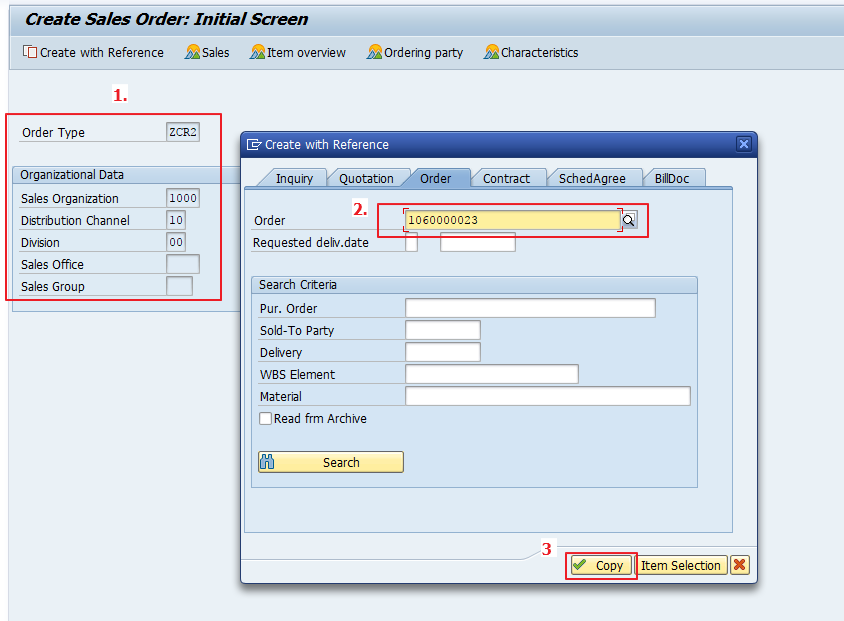
Run the transaction VA01 and select the Advance Returns document type, along with its sales area.
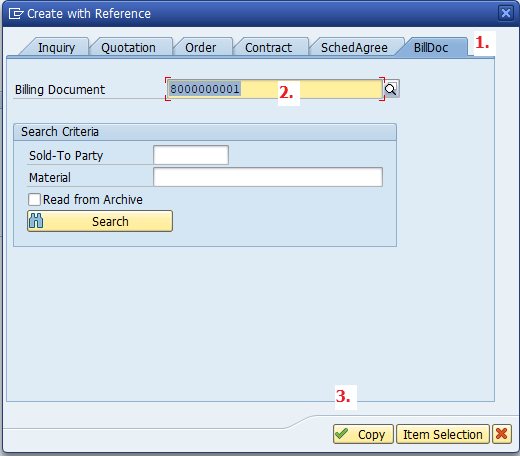
Click on the “Create with Reference button”, and input the billing document number, click the “Copy” button.
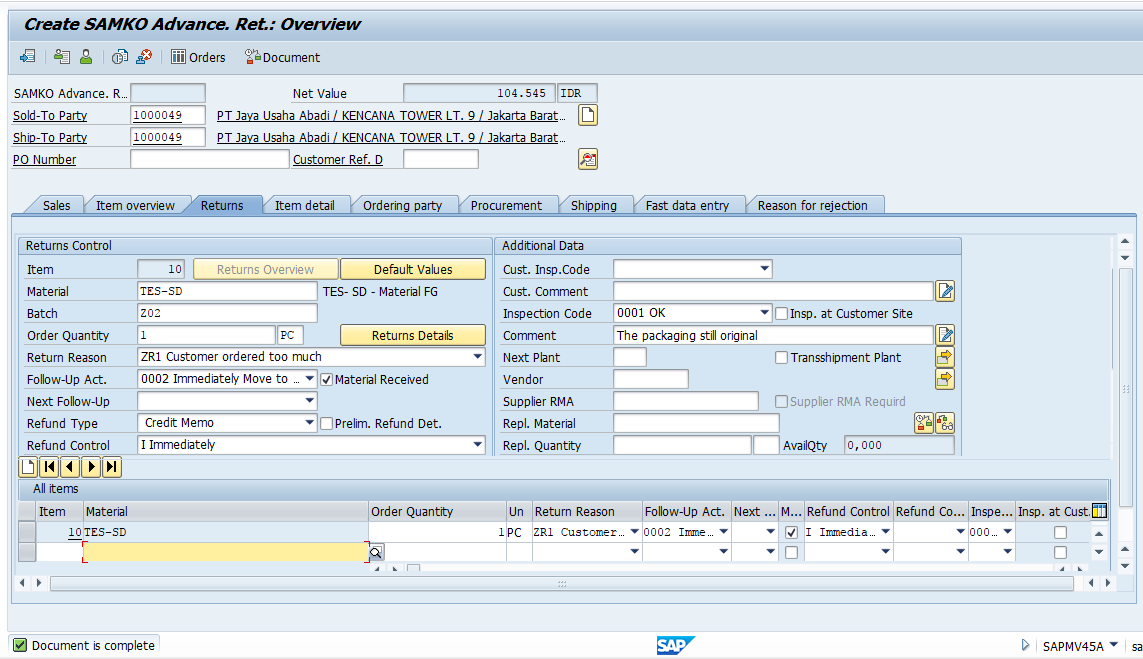
In the Overview Screen, you will be redirected to “Returns” tab, and let’s have a look at the Return Control and item details. There are several fields that should be filled which will determine next actions.
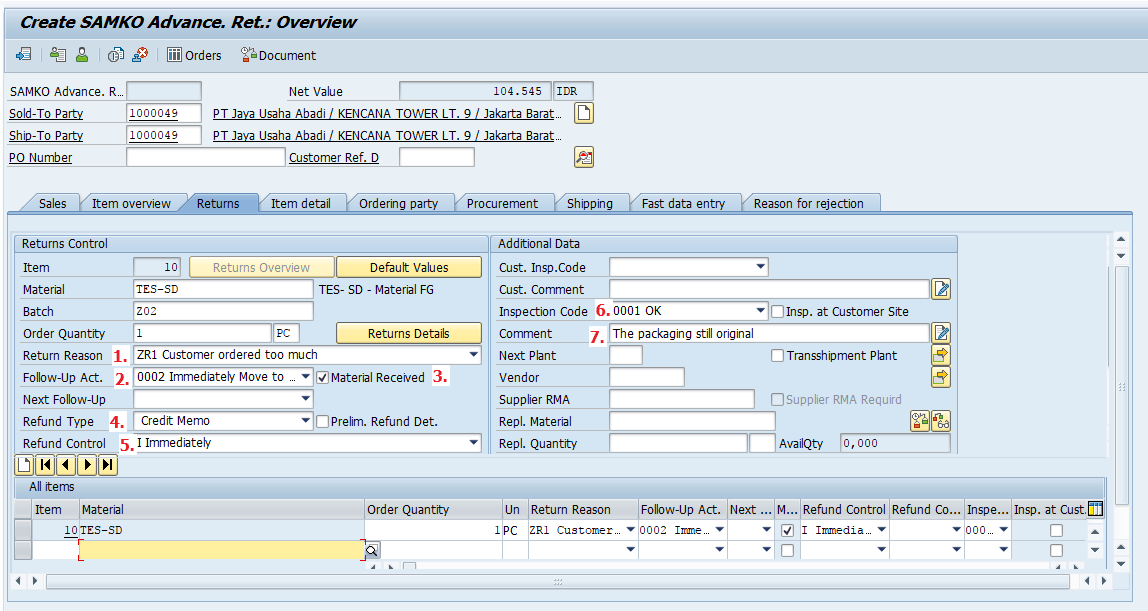
- The return reason is a predefined selection list that you have set before. This field is similar to Order Reason field we which we often encounter when working with debit/credit memo request documents.
- Follow-Up Activity contains predefined selection list that will determine the following document after you save the advance return document. Each selection will carry different document / scenario, so be aware of your choice. In my example, I selected the “002 Immediate Move to Free Available Stock.”
- The Material Received indicator indicates that the item material has been received during return processing.
- Refund Type field will specify what type of refund the customer receive. The system provides two types, credit memo (monetary compensation) or replacement material.
- Inspection Code is used to specify the quality of the returned material which will be determined during the inspection process.
- Inspection Command Line is a free text, you can enter anything here.
As you can see above, these fields will be applied to the line item material. Run the Incompletion Log for a good measure. Save the document afterwards.
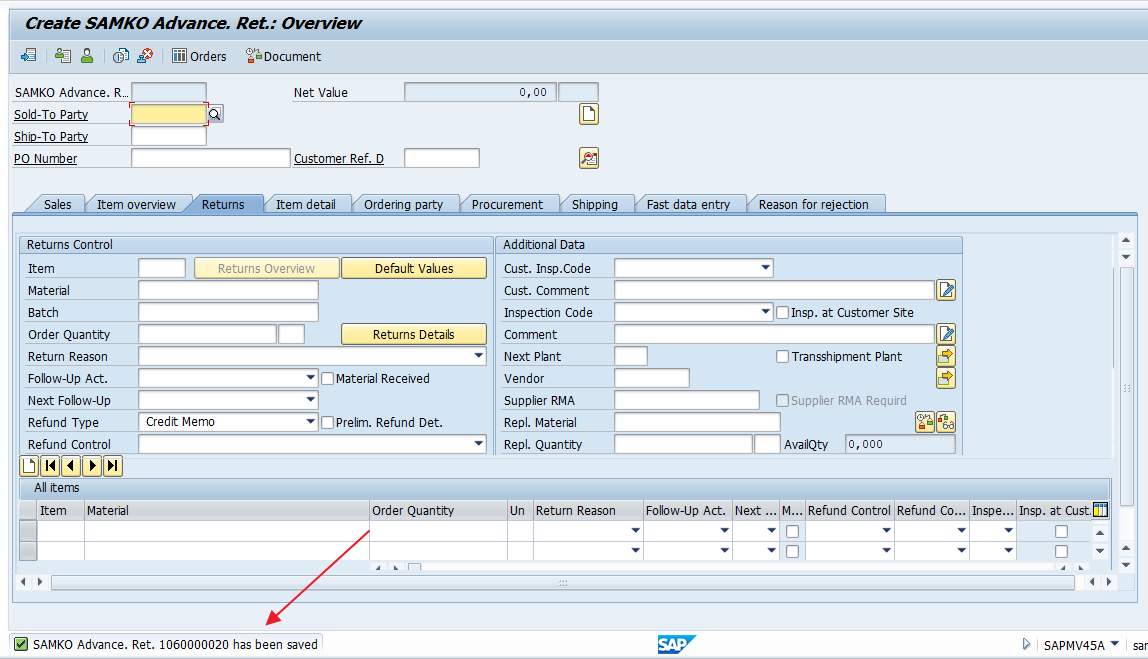
Save the document and you will have the SAP advance returns document.
Now, let’s run the transaction MSR_TRC_C (yes, it’s that long). It is used to monitor the return process and which documents have been created for each process.

- Input your name here.
- Fill / select the Return Order Type (I’m using ZRE2).
- The list of created documents will be displayed. Select / highlight the desired document.
- Click on the “Display Items” button.
- Line items for the document will be displayed.
- These are the return steps which are determined by the configuration we made prior in the advance return order document.
Let’s see the comparison between the “Return Steps” versus the advanced return order we made before.
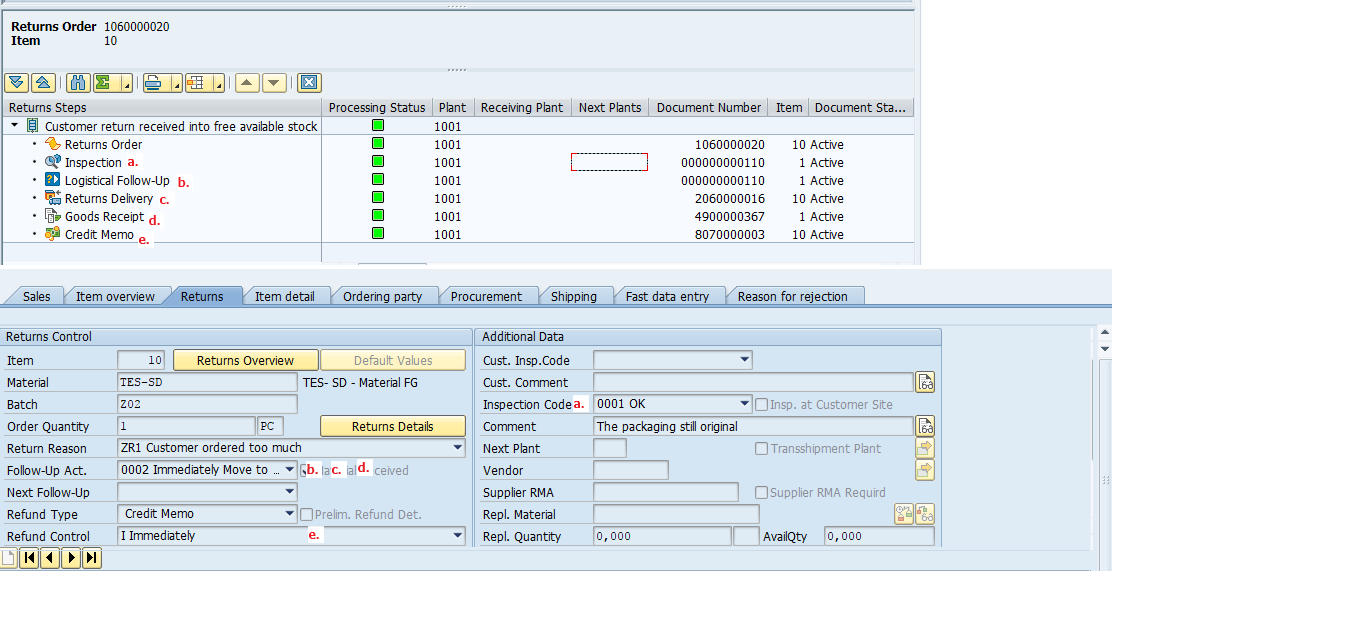
- The Warehouse Inspection is automatically created because I selected the “Inspection Code” OK.
- Logistical Follow Up document (Posting to Unrestricted Use) is done automatically based on the Follow Up Activity, “Immediately move to…” in the return order.
- Return Delivery is automatically created based on the return order.
- Goods Receipt is generated automatically because I ticked of “Material Received”.
- Credit Memo is generated automatically due to setting in refund control, “Immediately.”
SAP Advanced Returns Management with Complex Scenario
Consider the previous section as a warm up because in this section I am going to explain another scenario which involves more steps and more manual documents created due to different roles with different tasks. Here is an overview of a scenario with all the documents related to this complex SAP advanced returns management process.
| Document | Type | Person in Charge | Comment |
| Adv. Return Order | Manual step | Sales Admin | |
| Return Delivery | Automatically generated | – | Based on Return Order |
| Posting Goods Receipt | Manual step | Warehouse staff | Created when material arrives in warehouse |
| Warehouse Inspection | Manual step | Quality Assurance Staff | “Ship to Vendor” setting in return order will trigger Return Purchase Order |
| Return Purchase Order | Automatically generated | – | Created after warehouse inspection |
| Invoice Verification | Manual Step | Accounting | |
| Outbound Delivery to vendor and Posting Goods Issue | Manual Step | Warehouse Staff | Based on setting in return order (“After receipt of Credit Memo from Vendor”) |
| Credit Memo | Manual step | Accounting |
Now, let’s see how this works in SAP ERP system. Create a Return Order based on the reference billing document.
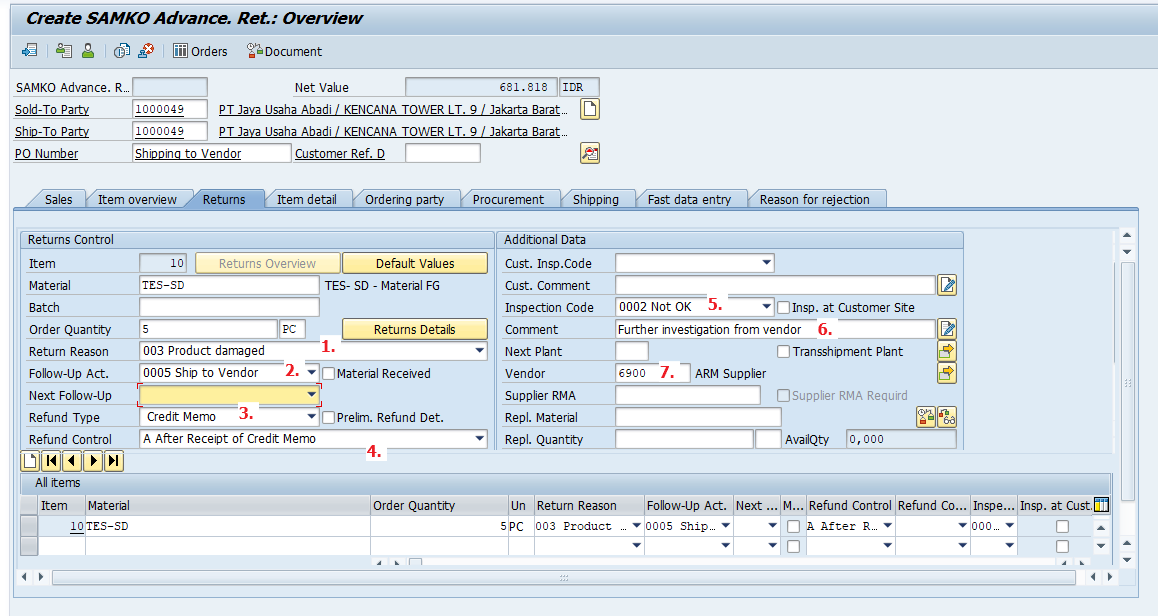
- Input the return reason. For this example, customer return five pieces because they are damaged.
- Since the item material was bought from an external vendor, the follow-up activity would be to send it to the vendor.
- We are going to provide payment as the refund for the customer.
- We will give a credit memo to the customer after we receive a credit memo from the vendor.
- The Inspection Code is “Not OK”. It will be processed in our warehouse later on.
- The following comment from inspection code.
- The vendor that we will ship the material to.
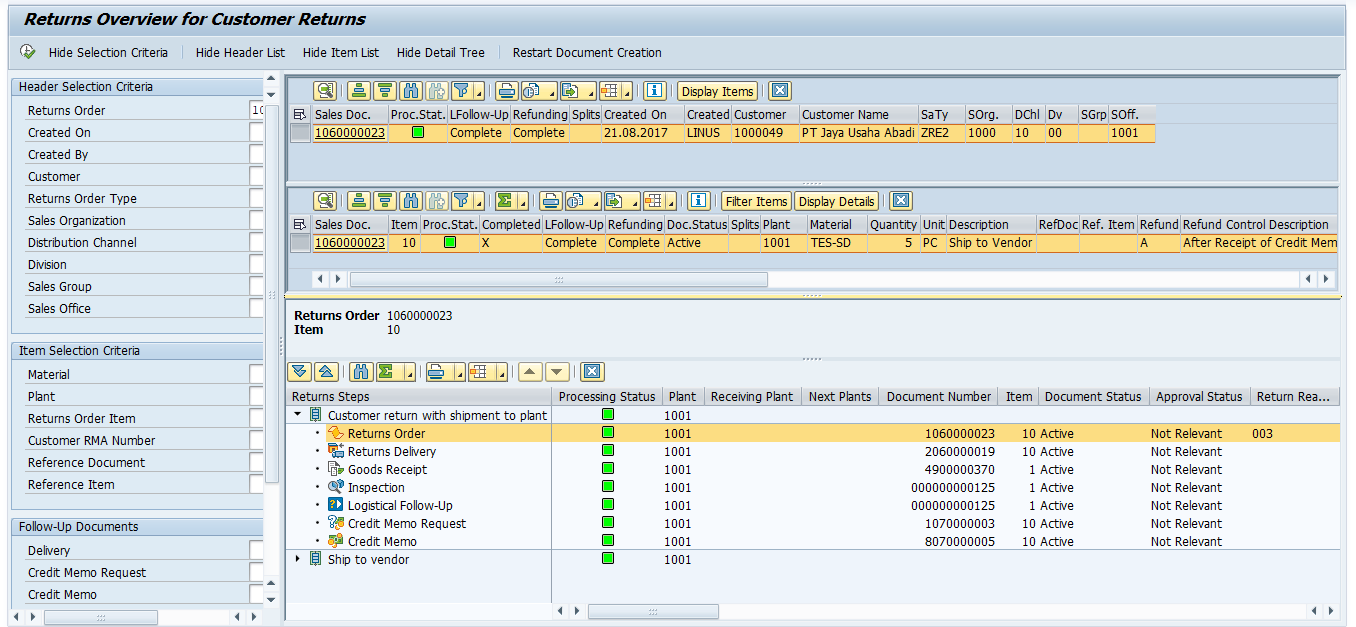
Now run the transaction MSR_TRC_C to monitor the return process.
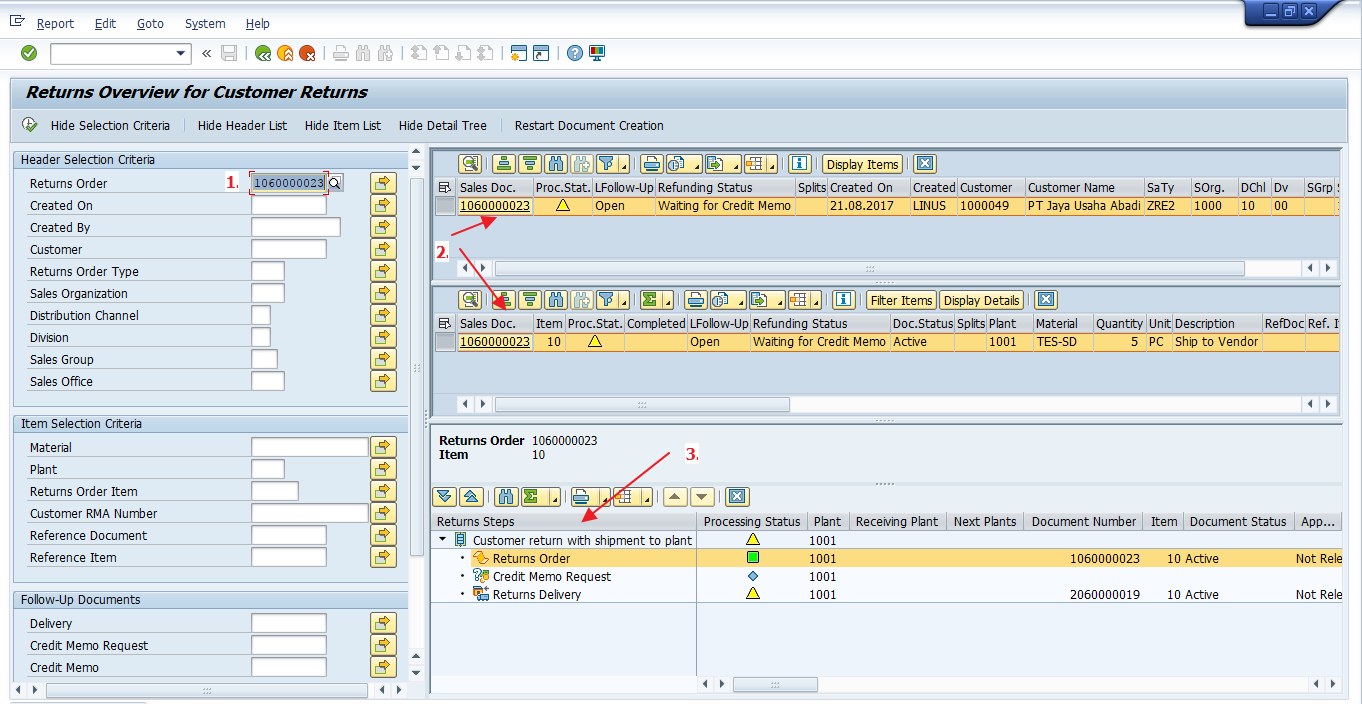
- Enter the return order document.
- Select the header and display the item.
- The tree of all the processes. As you can see, the process stops at the delivery order return creation.
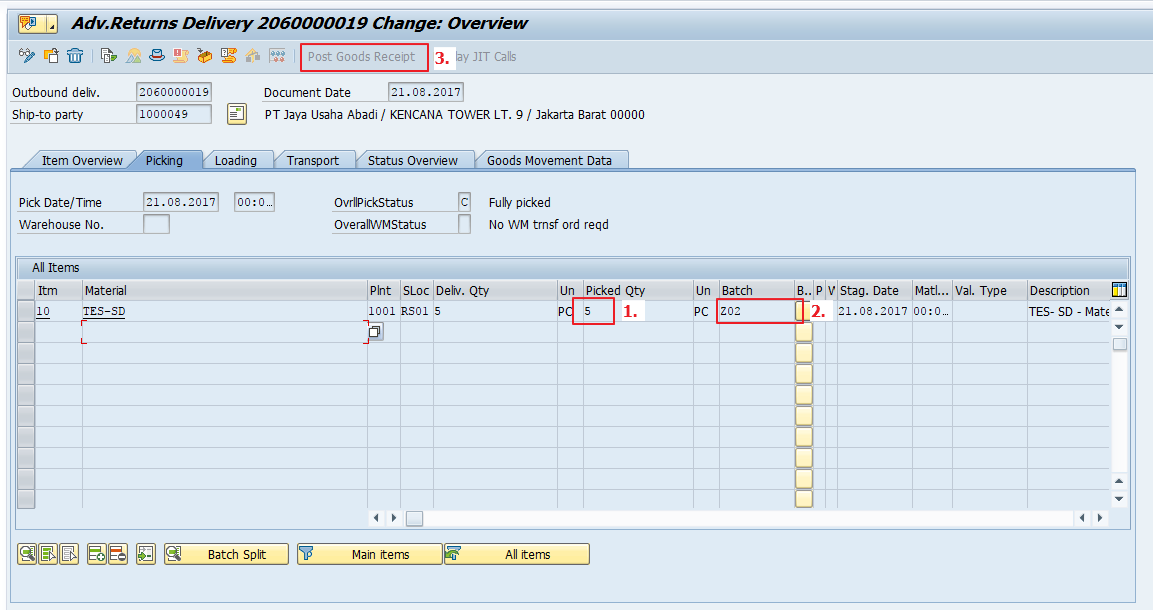
Now, run the transaction VL02N and enter Storage Location (return Storage Location obviously), picking quantity and do Post Goods Receipt.
Let’s go back to the MSR_TRC_C transaction and look up the next process.

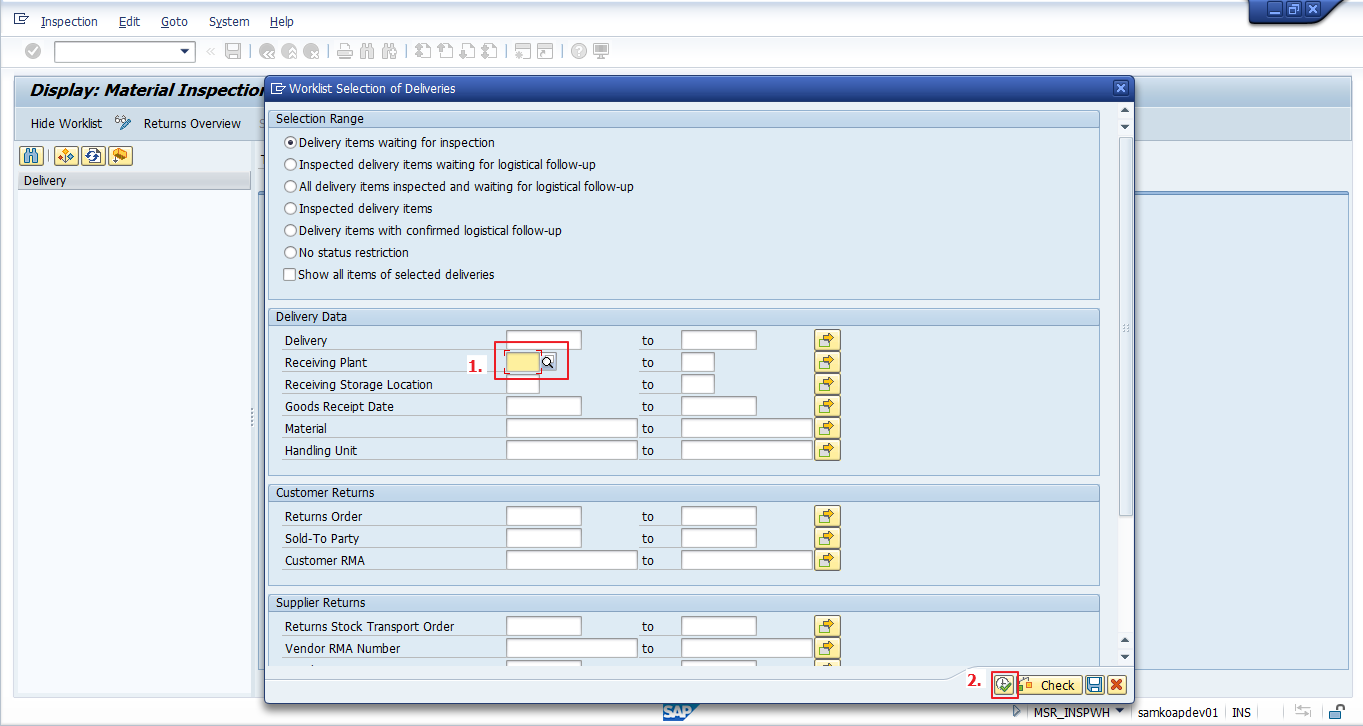
Run the transaction MSR_INSPWH, enter your plant and click the execute button.
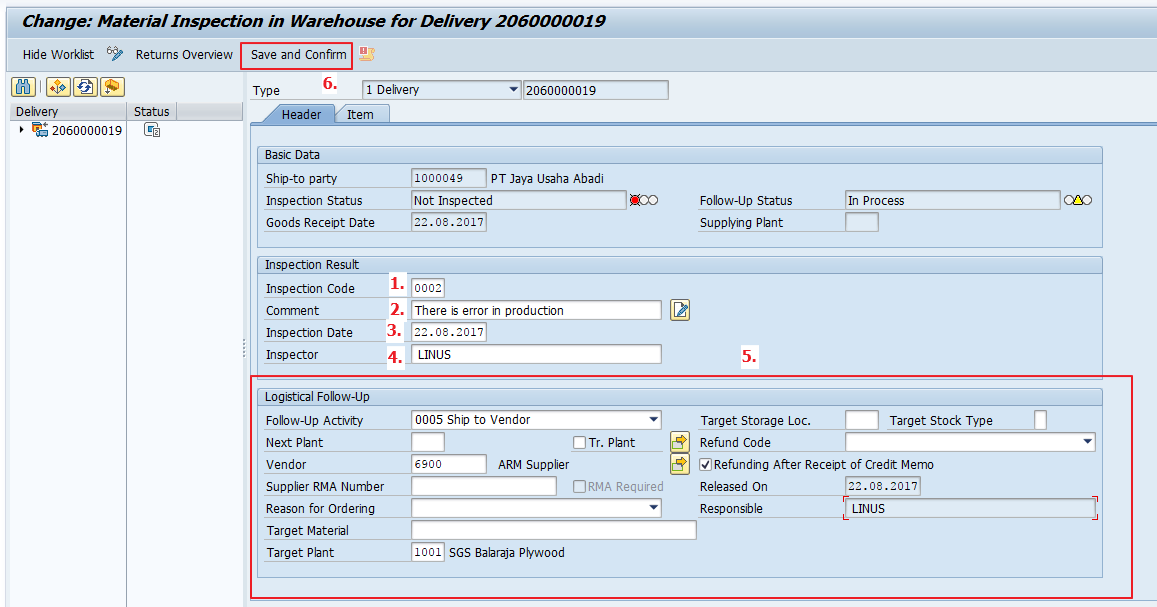
Look below for each order. First, you should select the inspection code, enter your comment there, enter the inspection date, and mention the person responsible for doing the inspection. The “Logistical Follow Up” is determined based on the prior return order setting. Afterwards, click the “Save and Confirm” button.
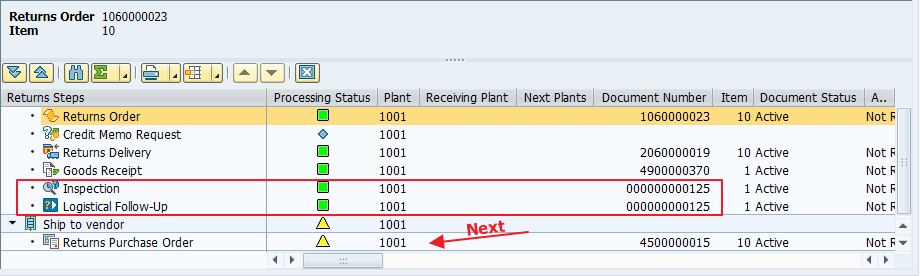
Let’s go back to the transaction MSR_TRC_C and we can see the screen below. The system automatically created a Returns Purchase Order.
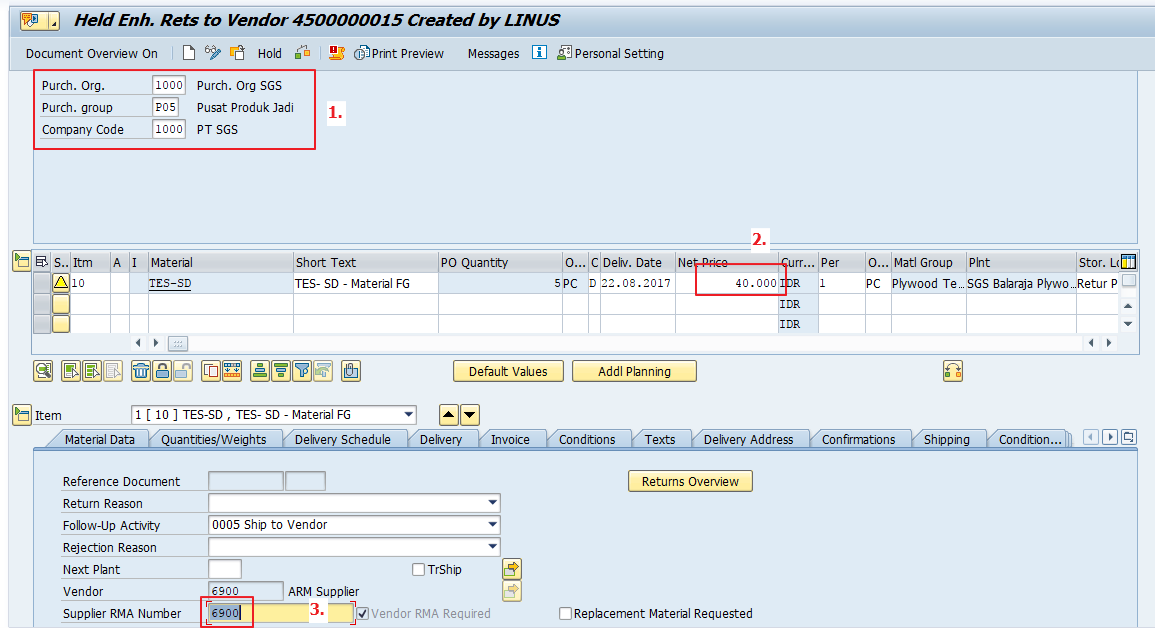
Let’s process the return purchase order in the transaction ME22N.
- Select the correct combination for the purchasing area.
- Enter the price for this material.
- Input the RMA Supplier (same with vendor code).
- Save the document.
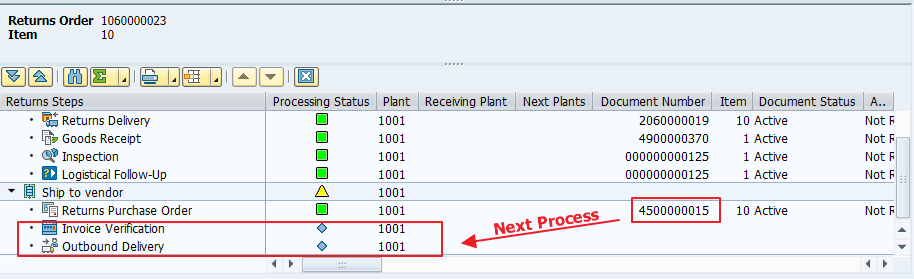
Go back the transaction MSR_TRC_C. Next, we are going to perform goods issue to the vendor.
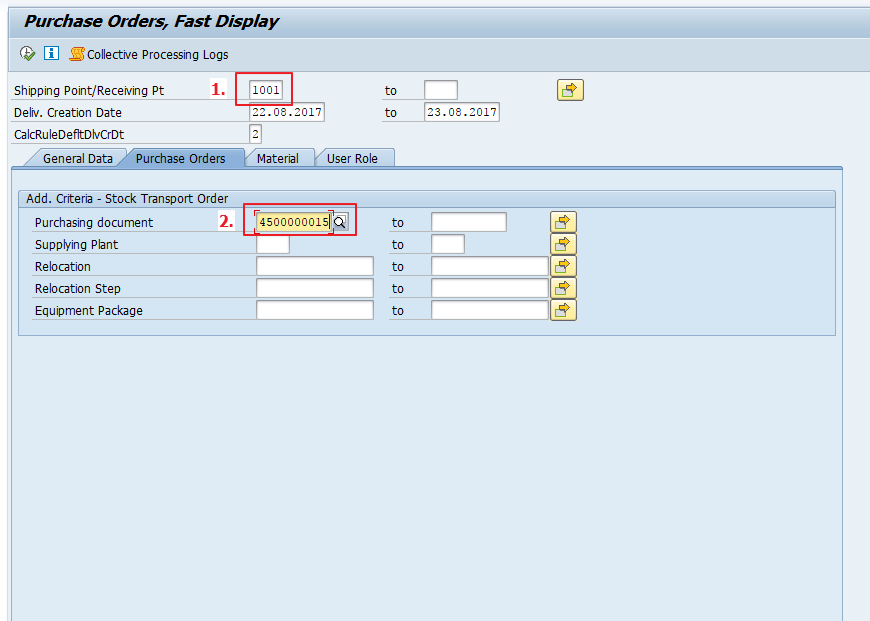
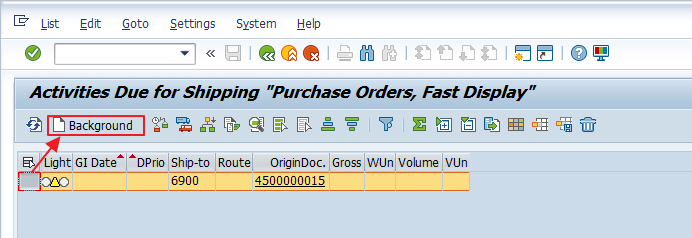
To create posting of goods issue to vendor which is based on the purchase order, run the transaction VL10B and insert the shipping point and the purchase order number. Then, execute it.
Now, select the line item with our document and click “Background” button.
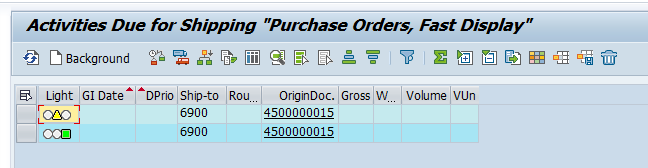
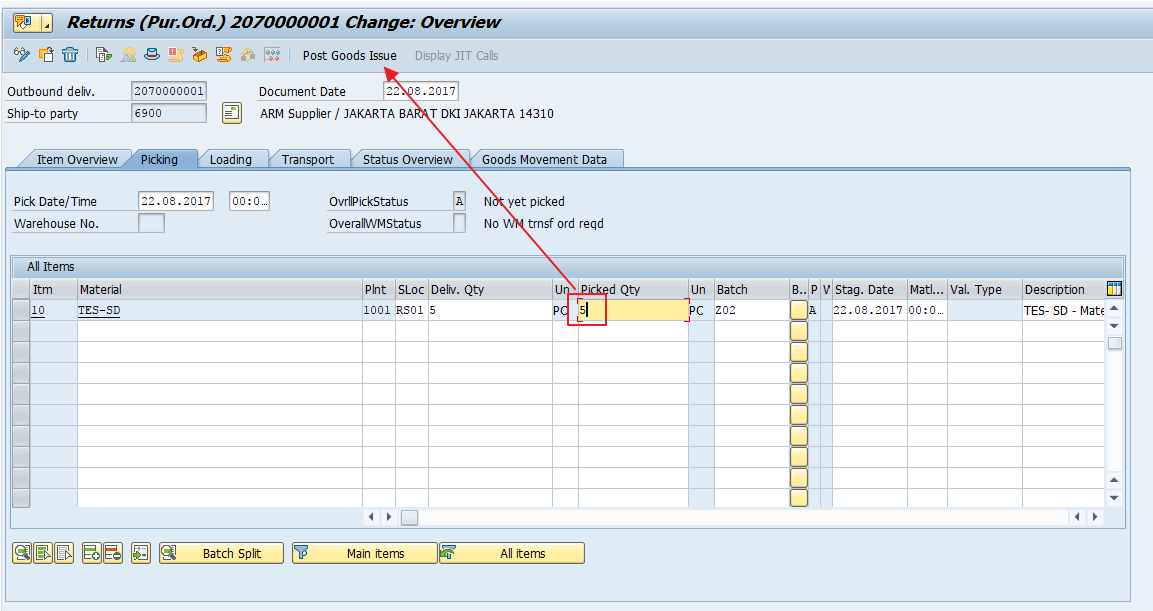
Return to the transaction MSR_TRC_C and you will see a new delivery order document is created. Now, posting goods issue in the transaction VL02N.
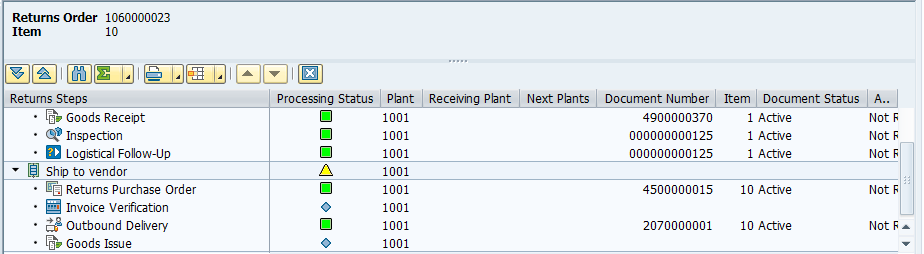
Now, in the MSR_TRC_C transaction, you can see the remaining step of the returns process is a credit memo to vendor.
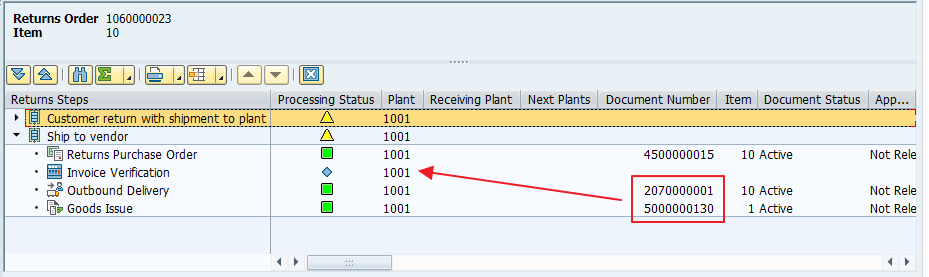
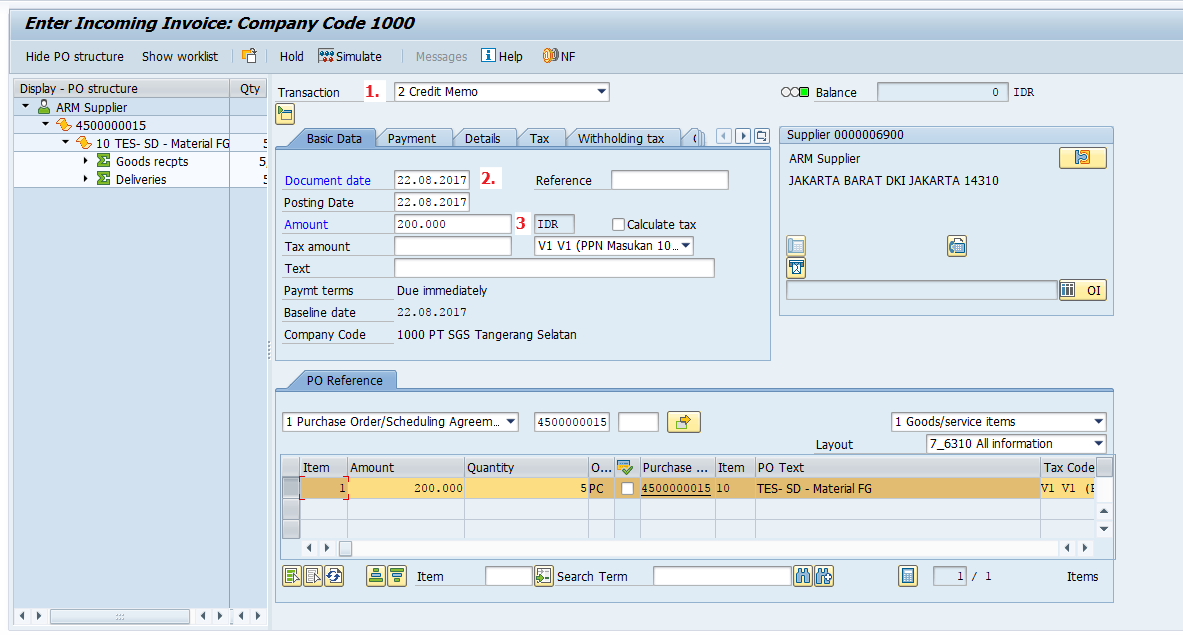
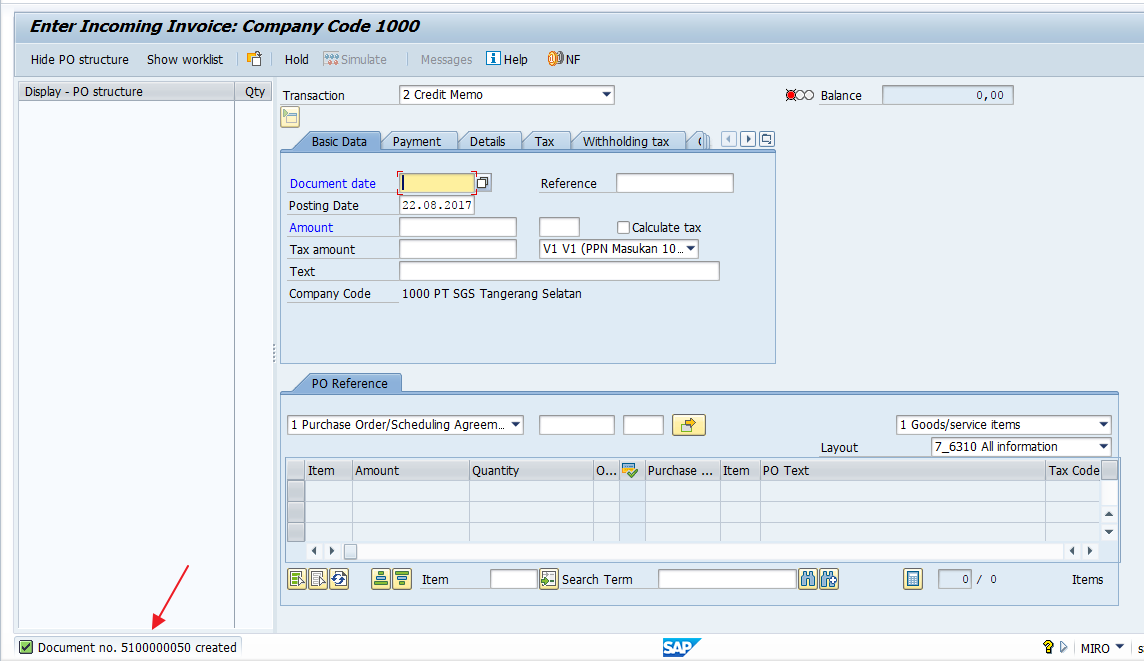
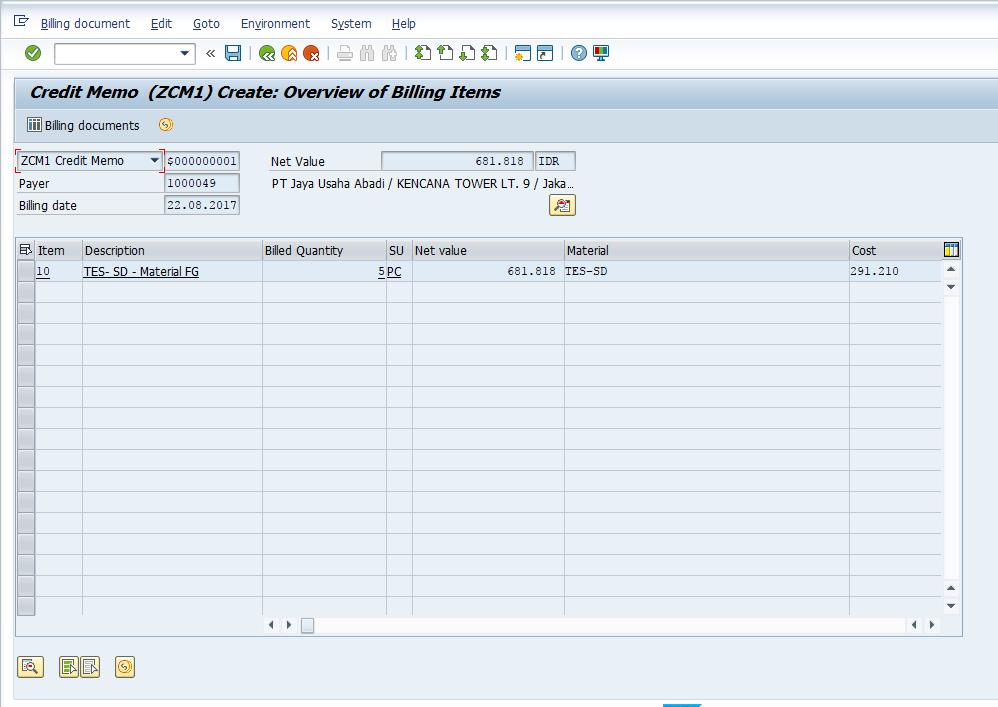
After the material arrives to the vendor’s premises, we are going to post an incoming payment with a credit memo document. This is a credit memo for the vendor and it is different from customer credit memo that we discussed in previous tutorials. Run the transaction MIRO, select the Credit Memo transaction and enter amount for the credit memo. Click Save button.
We are done our business with the vendor. Now, we return to our beloved customer because we are going to give them credit memo to reduce their account receivable after we received the credit memo from the vendor (remember the setting from the return order?).
Run the transaction VA01 and create a credit memo request by referencing the return order.
Release the billing block, fill out the Order Reason, and save the document.

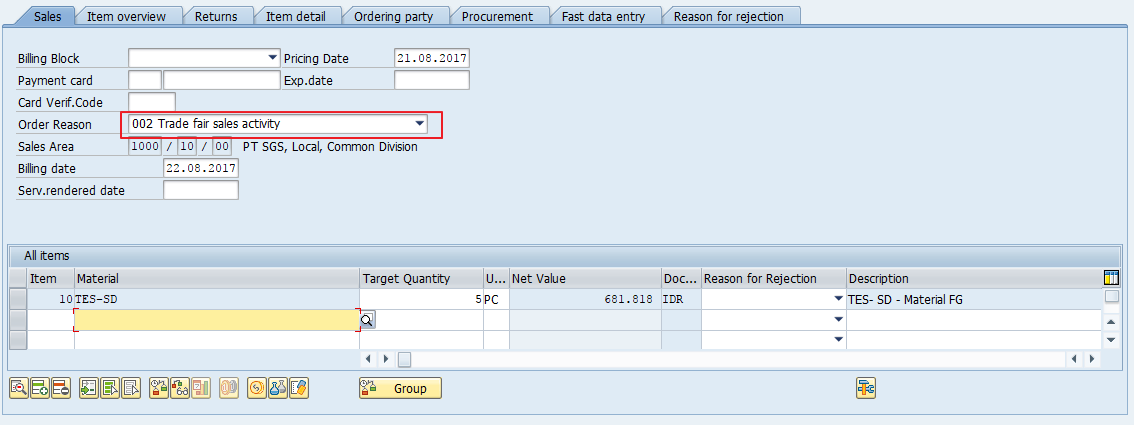
Release the billing block, fill out the Order Reason, and save the document. Finally, run the transaction VF01 and create a credit memo request document based on this return order.
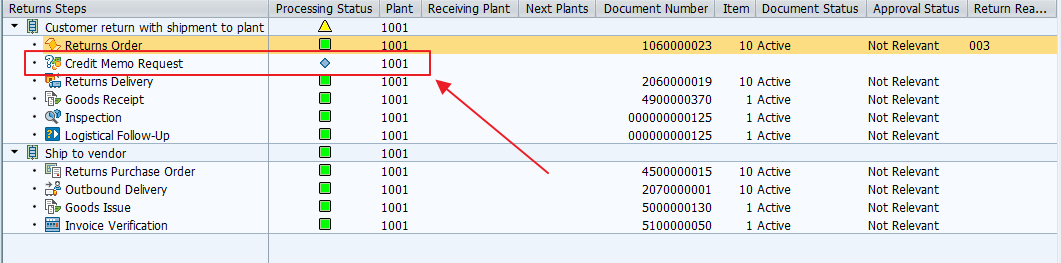
Go to the transaction MSR_TRC_C and check that all processing statuses are now completed and all the lights are green.
Common Questions for SAP Advanced Returns Management
Q-1: How to return material from external vendor?
A-1: In the Follow-Up Activity field, you may use the “0005 – Ship to Vendor” during Return Order creation. The return Purchase Order for that vendor will be created.
Q-2: What about plant? How can I make the scenario of return to plant within company?
A-2: Yes, this is also possible. Select the designated follow-up activity in the return order. Just be aware that not all the subsequent document will be created. Depending on the configuration and business process, you need to monitor the process.
Q-3: I want my Quality Assurance (QA) team to do the inspection manually and I want it to have a different code to determine any justification for the returned goods. How to achieve it?
A-3: First, you have to define the inspection code and assign it to the profile. Then, to do the inspection manually, just leave the “material received” indicator blank. You will need to run MSR_INSPWH transaction separately.
—
Did you like this tutorial? Have any questions or comments? We would love to hear your feedback in the comments section below. It’d be a big help for us, and hopefully it’s something we can address for you in improvement of our free SAP SD tutorials.
Navigation Links
Go to next lesson: Essential SAP SD Reports
Go to previous lesson: SAP Invoice Correction Request
Go to overview of the course: SAP SD Training
Fantastic. You made so many consultants day. Amaizing document. I will role this our for my client
Hi,
Exist some report standar to can see the information to MSR_TRC_C in list form?
Thanks!!
This is for returns management from Customer to Vendor. But what about the return management system for managing complete cycle of returns from pick up to inward to segregation/ grading to bulk sale or disposal. How can we get the real time serial number level information or visibility across all DCs to effectively manage and control these returns.
Returns generated from end customer, transit damages, under DOA policy or outside DOA policy. How to control these and what provision do we have in this system.
My challenges as a Large Format Retailer are as follows
1. No visibility of information (serial number level) on status pending at DCs.
2. No system integration with Brands for returns management, manage information.
Many thanks, it is really nice document. I cracked many of our existing issues in ARM looking through your doc.
5
Hi. Great job. Tks a lot. Really very helpful. May can you let me know in which SAP teaching lesson this topic is based? Tks a lot one more time…..Frank
Nice details step by step document . Thank you
Its really nice document. it will really help us in understanding the advance return process.
Thanks a lot for your efforts making this kind of documents
Thanks for Sharing…its really helpful document..
HI,
It is definitely a good document for consultants and end users.
I am working with the S4 Hana latest version were we have the Refund Code on the Returns Tab This is a great field where, we can link the deduction code / amount to the inspection code. The point no where i find any document or material which says how to link this code with Pricing procedure.
Dear Suresh,
Any suggestion on linking between Refund Code link with pricing?
Hi
I am doing cross-company store return. I don’t want the inspection step. I want to create credit memo directly after goods receipt at the DC. But VF01 fails to create credit memo with an error, “inspection not closed, billing not closed”. How do I deactivate the inspection step?
Thanks,
Sundar
you can choose immediately move to specified stock as follow up activity, Inspection document will be created automatically and you can create invoice after that.
Issue:
Cost not updated to PGR accounting document in return delivery from billing document.
Steps:
SO-Delivery-PGI-Invoice-Return Order-Return Delivery-PGR
I have MTO material in my SO and EK02 got updated from SO costing. Costing got updated in PGI accounting document and same appear in invoice VPRS. Now customer return material, with advance return management we created return order but here VPRS value not copied from invoice but have EK02 value. Requirement is cost should update to PGR accounting document.
Kindly please suggest.
Hi All,
Similarly to the comment from Sundar Munirathinam, I would like to deactivate the inspection check. This requires always to go to transaction MSR_INSPWH to enter the inspection results. Otherwise it is preventing me from issuing the intercompany billing document in transaction VF01. Error message is VF 353 “Inspection not closed, billing not possible.”
Another option could be that of marking as optional the inspection step of my scenario in the view MSR_V_STEP2SEQ. However, this does not seem to fix the problem either.
In the explanation it is said that setting the inspection code to “0001 OK”, this makes “The Warehouse Inspection is automatically created”, as opposed to “0002 Not OK”, which requires the inspection to be done manually by the warehouse. How is this differentiation achieved, is there a setting in the inspection code itself or is it any other configuration that is to be set?
Please advise.
Diego Neila
How to do Reversal in Advanced Returns. We can use VL09 and do the Reversal for Return Delivery.
User entered wrong plant in Advanced Return order, Inspection and Follow up, Return Delivery created. Need to do the Reversal
Hi Is there any BAPI or standard FM for the Tcode: MSR_INSPWH, because I need to automate this process.
Feliyanus Gea,
Can i enable the Virtual Goods receipt and Goods issue in case of “Direct shipment to Vendor” ?
Buongiorno,
si può aggiungere la visualizzazione di altri campi nella sezione lista delle posizioni?
Grazie.
check Account Assignment category and put E(KD-CO)